User manual Touch displays
TD-1055²-S / TD-1065²-S / TD-1075²-S / TD-1086²-S
Item No. 305000001x
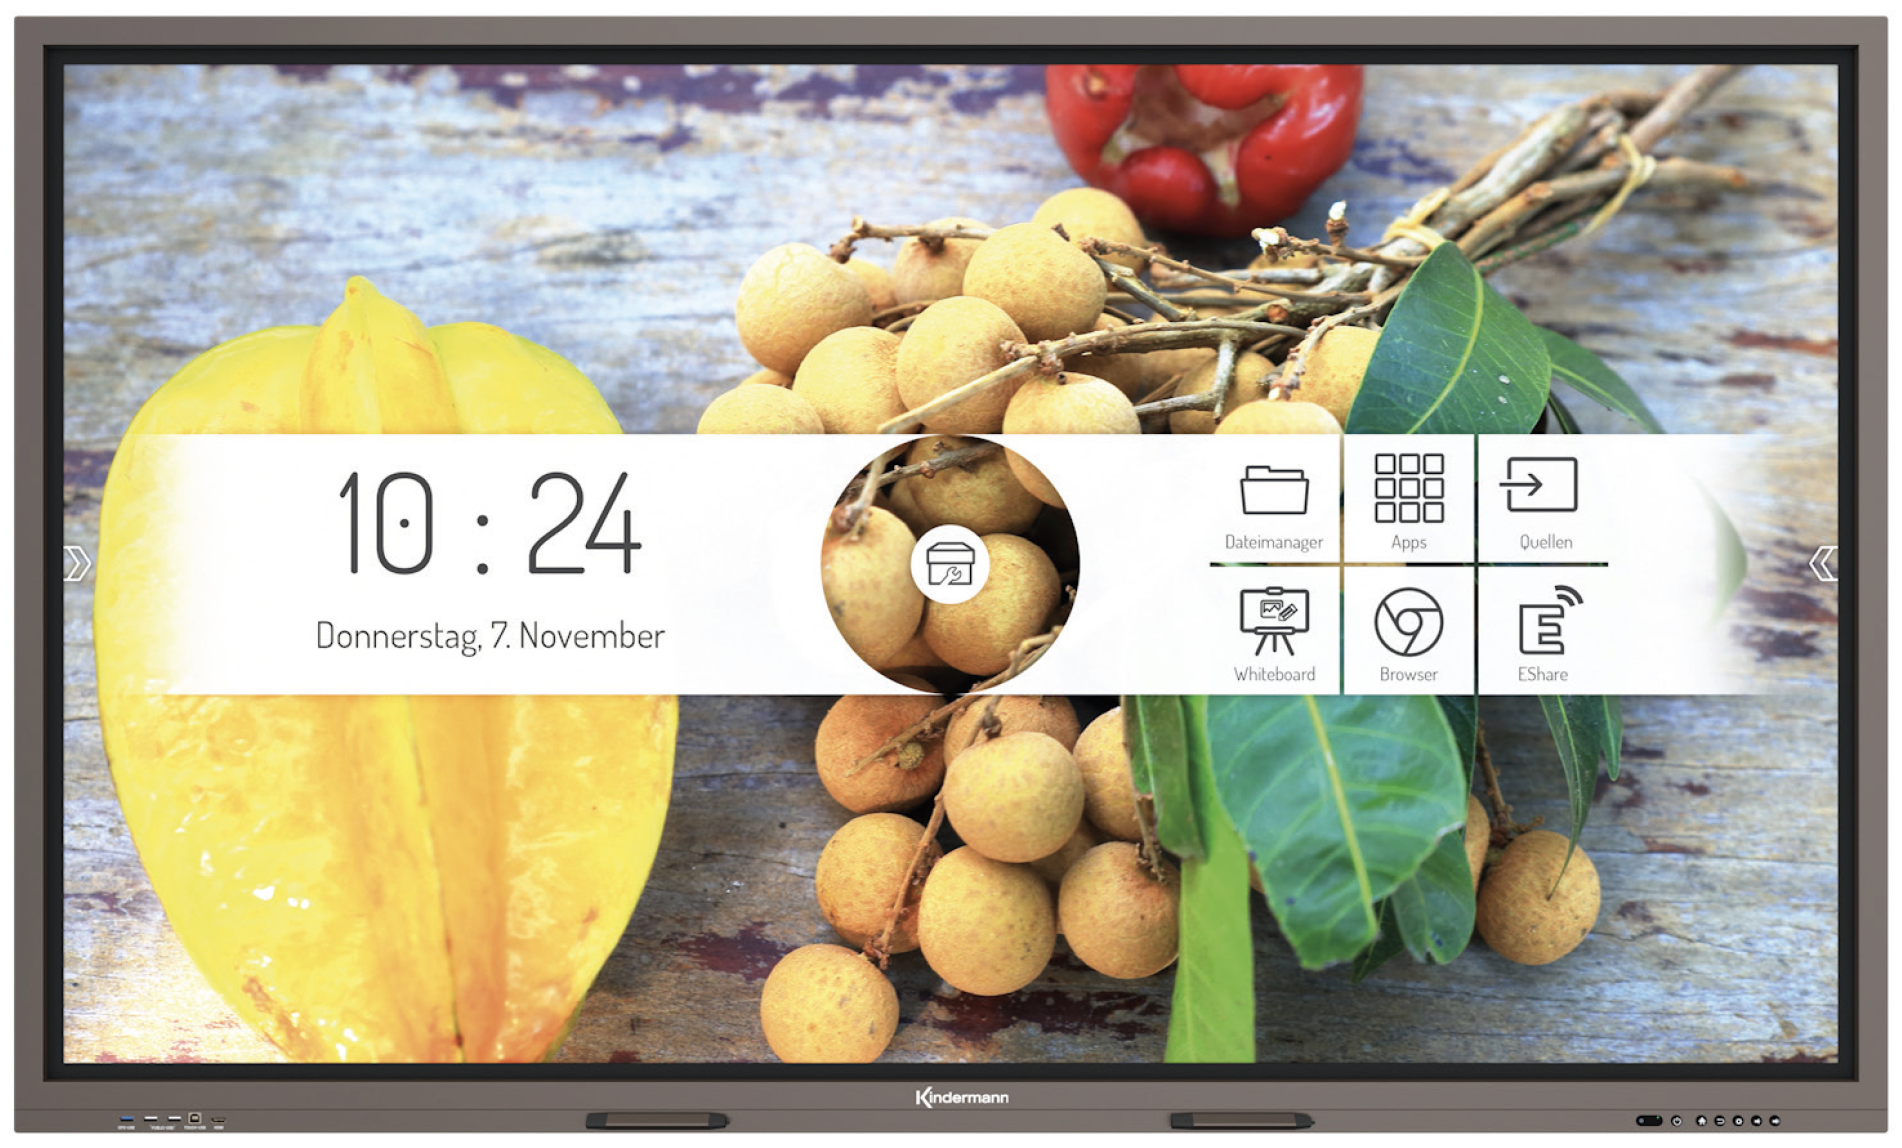
table of contents:
1. Precautions and safety instructions
1.1 Precautions for installation
2. Accessories included
3. Connections
4. Function of panel buttons
5. Remote control
5.1 Buttons on the remote control
5.2 Notes on the use of the remote control
6. Turn on/off
7. Operation and configuration

1. Precautions and safety instructions
- Please read this guide carefully before using the product and keep it scrupulous.
- Transport the display with at least two people.
- Place the display only on a stable, flat surface.
- If the device is brought from a cold to a warm environment, condensate can form inside. In such a case, the product should not be moved for a period of at least 24 hours before restarting, so that the condensate can dry in the air.
- No liquids or metallic objects must enter the product. If this is the case, immediately unplug the power plug and contact the service.
- Do not wipe with solvents such as gasoline, acids, alkalis, sharp or abrasive detergents, volatile oils and diluents, as these solvents can damage the product.
- Do not apply force when wipering the display, as this can scratch the display.
- Do not operate the display in direct sunlight.
- The ventilation openings must not be concealed.
- It is enclosed with a 3-pin power cable. Before installing, make sure that the grounding connector of the socket is properly grounded. Do not lay the power cable in passageways so that no people step on it; also keep it away from the areas where it could be squeezed.
- If the display is not in use for an extended period of time, turn it off and unplug the power plug.
- In case of unusual noises or smells, please turn it off immediately and unplug the power plug. Stop using it if necessary and contact the service.
- Do not try to open or disassemble this product, as this will expose you to dangerous tension or other risks.
- Avoid that static content, text or icons remain on the screen for too long, as this will lead to a "ghosting" on the screen.
1.1 Precautions for installation
- For the installation of the wall fastening, at least two qualified fitters are required.
- For wall mounting, use a suitable holder and approved mounting material.
- Convince yourself before mounting that the wall is sufficiently load-bearing.
- Do not install the display obliquely or lying down.
- Mount the display only in horizontal orientation.
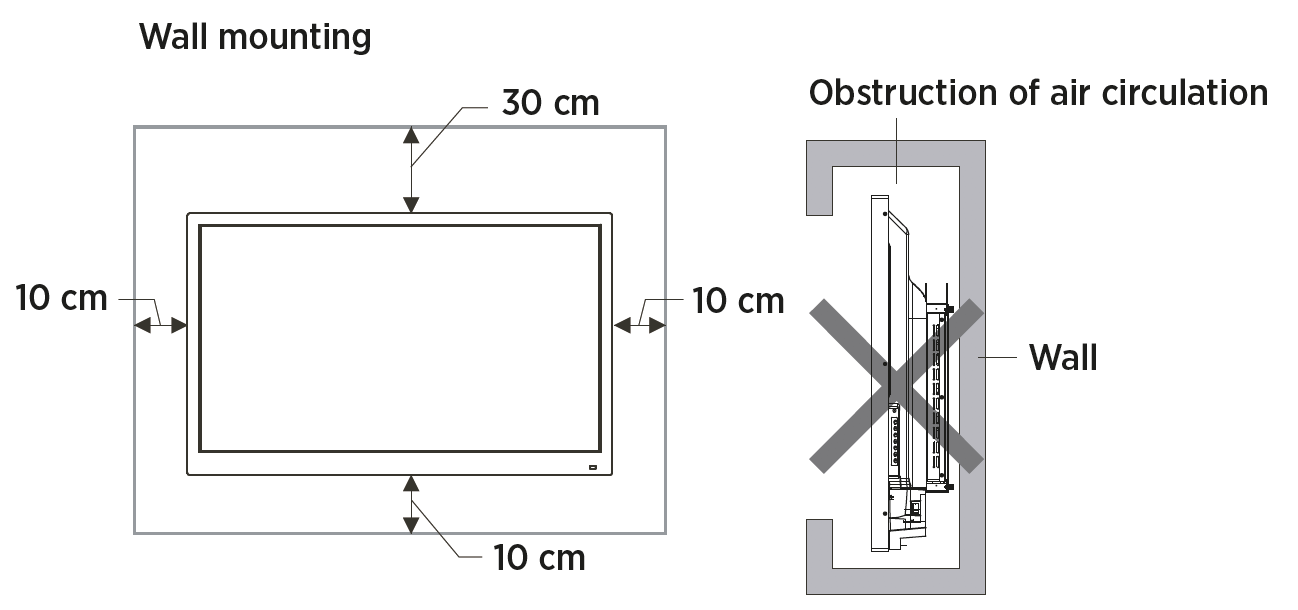
![]() hint: For mounting, please refer to the instructions in the manual of the holder.
hint: For mounting, please refer to the instructions in the manual of the holder.
2. Accessories included

3. Connections
3.1 Connectors at the front
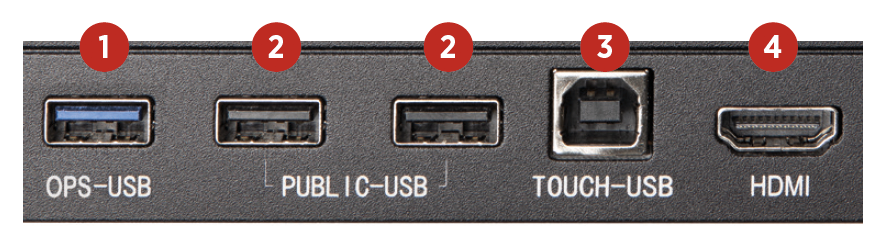
1. OPS USB Port** (USB 3.0 interface is available on the OPS computer)
2. PUBLIC-USB (pass-through for the active source)
3. TOUCH-USB (Mapped to HDMI input)
4. HDMI input
** Optimal function with branded USB 3.0 stick
3.2 Connections on the side
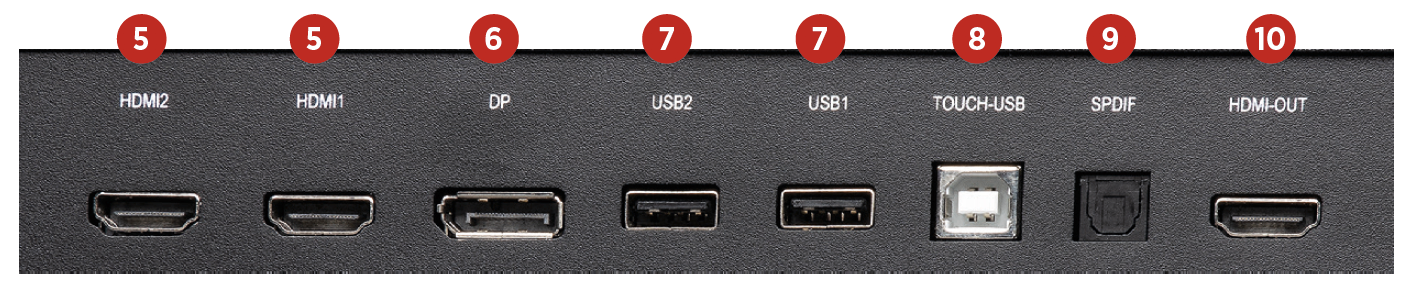
5. 2x HDMI input
6. DP (DisplayPort) input
7. 2x Android USB
8. Touch USB (Assigned to the HDMI and DP inputs)
9. SPDIF (Digial Audio) output
10. HDMI output
3.3 Connectors at the bottom
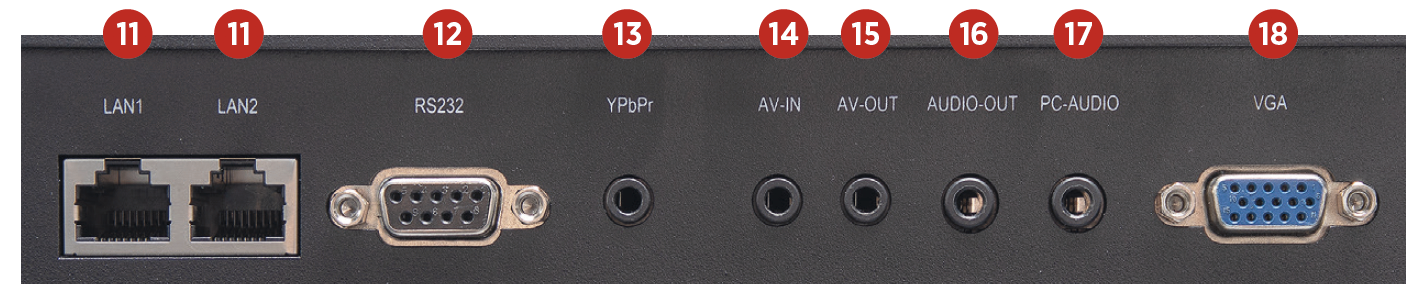
11. 2x network (LAN 1/2, both 100 MBit/s)
Network hub: The network connection is provided internally to the Android SoC and the OPS PC. A port can also be used to power external network devices.
12. RS232 input (control)
13. YPbPr input*
14. AV input*
15. AV output*
16. Audio output (3.5 mm jack)
17. Audio input to VGA (3.5 mm jack) VGA input
* optional adapter required
3.4 Power connection

3.5 Signal inputs
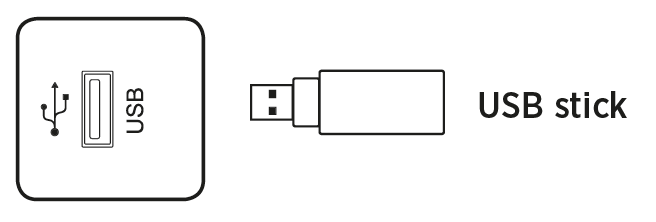
3.5.1 USB
![]() hint:
hint:
1. The output current of the USB 2.0 port is 500 mA. To ensure reliable operation, please do not use all USB ports at the same time to charge external devices.
2. The side USB ports are used to connect external devices to the Android system. The front USB ports are available to the active source. The assignment is done automatically with the source switching.
3. To upgrade the software, please use a USB 2.0 USB stick that has been formatted with FAT32 file system.
4. Optimal function with branded USB 3.0 stick.
3.5.2 HDMI-IN

![]() hint:
hint:
The maximum supported resolution is 4K@60Hz. Detailed information on the supported signal formats and resolutions can be found in Section 9.3 "Technical data".
The maximum transmission rate depends, among other things, on the quality and length of the HDMI cable. We recommend the use of high-quality cables.
3.5.3 TOUCH connector

![]() hint:
hint:
The maximum cable length supported by USB is 5 m. If you want to bridge a longer distance, you need to use high-quality, active cables with integrated signal regatators.
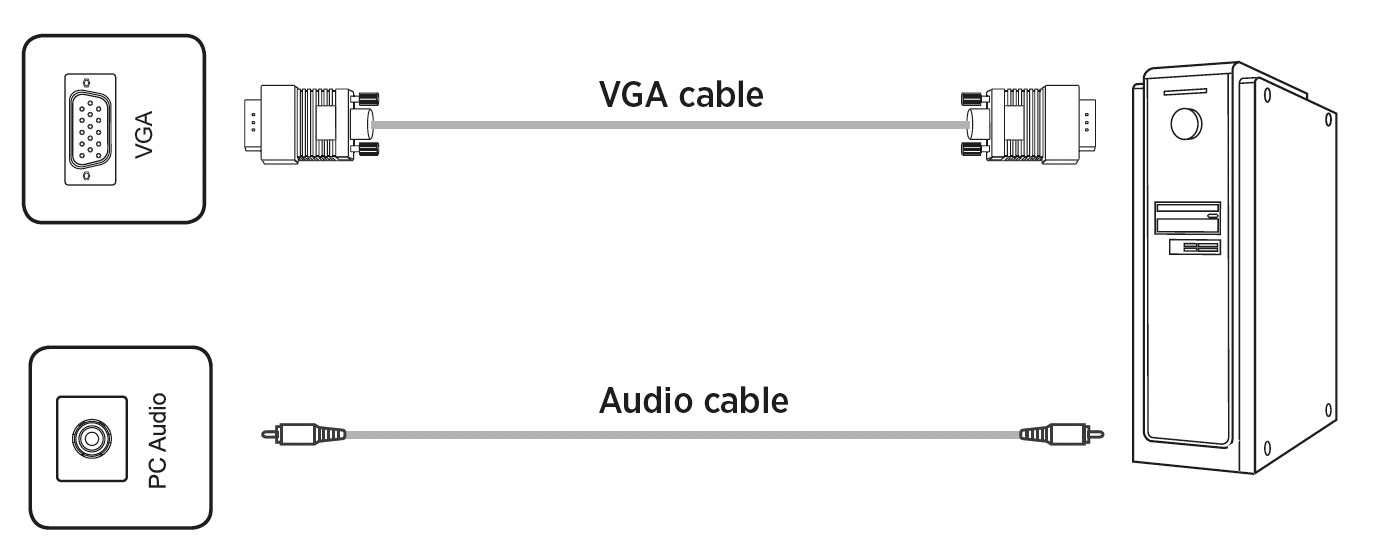
3.5.4 VGA & analog audio
![]() hint:
hint:
VGA and audio input work synchronously. Detailed information on the supported signal formats and resolutions can be found in Section 9.2 "Technical data".
3.5.5 DisplayPort

![]() hint:
hint:
The maximum supported resolution is 4K@60Hz. The maximum transmission rate depends, among other things, on the quality and length of the cable.
We recommend the use of high-quality cables.
3.6 Signal outputs
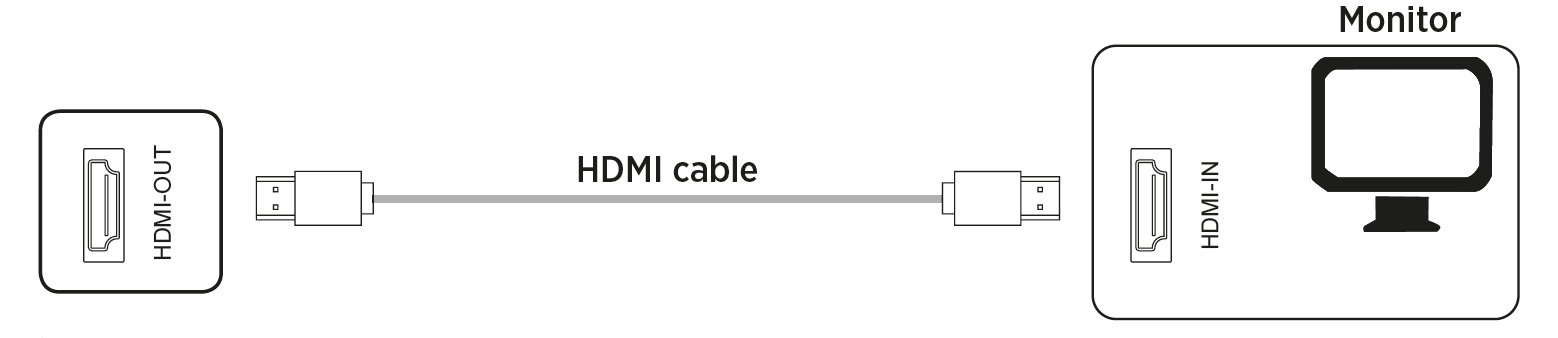
3.6.1 HDMI-OUT
![]() hint:
hint:
On the HDMI Out, image and audio signals are available parallel to the currently reproduced screen content, for example, to display it on a large screen via a projector.
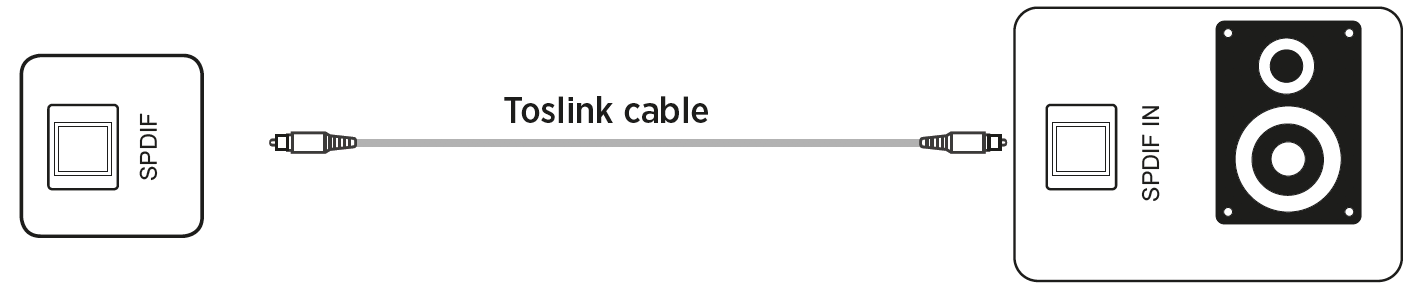
3.6.2 SPDIF – Digital Audio
3.6.3 Analog Audio
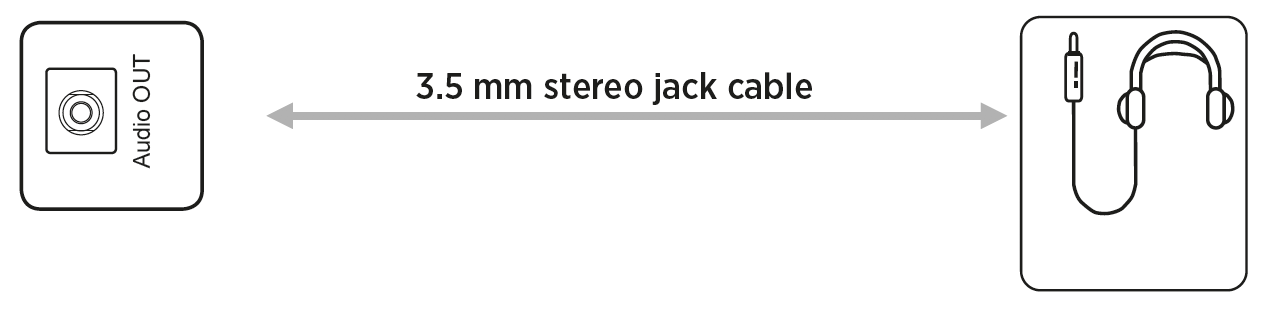
![]() hint: At the audio outputs, the sound signal is synchronous to the currently displayed video image.
hint: At the audio outputs, the sound signal is synchronous to the currently displayed video image.
3.7 Control connections
3.7.1 RS232 connector
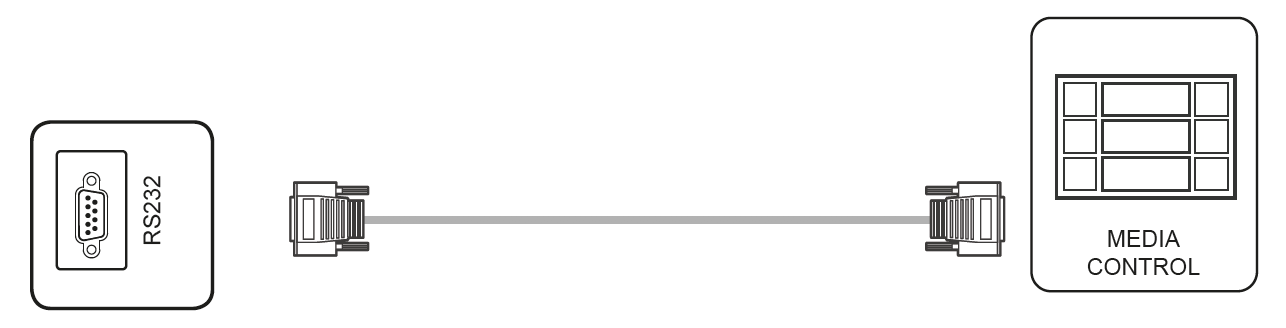
![]() hint: The RS232 commands can be found from page 19 in this manual.
hint: The RS232 commands can be found from page 19 in this manual.
4. Function of panel buttons
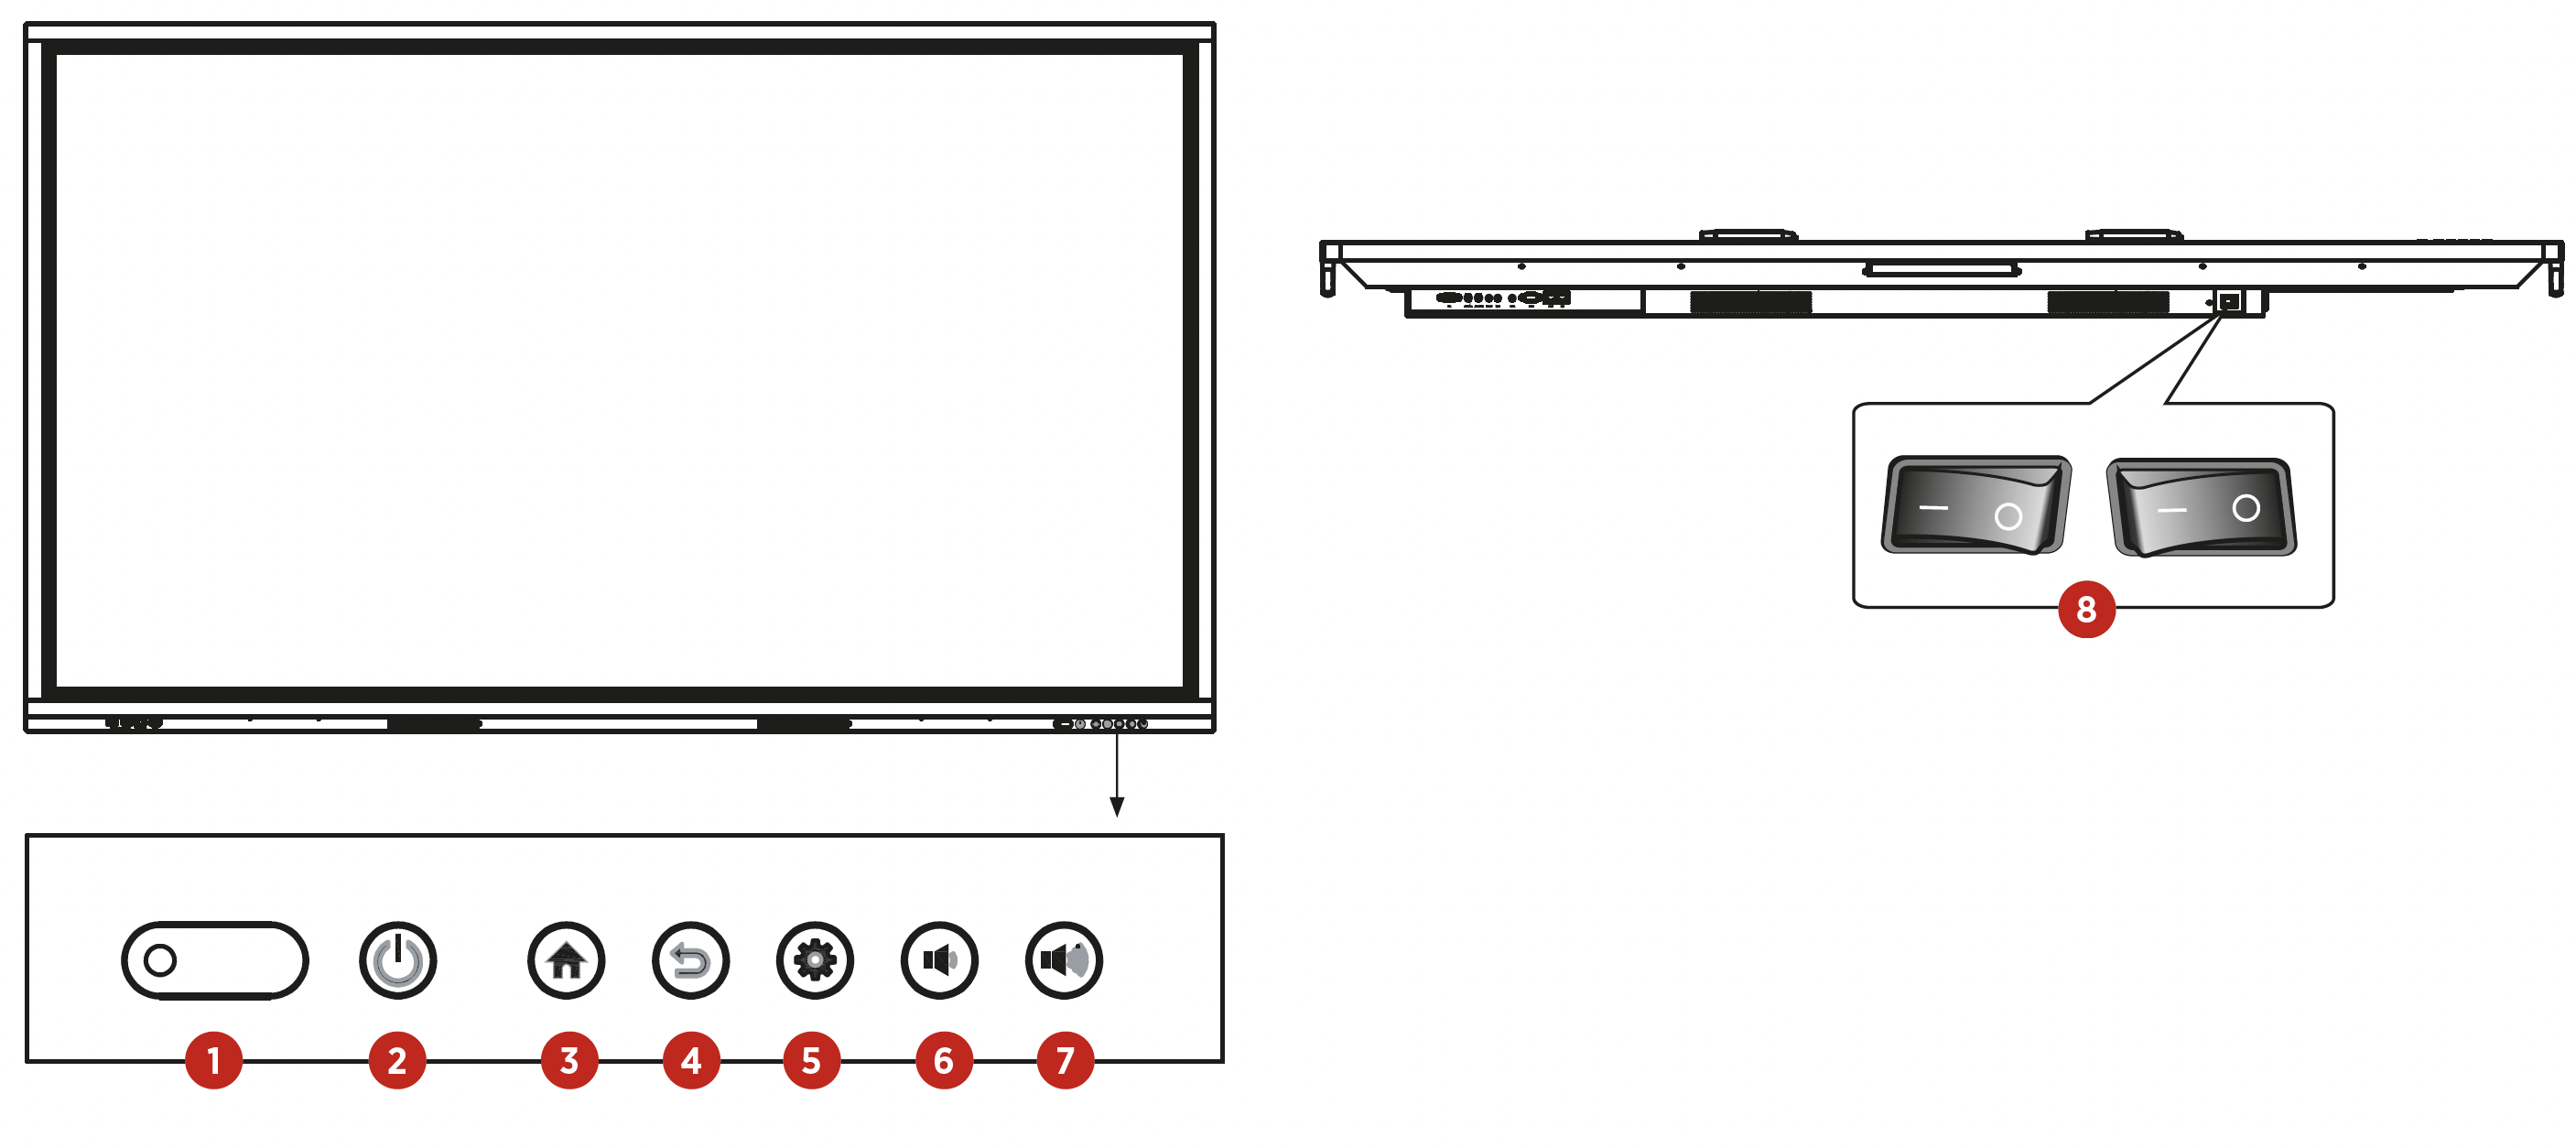
| 1. Status LED, receiver for IR remote control and light sensor | 5. |
| 2. | 6. |
| 3. | 7. |
| 4. | 8. Power switch |
5. Remote control
5.1 Buttons on the remote control

| KEY | FUNCTION |
|---|---|
POWER  | ON / Standby |
SOURCE  | Open source selection and settings |
NAVIGATION KEYS  | Select or customize menu options |
| OK | Confirm operation |
MENU  | Show main menu |
HOME  | Android – Access settings |
BACK  | Android – Back to the previous step |
| OPS | Select OPS PC as source |
WHITEBOARD  | Launches the whiteboard app |
SNAPSHOT  | Takes a screenshot |
VOL-  | Reduce volume |
MUTE  | Enable/disable sound |
VOL+  | Increase volume |
5.2 Notes on the use of the remote control
- Point the remote control at the receiver. Objects located between the remote control and the radio receiver can interfere with the function.
- If the radio receiver is exposed to direct sunlight or strong light, this can lead to a malfunction of the remote control. In such a case, change the angle of the lighting or product or use the remote control closer to the radio receiver.
- Replace the batteries if they are weak, otherwise it will reduce the range of the remote control. If the remote control is not used for a long period of time or the batteries are empty, please remove the batteries, as a liquid leakage from the batteries can cause damage to the remote control.
- Do not use different battery types and do not use new batteries with already used ones. Always replace batteries in pairs.
- Do not throw batteries into the fire, do not charge them and do not disassemble them. Spent batteries must not be charged, short-circuited, disassembled/assembled, heated or burned.
- Please dispose of empty batteries in accordance with the respective environmental regulations.
6. Turn on/off
  | Power the display. The power button is located on the bottom of the display. |
  | Via the power button on the remote control and at the front, the display can be switched on or into standby. |
![]() hint:
hint:
A short actuation of the front button turns the display dark. To put it into standby mode, you need to hold down the button for at least 2 seconds.
- Save before turning off
Before switching off, the display saves the image and sound settings.
When restarting, these settings are used.
- OPS PC ON/OFF
If the display is equipped with an OPS PC and this is selected as the signal source, the OPS module starts automatically.
Please shut down the OPS computer properly before switching off the display, otherwise this can lead to damage to the OPS computer or the installed software.
To turn off the product, the standby button on the panel or remote control can only be used after the OPS module has been completely shut down.
![]() hint: The OPS PC can be purchased optionally.
hint: The OPS PC can be purchased optionally.
7. Operation and configuration
7.1 Android Homescreen
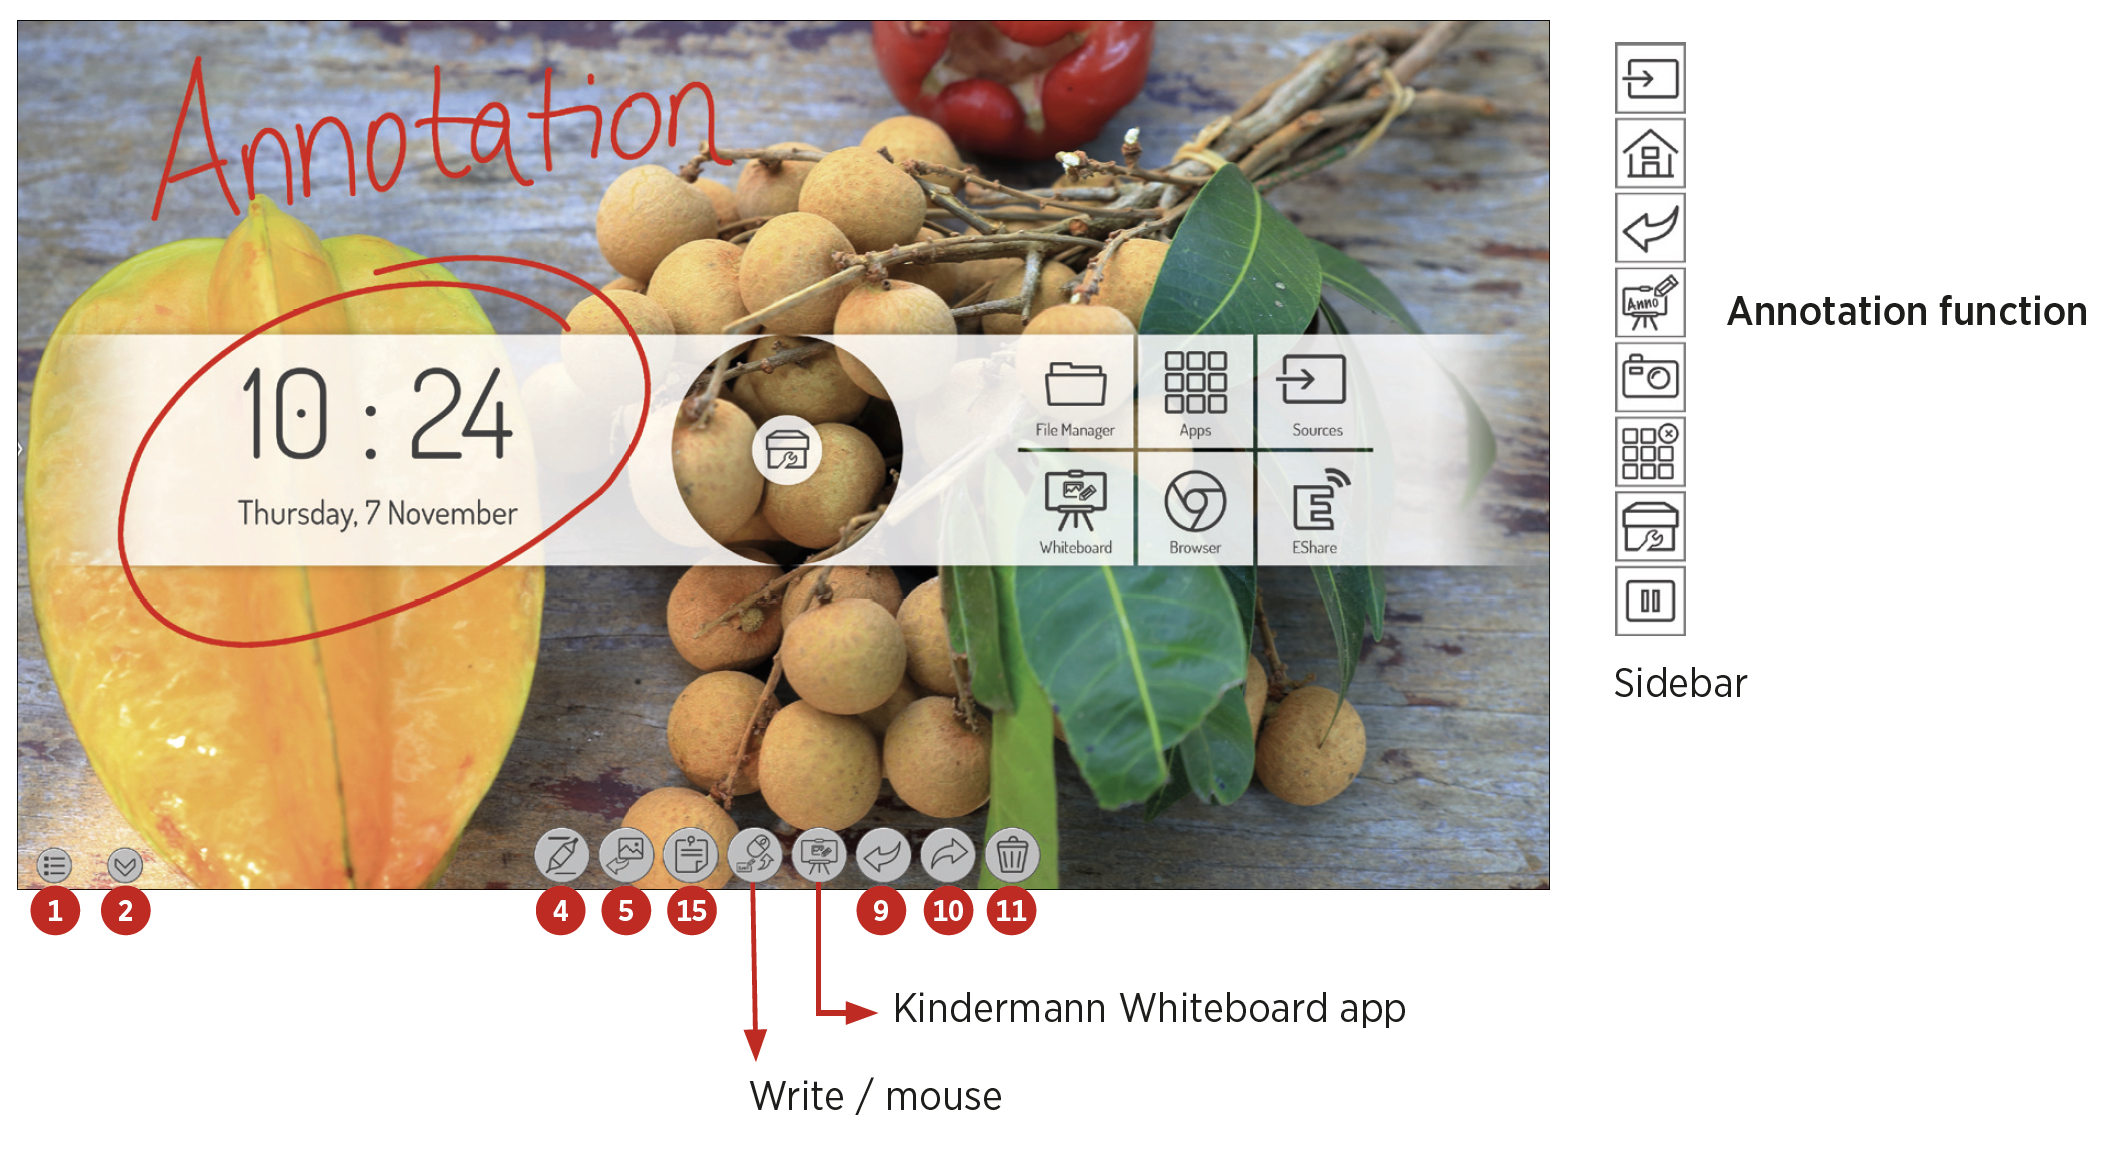
In the standard configuration, after switching on the display, the home screen of the integrated Android system is automatically displayed. From there you have access to all functions, apps and settings.
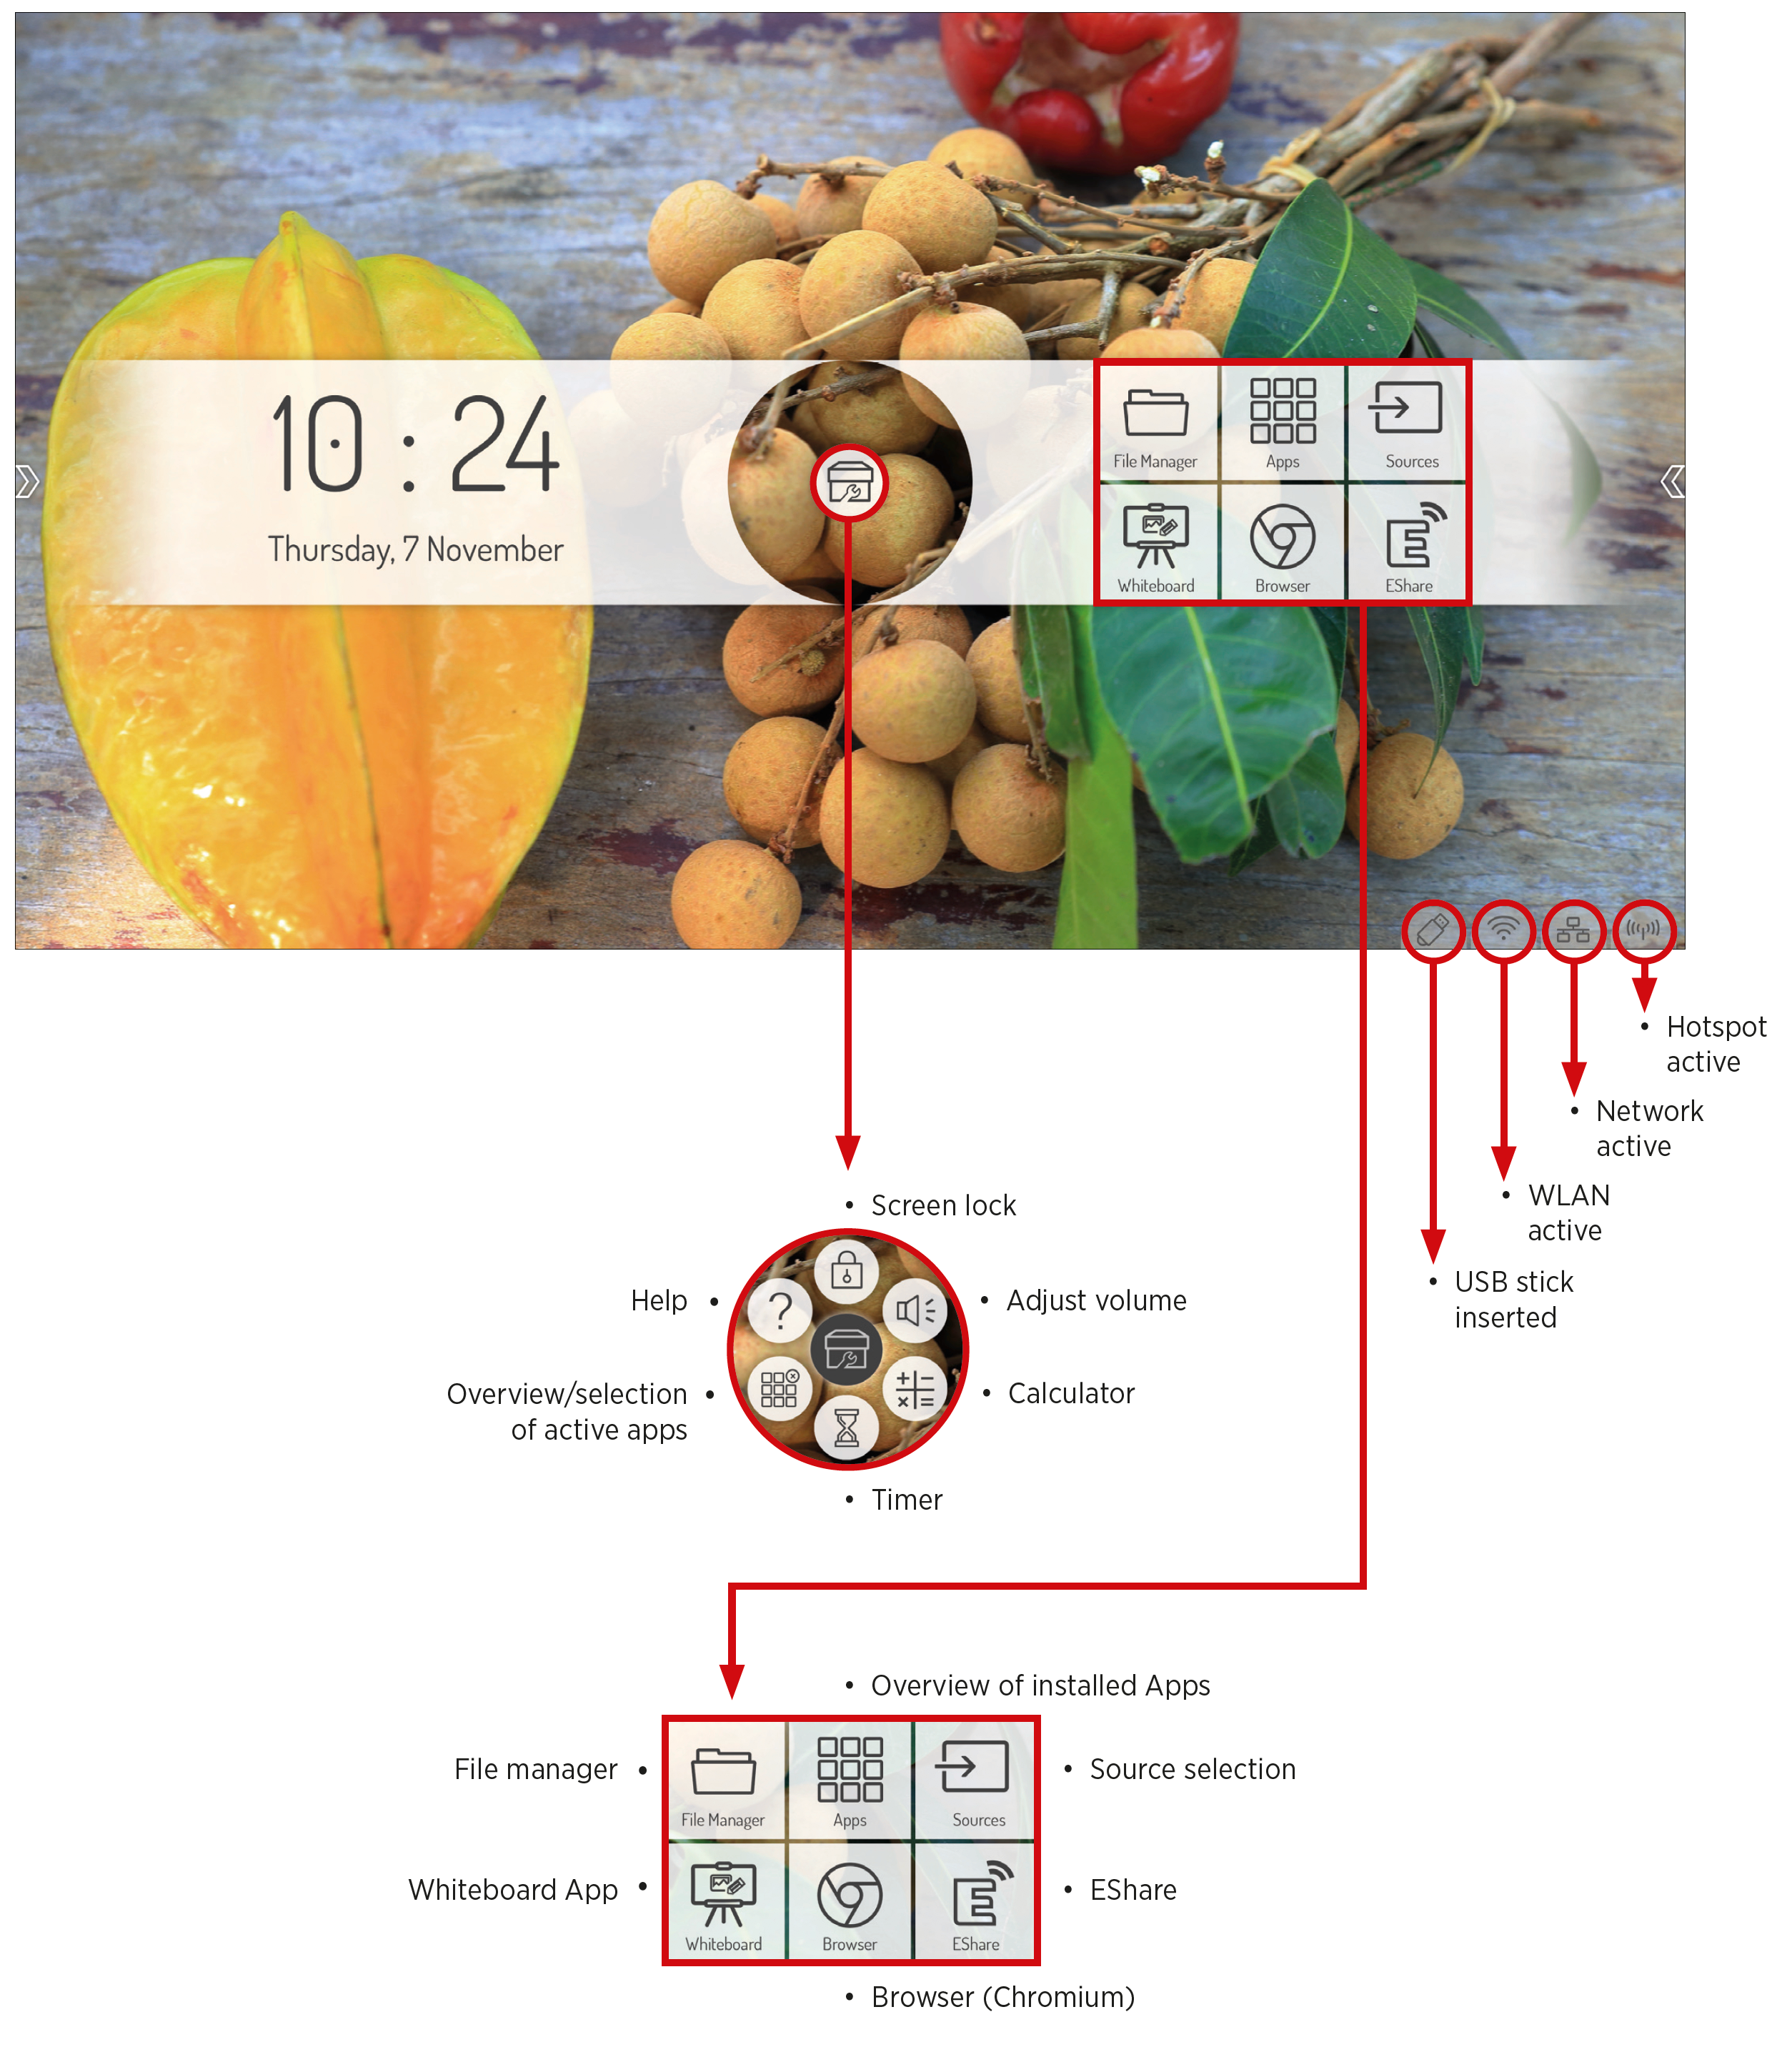
7.1.1 Sidebar
Tap one of the two semi-transparent arrows on the left and right edges of the screen, or swipe in from the edge of the screen to access the sidebar. This allows you to quickly access the most important functions.
 Spotlight Spotlight | ||
 calculator calculator | ||
 Stopwatch – Timer Stopwatch – Timer | ||
 Lock screen Lock screen | ||
 Stop all running apps Stop all running apps | ||
7.2 Source menu
7.2.1 Source selection
You can select the input source of the display either remotely or via touch screen:
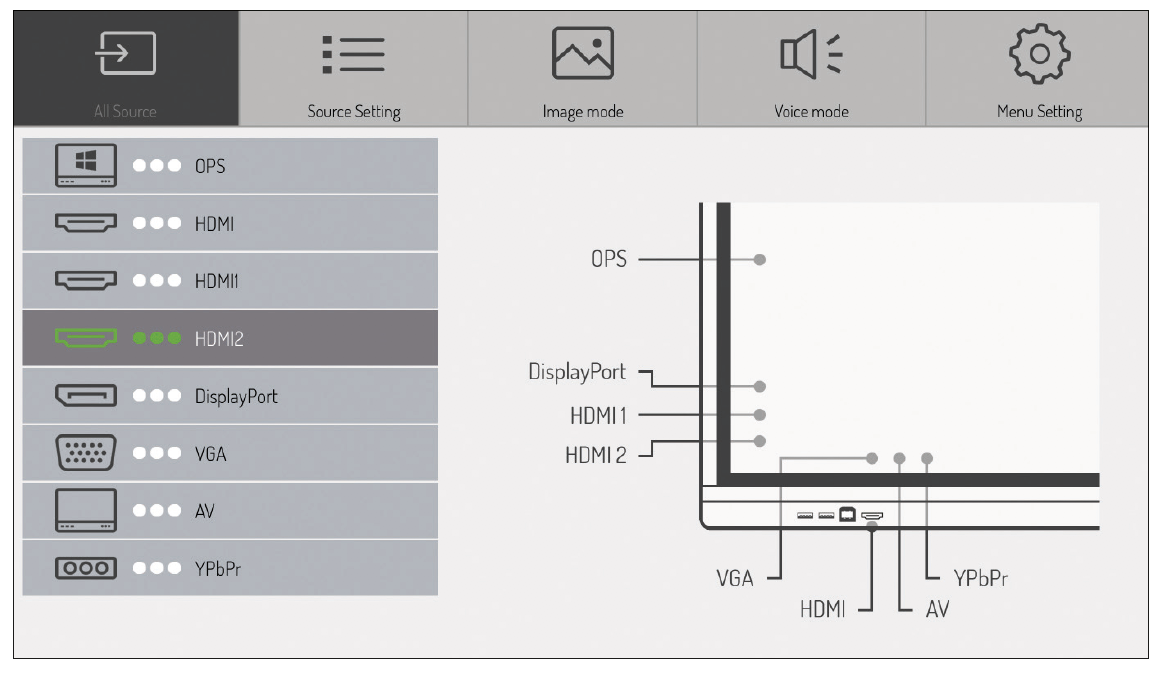
- Press the Source button on the remote control and use the direction keys to select your desired source. You confirm your selection with the "OK" button.
- Go to the sidebar and tap on the icon
 . You can select the source by tapping the desired interface.
 - In the main menu on the home screen, tap on the icon . You can select the source by tapping the desired interface.
![]() hint:
hint:
You can recognize an adjacent signal by the 3 green dots. The dark bar indicates the currently active source. To individually change the source name, please tap on the source name for longer.
7.2.2 Source options
Select the source selection item > source options
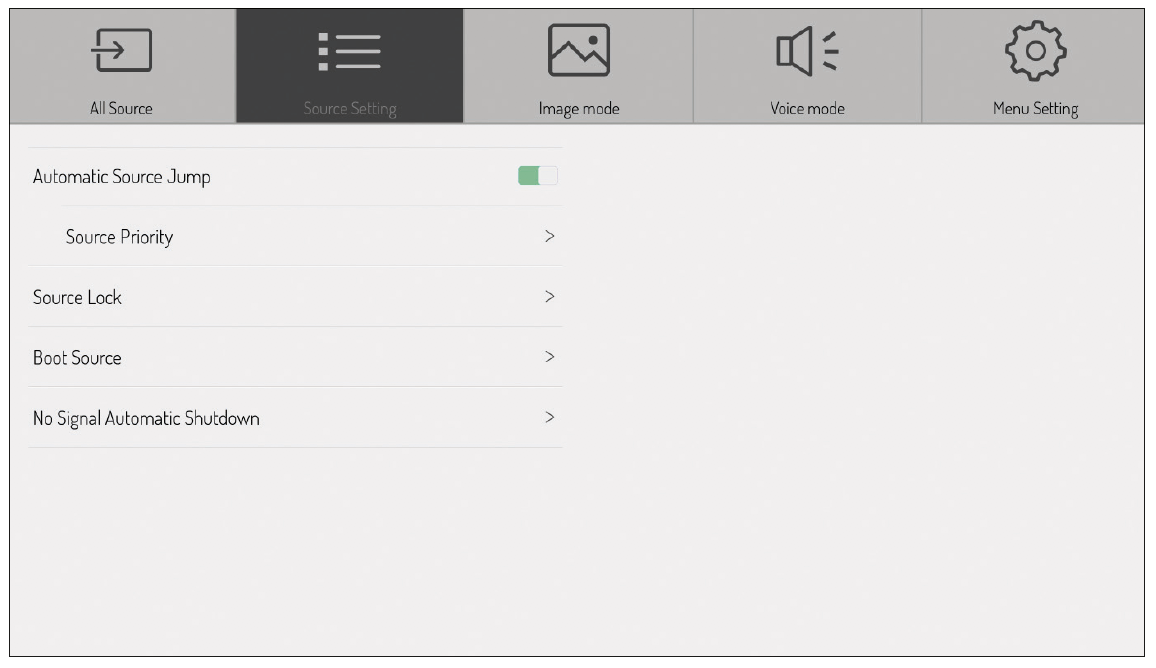
Here you have the following options:
- Automatic source selection on/off
If you activate this option, the display automatically switches to an active source or switches automatically as soon as a new source is connected. The Source Priority submenu is only available when the automatic function is activated. In this menu you define the priority of the input sources. This means that it will only automatically switch to the new source if the new source has a higher or equal priority than the current one (1 is the highest, 5 is the lowest priority). - Source lock
This setting allows you to limit the selection of video inputs, for example, to prevent incorrect operation. - Source selection when switching on
Specifies which signal input is displayed by default after the display is turned on. - Automatic shutdown
When this function is activated, the display is switched off after a defined time without an input signal. You can choose between off and 5, 15 and 30 minutes.
7.2.3 Image settings
Select the point Source selection > image
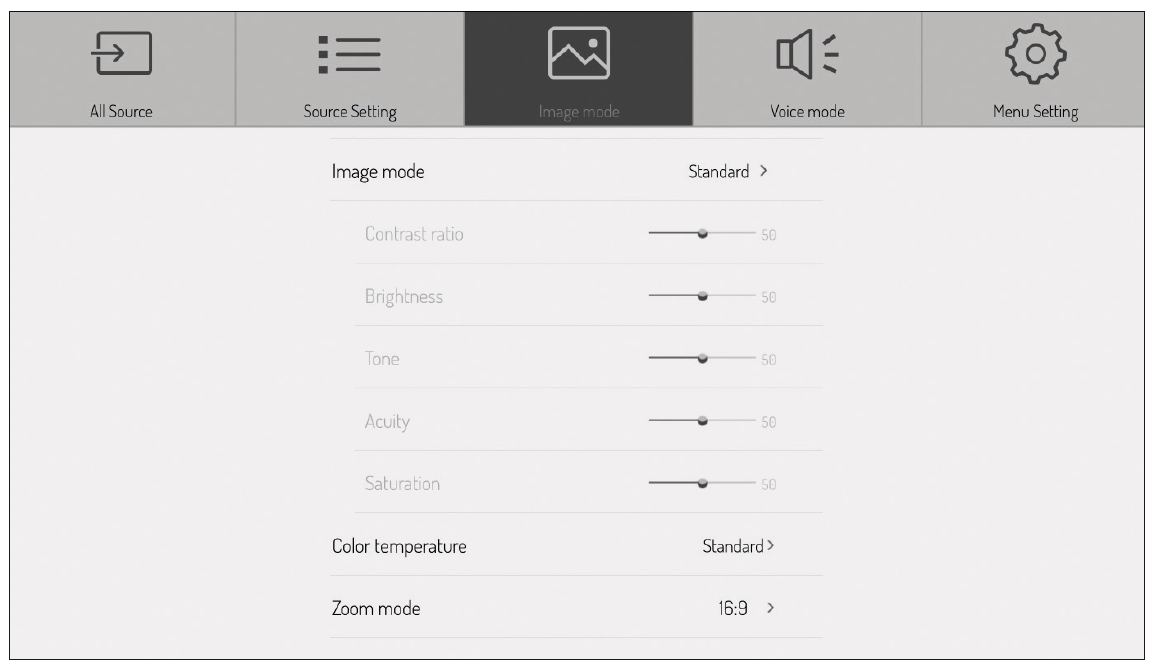
Here you can adjust the color settings, saturation, etc.
![]() hint:
hint:
The settings you make here have an effect on the image display of connected video sources (HDMI, DisplayPort, VGA).
7.2.4 Audio settings
Select the point Source selection > sound
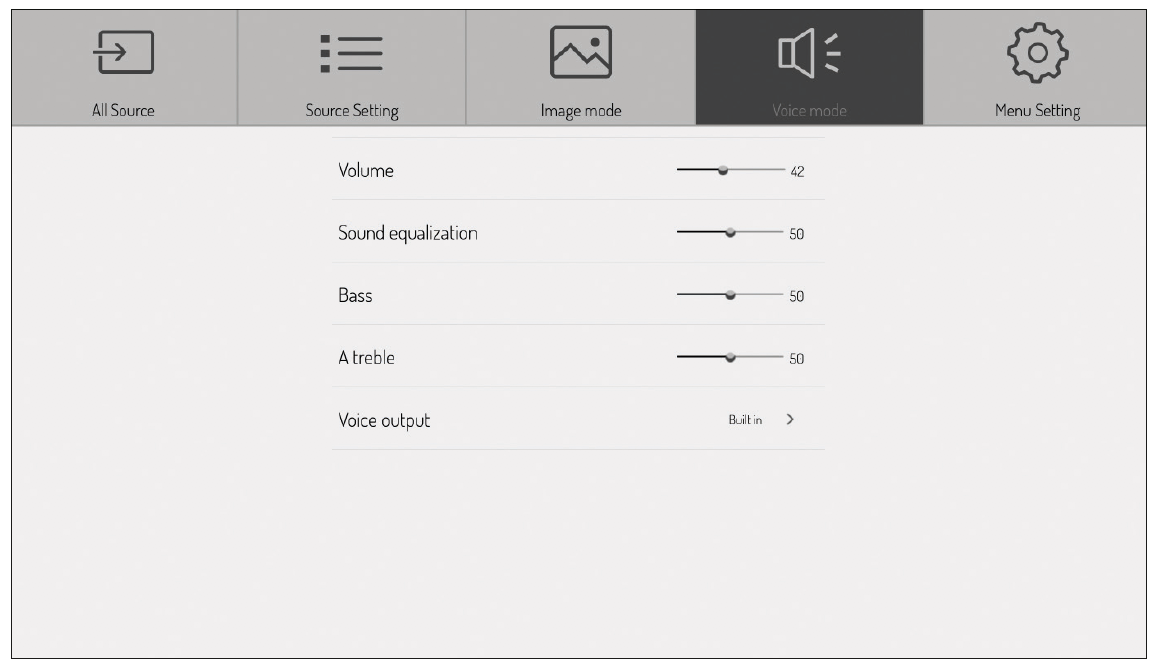
Here you can change the audio settings, i.e. adjust the volume control and make basic sound settings.
You can also specify whether the audio output should be parallel on the integrated speakers and the audio output or only on the output.
7.2.5 Settings
Select the point Source selection > settings
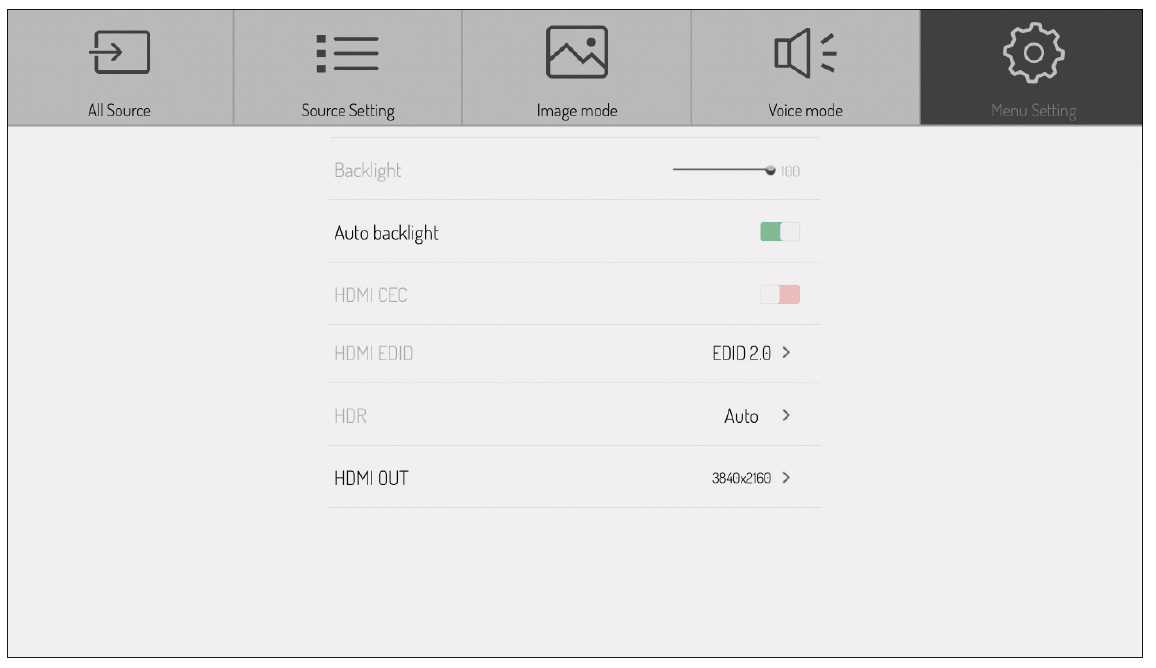
Here you can define whether the brightness of the background lighting should be changed manually or dynamically adjusted based on the ambient brightness (background lighting automatically). The ambient light sensor is located at the front next to the status LED.
If you enable the HDMI CEC option, the display can be controlled by other CEC compatible devices.
Via the point HDMI EDID you specify the maximum refresh rate, which is then output by the source devices. A lower refresh rate can help minimize connection problems.
EDID 1.4 = 3920×2160 @ 30 Hz (10.2 Gbps)
EDID 2.0 = 3920×2160 @ 60 Hz (18 Gbps)
The HDR setting defines the intensity of the HDR function – if it is provided by the source.
Under HDMI Out, set the output resolution provided via the HDMI output.
![]() hint: The HDMI output reflects the image that can be seen on the display.
hint: The HDMI output reflects the image that can be seen on the display.
7.3 Android System Settings
Select the "Settings" app or press the front button "Settings" to configure the basic settings of the Android system.
7.3.1 Network settings
7.3.1.1 Settings – Network – WLAN

- Select the menu item > network > WLAN
- Activate the WLAN function.
Select the network to which you want to connect from the network list. Enter the appropriate password and click connect.
7.3.1.2 Settings – Network – Ethernet (wired network)
- Plug the network cable into the connector on the display (see page 4 – Hardware interfaces point 10).
- Select the menu item > Network > Ethernet
- Enable the networking feature.
- By default, "DHCP" is selected, the display then automatically receives an IP address and establishes the connection to the network. If you select "Static" in the IP settings, you must manually enter the IP address, gateway, DNS server.
![]() hint:
hint:
The display has an integrated network switch. Once the display has a of the two connections has been connected to a network, the network access is available internally to the Android system, the optional OPS PC and the WLAN hotspot. The second network port can be used to connect another external device to the network.
7.3.1.3 Settings - Network - Hotspot
- Select the menu item > network > hotspot
- Turn on the hotspot.
- The standard name of the WLAN network (SSID) is "Android AP—xxxx". This can be changed at any time. To do this, override the existing name.
- Now select the encryption type. With an open network, no password is required, so that anyone can connect to the device. We recommend using WPA PSK/WPA2 PSK encryption. In this case, a password with more than 8 digits must be entered.
- The selection 2.4g or 5g describes the frequency on which access point transmits. 2.4 GHz promises a longer range and compatibility, but is much more frequented. 5 GHz, on the other hand, promises a larger bandwidth (transmission speed).
![]() hint:
hint:
Since the display only has one WLAN antenna, only the WLAN or the hotspot function can be used. As soon as one of the two functions is activated, the other is deactivated.
In the case of an unstable WLAN connection, we recommend performing a scan of the wireless environment, e.B. using the Android App Wifi Analyser and then switching to a less frequented frequency range.
7.3.2 Settings – Date/Time
Select the menu item > date/time
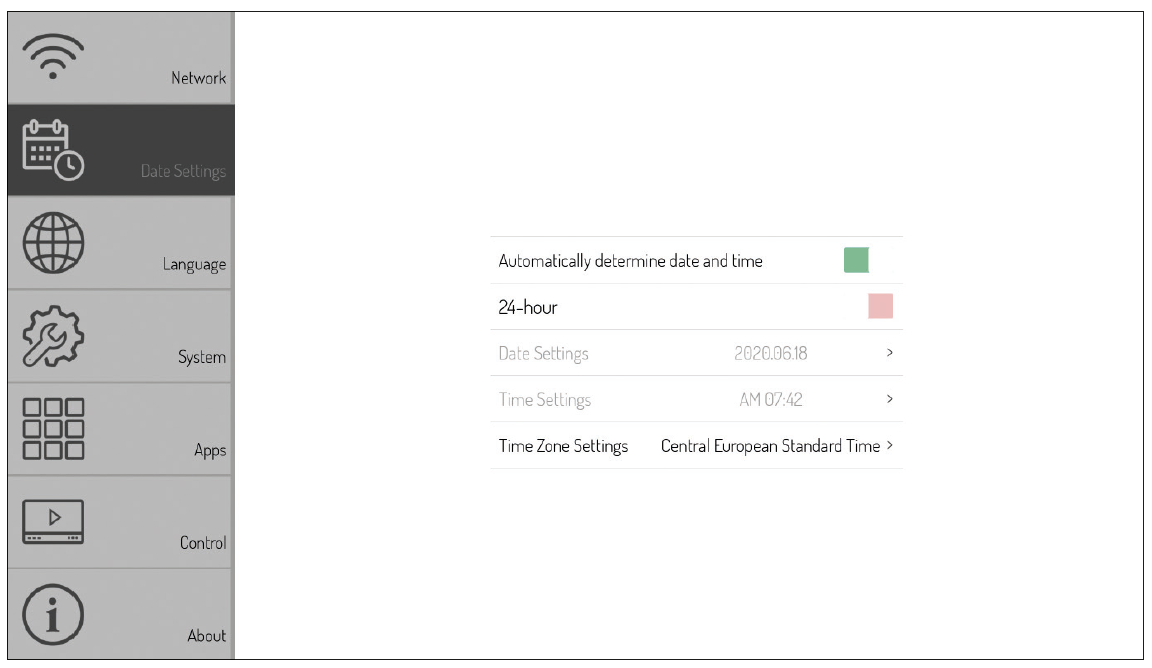
Android can automatically synchronize time and date settings via time servers on the Internet. Alternatively, you can also make the settings manually.
7.3.3 Settings – Language
Select the menu item > language
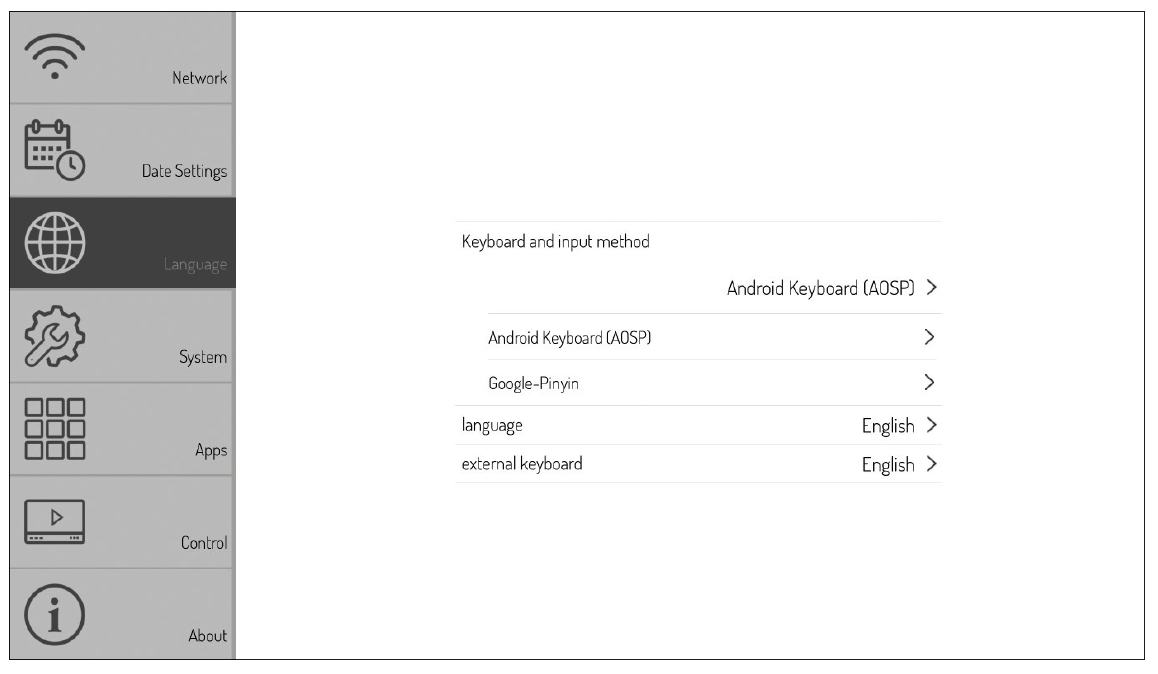
Here you select the system language as well as the keyboard layout.
7.3.4 Settings - System Setting
Select the menu item > system – the following options are available here:
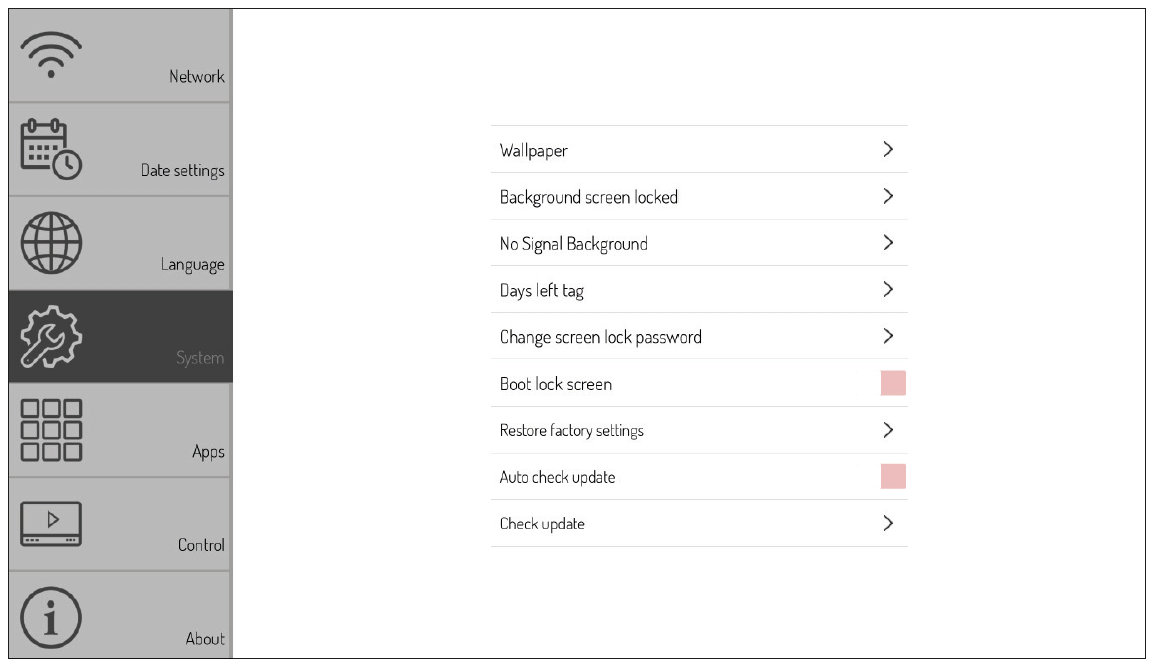
- wallpaper
Here you can load one or more individual background images, which are then displayed on the home screen.
- Background image display locked
The image that is loaded into the system here is displayed when the Android system is locked.
- Background image no signal
The image that is loaded into the system here is displayed if there is no signal from the active input.
- Countdown Day
This function can be used to display a message with a countdown. This is displayed in the upper left semi-transparently "above" each source. For example, an important event or a test alarm can be pointed out.
- Change password for screen lock
Here you can enter and change the PIN for unlocking the home screen. In the factory setting 888888 is stored.
- Enable screen lock at startup
If this option is indicated, the Android home screen is locked after system startup. To unlock, the 6-digit PIN must be entered.
- Reset to factory default
Resets all settings and configurations to factory settings.
- Automatically check for updates
If the feature is enabled, the system periodically scans for available updates (requires an Internet connection).
- Download updates
Here you can automatically initiate the search for updates (requires an Internet connection).
![]() hint:
hint:
The background images must be saved in PNG or JPEG format. The recommended resolution is 1920 x 1080 and 3840 x 2160 pixels,the file size should not exceed 1 MB so as not to affect performance.
7.3.5 Settings - Apps
Select the menu item > apps
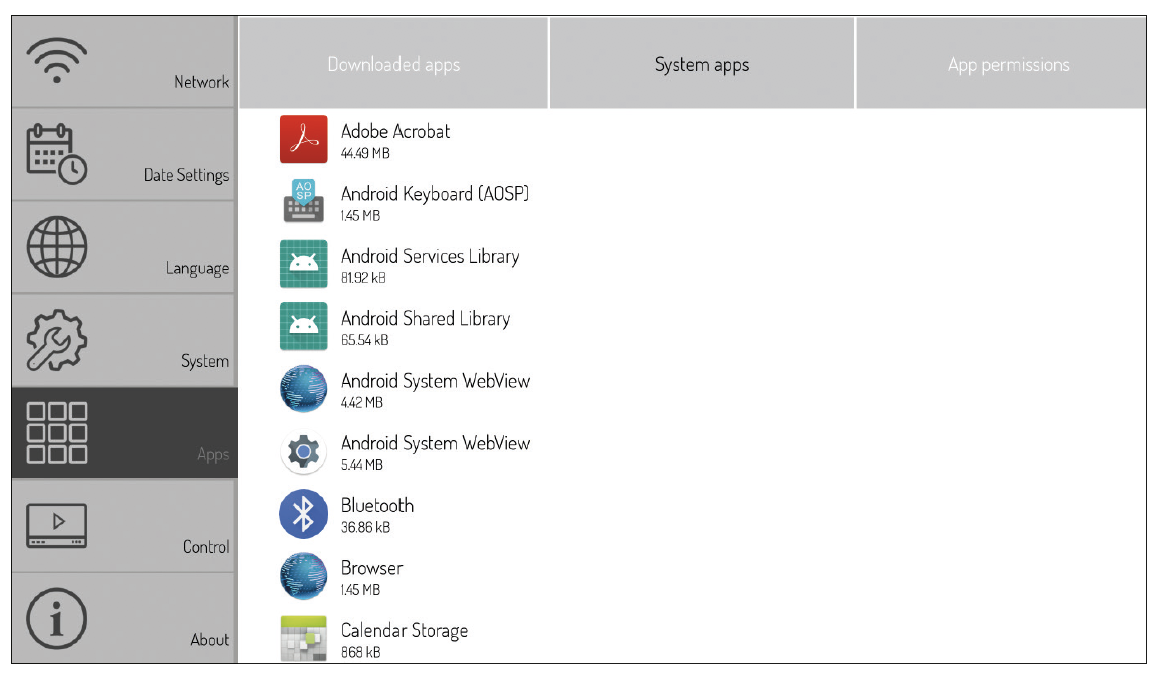
Here you will find an overview of all apps installed on the Android system and their permissions.
![]() attention:
attention:
Changes to the system apps or permissions can lead to functional restrictions or errors. Changes should only be made after prior consultation and approval by the Kindermann support.
7.3.6 Control settings
7.3.6.1 Settings – Control – Lock
Select the menu item > control > locking – the following options are available here:
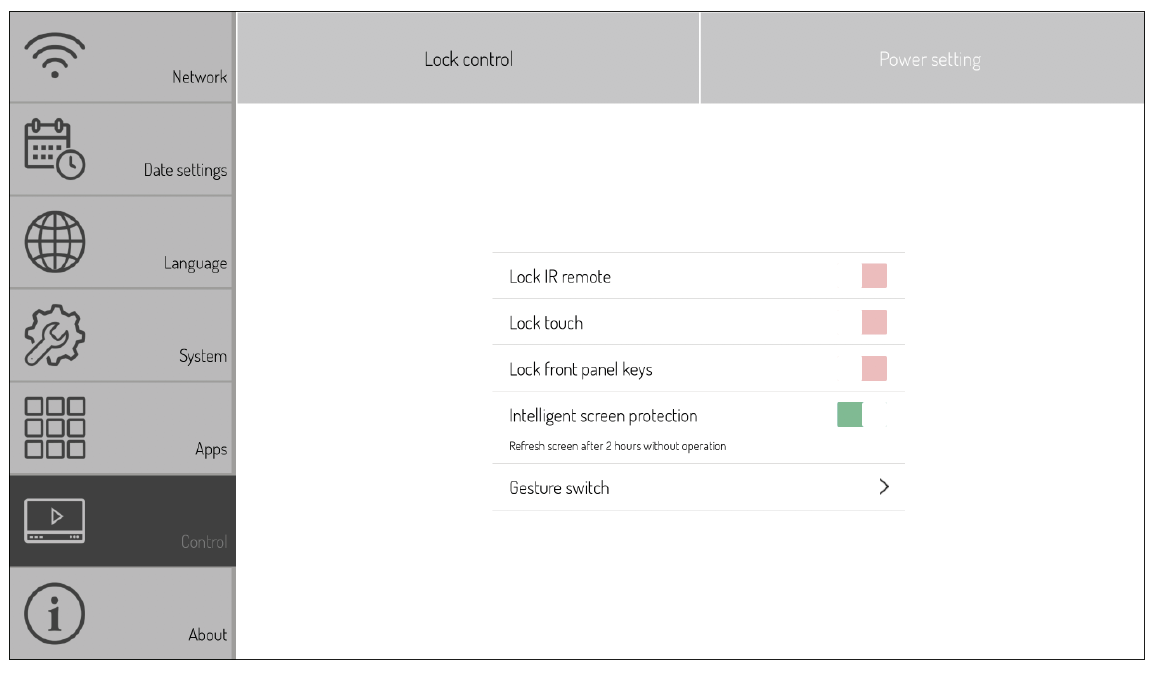
- Lock remote control
No commands of the IR remote control are accepted.
- Touch lock
Can be deactivated at any time by tapping the lock symbol, which is displayed briefly when touched.
- Lock front buttons
Disables the hardware buttons on the front of the device
- Intelligent screen protection
This function protects the panel from "burn-in effects" that can occur when a static image is displayed over a longer period of time.
- Enable gestures/Hide sidebars
If this function is activated, the arrows on the left and right with which the sidebar can be called up disappear.
7.3.6.2 Settings – Control – Power Options
Select the menu item > control > energy setting – the following options are available here:

- Wake-on-LAN
If this option is activated, the display can be started via wake-on-LAN command over the network.
- On and off timers
If this option is activated, you can specify times at which the display is automatically switched on or off.
- After 4 hours without use, switch to stand-by
If this option is activated, the display is moved to stand-by after 4 hours without touching it.
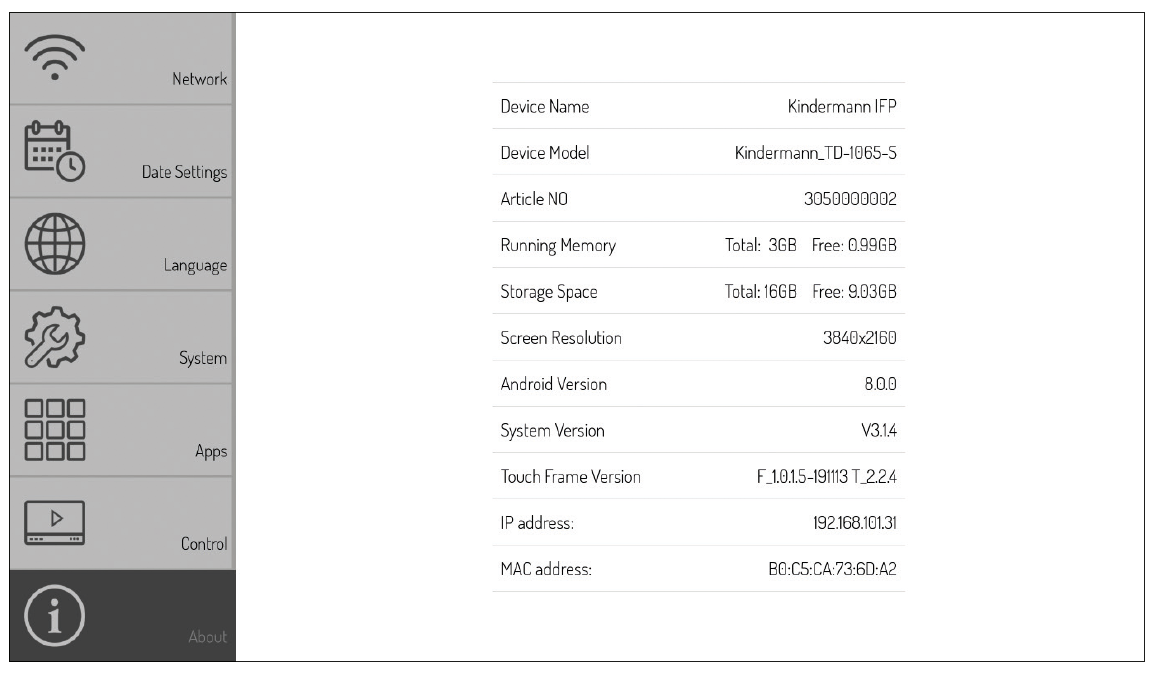
7.3.7 Settings – Info
Select the menu item > Info – here you will find all relevant system information, e.B. software statuses, etc.
8. Android System Apps
We have preinstalled the following apps for you:
- EShare – BYOD/Wireless Streaming
With the help of this app, you can wirelessly transfer the screen of your Windows or Mac computer as well as Android or iOS smartphones and tablets to the display. Please follow the instructions that are displayed after opening the app to load the necessary programs and apps from the web page or the respective appstores.
![]() hint:
hint:
To use the wireless function, either the integrated hotspot must be activated or the display must be taken into the same (WLAN) network that the source devices also use.
- file manager
With the file manager you get access to the folders and files of the Android system as well as to the USB data storage. Furthermore, the app supports the playback of images, videos and audio data, etc. By tapping long, objects can be selected, moved, copied and deleted.
- WPSOffice
With WPSOffice you can open and edit Word, Excel and PowerPoint as well as PDF files.
- Web browser – Chromium
Use the browser for Internet access.
- Adobe Reader
Is the official app from Adobe for viewing PDF files.
- Photo Gallery
Photo Gallery is an app for displaying images.
- NewPipe
Is an app for ad-free playback of Youtube videos.
- VLC
Is an app for playing video and audio files, as well as viewing network streams.
- Open Camera
The Open Camera app displays the live image of a visualizer or webcam. For example, documents or 3D objects can be easily digitized and annotated accordingly with the Annotation App.
- Open Street Map
Provides access to worldwide maps of the online service of the same name.
- Kindermann Whiteboard App
The app works like a digital flipchart or a digital blackboard and offers the possibility to make handwritten notes, sketches, etc. with digital ink on the display.
There are various background images and lines to choose from. If required, these can be extended with your own variants (as PNG/JPG in resolution 1920×1080 or 3840×2160 pixels).
 Masking Masking | ||
 Sticky note Sticky note | ||
 Split writing surfaces Split writing surfaces | ||
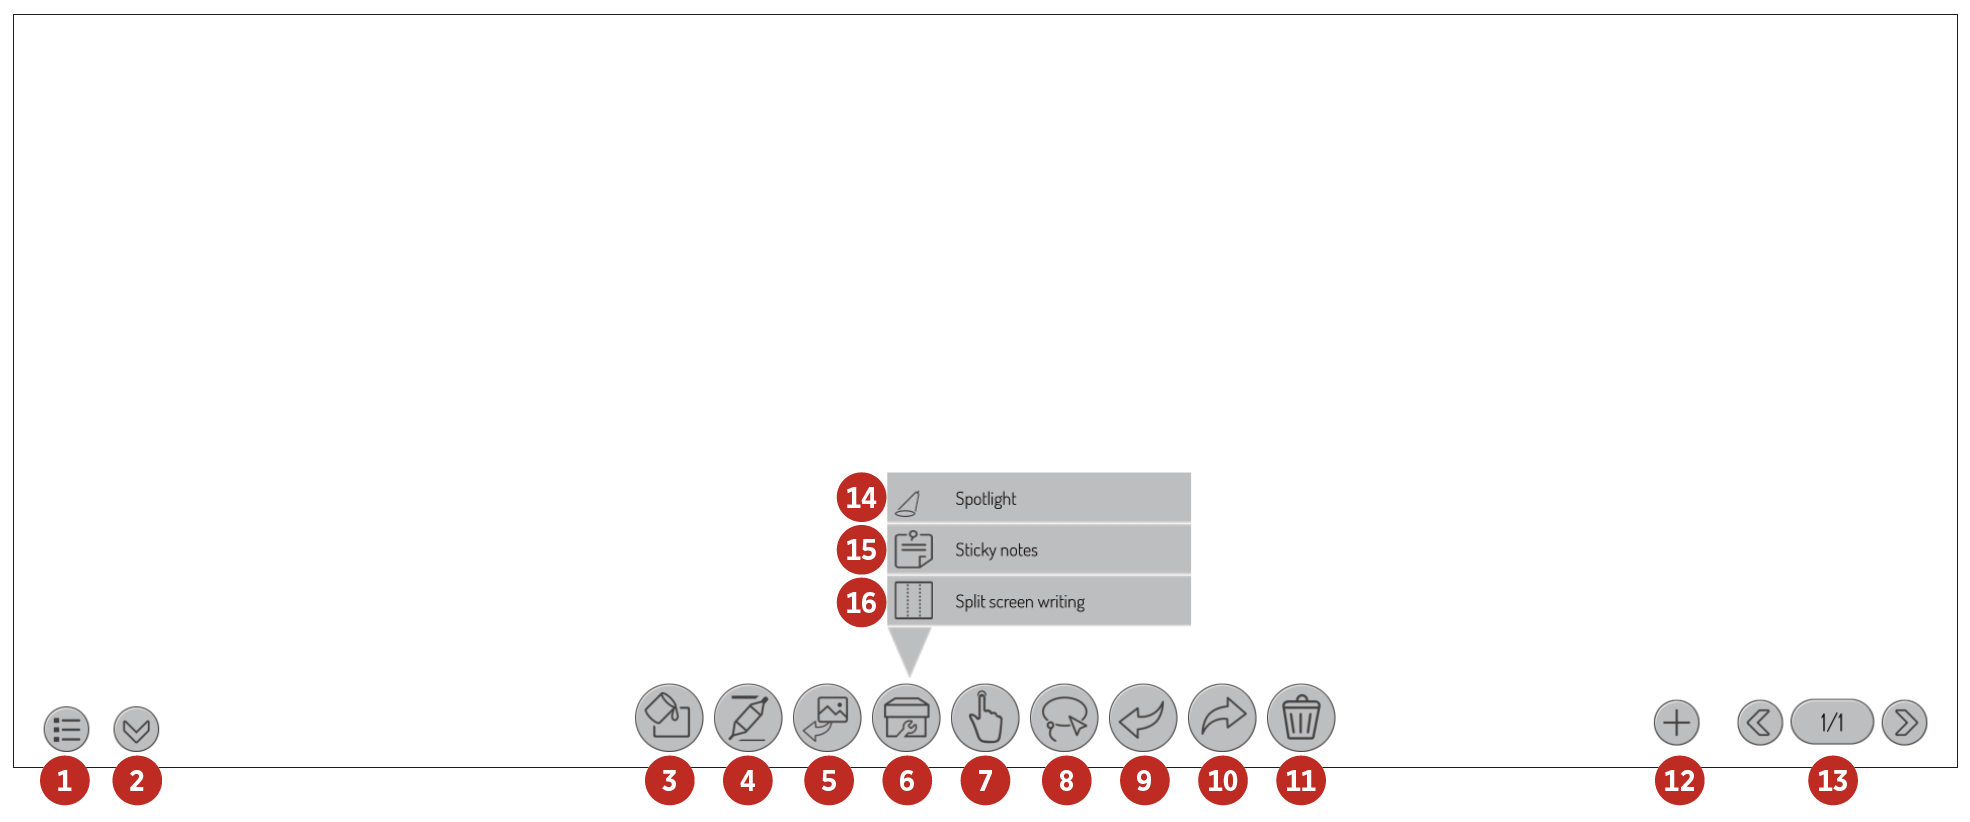
- Annotation function of Kindermann Whiteboard
The annotation function can be called via the sidebar. You can use it to make handwritten notes, sketches, etc.
![]() hint:
hint:
They annotate on a second level above the actual screen content. This remains unchanged. When the function is closed, all notes disappear. Of course, it is possible to save these annotations including the background.
9. Technical data
9.1 Kindermann Touch Display – Generation 2019
|
Kindermann 3050000011 |
Kindermann 3050000012 |
Kindermann 3050000013 |
Kindermann 3050000014 |
||
|
panel |
Diagonal / visible area in mm |
55" / 1210 x 680 |
65" / 1428 x 804 |
75" / 1647 x 927 |
86" / 1895 x 1066 |
|
Backlight |
Direct LED |
||||
|
Resolution / aspect ratio / color depth |
3840 x 2160 – 16:9 – 10bit (1.07 trillion colors) |
||||
|
Usage orientation / |
Landscape format / 18 hours |
||||
|
brightness |
350cd/m² (typ.) |
450cd/m² (typ.) |
450cd/m² (typ.) |
400cd/m² (typ.) |
|
|
contrast |
1300:1 (typ.) |
1200:1 (typ.) |
1200:1 (typ.) |
1200:1 (typ.) |
|
|
reaction time |
6ms (typ.) |
6ms (typ.) |
8ms (typ.) |
8ms (typ.) |
|
|
Refresh rate |
60Hz |
||||
|
Viewing angle |
178°(H) / 178°(V) |
||||
|
Image mode |
Standard/Soft/Users/Bright |
||||
|
Minimum lifetime |
50,000 operating hours |
||||
|
Touch |
Touch technology |
Infrared – Surface Light Wave |
|||
|
Maximum touchpoints |
20 |
||||
|
Front glass |
Tempered glass, 4 mm – MoHS7 – anti-reflective, transparent and antibacterial |
||||
|
permeability |
>88% |
||||
|
Minimum object size, accuracy |
1.6 mm, ±1 mm |
||||
|
reaction time |
<10 ms |
||||
|
driver |
Plug and Play (multitouch driver available for MacOS; Linux supports Single Touch) |
||||
|
service |
Fingers, control pen with soft tip or any comparable object |
||||
|
connection |
USB2.0 Full speed – Socket – Type B |
||||
|
compatible |
Windows 7/8/10, Linux, MAC OS, Android |
||||
|
loudspeaker |
Audio Out Power |
2 x 15W @ 8Ω |
|||
|
Soc |
CPU/GPU |
Quad Core, ARM Cortex A53, 1.5Ghz, MaliG51 |
|||
|
RAM/ROM |
3GB / 32GB |
||||
|
WiFi |
802.11 a/b/g/n – Dual Band 2.4G and 5GHz |
||||
|
OS |
Android 8.0 |
||||
|
Supplied |
Basic |
Kindermann Whiteboard app with note function, take screenshots, |
|||
|
file manager |
Yes, including photo, video, audio player |
||||
|
Office/PDF Viewer |
WPS Office, Adobe Reader |
||||
|
browser |
Chromium |
||||
|
BYOD wireless streaming |
Yes, Eshare |
||||
|
Additional apps |
OpenCamera, OpenStreetmaps |
||||
|
Menu languages |
available |
20 languages |
|||
|
Connections |
Public USB (Android&Windows) |
2 x (2.0, type A socket) |
|||
|
HDMI 2.0 input |
1 |
||||
|
OPS USB Port |
1 x (3.0, type A socket) |
||||
|
Touch USB |
1 |
||||
|
Connections |
OPS Slot |
1 (power supply 19V(DC)/5A) |
|||
|
HDMI output |
1 |
||||
|
SPDIF output (digital output) |
1 |
||||
|
Touch USB |
1 |
||||
|
Android USB |
2 x (2.0, type A socket) |
||||
|
DP input |
1 |
||||
|
HDMI 2.0 input |
2 |
||||
|
LAN (100 Mbps) |
2 |
||||
|
RS232 |
1 |
||||
|
YPbPr/AV in/AV out |
1/1/1 (adapter required) |
||||
|
Audio output (3.5 mm jack) |
1 |
||||
|
VGA / Audio (3.5 mm jack) input |
1 / 1 |
||||
|
bus bar |
Input voltage, connection |
100 V ~ 240 V/AC, 50/60 Hz – cold appliance jack |
|||
|
Consumption (typical) |
approx. 143W |
approx. 171W |
approx. 264W |
approx. 375W |
|
|
Standby consumption |
<0.5W |
||||
|
Environmental |
Temperature – Operation |
0 – 40°C |
|||
|
Temperature – Storage |
-10 – 60°C |
||||
|
Humidity – Operation |
20 – 80% non-condensing |
||||
|
Humidity – Storage |
10 – 60% non-condensing |
||||
|
Dimensions / Material |
Dimensions display (mm) (WxDxH) |
1299 x 94 x 789 |
1506 x 96 x 901 |
1736 x 104 x 1035 |
1992 x 113 x 1183 |
|
Dimensions packaging (mm) (WxDxH) |
1420 x 245 x 910 |
1660 x 245 x 1045 |
1880 x 280 x 1160 |
2140 x 280 x 1340 |
|
|
Net weight (approx. kg) |
28,5 |
42 |
58 |
77 |
|
|
Gross weight (approx. kg) |
38 |
57 |
75 |
100 |
|
|
case |
Aluminum/Metal |
||||
|
Frame width (O/U/L/R) |
27\47\27\27 mm |
27\47\27\27 mm |
27\47\27\27 mm |
28\48\28\28 mm |
|
|
VESA |
4 x M6 |
4 x M8 |
4 x M8 |
4 x M8 |
|
|
accessories |
Included |
IR remote control, power cable (3 m), USB cable (3 m), HDMI cable (3 m), |
|||
9.2 Vga mode display
| No. | mode | resolution | Refresh rate |
|---|---|---|---|
| 1 | VGA | 640x480 | 60Hz |
| 2 | SVGA | 800x600 | 60Hz |
| 3 | XGA | 1024x768 | 60Hz |
| 4 | WXGA | 1366x768 | 60Hz |
| 5 | Full HD | 1920 x 1080 | 60Hz |
9.3 Mode Display HDMI
| No. | mode | resolution | Refresh rate |
|---|---|---|---|
| 1 | SD | 720x480 | 70Hz |
| 2 | SD | 720x576 | 50Hz |
| 3 | HD | 1280x720 | 50Hz |
| 4 | HD | 1280x720 | 60Hz |
| 5 | Full HD | 1920 x 1080 | 50Hz |
| 6 | Full HD | 1920 x 1080 | 60Hz |
| 7 | UHD | 3840x2160 | 30Hz |
| 8 | UHD | 3840x2160 | 60Hz |
10. RS232 / IP control commands
10.1 Introduction
This section describes the hardware specification as well as the control protocol via RS232 and IP interface. Below, all ECUs that can send or receive commands via RS232 & LAN protocol are referred to as "media control".
10.2 Description
10.2.1 Hardware Specification
The connection to RS232 communication is located on the back of the display.
Connector type and pinout:
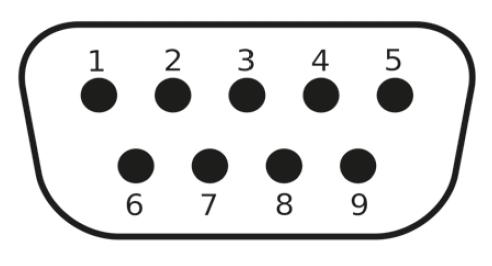
D-Sub 9-pin, male
(Connection to the display)
As a connection cable between PC and display, a crossover cable (null modem) must be used (pins 2 and 3 are crossed).
| PIN | signal | |
|---|---|---|
| 1 | NC | |
| 2 | TXD | to send a command |
| 3 | RXD | to receive a command |
| 4 | NC | |
| 5 | GND | |
| 6 | NC | |
| 7 | NC | |
| 8 | NC | |
| 9 | NC | |
| case | GND |
10.2.2 Settings of the serial interface:
| positions | value | |
|---|---|---|
| baud rate | 38400 bps | (fixed) |
| Bits | 8 | (fixed) |
| Stop bits | 1 | (fixed) |
| parity | none | (fixed) |
| Data stream control | none | (fixed) |
The display uses port 4660 for lan commands.
10.2.3 Network Settings
We recommend the use of the LAN interface with static assignment of the IP address, see Section 7.3.1.2.
10.3 Protocol
10.3.1 General
The RS232 and LAN commands are identical.
10.3.2 Protocol description
10.3.2.1 Command format
| head | Each command always starts with "k" for Kindermann |
| Display ID | The default value is "01". The ID "99" means that the command is sent to all connected displays. In this case, only the display responds with the ID "01". |
| Command Type | For sending a command, there are two command types: • Set command: "s" • Get command: "g" The display always returns one of the following responses to a command: • Valid set command: "y" • Valid Get command: "r" • Invalid Set or Get command: "n" |
| command | The function command |
| value | Three bytes define the value |
| end | each command completes with "cr" |
Structure of a send command (type "s" or "g") and the response command (type "r")
| head | Display ID | Command Type | command | Value 1 | Value 2 | Value 3 | end |
| 1 byte | 2 bytes | 1 byte | 1 byte | 1 byte | 1 byte | 1 byte | 1 byte |
Structure of a response command (type "y" and "n")
| head | Display ID | Command Type | end |
| 1 byte | 2 bytes | 1 byte | 1 byte |
Example 1
Sending a set command with invalid parameter: Setting the brightness of the display to 137.
| head | Display ID | Command Type | command | Value 1 | Value 2 | Value 3 | end | |
| Send (ASCII) | K | 01 | S | D | 1 | 3 | 7 | <CR> |
| Send (hex) | 0x6B | 0x30 0x31 | 0x73 | 0x44 | 0x31 | 0x33 | 0x37 | 0x0D |
| head | ID | type | end | |
| Answer (ASCII) | K | 01 | N | <CR> |
Example 2
Sending a Get command with a valid response: Query the contrast value from the display, the command is valid and the set value is 53.
| head | ID | type | command | Value 1 | Value 2 | Value 3 | end | |
| Send (ASCII) | K | 01 | G | A | 0 | 0 | 0 | <CR> |
| Send (hex) | 0x6B | 0x30 0x31 | 0x67 | 0x61 | 0x30 | 0x30 | 0x30 | 0x0D |
| Answer (ASCII) | K | 01 | R | A | 0 | 5 | 3 | <CR> |
10.3.3 Set Function Commands
|
category |
function |
ASCII command |
remark |
|
power |
from |
k01sA000<CR> |
|
|
one |
k01sA001<CR> |
Not available via LAN, please use |
|
|
source |
android |
k01sB00A<CR> |
|
|
HDMI |
k01sB004<CR> |
||
|
HDMI 1 |
k01sB014<CR> |
||
|
HDMI 2 |
k01sB024<CR> |
||
|
OPS |
k01sB007<CR> |
||
|
DP |
k01sB009<CR> |
||
|
VGA |
k01sB006<CR> |
||
|
AV |
k01sB001<CR> |
||
|
YPbPr |
k01sB003<CR> |
||
|
image |
Freeze screen: Off |
k01s[000<CR> |
|
|
Freeze screen: On |
k01s[001<CR> |
||
|
Backlight: Off |
k01s\000<CR> |
||
|
Backlight: On |
k01s\001<CR> |
||
|
contrast |
k01sCxxx<CR> |
Values for xxx: 000 ~ 100 Requirements: |
|
|
brightness |
k01sDxxx<CR> |
||
|
sharpness |
k01sExxx<CR> |
||
|
saturation |
k01sFxxx<CR> |
||
|
Zoom mode: 16:9 |
k01sM000<CR> |
||
|
Zoom mode: 4:3 |
k01sM001<CR> |
||
|
Color temperature: Standard |
k01sH000<CR> |
Requirements: |
|
|
Color temperature: Warm |
k01sH001<CR> |
||
|
Color temperature: Cold |
k01sH002<CR> |
||
|
clay |
Surround Sound: Off |
k01sI000<CR> |
|
|
Surround Sound: A |
k01sI001<CR> |
||
|
bass |
k01sJxxx<CR> |
Values for xxx: 000 ~ 100 |
|
|
heights |
k01sKxxx<CR> |
||
|
volume |
k01sPxxx<CR> |
||
|
Volume: down |
k01sP200<CR> |
||
|
Volume: high |
k01sP201<CR> |
||
|
Mute: Off |
k01sQ000<CR> |
||
|
Mute: On |
k01sQ001<CR> |
||
|
settings |
Language: English |
k01sN000<CR> |
|
|
Key lock: Off |
k01sR000<CR> |
||
|
Key lock: On |
k01sR001<CR> |
||
|
Touch input: Off |
k01sS000<CR> |
||
|
Touch input: On |
k01sS001<CR> |
||
|
IR lock: Off |
k01sV000<CR> |
||
|
IR lock: A |
k01sV001<CR> |
||
|
input |
number |
k01sT00x<CR> |
Values for x: 0 ~ 9 |
|
Navigation: high |
k01sU000<CR> |
||
|
Navigation: down |
k01sU001<CR> |
||
|
Navigation: left |
k01sU002<CR> |
||
|
Navigation: right |
k01sU003<CR> |
||
|
Enter |
k01sU004<CR> |
||
|
Open source menu |
k01sU005<CR> |
||
|
Open settings |
k01sU006<CR> |
||
|
Exit |
k01sU007<CR> |
||
|
Date: Year |
k01sXYxx<CR> |
Values for xx: 00 ~ 99 |
|
|
Date: Month |
k01sXMxx<CR> |
Values for xx: 01 ~ 12 |
|
|
Date: Day |
k01sXDxx<CR> |
Values for xx: 01 ~ 31 |
|
|
Time: Hour |
k01sYHxx<CR> |
Values for xx: 00 ~ 24 |
|
|
Time: Minute |
k01sYMxx<CR> |
Values for xx: 00 ~ 59 |
|
|
Time: Second |
k01sYSxx<CR> |
Values for xx: 00 ~ 59 |
|
|
Reset to factory settings |
k01sZ000<CR> |
10.3.4 Get Function Commands
|
category |
function |
ASCII command |
Answer (Rx) |
status |
|
|
power |
Power status |
k01gi000<CR> |
Now ON<LF> |
one |
|
|
Now Standby <CR> |
from |
only by RS232 |
|||
|
source |
Source query |
k01gh000<CR> |
k01rh00A<CR> |
Home |
hint: Example: |
|
k01rh004<CR> |
HDMI |
||||
|
k01rh014<CR> |
HDMI 1 |
||||
|
k01rh024<CR> |
HDMI 2 |
||||
|
k01rh007<CR> |
OPS |
||||
|
k01rh009<CR> |
DP |
||||
|
k01rh006<CR> |
VGA |
||||
|
k01rh001<CR> |
AV |
||||
|
k01rh003<CR> |
YPbPr |
||||
|
image |
contrast |
k01ga000<CR> |
k01raxxx<CR> |
Values for xxx: 000 ~ 100 |
|
|
brightness |
k01gb000<CR> |
k01rbxxx<CR> |
|||
|
sharpness |
k01gc000<CR> |
k01rcxxx<CR> |
|||
|
saturation |
k01gd000<CR> |
k01rdxxx<CR> |
|||
|
colour |
k01ge000<CR> |
k01rexxx<CR> |
|||
|
clay |
volume |
k01gf000<CR> |
k01rfxxx<CR> |
Values for xxx: 000 ~ 100 |
|
|
Mute |
k01gg000<CR> |
k01rg000<CR> |
from |
||
|
k01rg001<CR> |
one |
||||
|
settings |
IR lock |
k01gj000<CR> |
k01rj000<CR> |
from |
|
|
k01rj001<CR> |
one |
||||
|
Keylock |
k01gl000<CR> |
k01rl000<CR> |
from |
||
|
k01rl001<CR> |
one |
||||
|
Touch input |
k01gm000<CR> |
k01rm000<CR> |
from |
||
|
k01rm001<CR> |
one |
||||
|
date |
month |
k01gpM00<CR> |
k01rpM11<CR> |
November 14 |
|
|
day |
k01gpD00<CR> |
k01rpD14<CR> |
|||
|
hour |
k01gqH00<CR> |
k01rqH13<CR> |
time: 13:55:21 |
||
|
minute |
k01gqM00<CR> |
k01rqM55<CR> |
|||
|
second |
k01gqS00<CR> |
k01rqS21<CR> |
|||
|
system |
Device Name |
k01gr000<CR> |
k01r1WB8<CR> k01r248<CR> |
WB848 |
|
|
MAC address |
k01gs000<CR> |
k01rs1B0<CR> k01rs2C5<CR> k01rs3CA<CR> k01rs412<CR> k01rs534<CR> k01rs656<CR> |
B0:C5:CA:12:34:56 |
||
11. CE Declaration
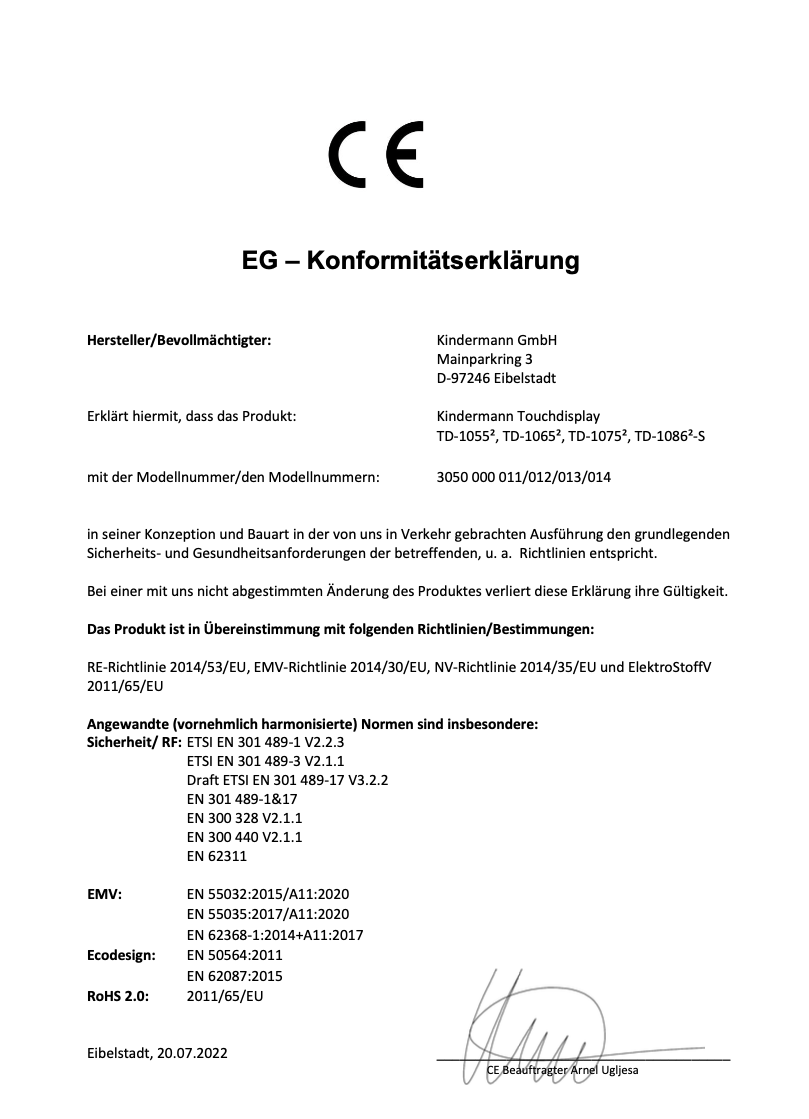
The currently valid CE declaration can be viewed and downloaded at the following URL: ![]() 305000001x_CE_DE.pdf
305000001x_CE_DE.pdf![]() 305000001x_CE_EN.pdf
305000001x_CE_EN.pdf
UKCA: 3050000011_UKCA_en_1.pdf
12. Typical sources of error
Please check the table below to help you determine the reason for the malfunction that occurred before making a service request.
If you are still unable to completely eliminate the fault according to the instructions in this manual, please contact the Service Center to perform product maintenance: support@kindermann.En
| symptom | Possible cause | solution |
|---|---|---|
| The display does not start; no image is displayed | • Power plug loose • Faults in the power supply | Verify that the power cord is properly connected. |
| The picture shown shows stripes (with active VGA source) | Signal disturbance caused by other electrical devices | • Disconnect circuits of the devices • Replace VGA cable |
| The images shown on the product are disturbed by dotted lines or stripes (with HDMI or DP signal) | Poor transmission quality | Shorten the cable length, reduce the number of connectors, or reduce the resolution or refresh rate. Alternatively, a signal repeater can help. |
| Remote control only works out short distance or not at all | • The receiver of the display is blocked by another object • The battery of the remote control is weak • The use of the remote control has been deactivated. | • Remove the item in front of the recipient • Replace the batteries • See section 7.3.6.1 |
| The touch operation is slow, does not work (Android) | There are too many programs running | Close the programs that you do not need and thus free up memory. |
| OPS cannot be activated, no display, no touch operation | OPS was not used properly | Re-insert the OPS. To do this, make the display powerless. |
| the touch function does not work on externally connected computers | • The USB cable is connected to a USB port connected that is not associated with the video source • The touch USB cable is too long or of poor quality | • Check and change the appropriate interface of the touch USB cable • Use a shorter or active USB cable |
13. Cleaning and maintenance of displays

preparation:
![]() hint:
hint:
Please remove the power supply before you start cleaning and care to avoid electrocution.
Clean screen:
Mix a few drops of mild detergent (neutral soap, dish soap) in lukewarm water. Moisten a soft cloth with the mixture. Wring out the cloth very well.
![]() hint:
hint:
You can add commercially available disinfectants or alcohol, e.B alcohol to the mixture.
However, please do not use microfiber cloths, these can damage the special coating of the front glass and make it unusable when used intensively.
Cleaning the frame:
Use a dry, soft, lint-free cloth. Rub the frame carefully with it.
14. Product Support
Please first contact the dealer from whom you purchased the display. Alternatively, you can find further contact information on our support homepage: https://touchdisplays.eu/support/
15. Warranty conditions
General provisions for our durability guarantee
- These warranty provisions apply in Germany. German law applies exclusively; the provisions of the UN Sales Convention do not apply.
- These warranty provisions apply exclusively to the Kindermann Touch displays Kindermann TD-10xx2-S.
- Proof of warranty entitlement is the invoice of the dealer provided with the date of purchase and the serial number.
Warranty periods and validities
- Kindermann offers a 3-year limited warranty within Germany Kindermann TD-10xx2-S series touch displays with on-site replacement service. Optionally, the warranty can be extended to 5 years. The renewal must be completed directly at the time of purchase of the display and must be shown on the invoice.
Warranty exclusion
We make every effort to ensure that your new product works flawlessly. Of course, some aspects are beyond the control of Kindermann and are not covered by this warranty:
- The serial number on the product has been changed, removed or made unreadable.
- Damage as a result of transport, by falling or bumping during transport or by shipping after purchase.
- Defects or damages that occur as a result of incorrect use, misuse or use by unauthorized persons or due to non-compliance with this user manual.
- Damage or defects resulting from an incorrect, not caused by Kindermann for which you are responsible.
- Damage or defects resulting from the fact that electrical connections were not made in accordance with the operating instructions.
- Damage or defects as a result of vandalism, fire, earthquakes, floods, lightning strikes or other natural disasters, surges, wars, armed conflicts or otherwise force majeure.
- Damage or defects resulting from the use of non-original parts or repairs carried out by third parties.
- Errors due to product modifications or subsequent changes by the guarantor, his employees or third parties commissioned by him.
- Wear parts, e.B. batteries etc.
Warranty
- If, despite the fact that you have used it in accordance with the instructions in these instructions, your product does not (or no longer) work properly, you can contact the supplier of the product or directly with the Kindermann GmbH. Within the applicable warranty period, we will replace the product with an equal, equivalent or reasonably similar product, this decision being made at the discretion of the Kindermann GmbH.
- The customer is responsible for:
- Providing complete and accurate information for the support of Kindermann at the diagnostic procedure. If the customer does not follow the instructions and unnecessary effort is caused as a result, the customer reserves the right to Kindermann reserves the right to charge the customer for the associated costs.
- Backing up and deleting personal data from defective products. Kindermann is not responsible for this.
- Installing soft or firmware updates as directed by the support.
- Reset the device after consulting support.
- Telephone assistance with fault diagnosis with support (e.B. connection of different signal sources).
- For the on-site replacement of the display, the Kindermann GmbH at its own expense a service companyof his choice. The following services are included in the dismantling and reconstruction:
- Removing all connected cables including removing an existing OPS PC and safe packaging of the defective device
- Installation of the replacement device and connection of all cables including inserting the existing OPS PC
- Turn on the replacement device to check its function
- The defective device is taken away by the service partner
This service is subject to the following conditions:
– It is a defective Kindermann display and not a problem with the installation or any other product.
– The display is mounted no higher than 1.5 meters above the ground. If the display is installed on a height adjustment, the customer must ensure that the VESA mount is fixed and does not move during or after (dis)assembly, e.g. due to the lack of weight balance in a pylon system with counterweights.
– The display must be freely accessible (e.g. not built into a piece of furniture). Access and space are sufficient to ensure the safe work of two service personnel.
– All possible access restrictions to the installation site have been eliminated in advance.
– There is no need to use a special lifting or climbing device.
- Kindermann reserves the right to request photo proof of the defective product and/or the location where it is located before any services are provided.
- If it is unclear or disputed whether the product was used illegally or whether there is a case of exclusion from the warranty, the burden of presentation and proof lies with the guarantor.
- Costs that go beyond the scope of disassembly and reassembly described above, for example installation or connection work, scaffolding or lifting devices, etc. are excluded from the warranty.
- Kindermann Likewise, assumes no liability for indirect, consequential or other disadvantages suffered by the user or buyer due to possible defects in the product or due to delays in replacing the product.
- Of course, the statutory liability provisions remain in force. Exclusions and limitations of liability in these warranty provisions therefore do not apply to intentional breaches of duty, to a culpable injury to health, limb or life, to a legally mandatory liability under the Product Liability Act or to the violation of essential contractual obligations (so-called cardinal obligations, i.e. those contractual obligations, the fulfillment of which makes the proper execution of the contract possible in the first place, on the compliance with which ng the guarantor may regularly trust and whose violation endangers the achievement of the purpose of the contract).
Kindermann GmbH • Mainparkring 3 • D-97246 Eibelstadt • E-Mail: info@kindermann.de • www.kindermann..com