Instruction manual touch displays
TD-2065-S / TD-2075-S / TD-2086-S
Item No. 3050000022 / 3050000023 / 3050000024
Status: August 2022
Tutorial Video
Table of Contents Tutorial Video:
0:00 Introduction
0:19 Homescreen
3:17 Favorites
5:26 Sidebar
12:56 Annotation App
17:09 Settings
17:36 Settings: Network & Connections
19:52 Settings: Wallpaper
20:30 Settings: Language
8:59 p.m. Settings: Time & Date
21:21 Settings: Security
21:45 Settings: Apps
22:09 Settings: Inputs and Outputs
27:34 Settings: Power Settings
30:41 Settings: About
32:12 Settings: Miscellaneous
36:44 Hotspot
38:12 Screensharing
39:09 EShare: Using the dongle
41:26 EShare: Connecting via app
43:58 EShare: AirPlay Connection
45:16 EShare: Connecting via Chromecast or Miracast
48:02 EShare: Settings
52:36 File Manager
table of contents:
1. Precautions and safety instructions
1.1 Precautions for installation
2. Accessories included
3. Connections
3.5 Functions of the interfaces
4. Device buttons
5. Remote control
5.1 Buttons on the remote control
5.2 Notes on the use of the remote control
6. Turn on/off
7. Operation and configuration

1. Precautions and safety instructions
- Please read this guide carefully before using the product and keep it scrupulous.
- Transport the display with at least two people.
- Place the display only on a stable, flat surface.
- If the device is brought from a cold to a warm environment, condensate can form inside. In such a case, the product should not be moved for a period of at least 24 hours before restarting, so that the condensate can dry in the air.
- No liquids or metallic objects must enter the product. If this is the case, immediately unplug the power plug and contact the service.
- Do not wipe with solvents such as gasoline, acids, alkalis, sharp or abrasive detergents, volatile oils and diluents, as these solvents can damage the product.
- Do not apply force when wipering the display, as this can scratch the display.
- Do not operate the display in direct sunlight.
- The ventilation openings must not be concealed.
- It is enclosed with a 3-pin power cable. Before installing, make sure that the grounding connector of the socket is properly grounded. Do not lay the power cable in passageways so that no people step on it; also keep it away from the areas where it could be squeezed.
- If the display is not in use for an extended period of time, turn it off and unplug the power plug.
- In case of unusual noises or smells, please turn it off immediately and unplug the power plug. Stop using it if necessary and contact the service.
- Do not try to open or disassemble this product, as this will expose you to dangerous tension or other risks.
- Avoid that static content, text or icons remain on the screen for too long, as this will lead to a "ghosting" on the screen.
1.1 Precautions for installation
- For the installation of the wall fastening, at least two qualified fitters are required.
- For wall mounting, use a suitable holder and approved mounting material.
- Convince yourself before mounting that the wall is sufficiently load-bearing.
- Do not install the display obliquely or lying down.
- Mount the display only in horizontal orientation.
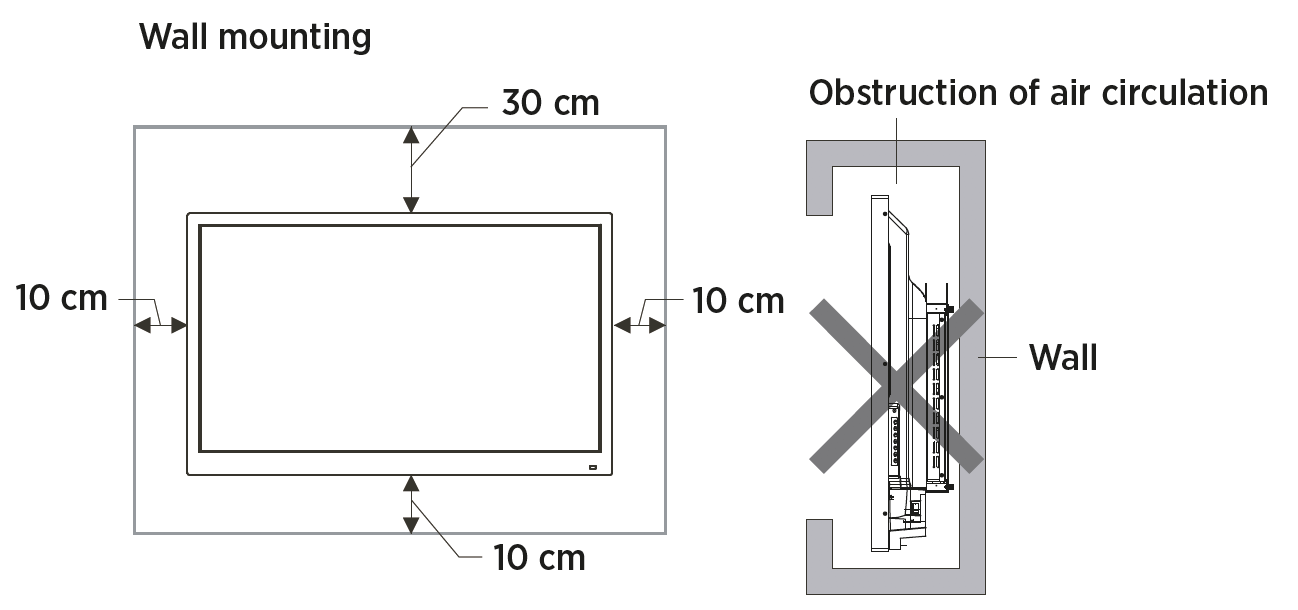
![]() hint: For mounting, please refer to the instructions in the manual of the holder.
hint: For mounting, please refer to the instructions in the manual of the holder.
2. Accessories included

3. Connections
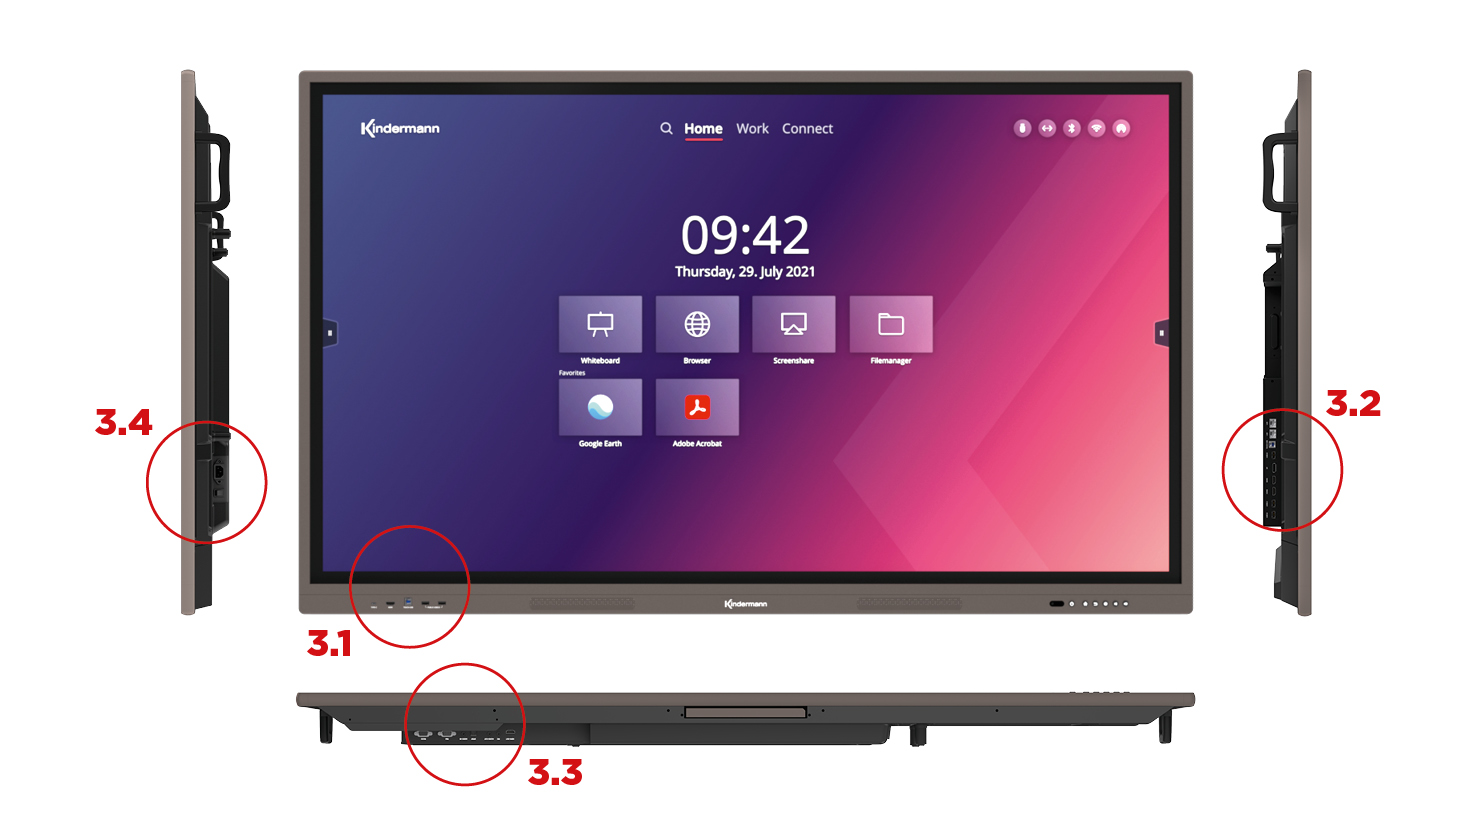
3.1 Connectors at the front
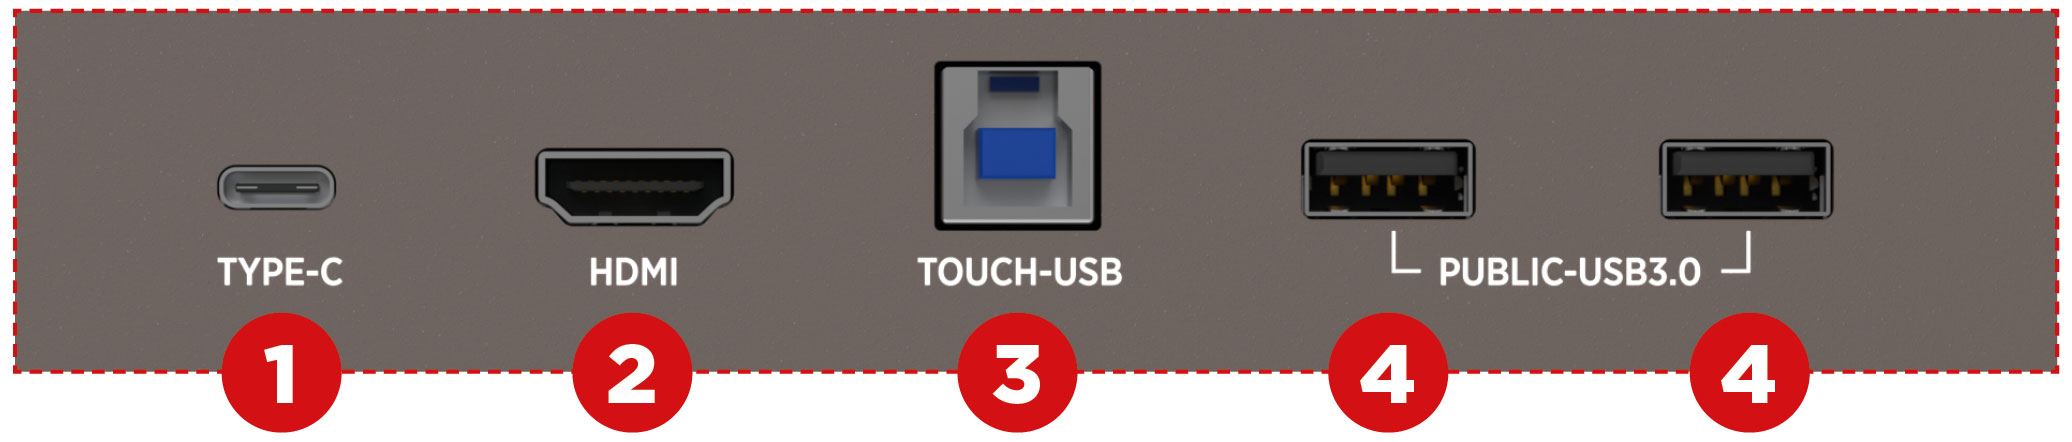
1. 1 x USB-C
For video with up to 3840×2160@60Hz (DP Alt Mode), touch, data transfer (USB 3.2 Gen1), USB PD 3.0 max. 20V / 3.25 A (65 Watt))
2. 1 x HDMI 2.0 input
3. 1 x Touch USB Type B
Assigned to Input No. 2 (HDMI)
4. 2 x USB 3.0 Type A (Public)
The USB ports are switched with the video source. Connected USB devices can then be accessed via the respective assigned USB touch port.
3.2 Connections on the side

5. 2 x USB 3.0 Type A
Only available on Android
6. 2 x HDMI 2.0 inputs
7. DisplayPort 1.2 input
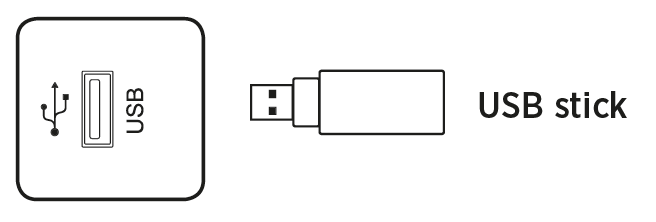
8. 1 x USB 2.0 Type A
For firmware update via USB sticks
9. 1 x Touch USB Type B
Assigned to inputs No. 6, 7 and 16
10. 2 x Network/LAN (RJ45 100/1000 Mbps, works as a switch)
The integrated network switch also supplies the Android SoC and the OPS PC internally.
The second RJ45 socket can be used to connect another external device to the network.
3.3 Connectors at the bottom
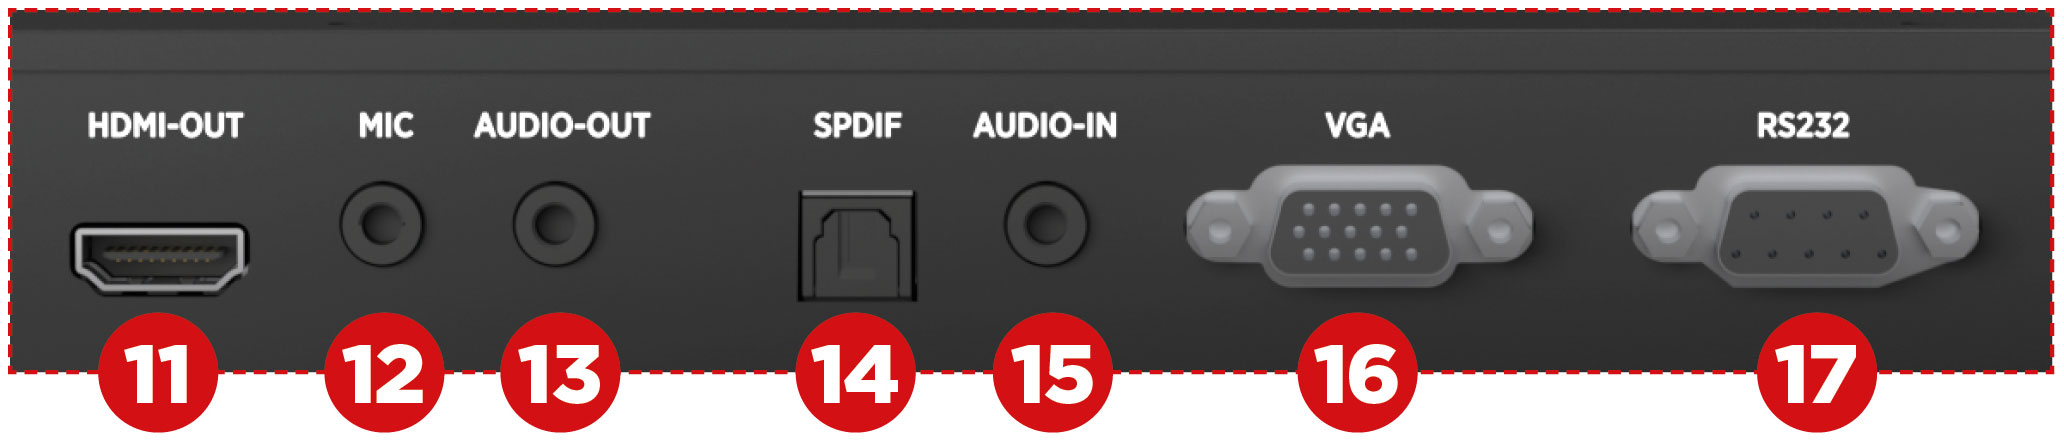
11. 1 x HDMI output
Outputs the same image that is currently displayed on the display.
(Switchable between 4K30 and 4K60, HDCP 2.2)
12. 1 x Audio/Microphone Input (3.5mm Stereo Jack)
13. 1 x Audio output (3.5mm stereo jack)
14. 1 x Audio output (SPDIF, optical)
15. 1 x Audio Input (3.5mm Jack)
Assigned to VGA input (16)
16. 1 x VGA input
17. 1 x RS232
To control the display by means of media control
3.4 Power connection
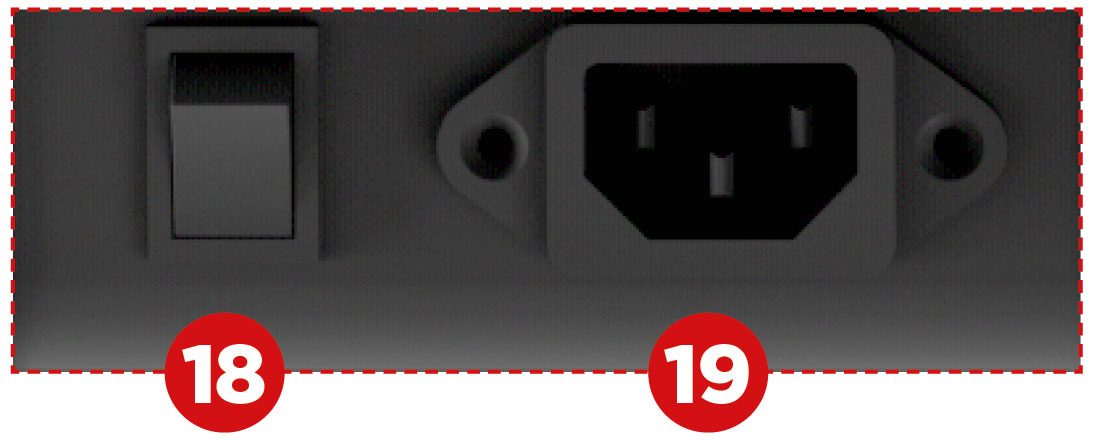
18. 1 x On/Off switch
19. 1 x Power connection
100 V ~ 240 V/AC, 50/60 Hz – COLD socket (IEC 60320 – C13)

3.5 Functions of the interfaces
USB Data Interfaces (4 + 5)
![]() hint:
hint:
1. The side USB ports are used to connect external devices to the Android system. The front USB ports are also available for the active source. The assignment takes place automatically with the source switching.
2. To upgrade the software, please use a USB 2.0 USB stick that has been formatted with FAT32 file system.
HDMI-IN (2 +6)

![]() hint:
hint:
The maximum supported resolution is 4K@60Hz.
Detailed information on the supported signal formats and resolutions can be found in Section 9.3 "Specifications".
The maximum transfer rate depends, among other things, on the quality and length of the HDMI cable.
We recommend the use of high-quality cables.
TOUCH USB (3+9)

![]() hint:
hint:
The maximum cable length supported by USB is 5 m. If you want to bridge a longer distance, you need to use high-quality, active cables with integrated signal regatators.
VGA & analog audio (15 + 16)
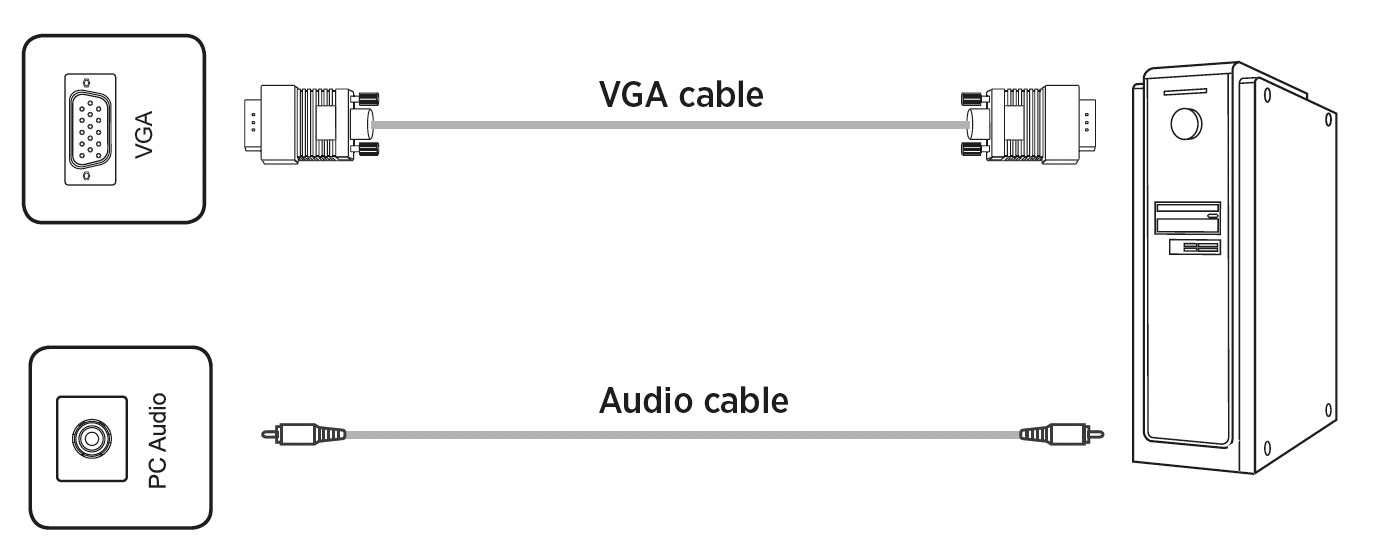
![]() hint:
hint:
VGA and audio input work synchronously. Detailed information on the supported signal formats and resolutions can be found in Section 9.2 "Technical data".
DisplayPort (7)

![]() hint:
hint:
The maximum supported resolution is 4K@60Hz. The maximum transmission rate depends, among other things, on the quality and length of the cable. We recommend the use of high-quality cables.
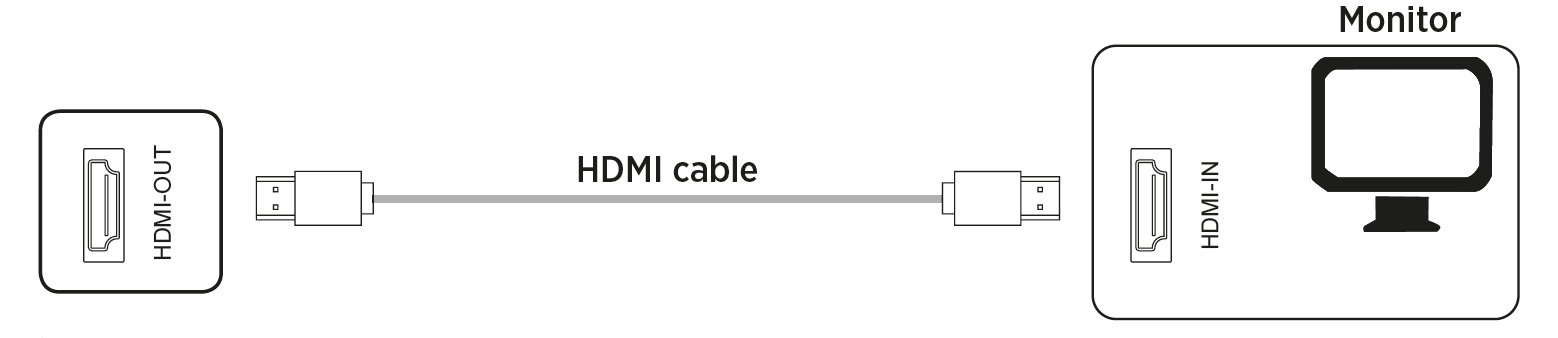
HDMI-OUT (11)
![]() hint:
hint:
On the HDMI Out, image and audio signals are available parallel to the currently reproduced screen content, for example, to display it on a large screen via a projector.
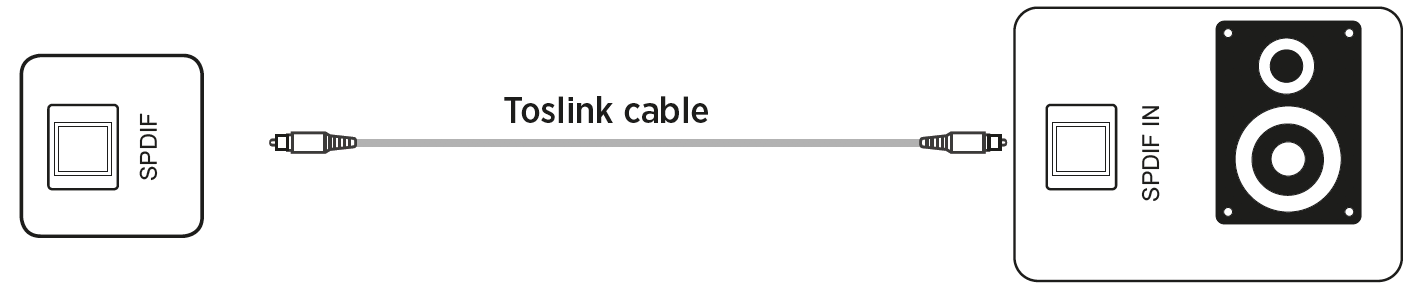
SPDIF – Digital Audio (14)
Analog Audio (13)
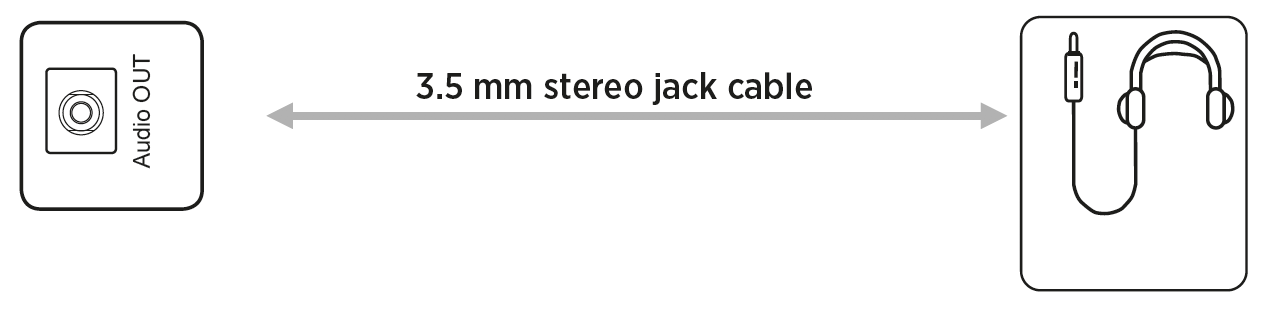
![]() hint: At the audio outputs, the sound signal is synchronous to the currently displayed video image.
hint: At the audio outputs, the sound signal is synchronous to the currently displayed video image.
RS232 port (17)
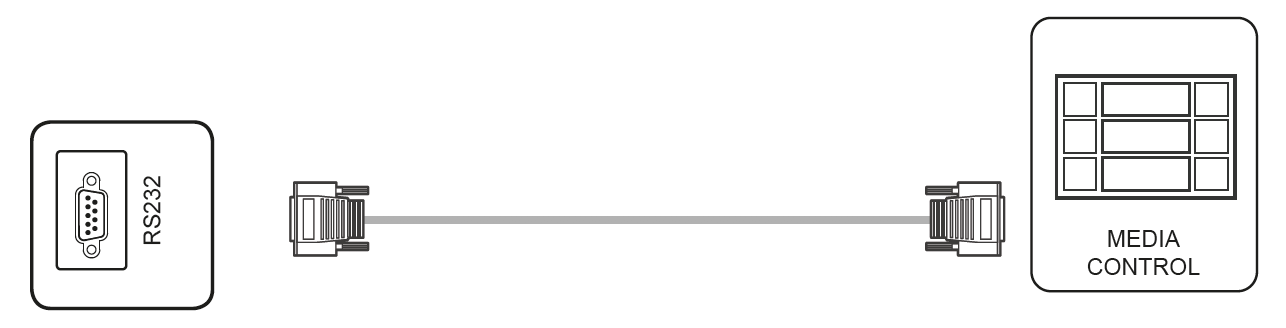
![]() hint: The RS232 commands can be found in section 10 of this user manual.
hint: The RS232 commands can be found in section 10 of this user manual.
4. Device buttons
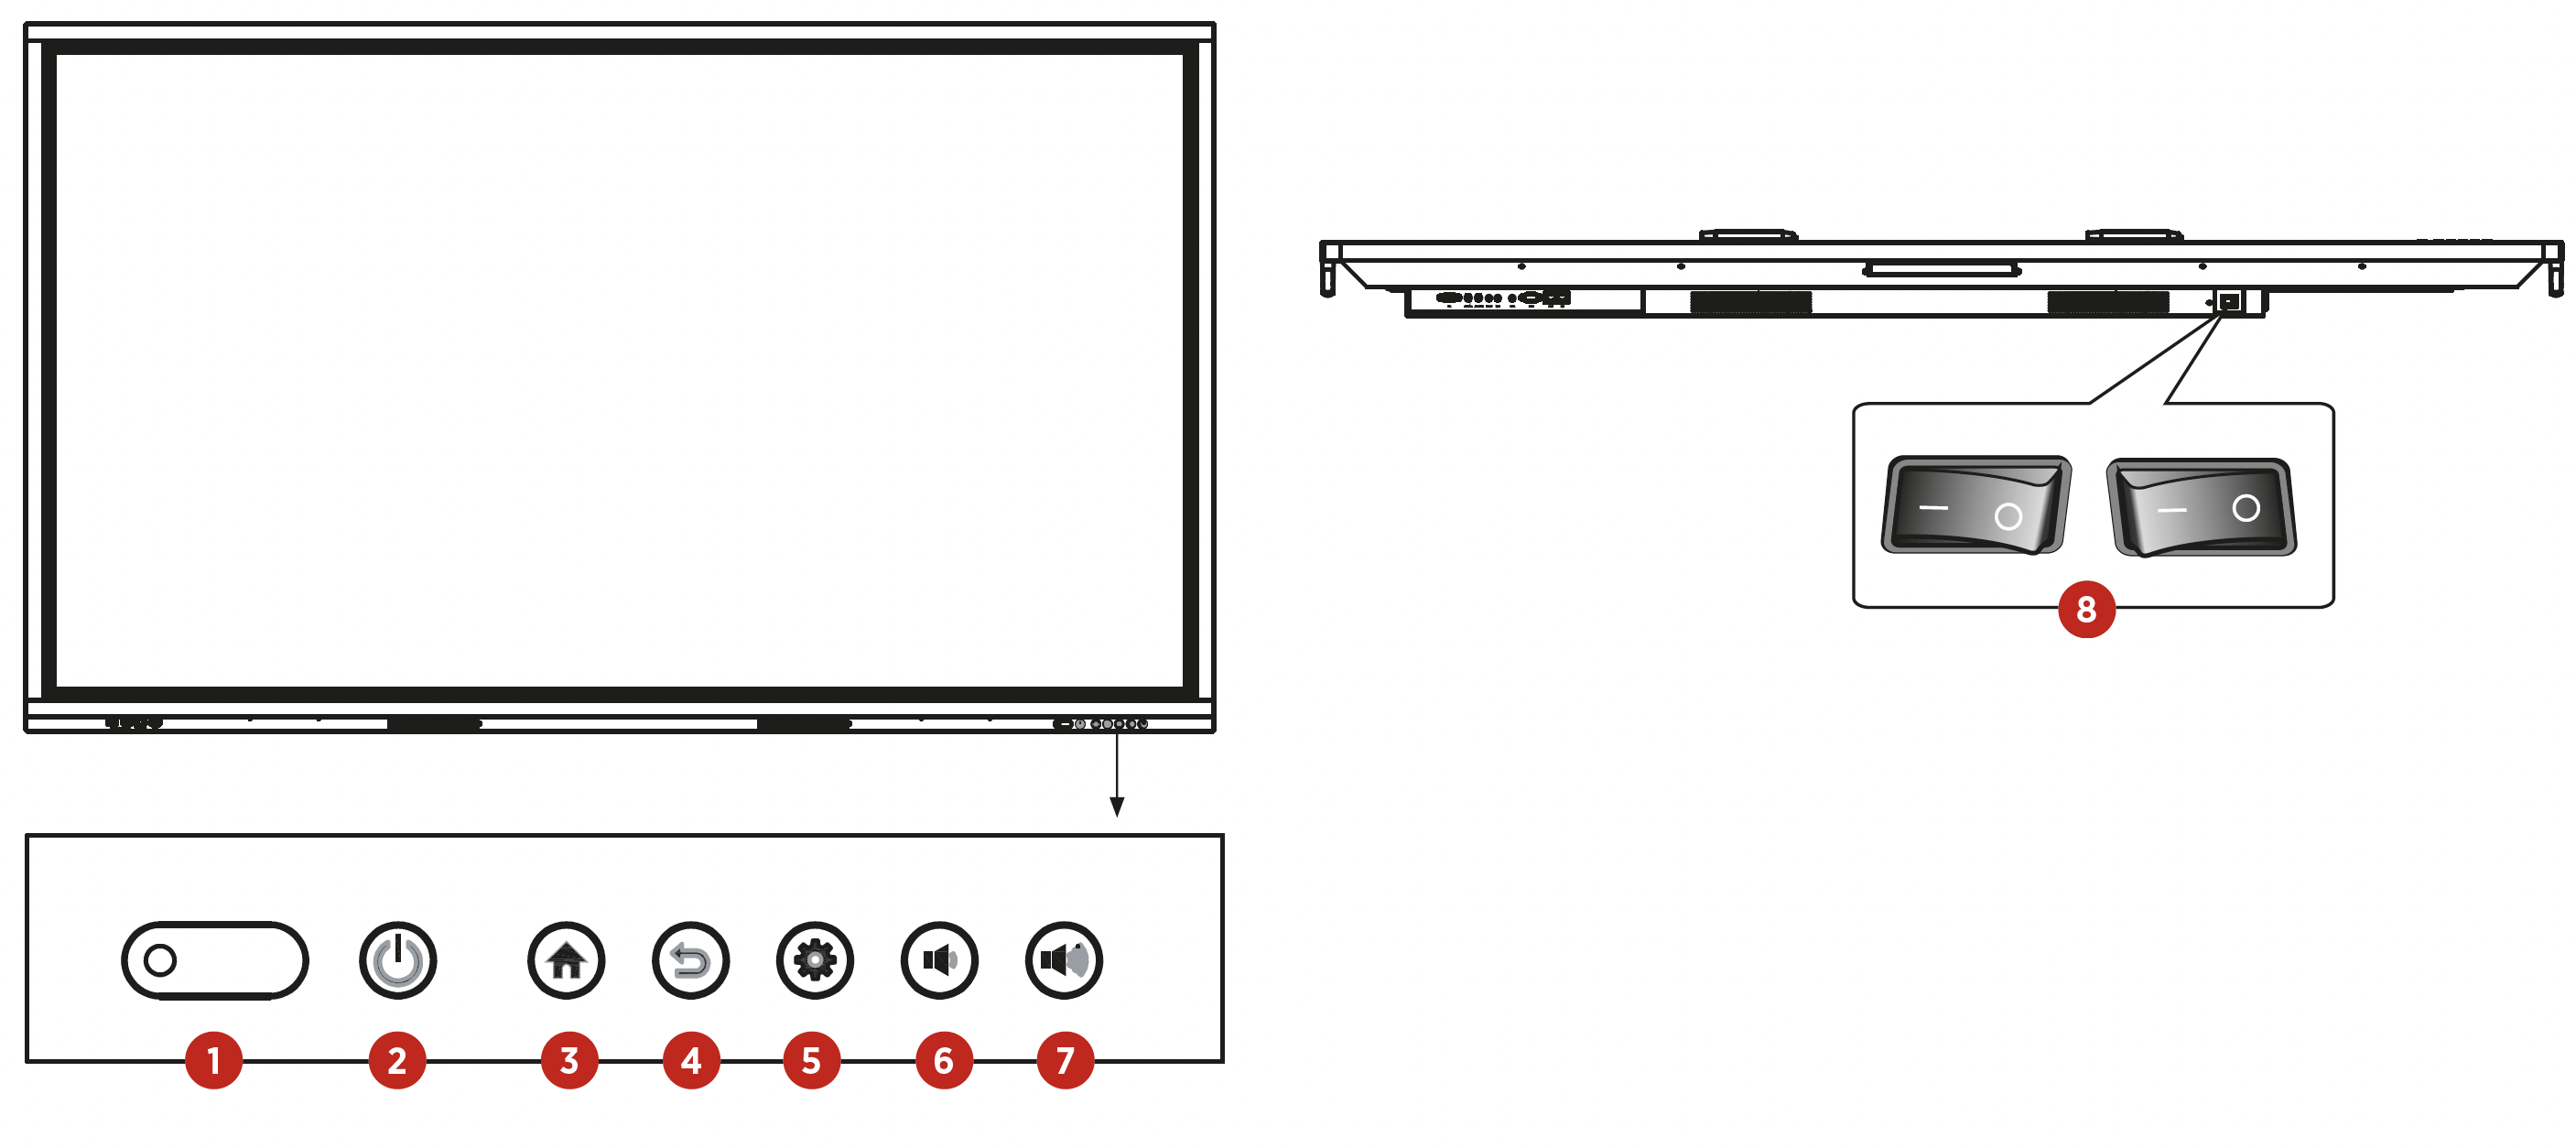
| 1. Status LED, receiver for IR remote control and light sensor | 5. |
| 2. | 6. |
| 3. | 7. |
| 4. | 8. Power switch |
5. Remote control
5.1 Buttons on the remote control
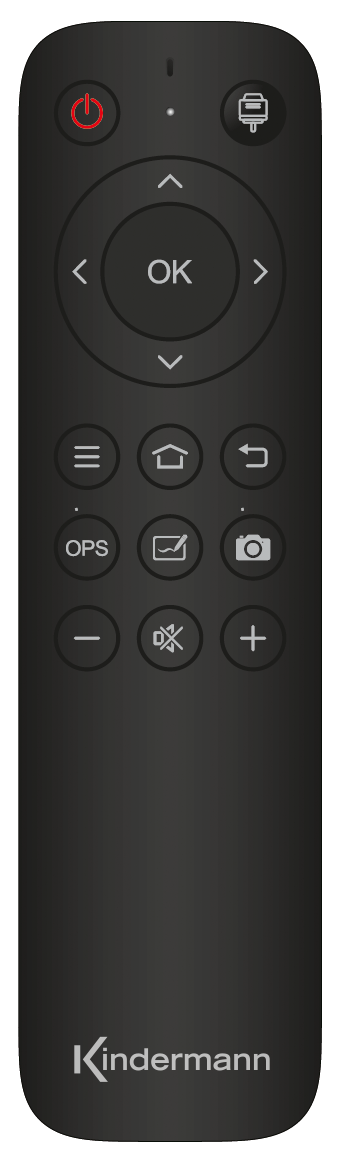
| KEY | FUNCTION |
|---|---|
POWER  | ON / Standby |
SOURCE  | Open source selection and settings |
NAVIGATION KEYS  | Select or customize menu options |
| OK | Confirm operation |
MENU  | Open settings |
HOME  | Go to Homescreen |
BACK  | Android – Back to the previous step |
| OPS | Select OPS PC as source |
WHITEBOARD  | Launches the whiteboard app |
SNAPSHOT  | Takes a screenshot |
VOL-  | Reduce volume |
MUTE  | Enable/disable sound |
VOL+  | Increase volume |
5.2 Notes on the use of the remote control
- Point the remote control at the receiver. Objects located between the remote control and the radio receiver can interfere with the function.
- If the radio receiver is exposed to direct sunlight or strong light, this can lead to a malfunction of the remote control. In such a case, change the angle of the lighting or product or use the remote control closer to the radio receiver.
- Replace the batteries if they are weak, otherwise it will reduce the range of the remote control. If the remote control is not used for a long period of time or the batteries are empty, please remove the batteries, as a liquid leakage from the batteries can cause damage to the remote control.
- Do not use different battery types and do not use new batteries with already used ones. Always replace batteries in pairs.
- Do not throw batteries into the fire, charge them or disassemble them. Used batteries must not be charged, short-circuited, disassembled/assembled, heated or burned.
- Please dispose of empty batteries in accordance with the respective environmental regulations.
6. Turn on/off
  | Power the display. The power button is located on the bottom of the display. |
  | Via the power button on the remote control and at the front, the display can be switched on or into standby. |
![]() hint:
hint:
A short actuation of the front button turns the display dark. To put it into standby mode, you need to hold down the button for at least 2 seconds.
- Save before turning off
Before switching off, the display saves the image and sound settings.
When restarting, these settings are used.
- OPS PC ON/OFF
If the display is equipped with an OPS PC and this is selected as the signal source, the OPS module starts automatically.
To turn off the product, the standby button on the panel or remote control can be used, the OPS module is automatically shut down before turning off the display.
![]() hint: The OPS PC can be purchased optionally.
hint: The OPS PC can be purchased optionally.
7. Operation and configuration
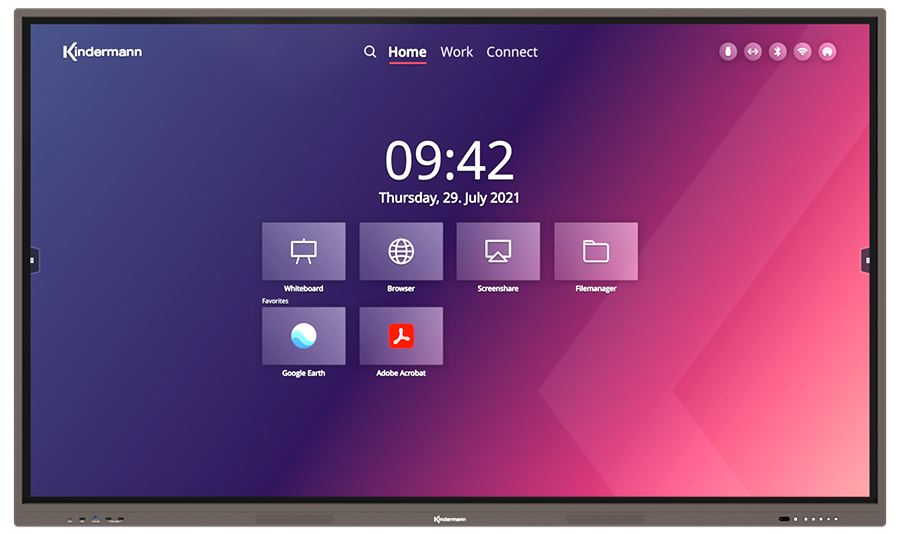
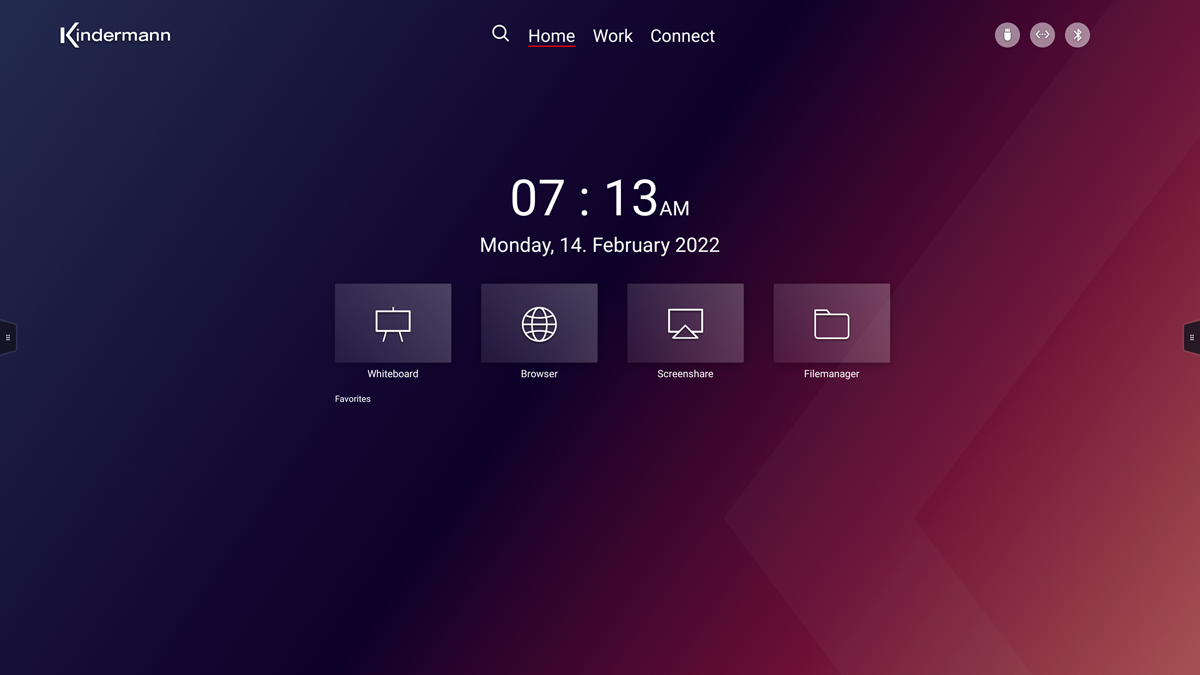
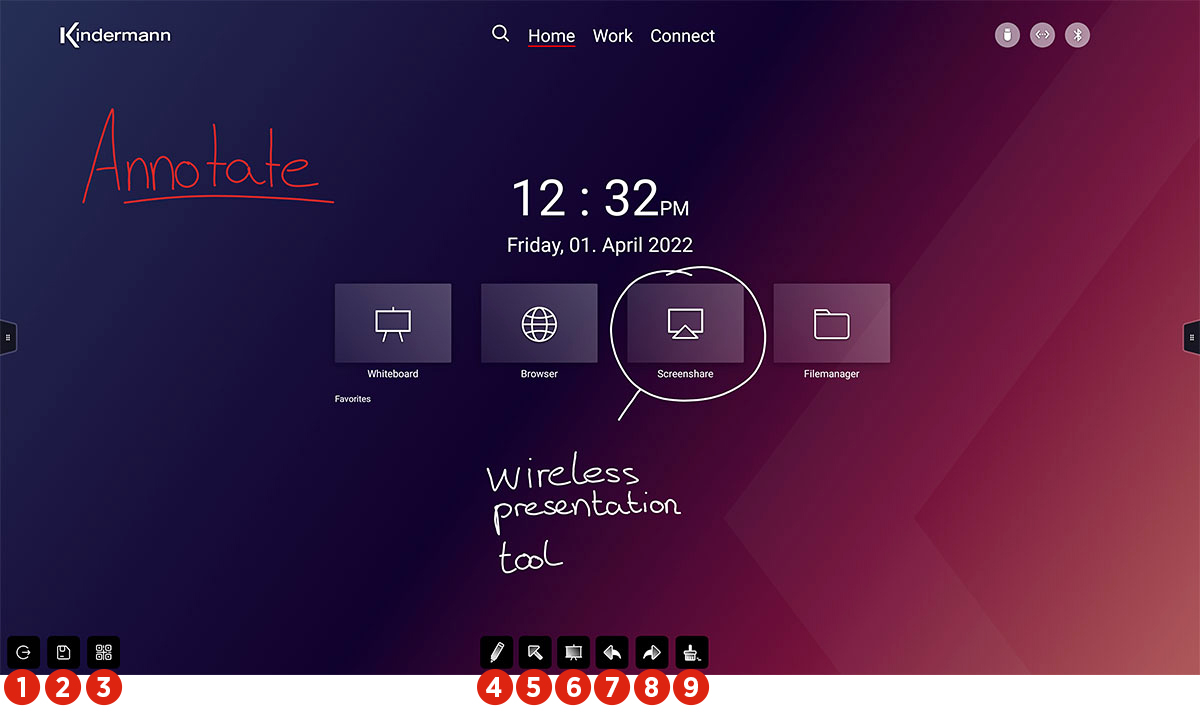
7.1 Android Homescreen
In the default configuration, the home screen of the integrated Android system is automatically displayed after switching on the display. The home section consists of four pages with the categories Search, Home, Work and Connect. To switch areas, either click directly on the corresponding point at the top center of the screen, or alternatively swipe the screen to the left or right to go to the next area.

Homescreen
"Home" displays the time and date. Among them are four fixed applications: whiteboard, browser, screen sharing and the file manager. Among them, four other apps can be freely set as favorites, details can be found in the following sections.
Work
The Work pane displays all the apps installed on the display. The applications can also be started from here.

By long pressing on an application you get the option to select or deselect an app as a favorite by activating the star icon. (This app will then also appear under Favorites on the home screen or in the sidebar). The app can be uninstalled via the Recycle Bin icon.
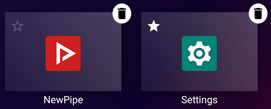
![]() Hint: System apps cannot be uninstalled.
Hint: System apps cannot be uninstalled.
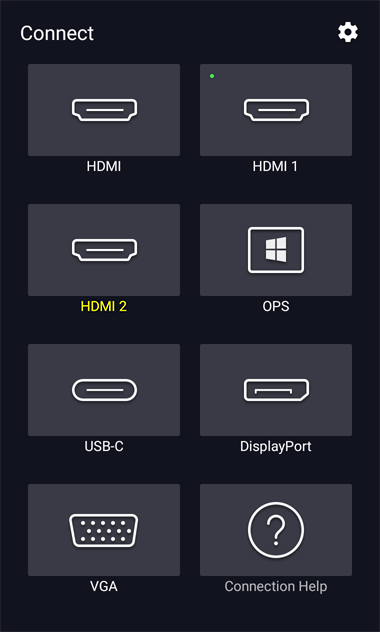
Connect (input selection)
Under "Connect" you can switch between the individual video inputs.
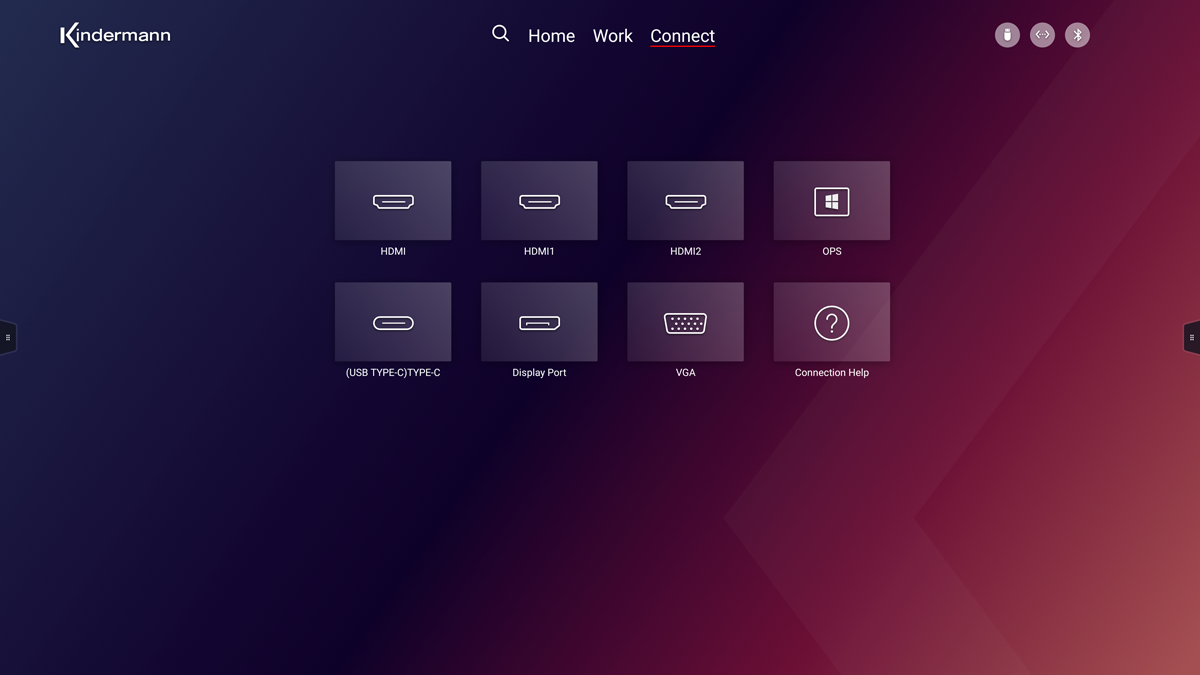
If there is a signal at an input, a live preview image is shown, in addition, the tile is marked with a green dot.
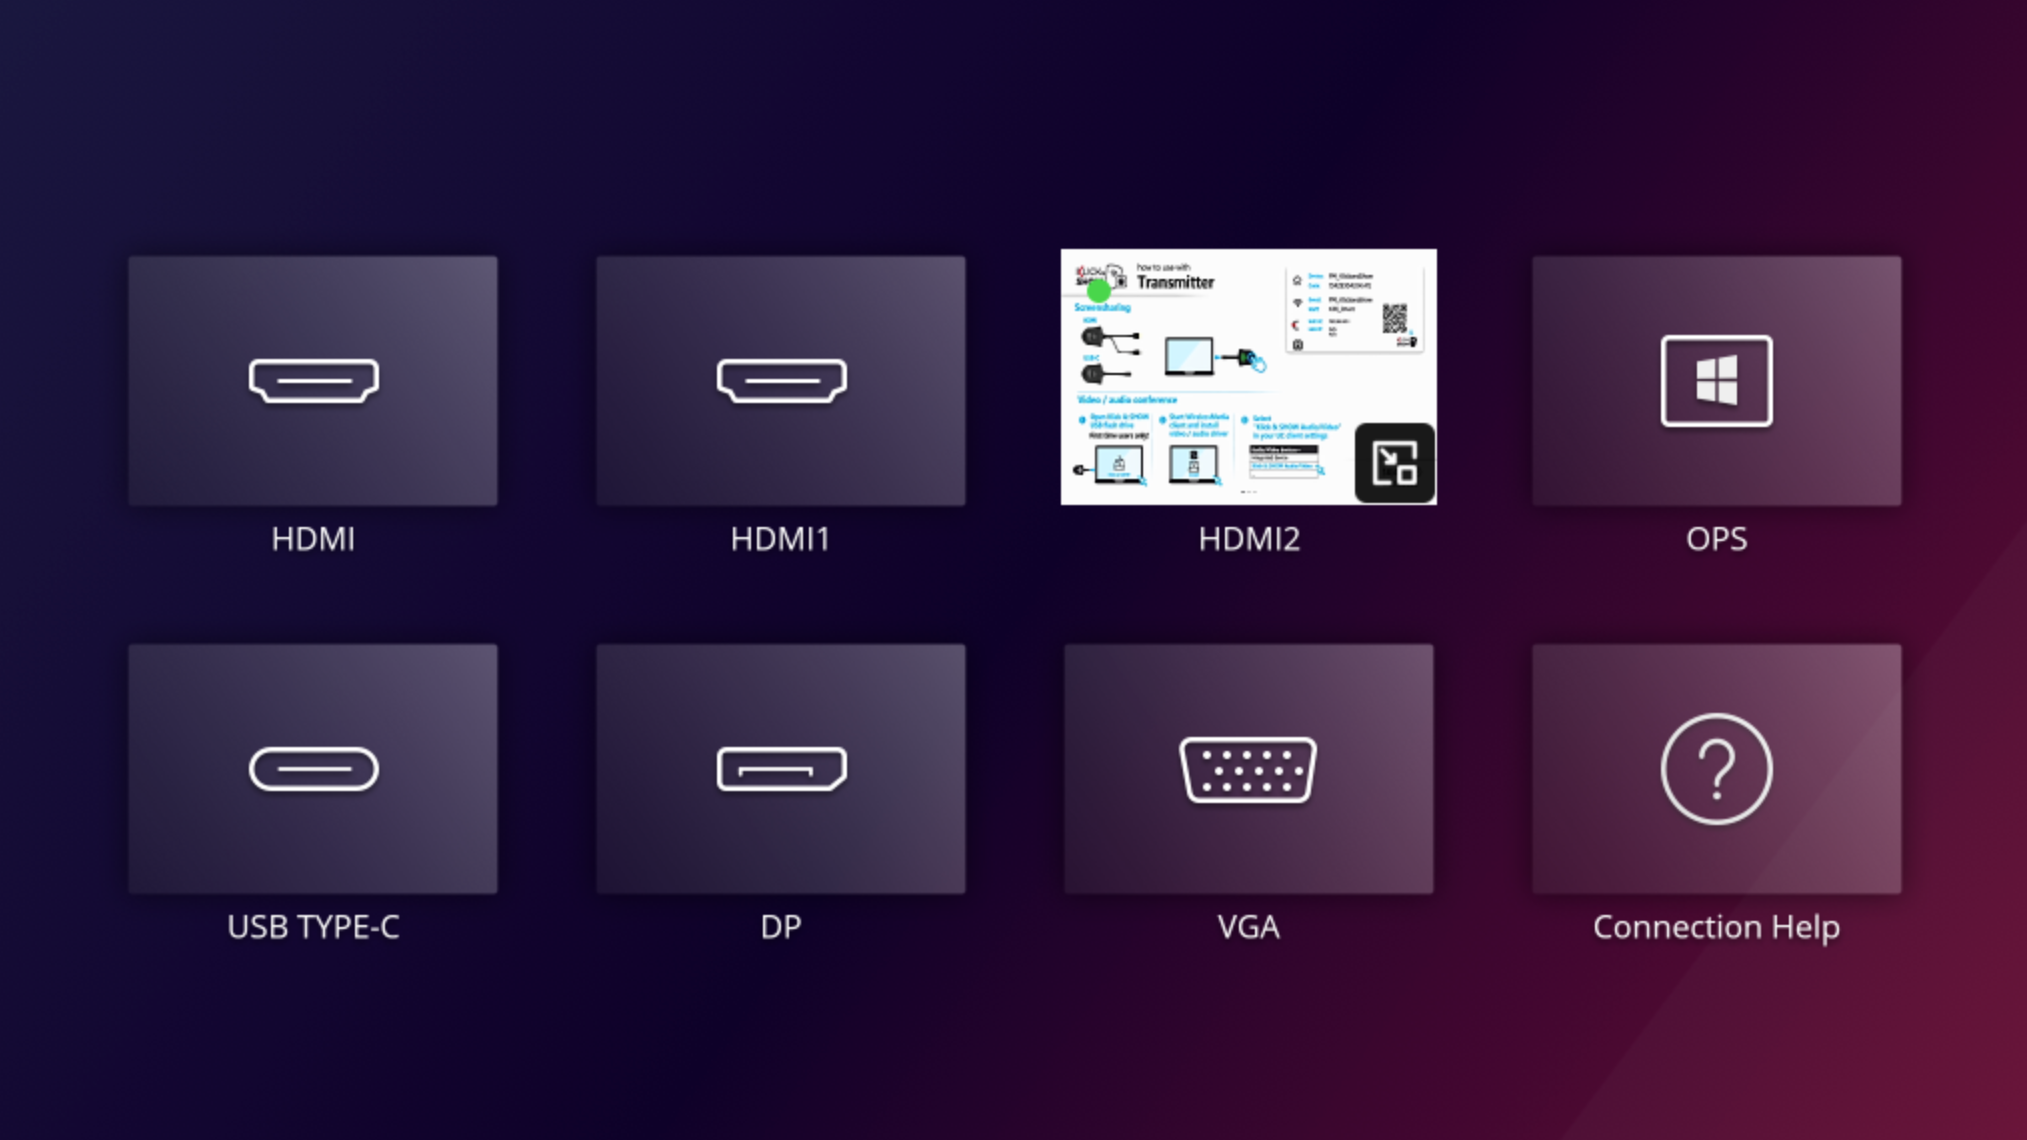
![]() hint:
hint:
Only one live image can be displayed at a time. If there is a signal at several sources at the same time, the live display switches to the next source every three seconds. The other sources then remain visible as a still image.
The icon ![]() in the lower-right corner of the source activates the PiP function (Picture in Picture). This displays the image in a separate overlay window at the bottom right. This window can be moved and also enlarged and reduced with the 2-finger gesture. If PiP is active and you choose via the Symbol another input, the contents of the preview window are replaced.
in the lower-right corner of the source activates the PiP function (Picture in Picture). This displays the image in a separate overlay window at the bottom right. This window can be moved and also enlarged and reduced with the 2-finger gesture. If PiP is active and you choose via the Symbol another input, the contents of the preview window are replaced.
Only one PiP window can be shown at a time.
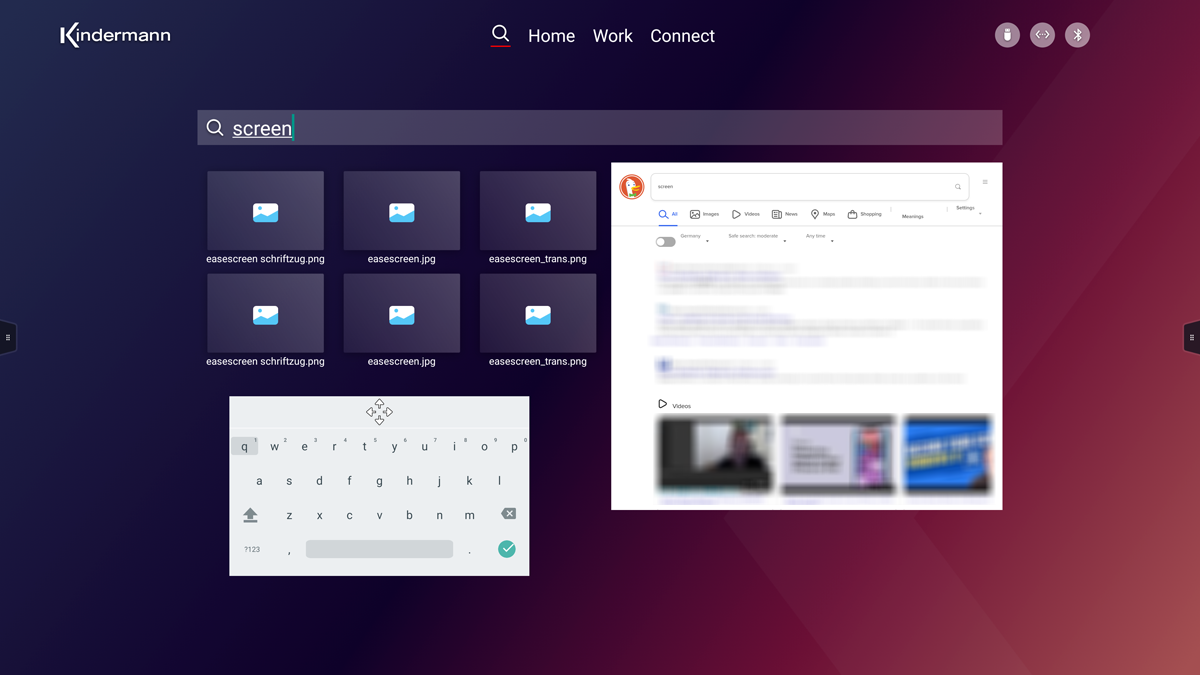
search
The search works both locally and online. In the left half, all local results (files, apps, etc.) are displayed. In the right area, the search engine (Duckduckgo.com) searches the web. The search results are opened in the system browser (Firefox).
Status Icons
The status icons are displayed on all home screen pages in the upper right corner. The respective icon is only displayed if the function is available or activated.
| An external storage medium, e.B. USB stick is connected | |
| The display is wired to a network | |
| The display is connected to a Wi-Fi network | |
| The Wi-Fi hotspot is activated | |
| Bluetooth is enabled |
The icons are active, i.e. with one click you can go directly to the respective settings menu, or to the file manager, for storage media.
7.2 Sidebar
Tap on one of the two icons ![]() at the edge of the screen or swipe in from the edge of the screen to enter the sidebar. This gives you quick access to the most important functions.
at the edge of the screen or swipe in from the edge of the screen to enter the sidebar. This gives you quick access to the most important functions.
Home
Back to android home screen.
Back
One operating level back (Android only)
Connect
Connect opens a menu to toggle video inputs. Here, too, an attached signal is marked with a green dot. The currently displayed source is displayed in yellow. A preview image is only displayed on the home screen.
Annotate
The button starts the annotation application.
A functional description can be found here.
Apps
Apps opens a submenu that is divided into three sections: active apps, favorites, and tools.
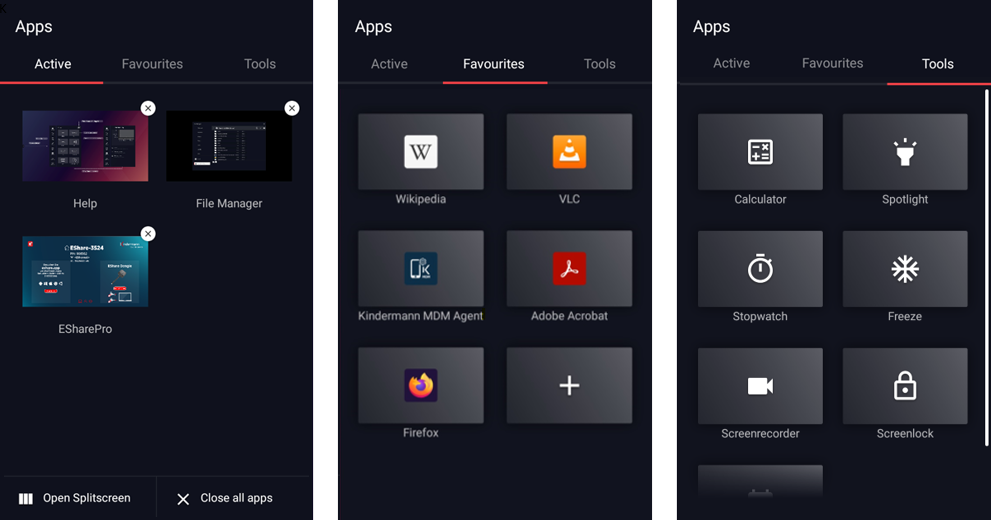
- Active Apps
All apps that run in the background are displayed here. By clicking on the respective app, it is opened, via the X it is terminated.
With "Close all apps" at the bottom of the window, you can close all apps at once.
In addition, the "Open split screen" option can be found here, with which two apps can be displayed side by side.
![]() hint:
hint:
The Splitscreen option is not available on the home screen and in the Whiteboard app.
Instead of an app, an input signal can also be displayed in split screen.
- Favorites
Here you can define regularly used apps as favorites and start them. The first four apps also appear on the home screen. In the sidebar menu, however, other apps can be defined as favorites.
Tap and hold the app icon for a few seconds to remove the app or several apps from the favorites.
- tools
 | Calculator Hint: To move, please touch in the lower area. |
 | Spotlight Part of the image is placed in focus, the rest is darkened. |
 | Stopwatch Stop time and timer. |
 | Countdown to a specific day or event The window appears in the upper left corner, but can be moved. The window is only visible on the home screen, pinned it always remains in the foreground. |
 | Screen Recorder With this tool you can record your activities on the display (screen recording). If you have a microphone connected to the display, the sound is also recorded. The file is stored locally in the "Video" folder as an mp4 file. |
 | Enable screen lock Lock the device with a code. A numerical code or pattern can be chosen. |
 | Freeze image Creates a still image Attention: Only available for the video inputs, not on Android. |
Screenshot
Create a screen capture. You can select a specific area or the entire screen.
The corresponding button on the remote control always generates a complete screenshot.
The image file is stored as a PNG file locally in the "Screenshots" directory.
Control Center
Control Center allows quick access to regularly used settings.
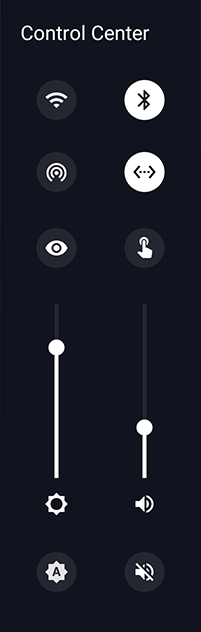
The icons activate or deactivate the functions:
![]() WIRELESS
WIRELESS
![]() Bluetooth
Bluetooth
![]() Hot spot
Hot spot
![]() Ethernet
Ethernet
If you tap on one of the icons for a longer period of time, the corresponding setting opens directly.
![]() Eye-Care: Reduces the proportion of blue light in two stages. The color temperature becomes warmer.
Eye-Care: Reduces the proportion of blue light in two stages. The color temperature becomes warmer.
![]() Enables/disables touch sound.
Enables/disables touch sound.
The left slider controls the image brightness.
The right slider controls the volume of the internal and all connected external speakers.
![]() Enable/Disable Auto Mode for Brightness Control.
Enable/Disable Auto Mode for Brightness Control.
![]() Enables/Disables muting.
Enables/Disables muting.
Power off
In the submenu you can either shut down only the OPS PC, or switch the entire display to standby (incl. OPS).
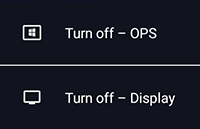
![]() hint:
hint:
If the display is switched off when the OPS is switched on, the OPS PC is shut down properly and only then the display.
7.3 Android System Settings
Open the settings menu from the Settings app ![]() .
.
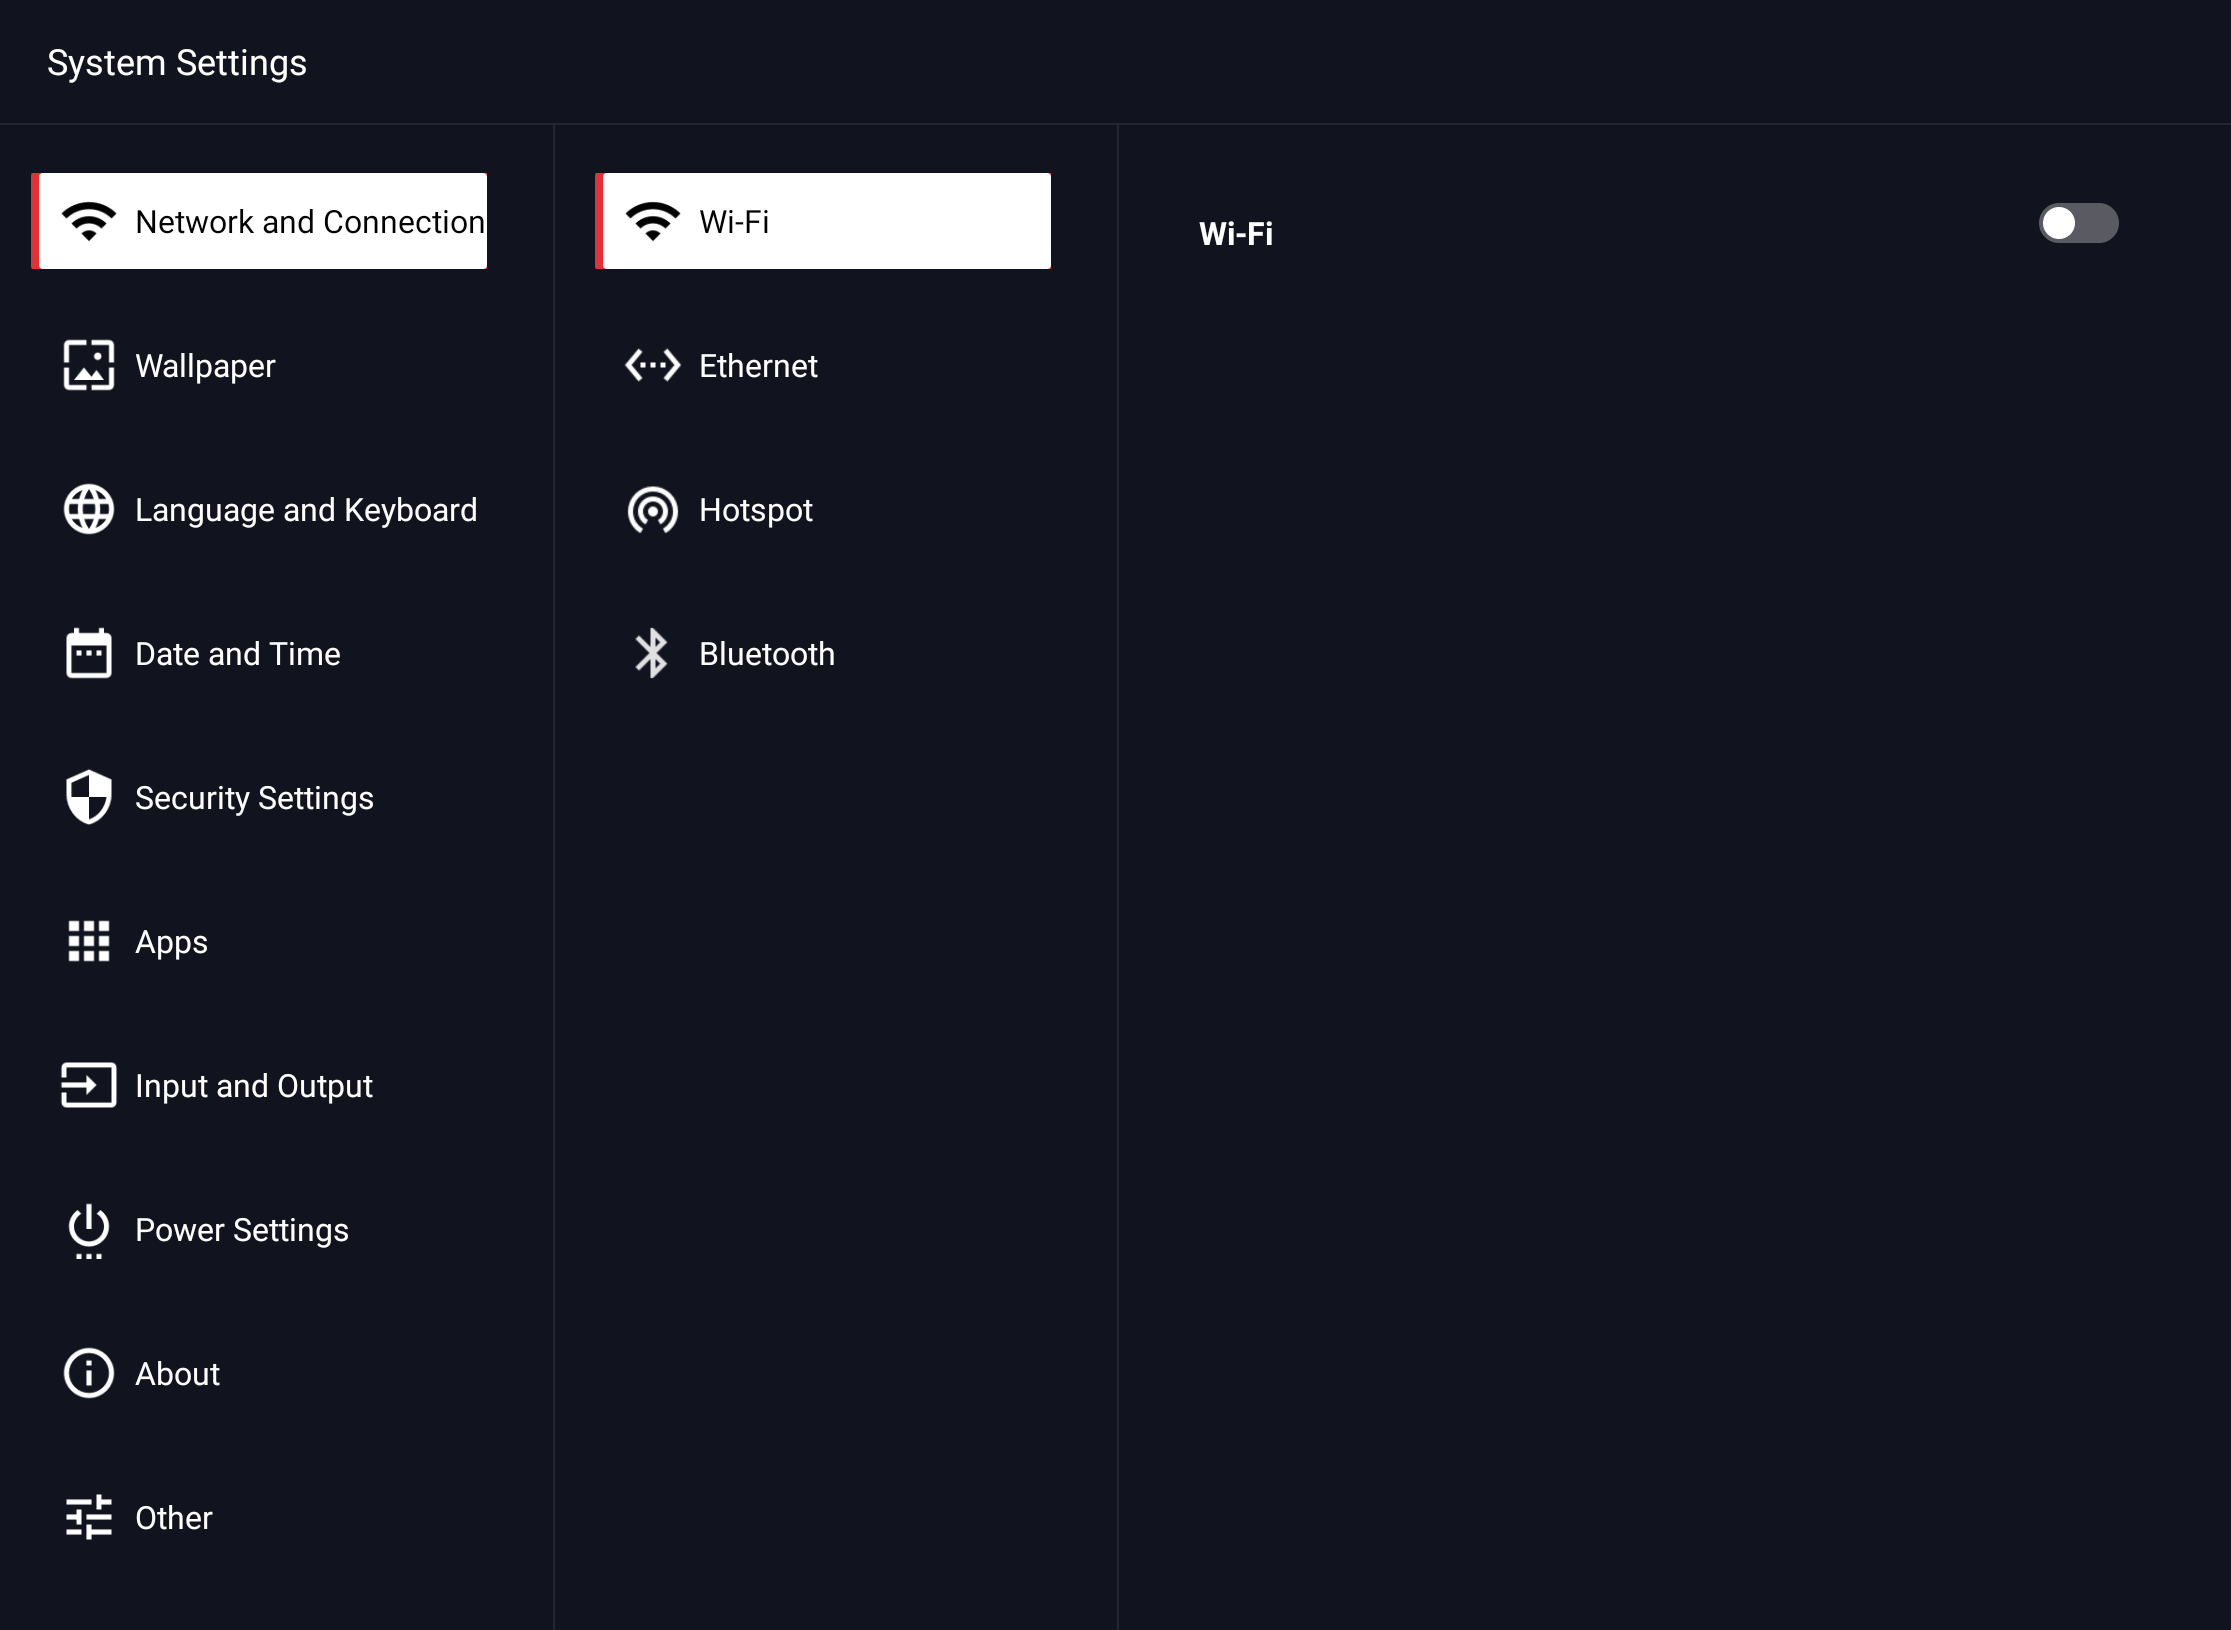
7.3.1 Network and Connections
7.3.1.1 Settings – Network and Ports – Wi-Fi
- Select the menu item > Network and connections > Wi-Fi
- Activate the WLAN function.
Select the network to which you want to connect from the network list. Enter the appropriate password and click connect.
7.3.1.2 Settings – Network and Ports – Ethernet
- Plug the network cable into the connector on the display.
- Select the menu item > Network and Ports > Ethernet
- Enable the network connection.
- By default, "DHCP" is selected, the display then automatically receives an IP address and establishes the connection to the network. If you select Static, you can manually enter the IP address, gateway, network prefix, DNS server, and proxy.
![]() hint:
hint:
The display has a built-in network switch. As soon as the display has been connected to a network via one of the two interfaces, the network connection is shared internally with both the Android system, the OPS slot and the WLAN hotspot. The second RJ45 socket can be used to connect another external device to the network.
7.3.1.3 Settings – Network and Ports – Hotspot
- Select the menu item > Network and Connections > Hotspot
- Turn on the hotspot.
- The default name of the WLAN network (SSID) is "KindermannTD_XXXX". This can be changed at any time. To do this, overwrite the existing name.
- If you enable encryption (recommended), a password is required to connect to this hotspot. The type of encryption used is WPA2 PSK. If this option is deactivated, the network is open and accessible to everyone.
![]() hint:
hint:
One click on the QR code icon  enlarges this. The QR code contains the network name (SSID) and the WLAN password. Scan the code with the camera app of your smartphone or tablet. The network connection to the hotspot is then established automatically. (Function depends on app and operating system.)
7.3.1.4 Settings – Network and Ports – Bluetooth
- Select the menu item > Network and Connections > Bluetooth
- Turn on the Bluetooth.
- The default designation of the display is "Kindermann IFP". This can be changed at any time. To do this, overwrite the existing name.
- In the lower area, the display lists all Bluetooth connections that are currently accessible. Click on an entry to connect to the device. The connection request must be accepted on the target device.
7.3.2 Settings – Background Image
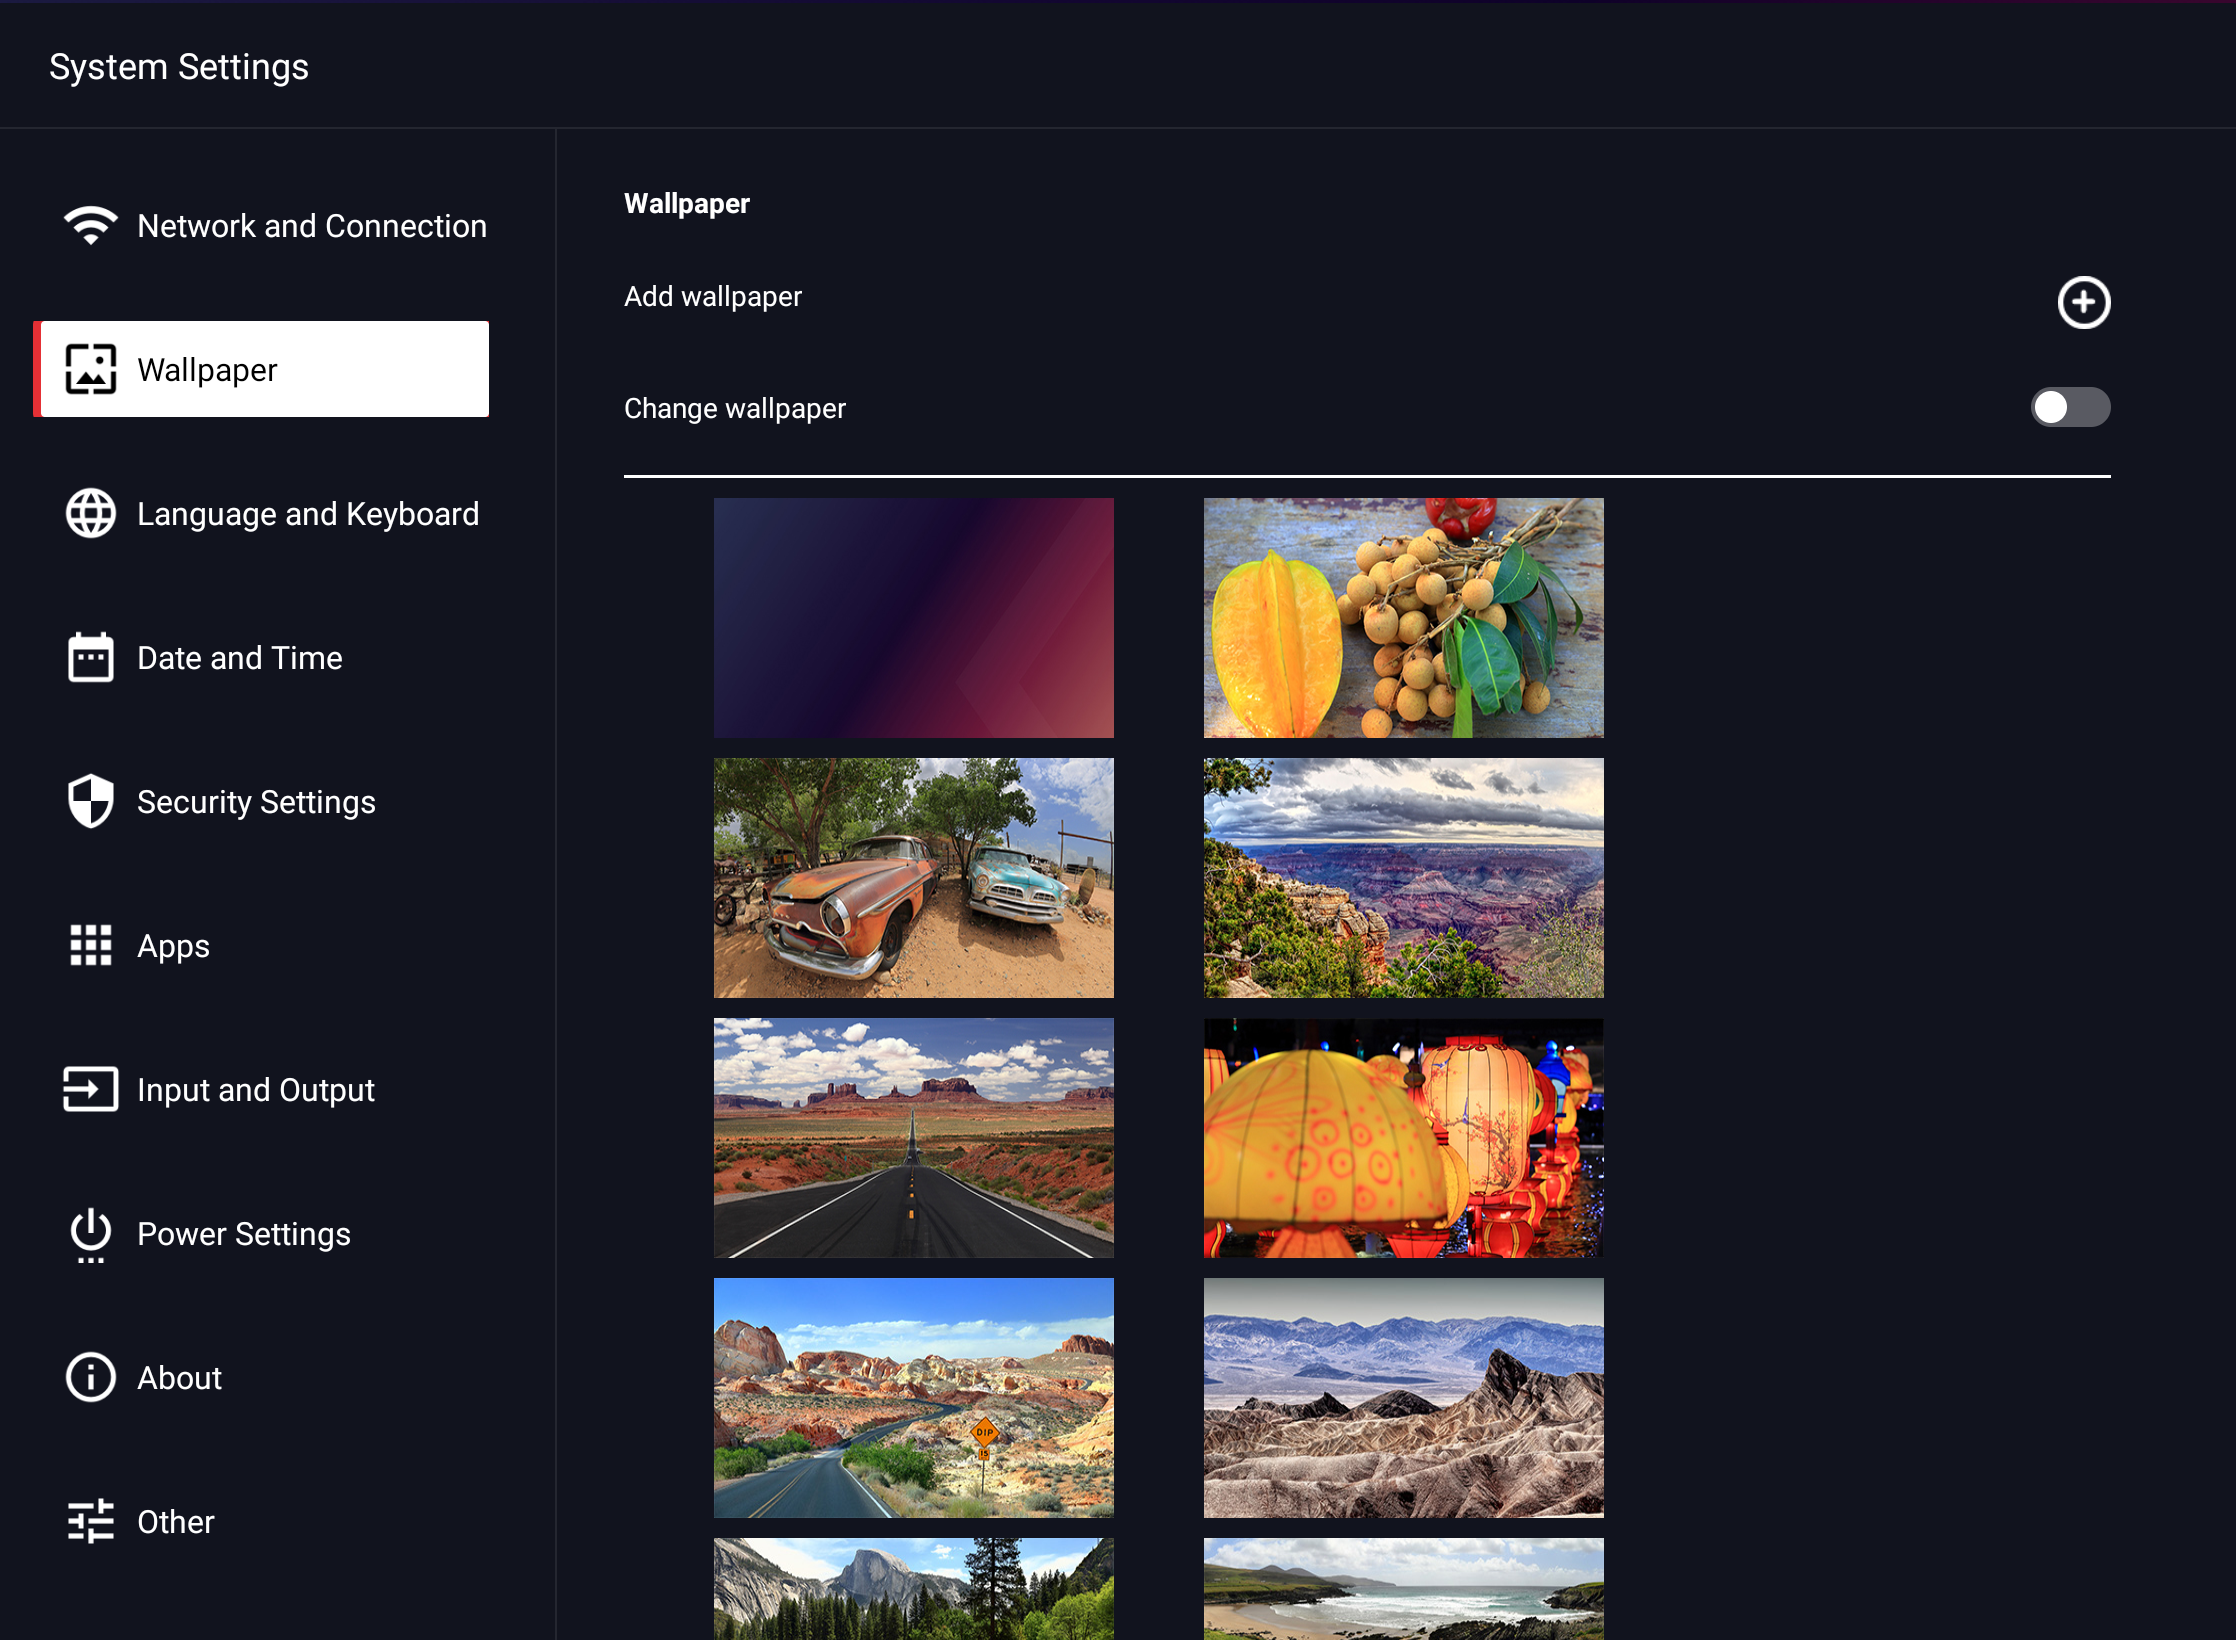
Here you can load one or more individual background images. Own images can be deleted again, those contained ex works are read-only.
Select Change Background Image to let the background images switch dynamically. You can set the change interval to 1 minute, 10 minutes, 30 minutes, 1 hour, and 6 hours.
7.3.3 Settings – Language and Keyboards
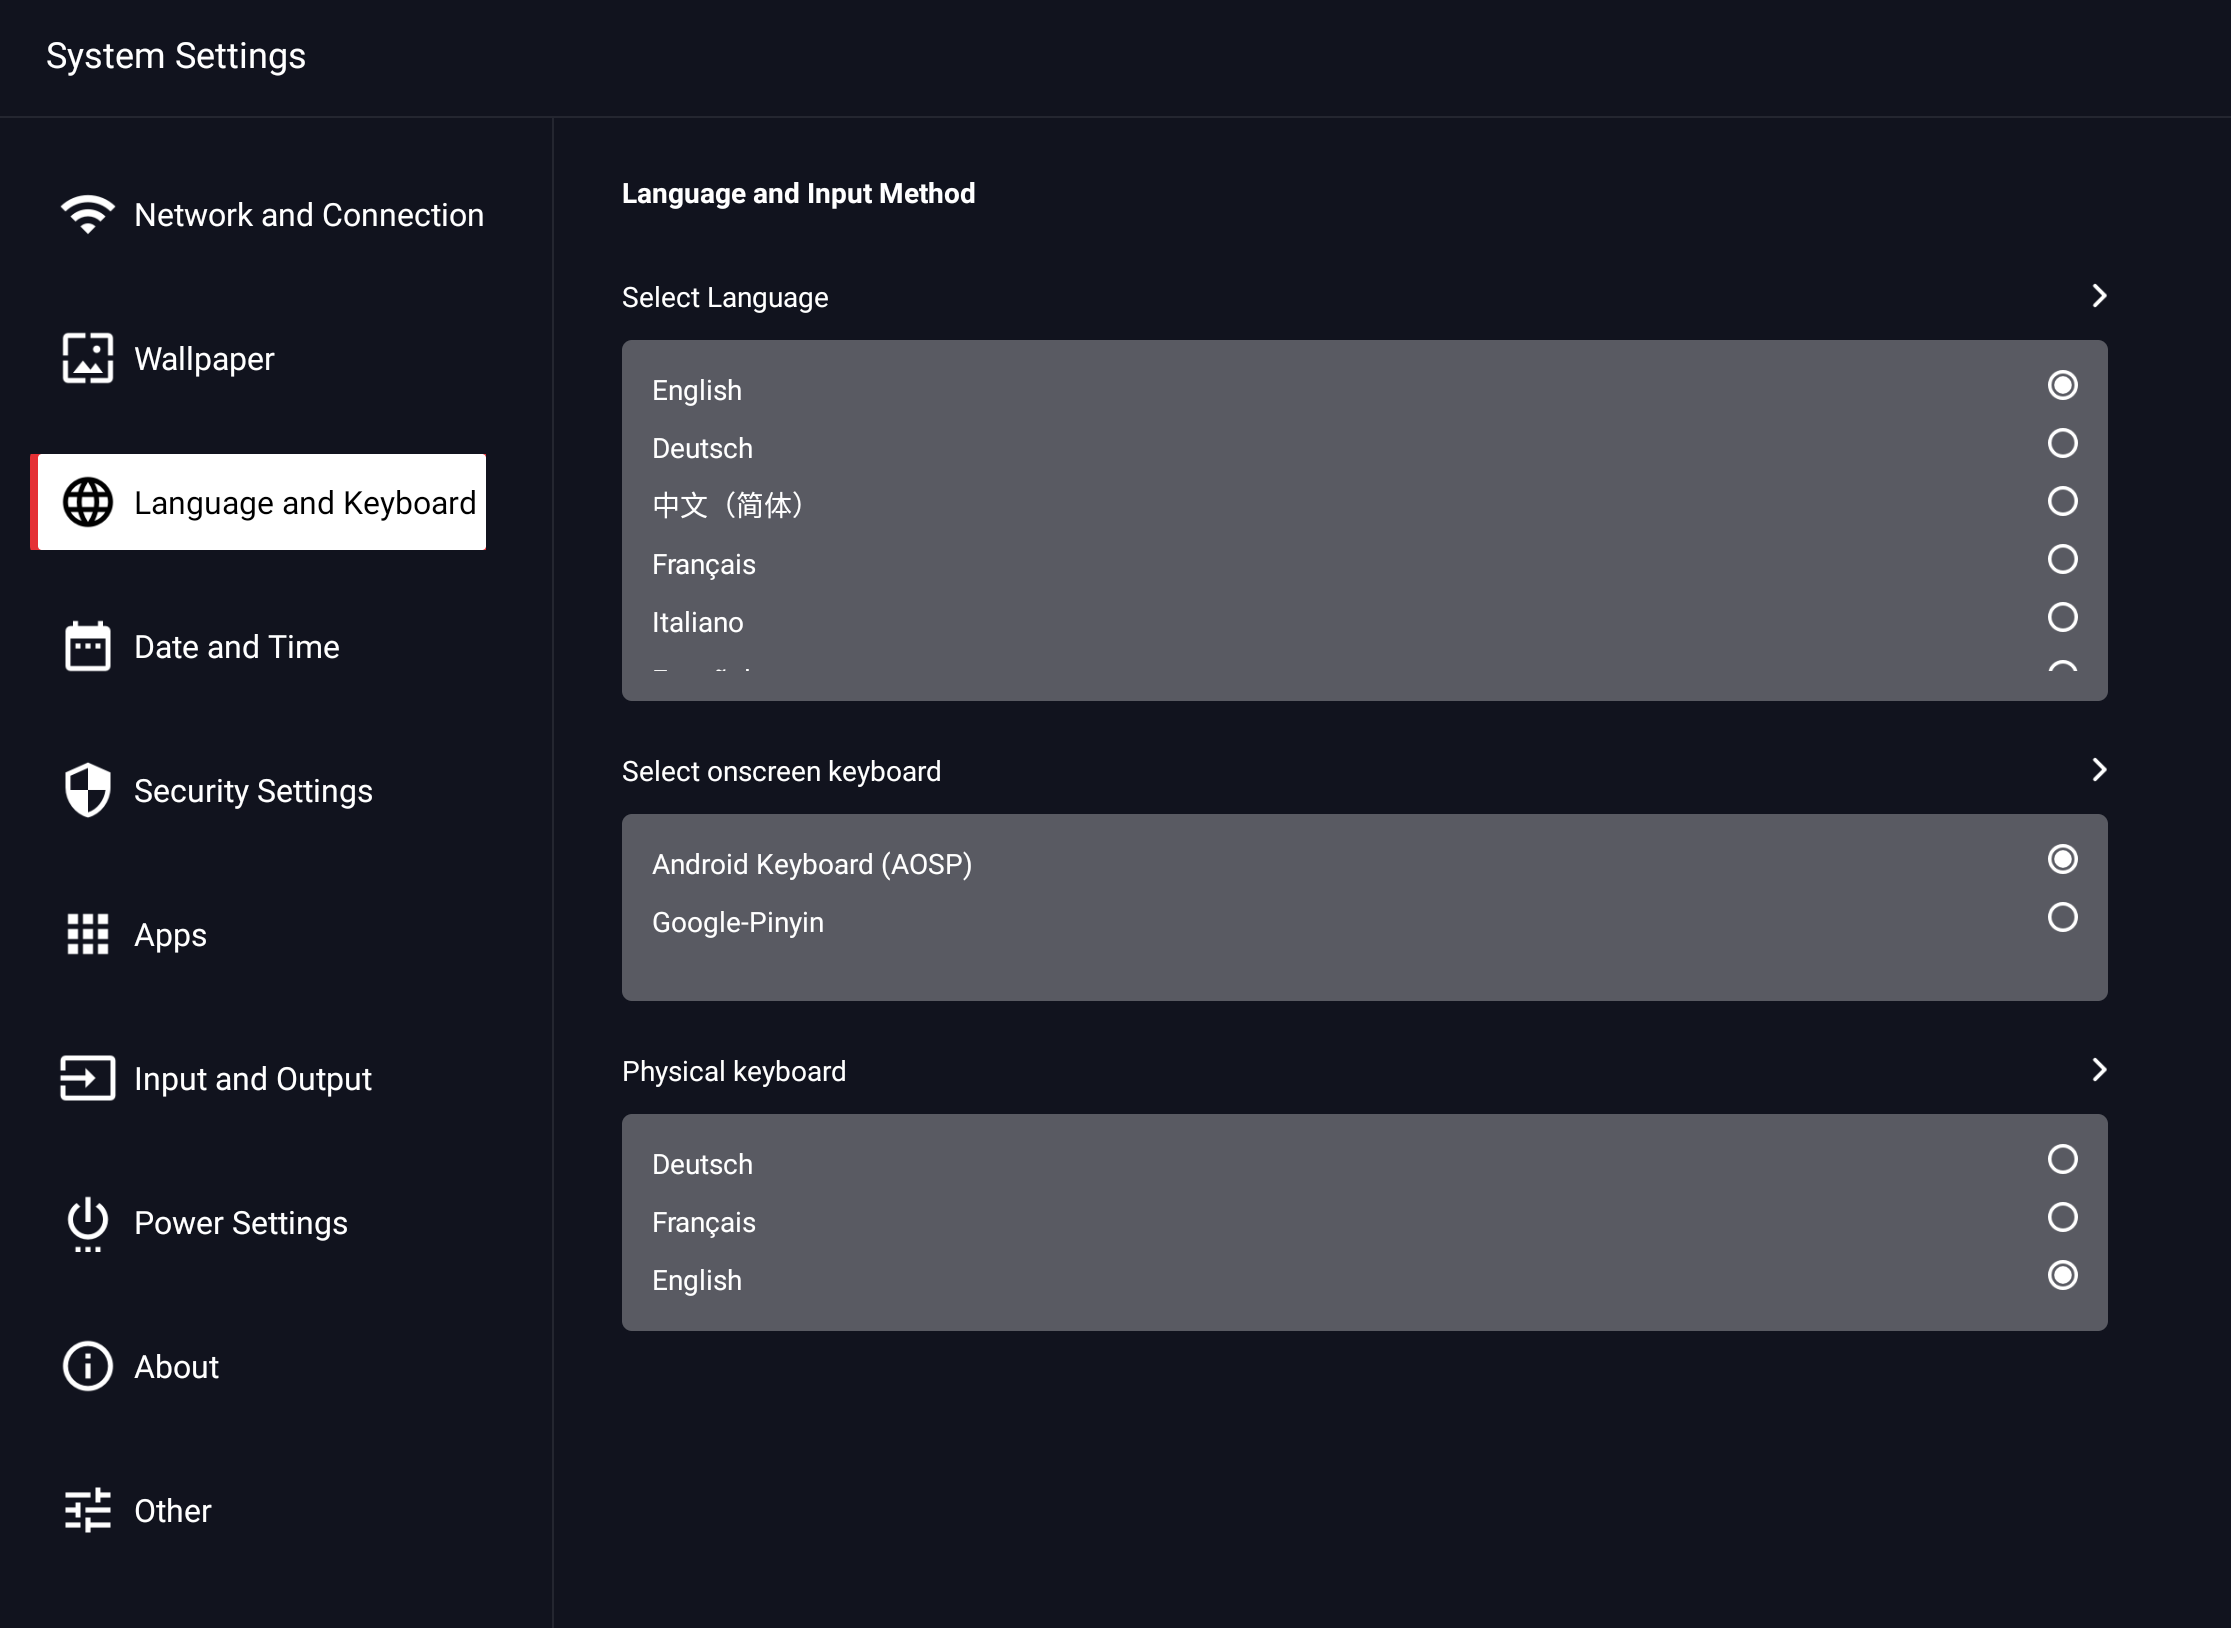
Here you select the system language as well as the keyboard layout of the on-screen keyboard and external keyboards.
![]() hint:
hint:
Only when the external keyboard is connected is the menu item displayed, which you can use to set the keyboard layout for it.
7.3.4 Settings – Date and Time
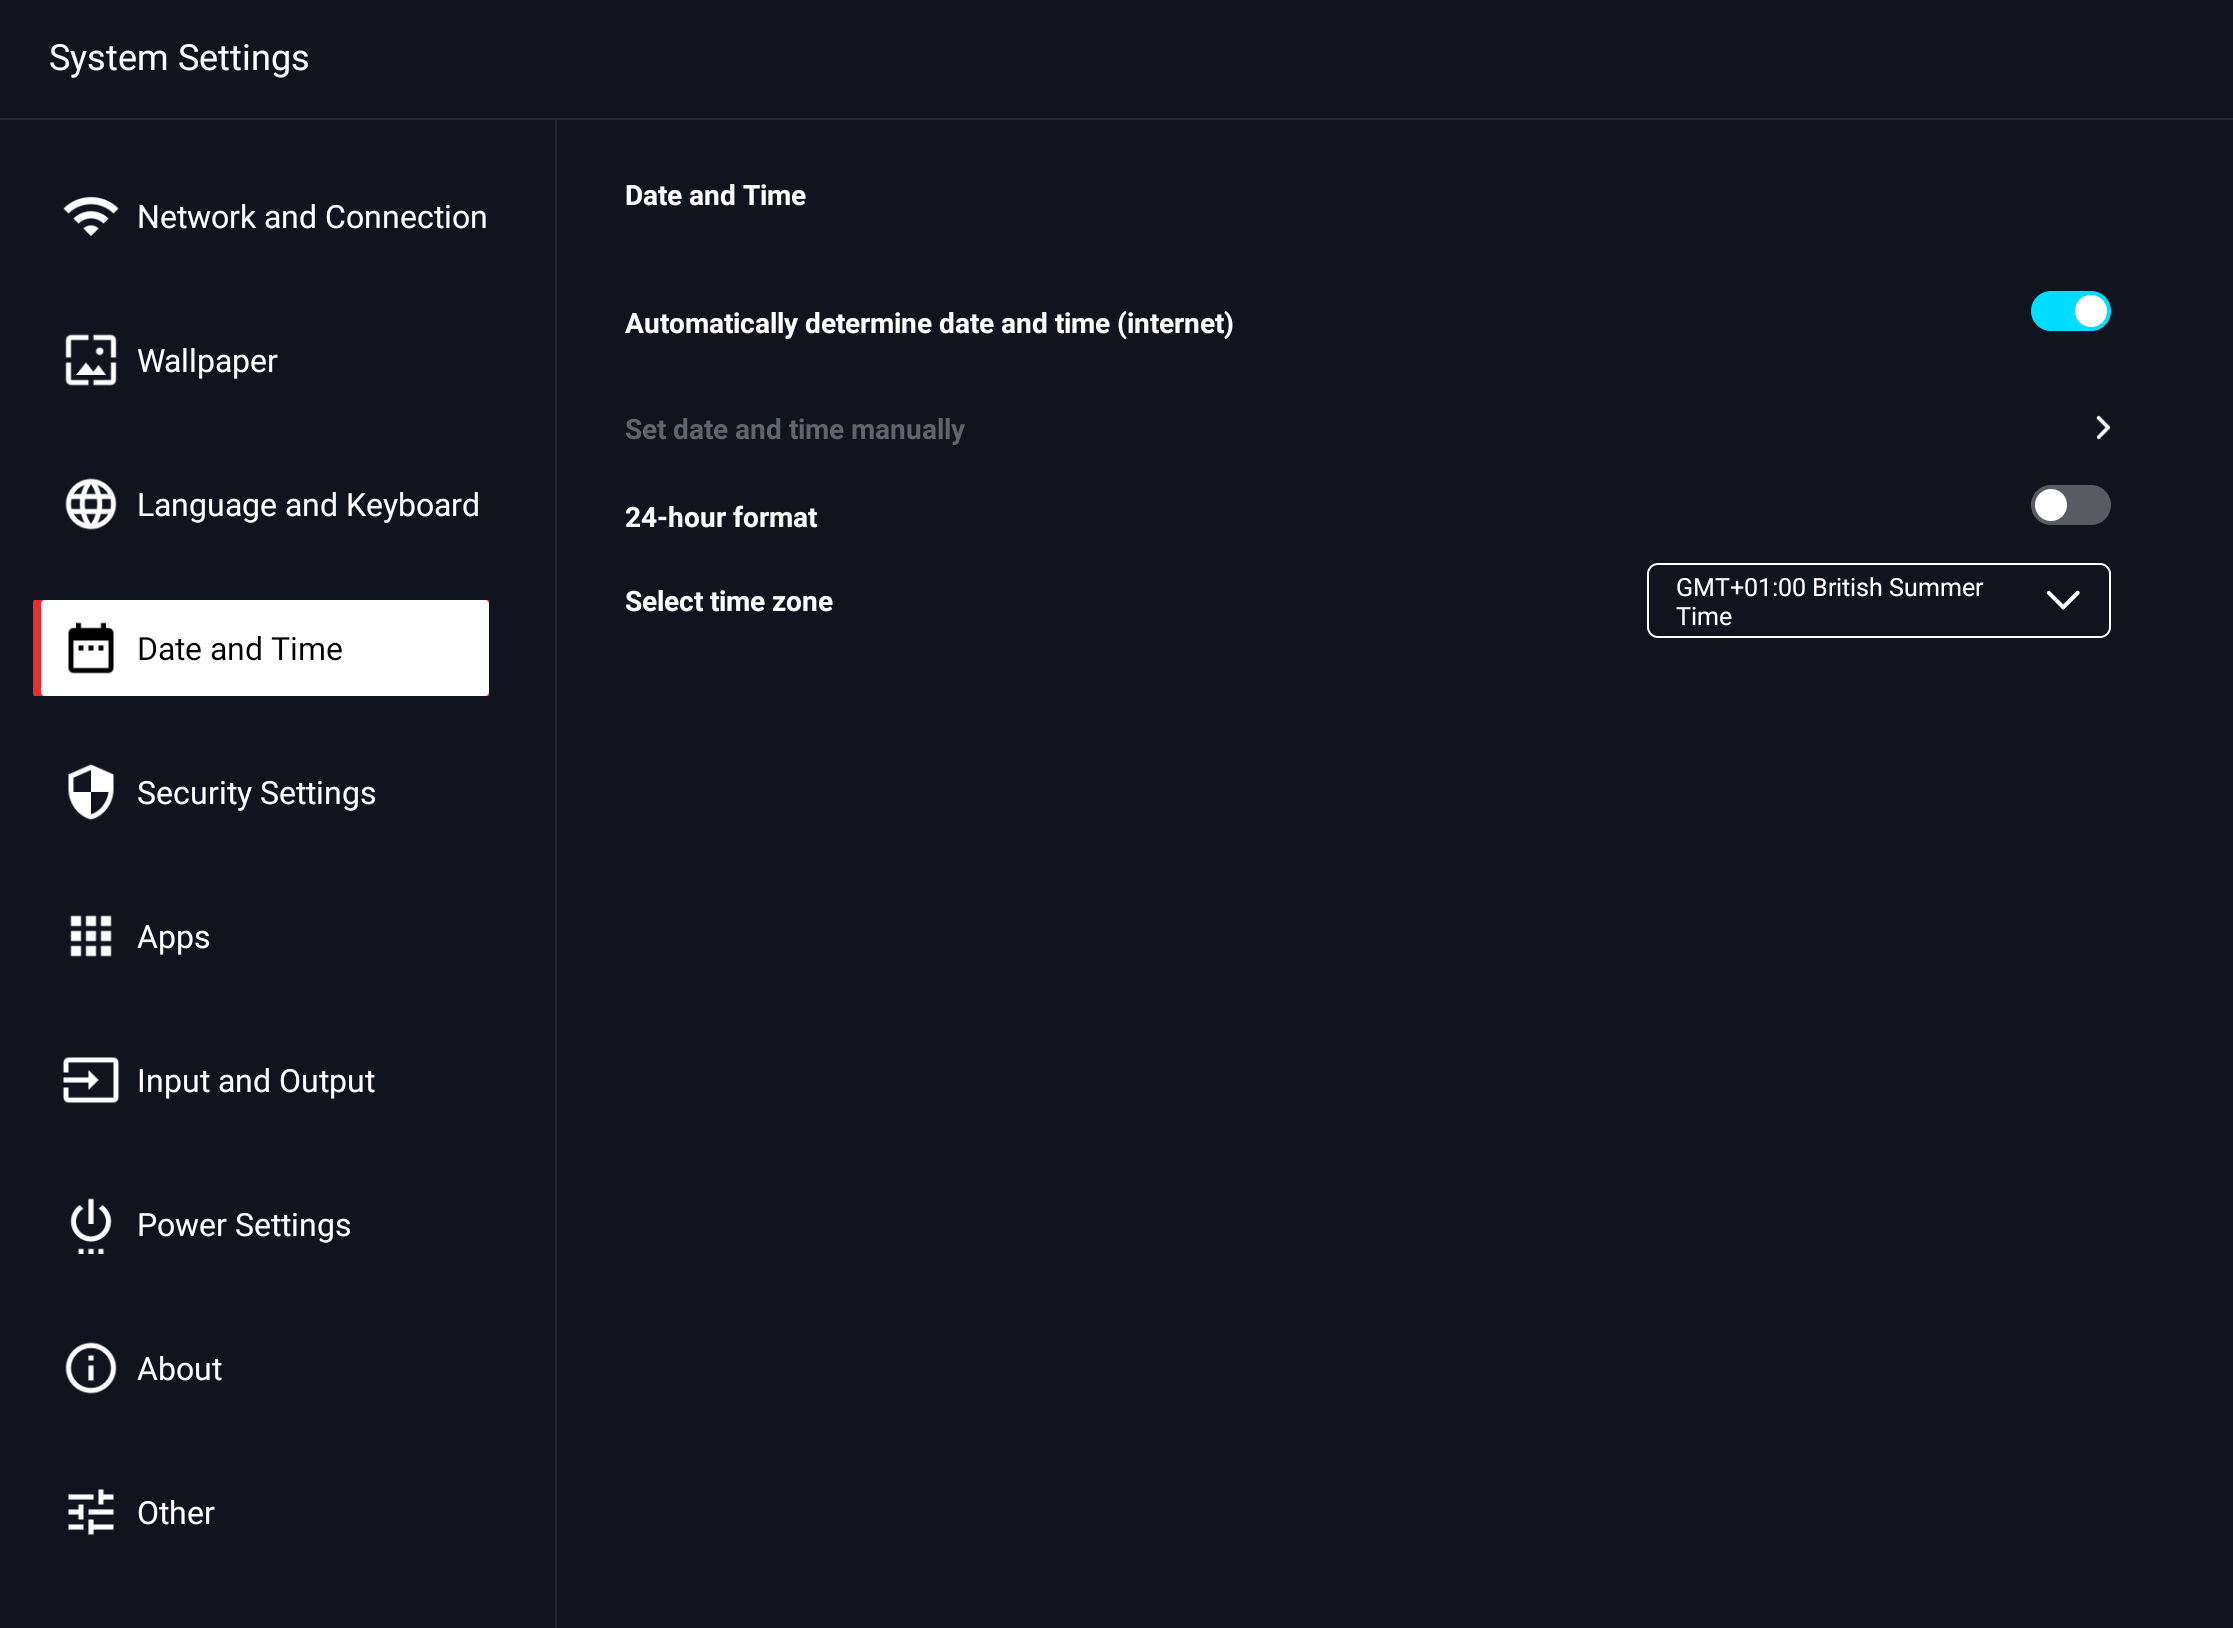
Android can automatically synchronize time and date settings via time servers on the Internet, for this you have to set the correct time zone once in the setup or subsequently in the settings under Select date and time > time zone.
Alternatively, you can also make the settings manually.
7.3.5 Settings – Security
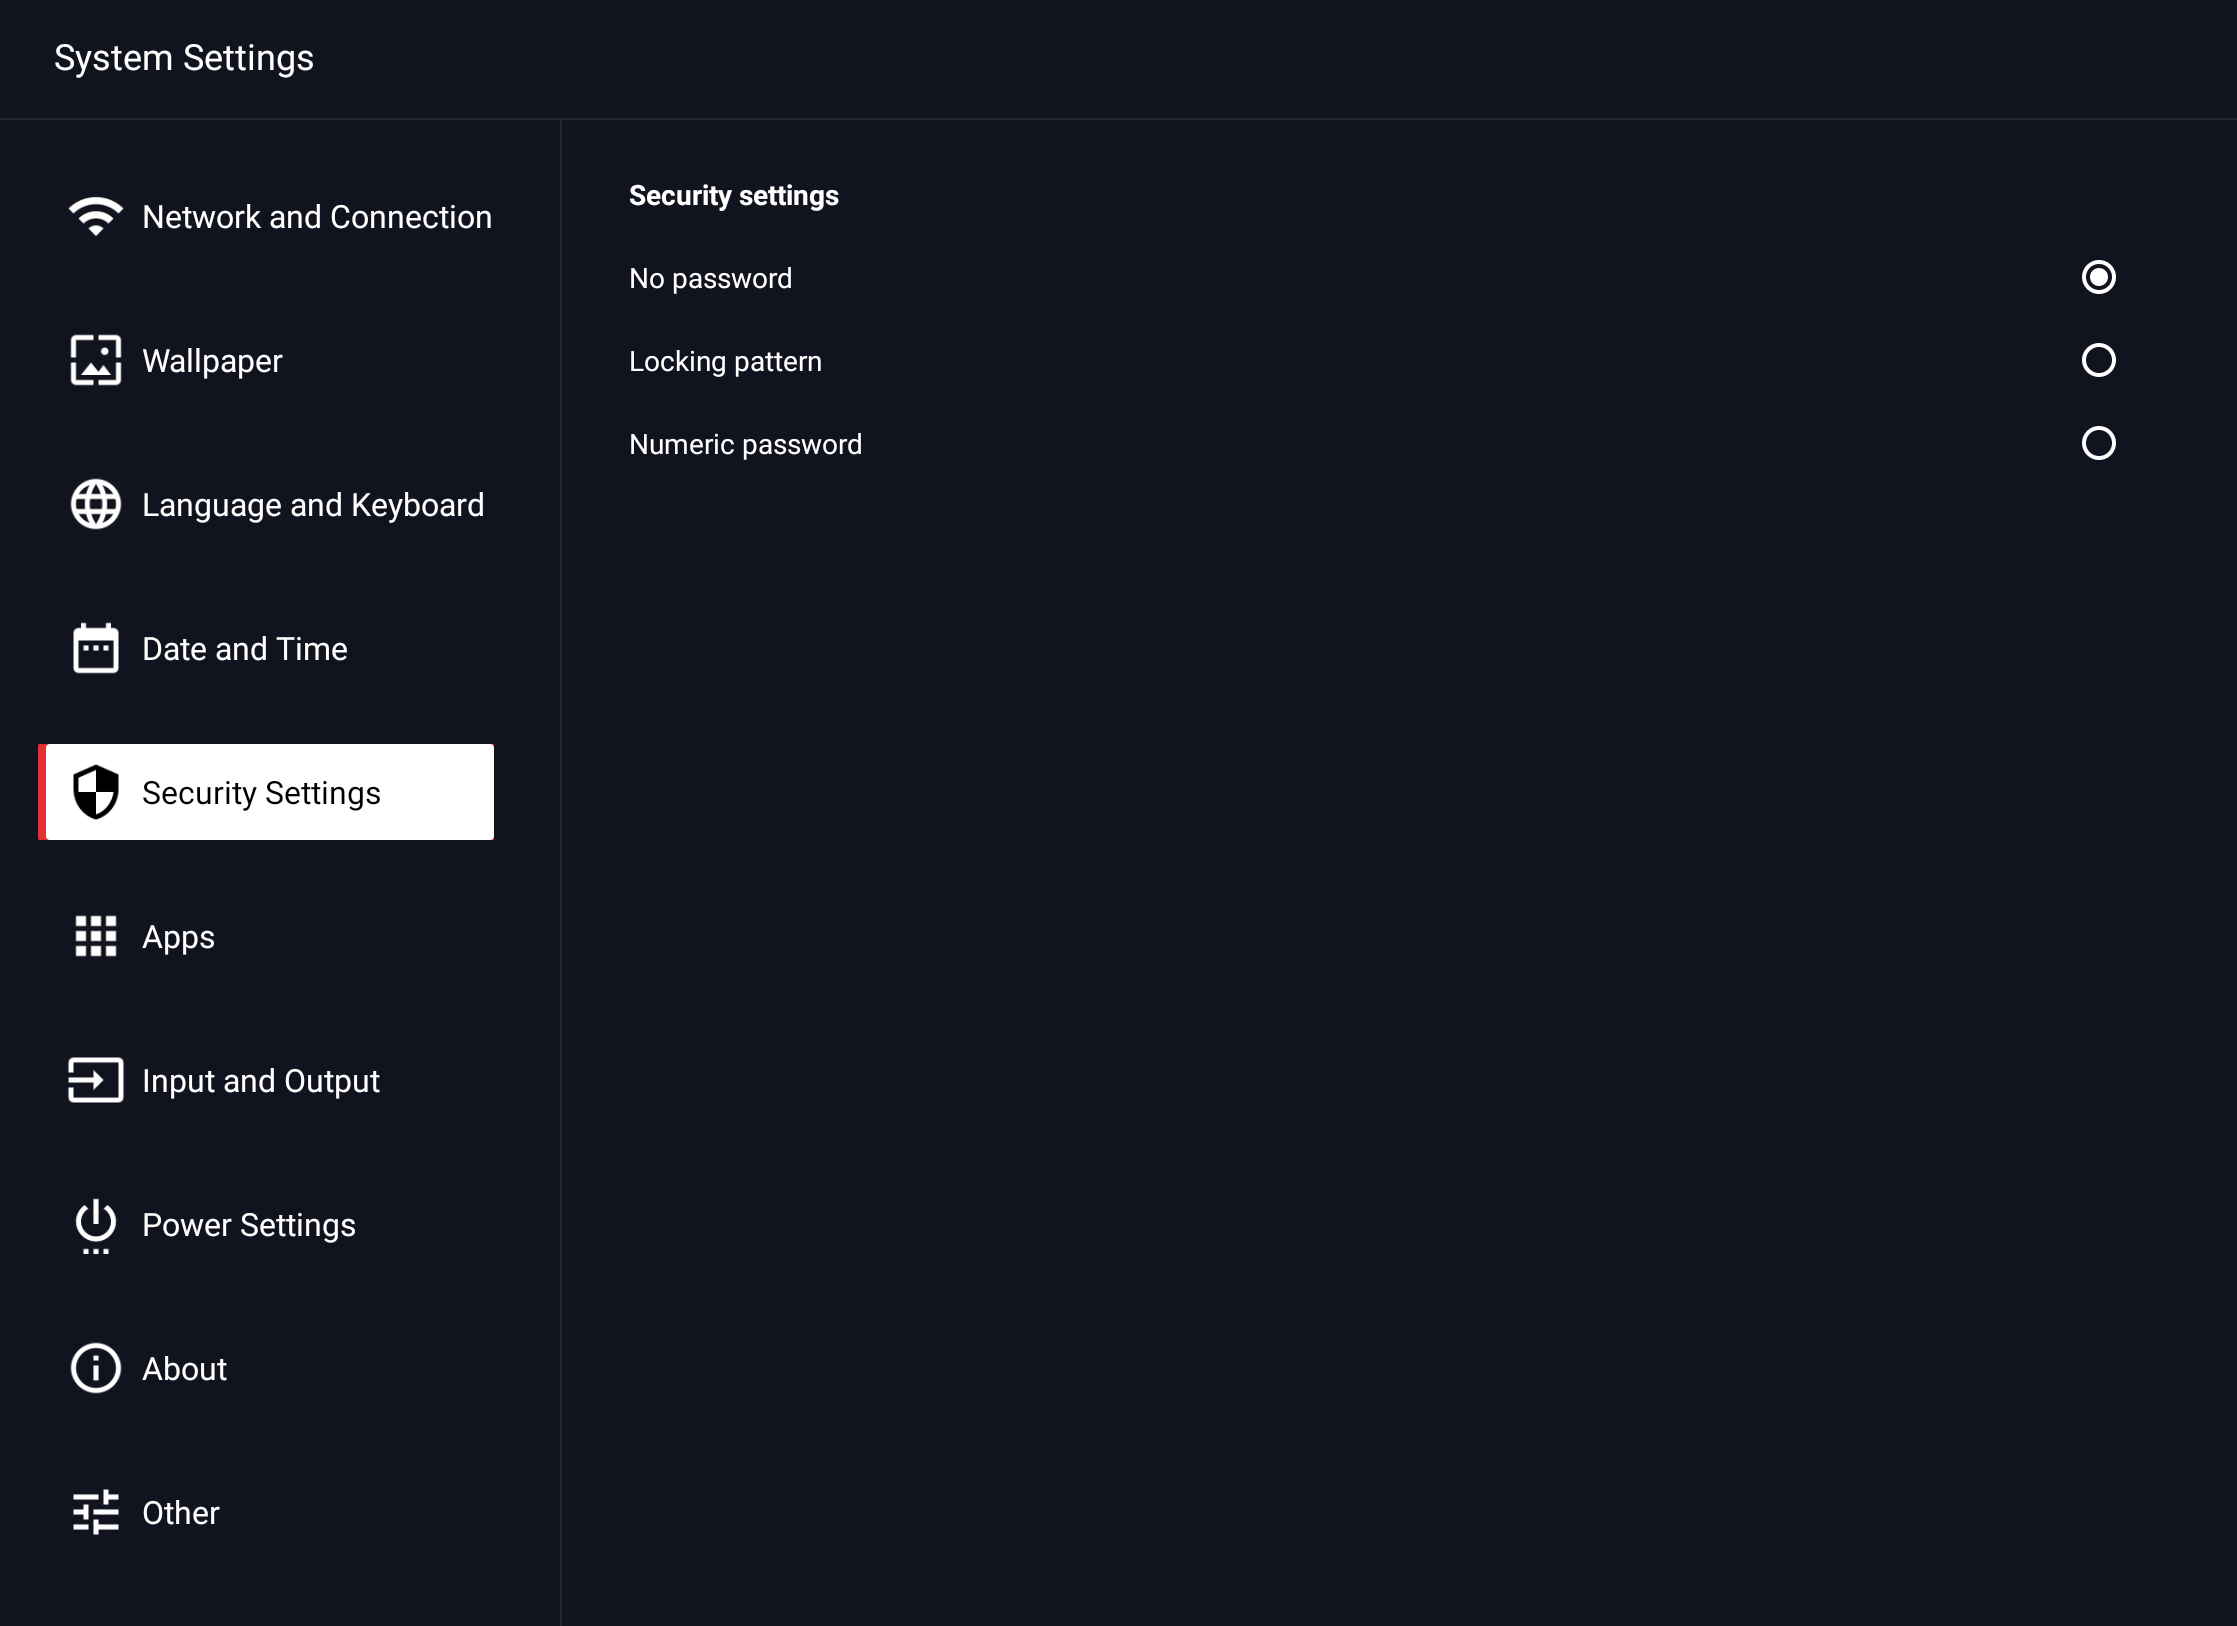
In this section you configure the screen lock. The code must be entered when starting the display as well as after a manual lock. Manual lock is enabled via the Sidebar -> Apps -> Tools -> Screen Lock.
You can choose between three options:
- No password
No input is required when starting the display. When locking via the app, the display is only unlocked afterwards by touch. - Sample Password
Draw a freely definable pattern to unlock.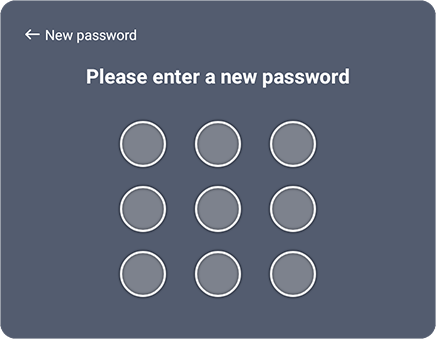
The input must be repeated for security. - 4-digit numerical code
Enter a 4-digit numerical code.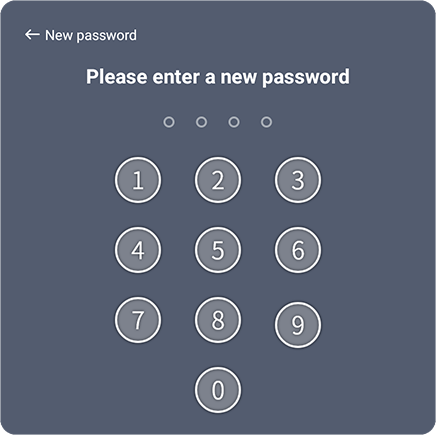
The input must be repeated for security.
![]() hint:
hint:
You have 5 attempts to enter the correct password. After that, the display will be locked for 30 seconds. If you click on "Forgot password", you will be asked to enter a master password. This is 1-2-3-4.
7.3.6 Settings – Apps
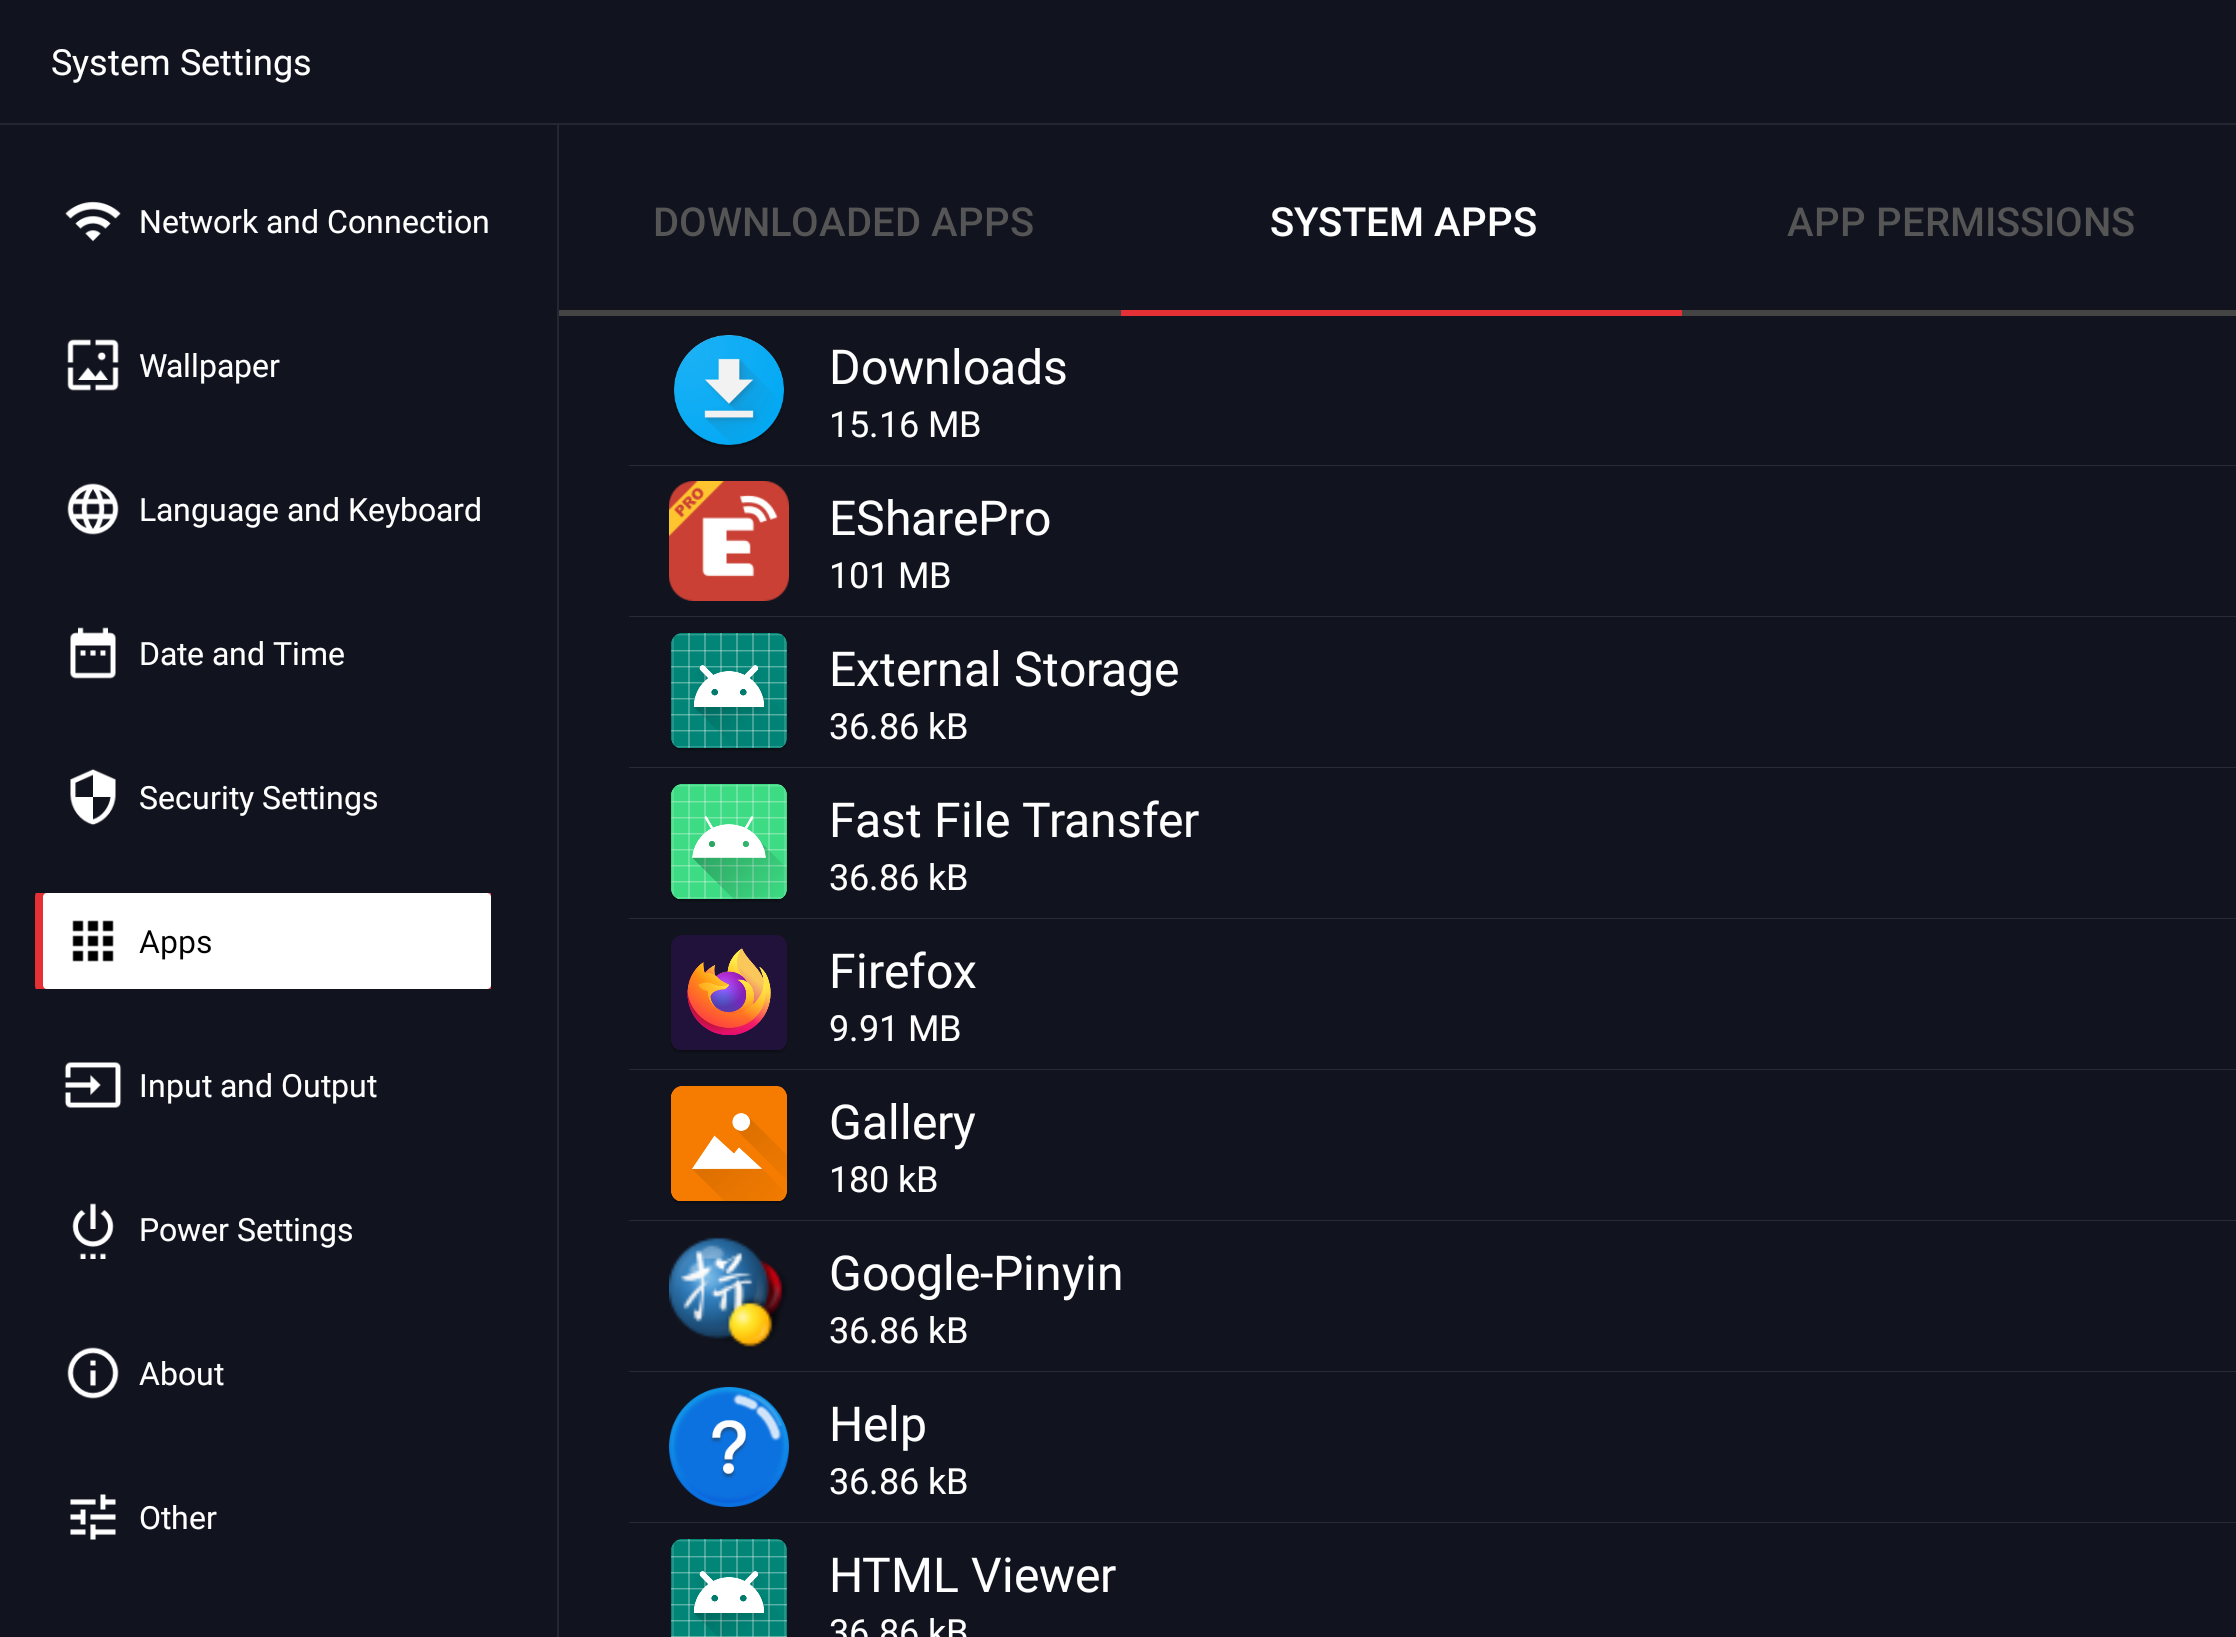
Here you will find an overview of all apps installed on the Android system, as well as their system permissions.
7.3.7 Settings – Input and Output
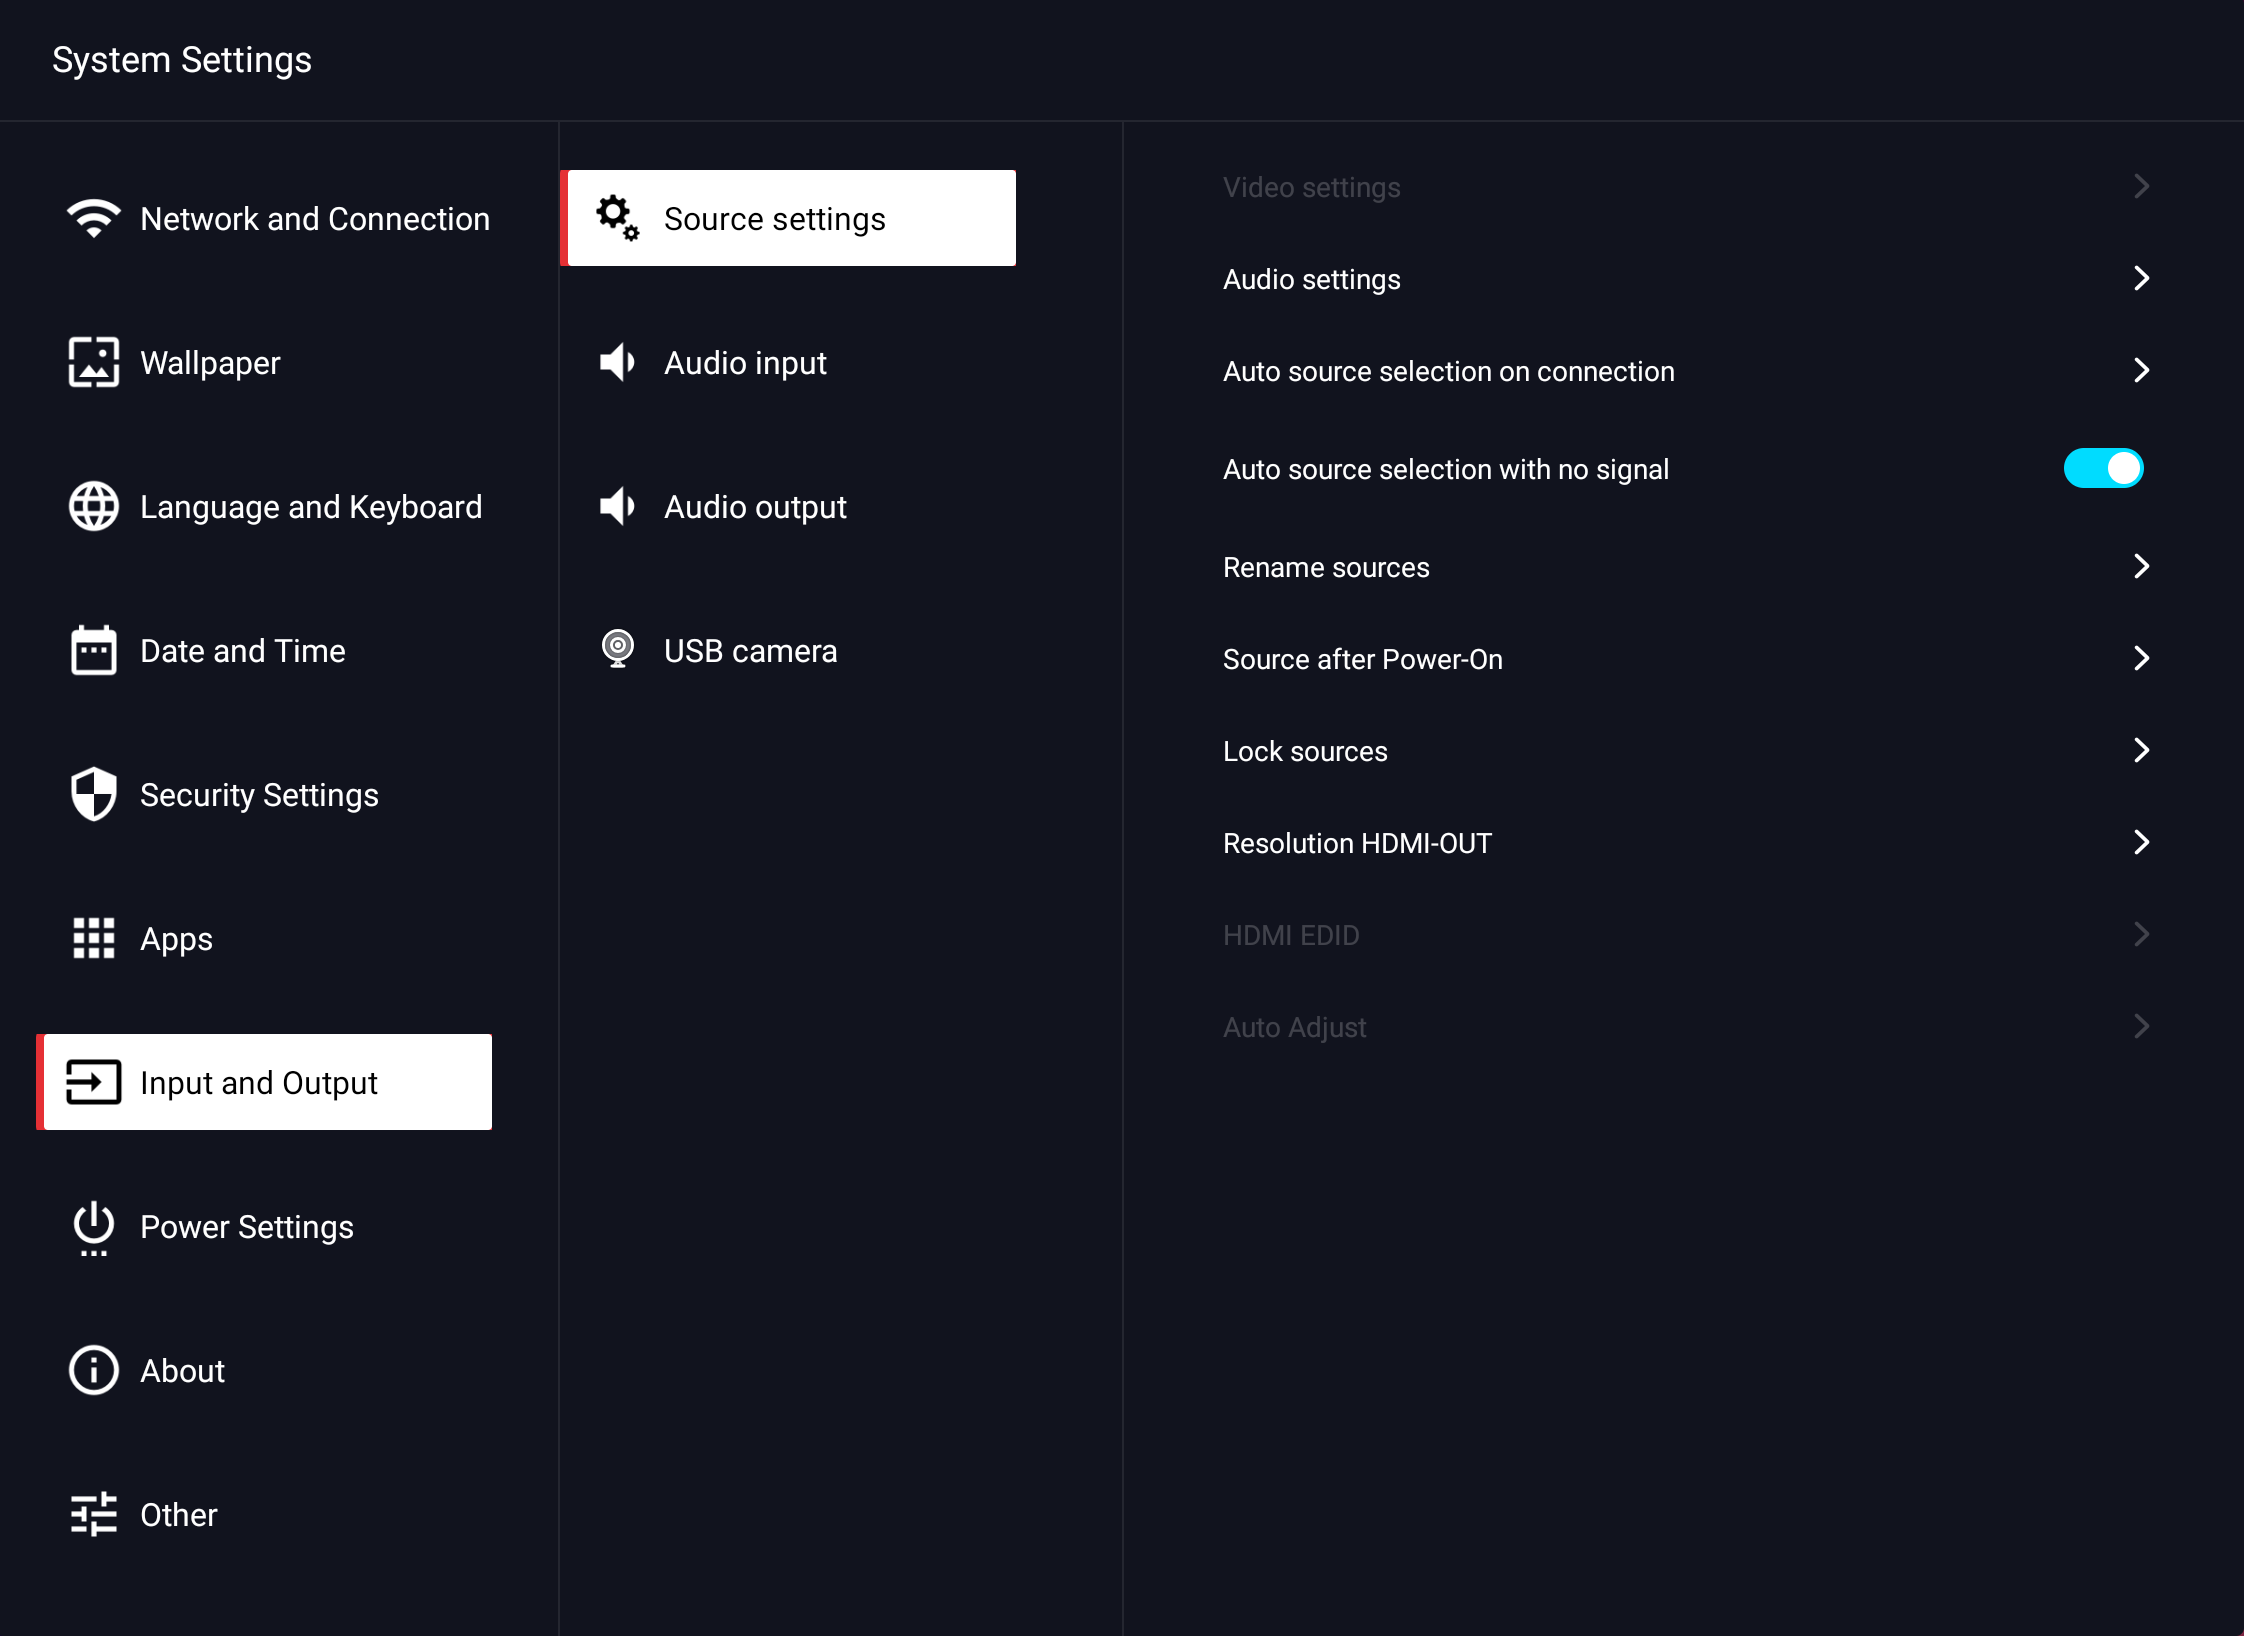
Here you will find all settings for the video and audio interfaces.
7.3.7.1 Settings – Input and Output – Video Settings
This option is only available if you have selected a video input. On Android, these settings are not available.
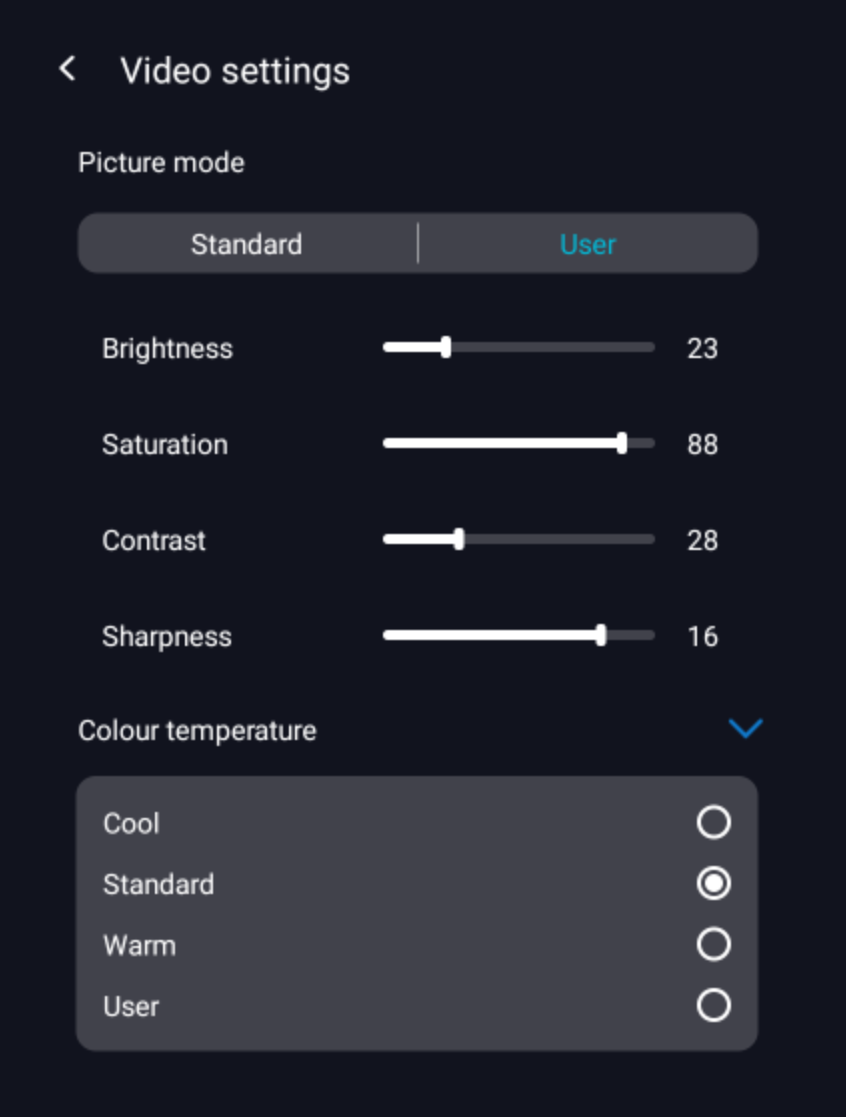
Here you can manually configure the parameters of the display.
![]() hint:
hint:
The settings only affect the appearance of the selected video source.
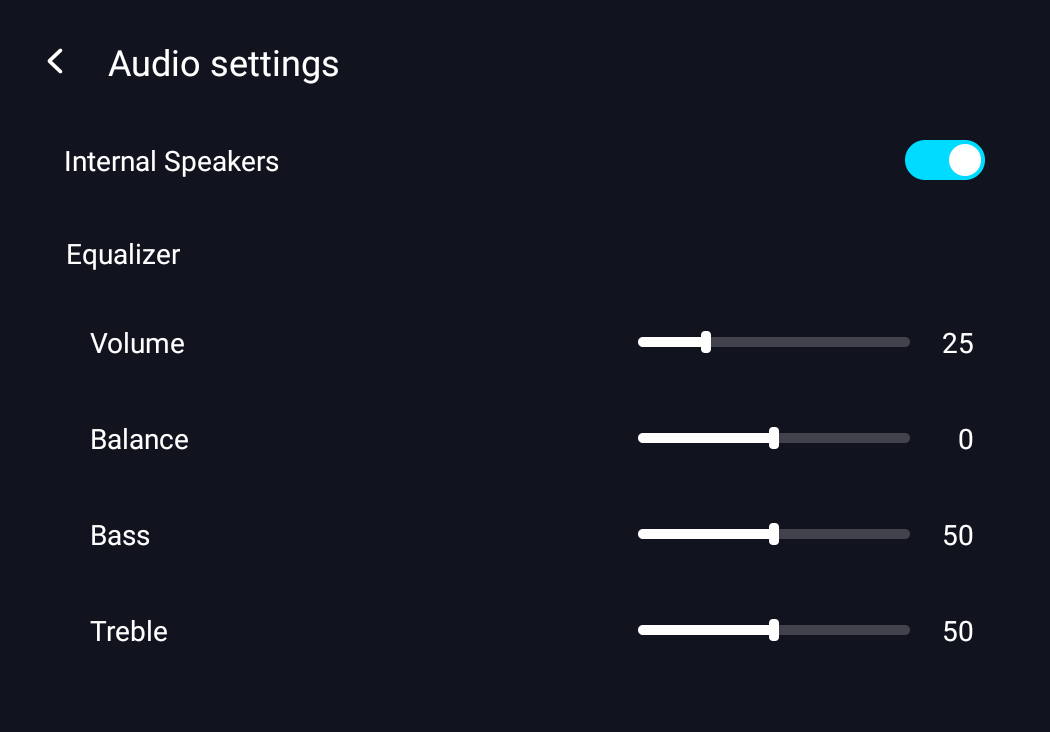
7.3.7.2 Settings – Input and Output – Audio Settings
Here you can activate or deactivate the internal speakers and make basic sound settings.
7.3.7.3 Settings – Input and Output – Automatic source selection when connected
Here you define the behavior of the display when a new video source is connected during operation.

If you select "Auto-Switch", it will automatically switch to the source to which you have plugged in a new input device. Alternatively, you can select the Notification option.
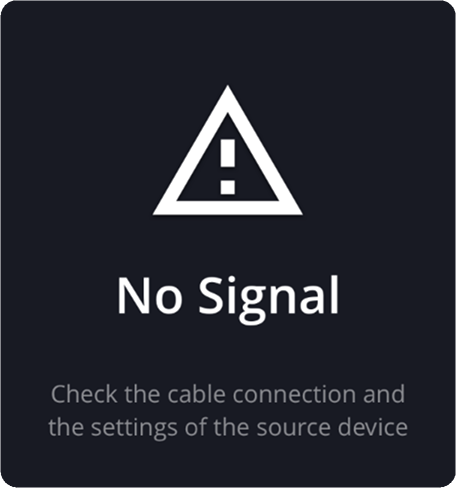
7.3.7.4 Settings – Input and Output – Automatic source selection for no signal
If this function is switched on, if the signal is missing (e.B. input selected without source or signal aborts), the next source with the adjacent signal is automatically switched to after 10 seconds. The source OPS is preferred here.
7.3.7.5 Settings – Input and Output – Rename Sources
If you have firmly wired a playback device to a specific interface, you can rename the name of the input (e.B. HDMI1 to DokuCam).
![]() hint:
hint:
The input is limited to 11 characters and only letters and numbers can be entered.
7.3.7.6 Settings – Input and Output – Source after power on
At this point, you define which input is displayed after the display is switched on. For example, if you always use the built-in OPS PC, you can display this input immediately after starting the display.
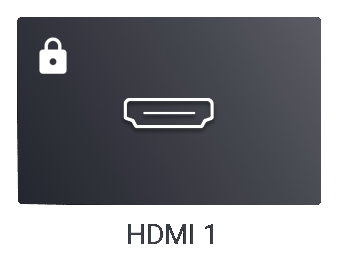
7.3.7.7 Settings – Input and Output – Block Sources
This setting allows you to restrict the selection of available video inputs, for example to make the operation clearer.
A lock is drawn for a locked input source. When trying to select the input, the message "Source is locked" appears on the display.
7.3.7.8 Settings – Input and Output – Output HDMI-OUT
Under HDMI Out, set the output resolution that is output to the HDMI output. You can choose between Auto, FullHD (1920×1080) and 4K resolution (3840×2140).
The image currently displayed on the display is also output (spiked) at the HDMI output.
![]() hint:
hint:
The signal is always output with HDCP 2.2. The external display device must be able to process HDCP, otherwise the image will remain dark or the encrypted signal (ant football) will be displayed.
7.3.7.9 Settings – Input and Output – HDMI-EDID
The HDMI EDID suggests settings for the source device for optimal resolution, refresh rate, color depth, etc. You can choose from:
EDID 1.4 = 3920×2160 @ 30 Hz (10.2 Gbps)
EDID 2.0 = 3920×2160 @ 60 Hz (18 Gbps)
![]() hint:
hint:
The EDID 1.4 setting, and thus a lower refresh rate and data rate, can help stabilize connection problems or disconnected video connections.
7.3.7.10 Settings – Input and Output – Automatic Adjustment
Optimizes the image synchronization of the analog VGA signal.
7.3.7.11 Settings – Input and Output – Audio Input
This menu item lists the connected USB audio devices.
7.3.7.12 Settings – Input and Output – Audio Output
- Select the menu item > Input and Output > Audio Output
- Adjust the volume for the display's jack audio output.
![]() Hint:
Hint:
With speakers connected via jack, the audio of the display is automatically switched to them, the internal speakers are muted. The volume can be controlled both via the volume buttons on the housing and via the slider in the sidebar (see 7.2).
When the speakers are connected via a digital cable, the internal speakers remain active. You can (de-)activate these under 7.3.7.2 Audio Input.
The volume of loudspeakers, such as soundbars or the like, can only be controlled via the output device itself (e.g. via a remote control or housing buttons).
7.3.7.13 Settings – Input and Output – USB Camera
This menu item is only visible when a USB camera is connected. At this point, all connected devices are listed and a preview of the current camera image is displayed.
7.3.8 Settings – Power Settings

- Automatic shutdown of no signal
If this function is activated, the display is switched off after a defined time if no video signal is detected. You can choose between 5, 15 and 30 minutes.
![]() hint:
hint:
The home screen (Android) overrides the automatic shutdown.
- Behavior when connected to the power grid
Here you can set how the display behaves when the power plug is plugged in. You can choose between "Start", switch to standby mode or restore the state before switching off.
- Standby settings
If you enable this option, the display automatically switches to standby if no user action is performed for a certain period of time. It can be selected between Off, 10 minutes, 1 hour, 2 or 4 hours.
- On/off timer
In this menu you can set times at which the display is automatically switched on or off. The figure shows, for example, that the display is automatically switched off every Monday and Wednesday at 19:00.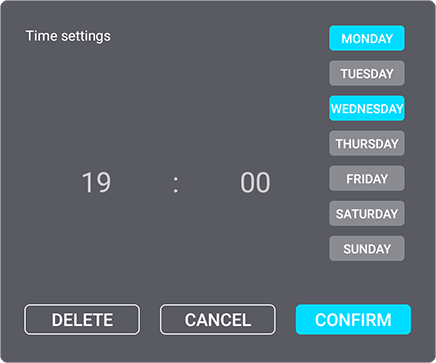
- Automatic wake-up
With the option "Automatic wake up when a source is connected", the display wakes up by connecting a video source from standby.
If the Wake-on-LAN option is activated, the display can be started over the network.
![]() Hint:
Hint:
Wake-on-LAN only works if the display is connected via LAN cable and is not disconnected from the network.
The MAC address is required for control. These can be found under Network and Ports – Ethernet. (see 7.3.1.2)
7.3.9 Settings – About
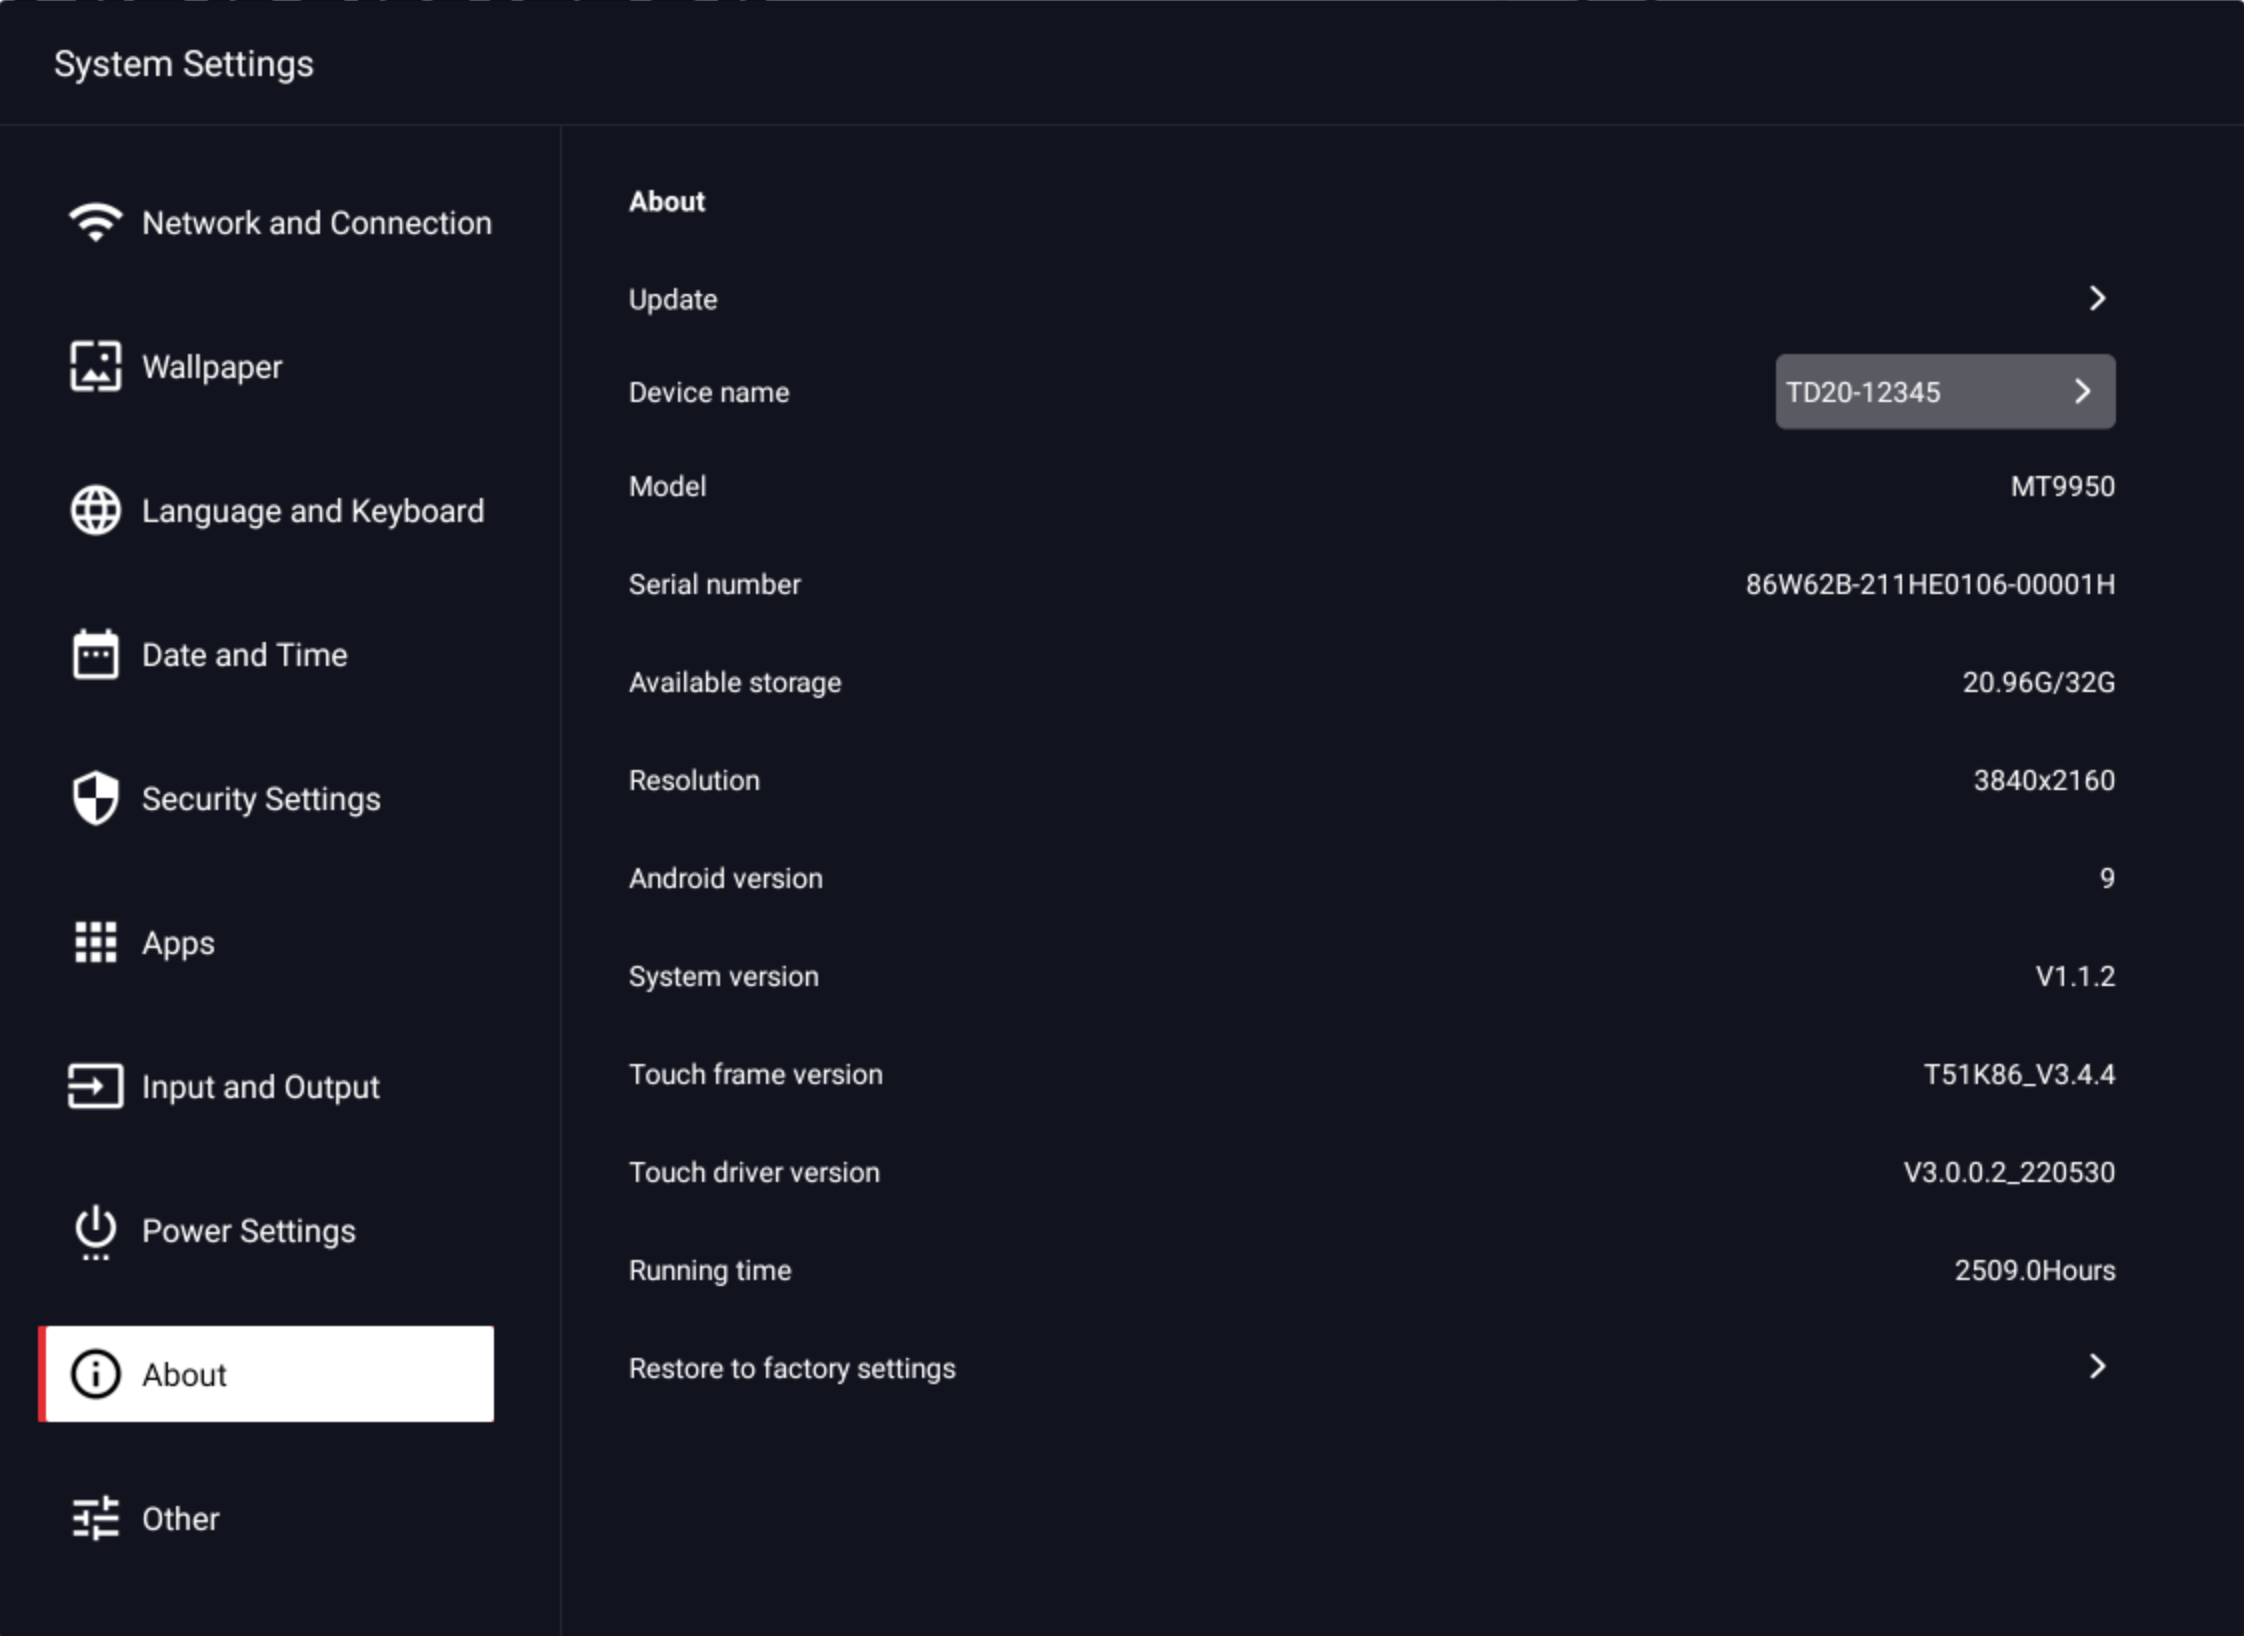
Under the menu item "About" you will find all relevant system information (e.B. the firmware versions, etc.).
Also, here you can change the device name and reset the system to factory settings.
7.3.10 Settings – Miscellaneous
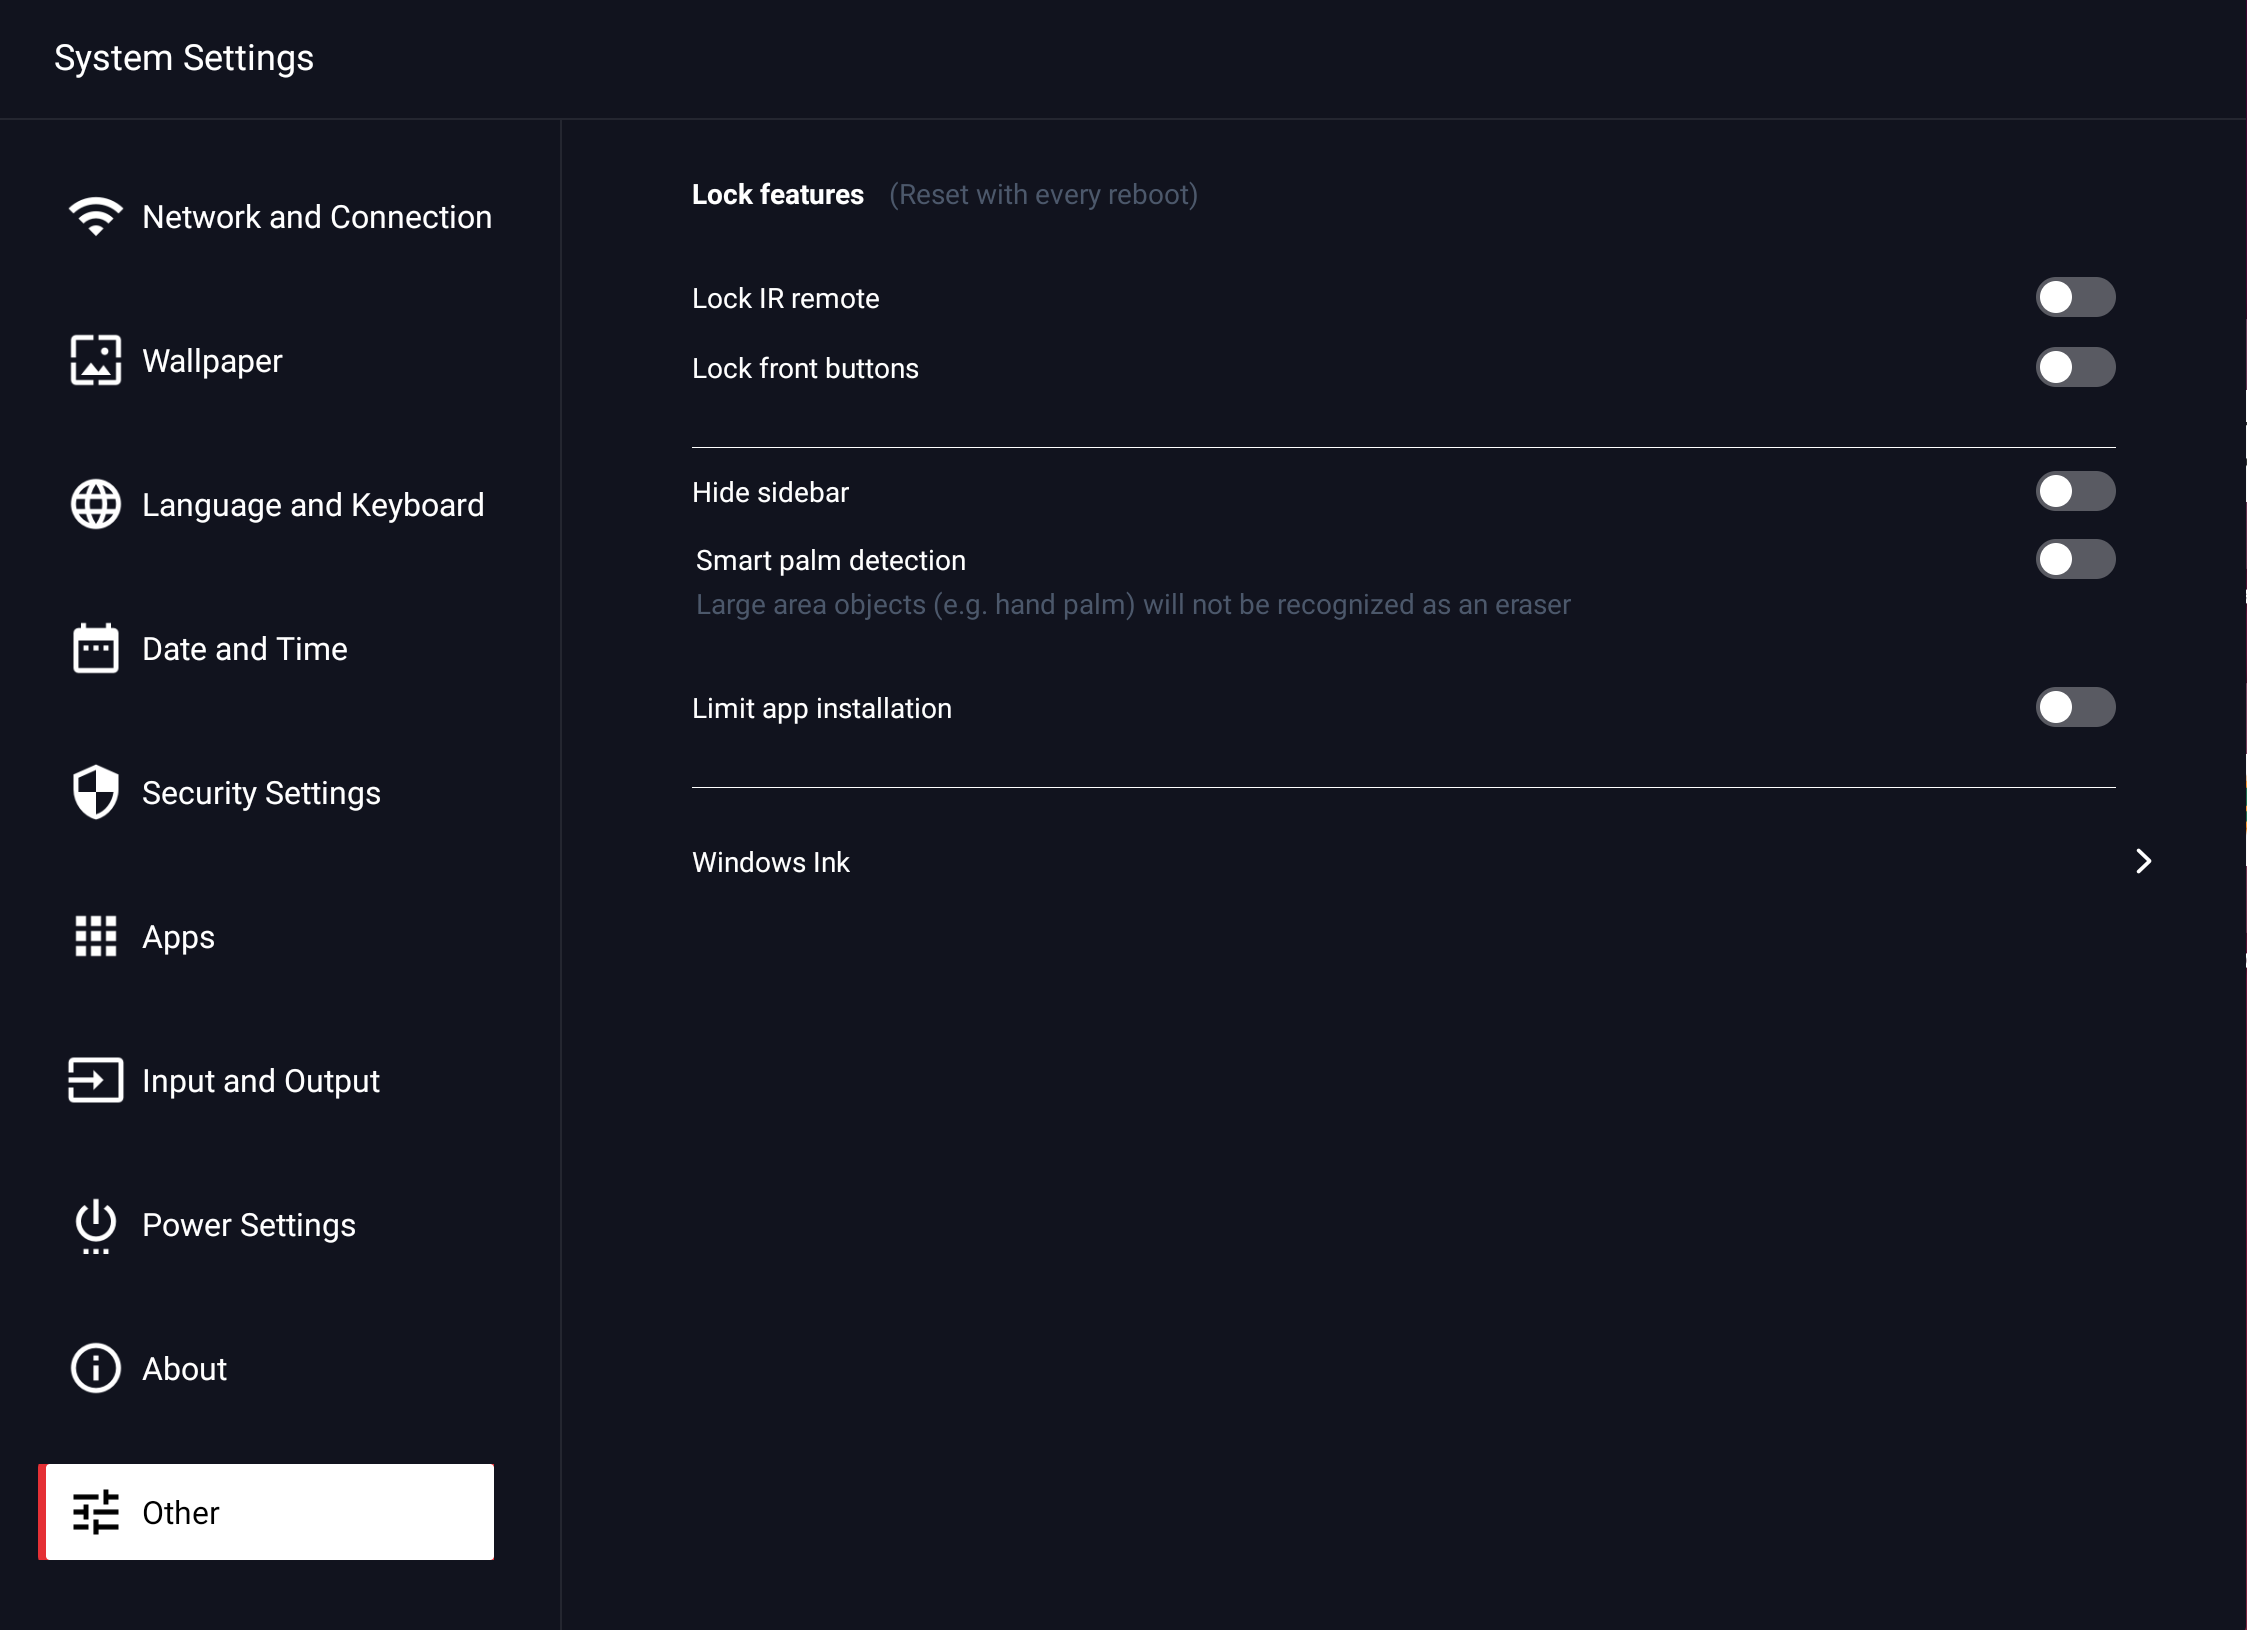
7.3.10.1 Settings – Miscellaneous – Lock functions
Here you have the possibility to block certain functions.
- Lock infrared remote control – deactivates operation via the supplied remote control.
- Lock front buttons – disables all buttons on the front of the case except the power button.
- Sidebar: – hides the side controls for calling the sidebar. With the swipe gesture from the edge of the screen inwards, you can still call up the sidebar.
- Intelligent palm recognition: By default, whiteboard applications can be erased with the palm of your hand or other large-area objects. If this function is activated, you can place your hand on the glass while writing.
- Limit installation: Prevents the installation of additional apps on Android.
7.3.10.2 Settings – Miscellaneous – Windows Ink
That Kindermann-Touch display supports the Windows Ink protocol under Windows 10 /11, in the Microsoft Office applications as well as in the Windows Whiteboard app, etc.
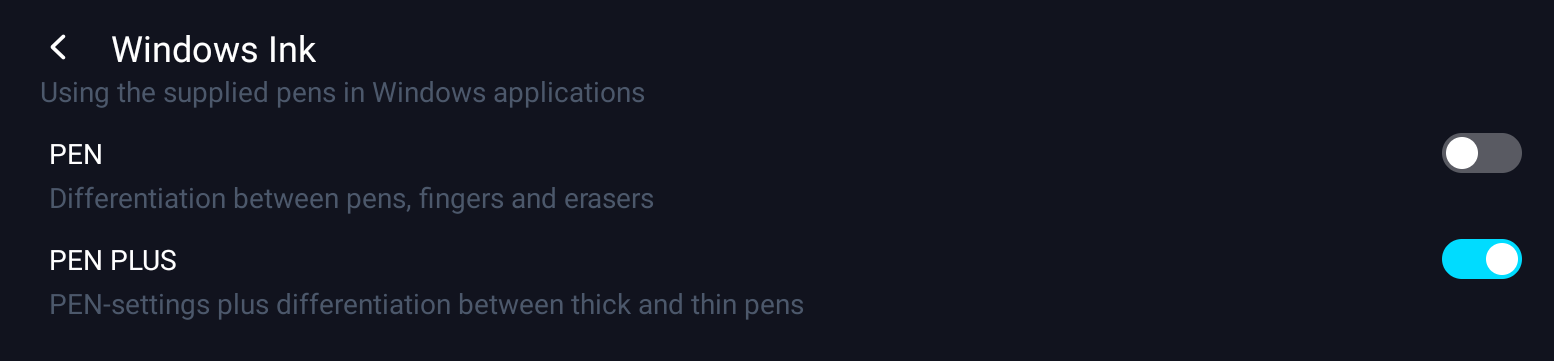
Both options deselected:
The supplied pens are recognized as fingers, large objects, as well as palms as erasers.
PEN:
To distinguish between fingers and large objects, a pen is also recognized as such. So you can write with thick and thin tip alike, move the cutout with one finger and delete the drawing with the palm of your hand.
PEN PLUS:
Allows you to distinguish the thin and thick pen tip on Windows. You can assign different pen types and colors to both tips.
This does not change the distinction between fingers and etching.
8. Android System Apps
We have preinstalled the following apps for you:
- Whiteboard App
The app works like a digital flipchart or a digital blackboard and offers the possibility to make handwritten notes, sketches etc. with digital ink on the display.
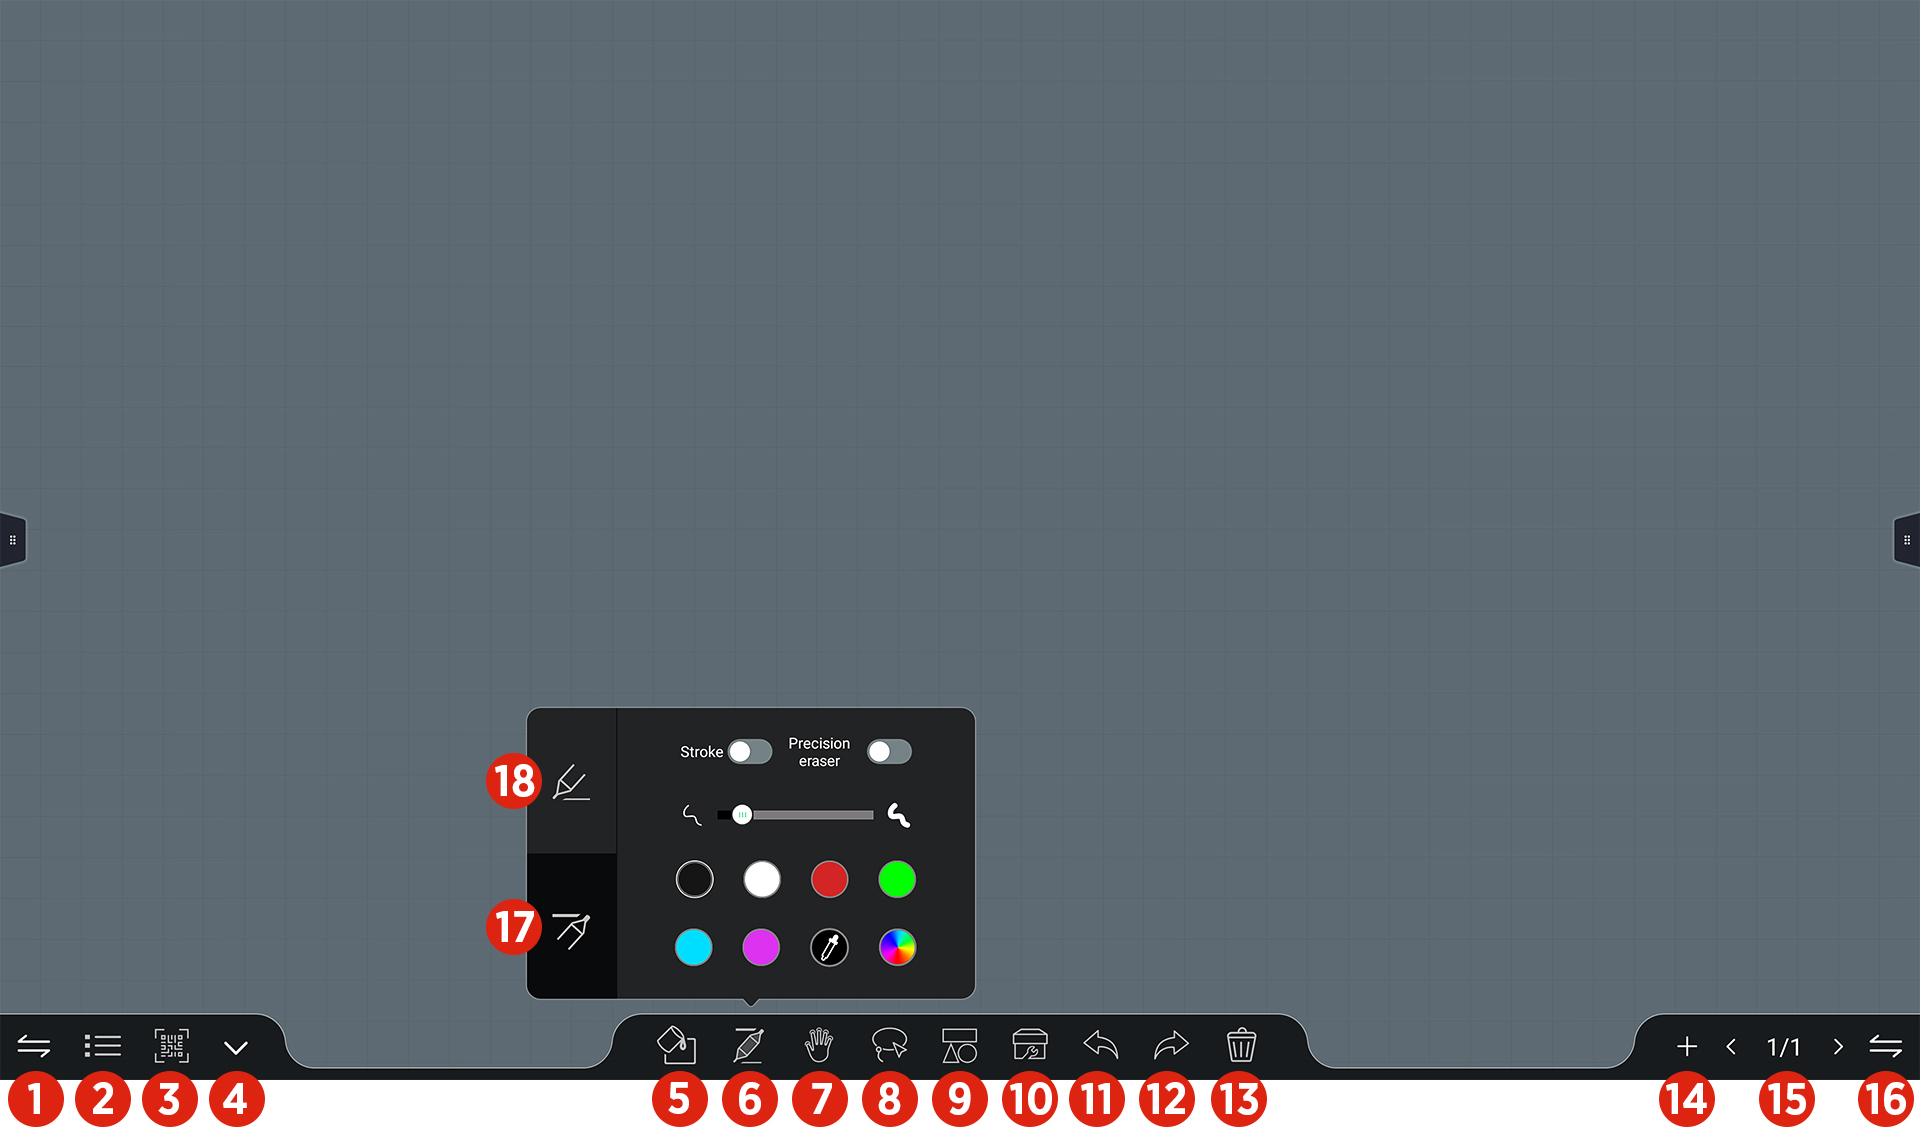
Functions:
| | ||
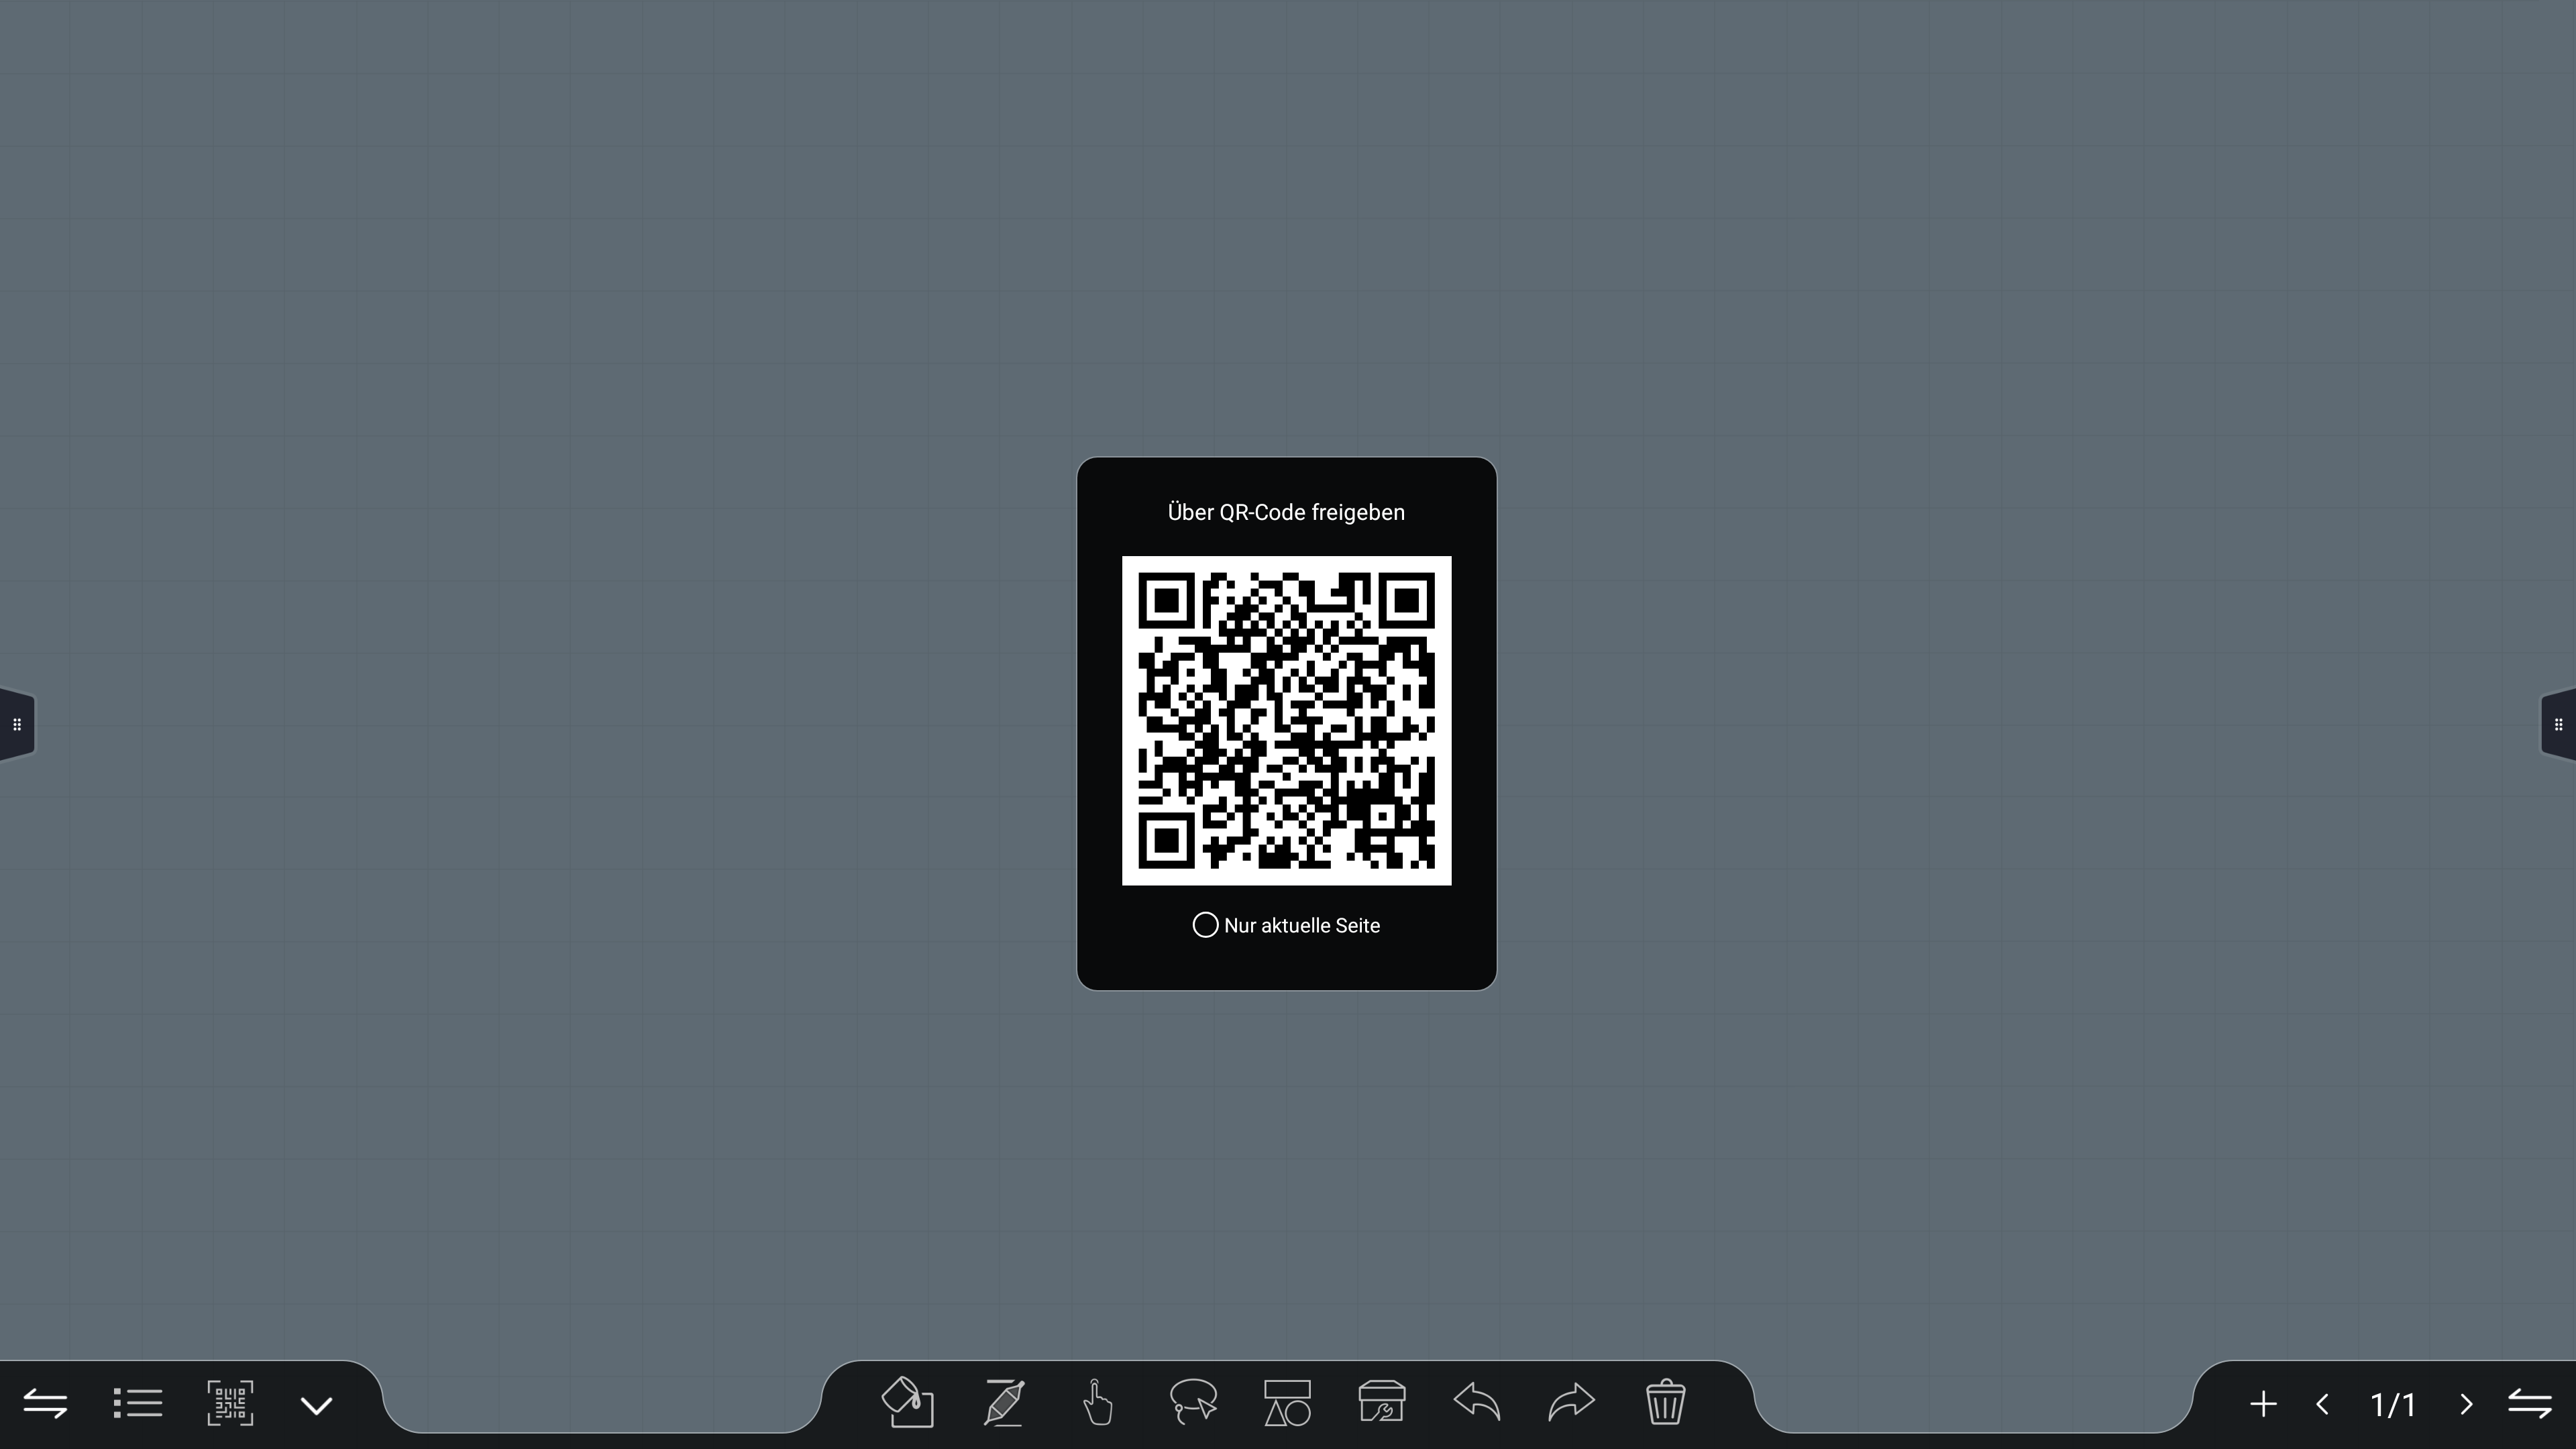
Via the QR Code symbol ![]() create a QR code that can be read with the camera app of a mobile device. The QR Code contains the link to a local website where the whiteboard pages are available for download as an image file.
create a QR code that can be read with the camera app of a mobile device. The QR Code contains the link to a local website where the whiteboard pages are available for download as an image file.
![]() Hint:
Hint:
The mobile device and the display must be on the same network. The images are stored locally in the memory of the display.

In the Whiteboard app there is already a selection of backgrounds ![]() contain. Own backgrounds can be accessed via the icon
contain. Own backgrounds can be accessed via the icon ![]() can be added. The backgrounds then remain permanently ready in the selection. The backgrounds must be available as JPG or PNG file in the resolution 1920×1080 or 3840×2160.
can be added. The backgrounds then remain permanently ready in the selection. The backgrounds must be available as JPG or PNG file in the resolution 1920×1080 or 3840×2160.
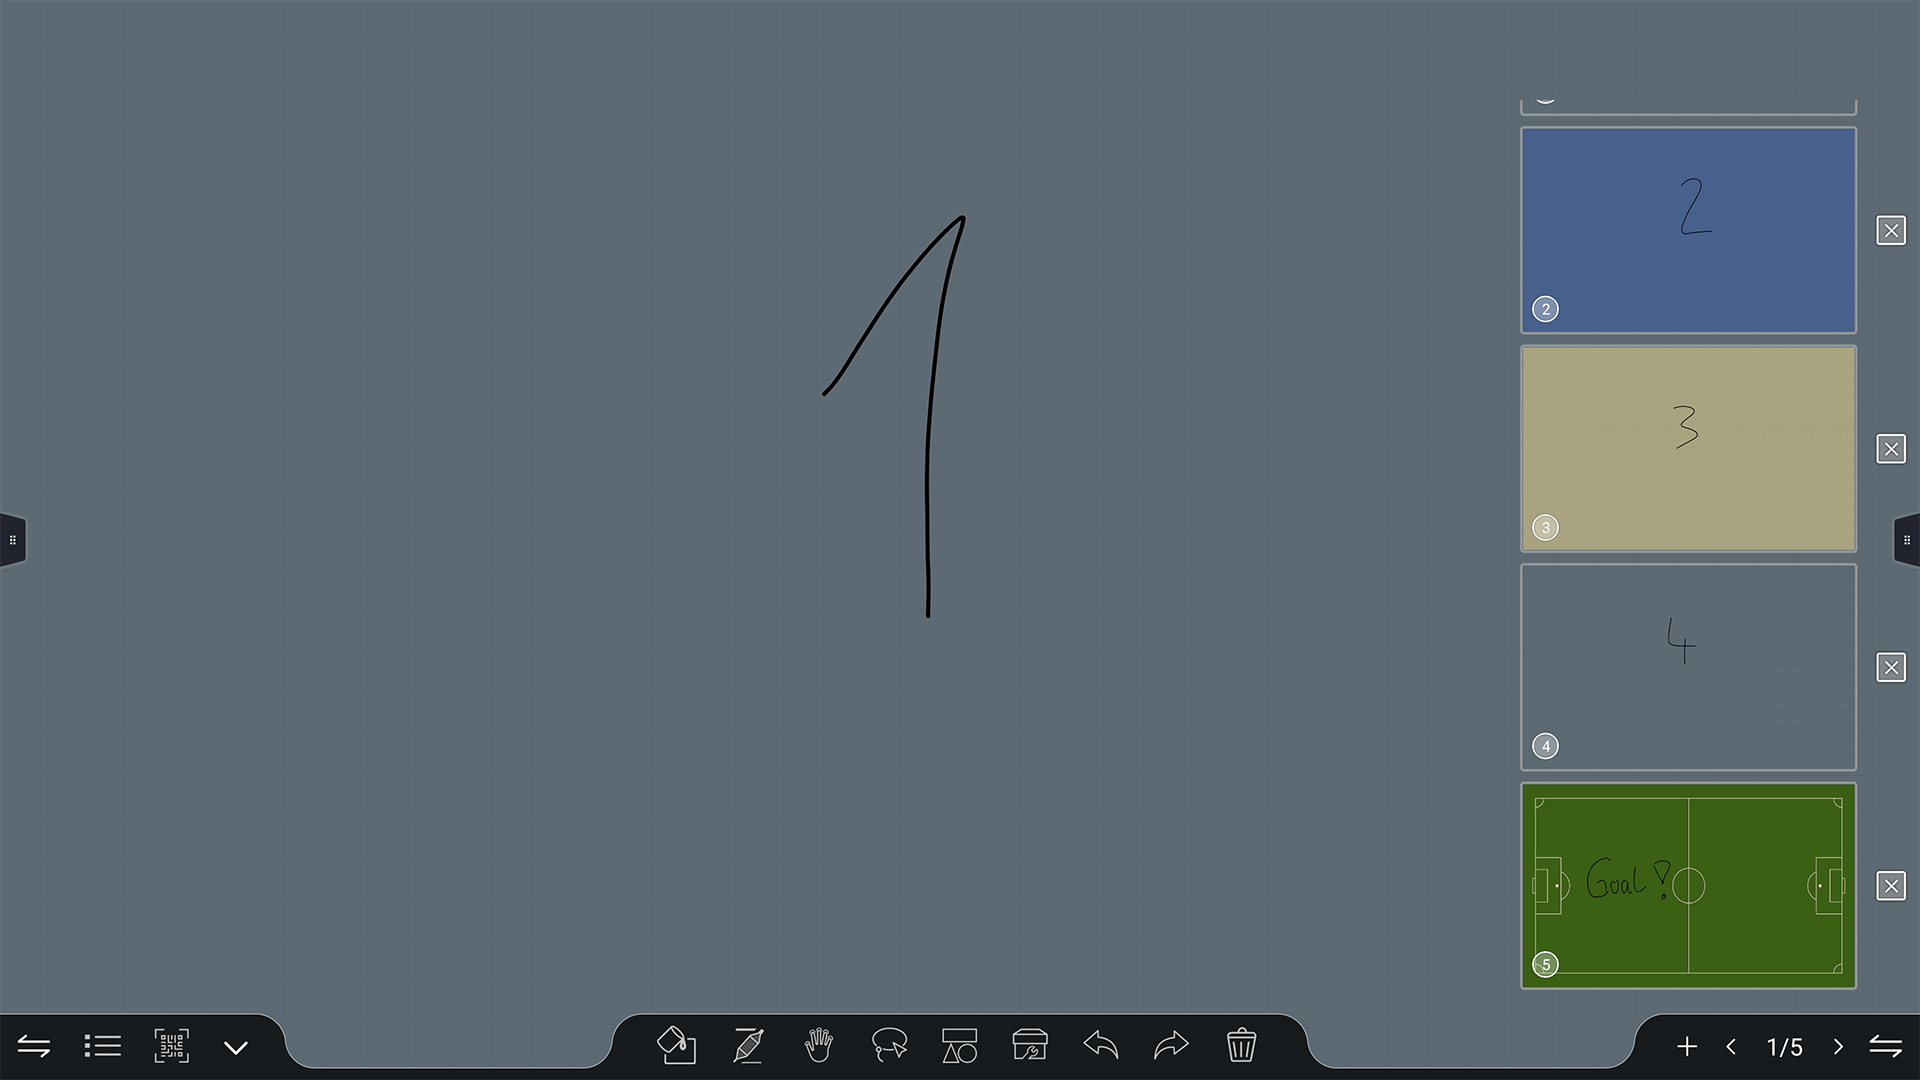
With a click on the page numbers ![]() Go to the saved whiteboard pages. Tap the page to select it. To close a page, tap the cross next to the whiteboard page you want to close.
Go to the saved whiteboard pages. Tap the page to select it. To close a page, tap the cross next to the whiteboard page you want to close.
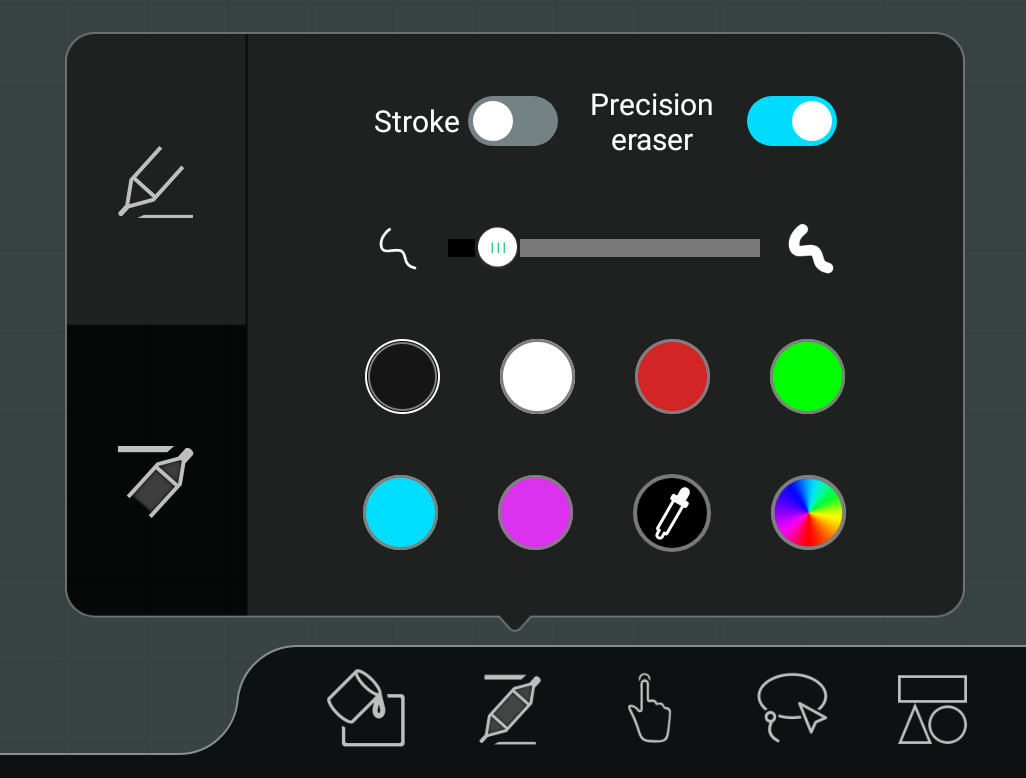
The Pencil Icon ![]() opens a submenu in which the color selection, line thickness or the eraser function for the thin and thick pen tip can be selected. You can use the eyedropper to apply the color from another object.
opens a submenu in which the color selection, line thickness or the eraser function for the thin and thick pen tip can be selected. You can use the eyedropper to apply the color from another object.
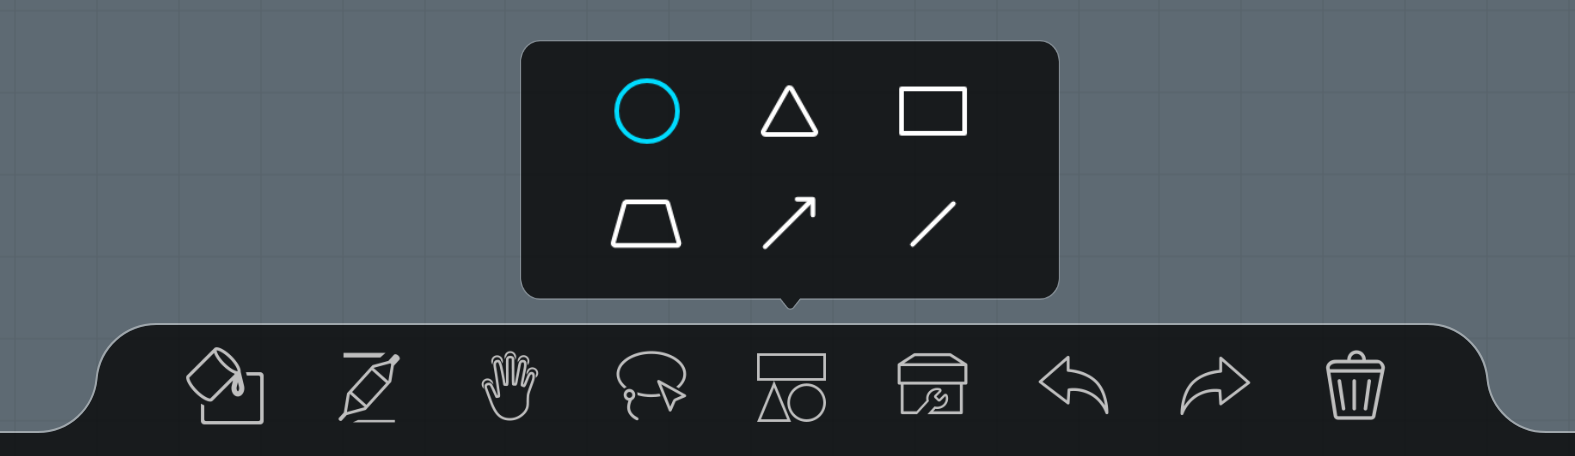
Via the "Shapes" icon ![]() call up the submenu where you can choose from different shapes.
call up the submenu where you can choose from different shapes.
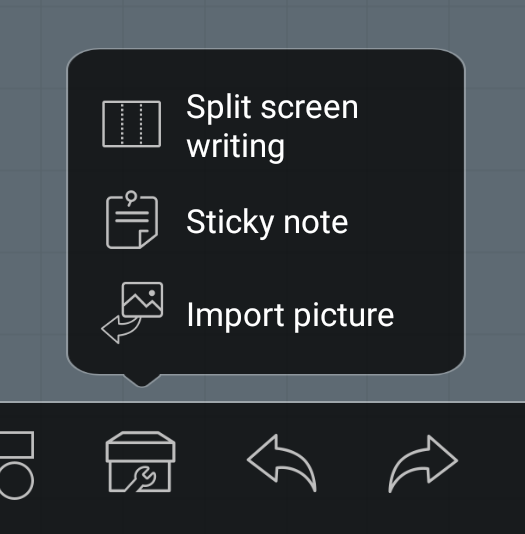
From the Icon tool ![]() you get access to the functions:
you get access to the functions:
- Split screen
Divides the whiteboard surface into 2 or 3 areas that can be described independently. - Sticky Notes – Sticky notes that can be filled with text.
- Insert images
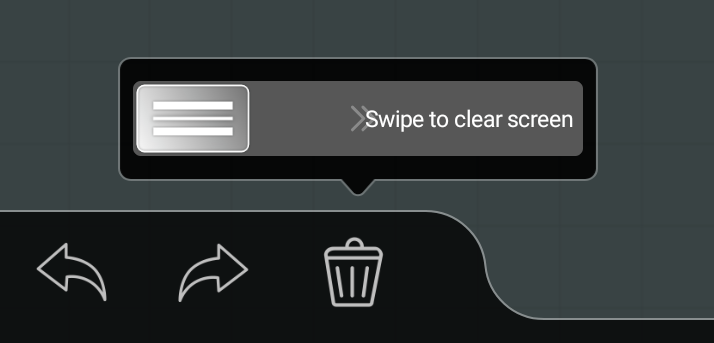
With the icon "Recycle Bin" ![]() you can delete the entire page. To do this, slide the slider to the right.
you can delete the entire page. To do this, slide the slider to the right.
- Annotation
The annotation function can be called via the sidebar. This allows you to make handwritten notes, sketches, etc.
![]() hint:
hint:
They annotate on a second level above the actual screen content. This remains unchanged. When you close the function, all notes disappear. Of course, it is possible to save these annotations including the background.
With the "Screenshot" function ![]() you can transfer the entire image or a section directly into the Whiteboard app.
you can transfer the entire image or a section directly into the Whiteboard app.

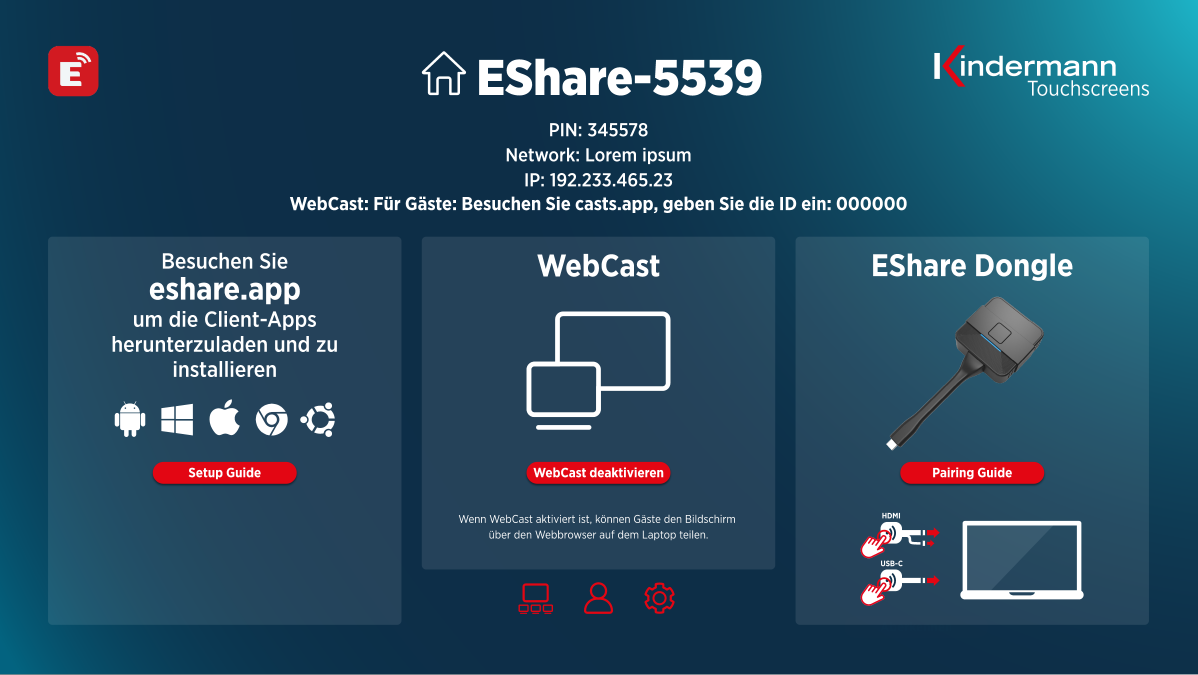
- EShare – BYOD / Wireless Streaming
With the help of this screen sharing app, you can wirelessly transfer the screen of your computer, smartphone and tablet to the display. The software for Windows, macOS, Android, ChromeOS and Linux can be found under https://eshare.app.
Alternatively, the screen can also be conveniently transferred via the browser of your laptop without software. To use the WebCast function, first activate it in the EShare app on your display, then enter https://casts.app in the address bar of your browser and type in the ID displayed on the display. After requesting the one-time password that appears, you can choose which screen you want to share.
The third way to share your screen wirelessly are the HDMI transmitters or USB-C transmitters. They work like an external screen and transmit the video signal intuitively and also without software installation to the display.
Please follow the instructions that appear after opening the app.
For more practical tips on how to use EShare, check out our Academy.
![]() hint:
hint:
To use wireless image transmission, the mobile devices must be connected to the hotspot of the display or better the display must be accessible from the same (WLAN) network in which mobile devices work.
- File manager
With the file manager you get access to the folders and files of the Android system as well as to the USB data storage. Furthermore, the app supports the playback of images, videos and audio data, etc.
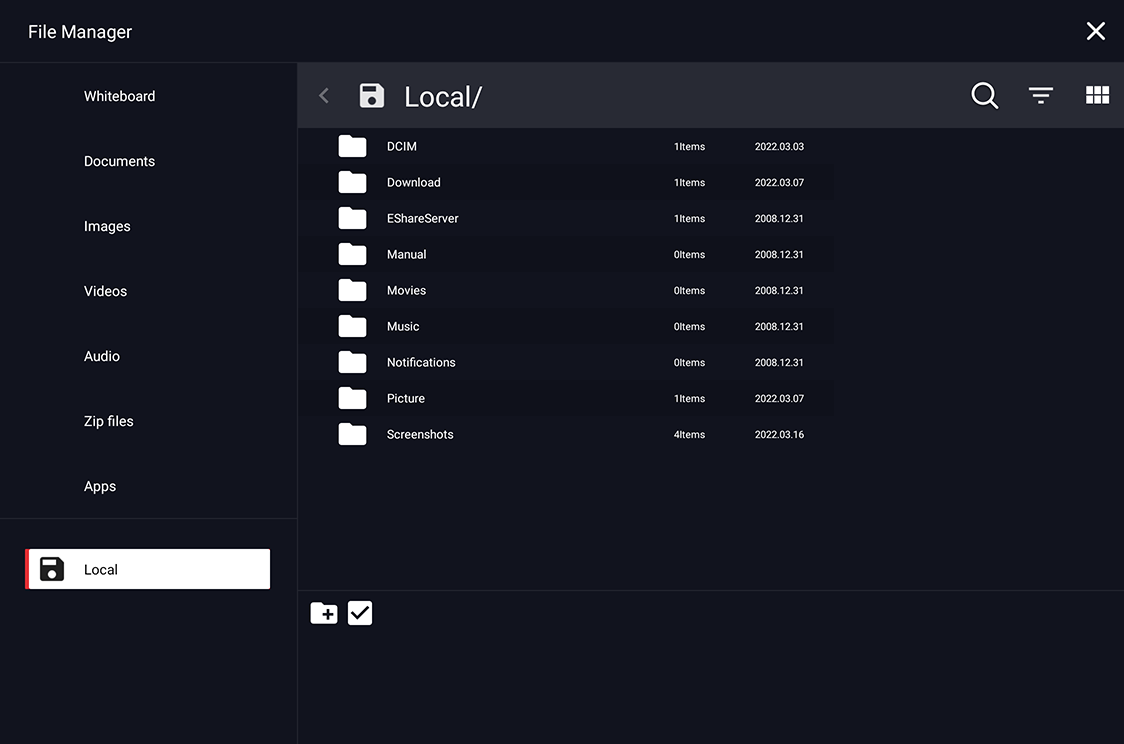
Click on the ![]() icon to create a new directory. To select a directory or files, either click on the selection icon
icon to create a new directory. To select a directory or files, either click on the selection icon ![]() , or you can long tap an object.
, or you can long tap an object.
This will display additional option icons: ![]()
If this bar is active, individual objects can be added by clicking on the selection. If you click selected objects again, deselect this object again.![]() selects or deselects all files for all of them:
selects or deselects all files for all of them: ![]()
![]() copies the selected objects
copies the selected objects![]() moves the selected objects
moves the selected objects![]() deletes the selected objects
deletes the selected objects![]() renames the selected object (is
renames the selected object (is ![]() inactive in case of multiple selection)
inactive in case of multiple selection)![]() Transmission of the selected objects via Bluetooth
Transmission of the selected objects via Bluetooth![]() Transfer the selected items via GoogleDrive or OneDrive
Transfer the selected items via GoogleDrive or OneDrive![]() closes the advanced options bar
closes the advanced options bar
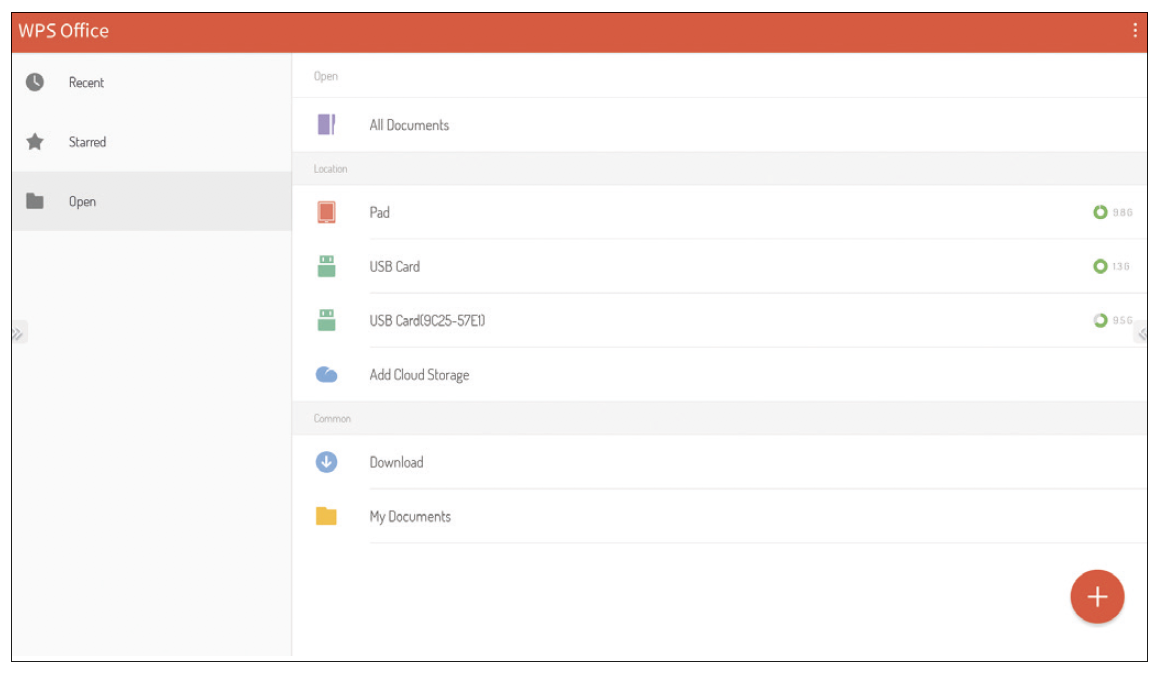
- WPSOffice
With WPSOffice you can open and edit Word, Excel and PowerPoint as well as PDF files.
- Default browser: Firefox
In addition, the Chromium Browser is also pre-installed.
- Adobe Reader
Is the official app from Adobe for viewing PDF files.
- NewPipe
Is an app for ad-free playback of Youtube videos.
- VLC
Is an app for playing video and audio files and playing streams on the local network. - Gallery
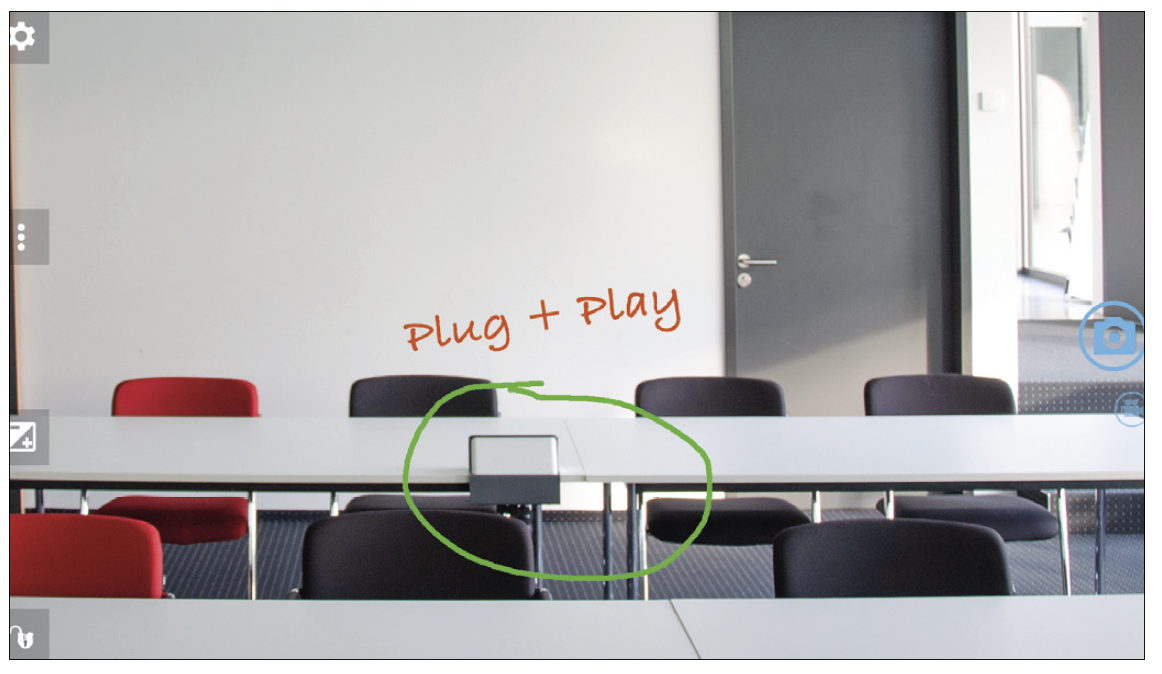
Is an app for opening and editing pictures and videos. - Open Camera
The Open Camera app displays the live image of a visualizer or webcam. For example, documents or 3D objects can be easily digitized and annotated accordingly with the Annotation App.
- Open Street Map
Provides access to worldwide maps of the online service of the same name.
9. Technical data
9.1 Data sheet
In the data sheet for the touch displays TD-20xx you will find all relevant technical data.
9.2 Vga mode display
| No. | mode | resolution | Refresh rate |
|---|---|---|---|
| 1 | VGA | 640x480 | 60Hz |
| 2 | SVGA | 800x600 | 60Hz |
| 3 | XGA | 1024x768 | 60Hz |
| 4 | WXGA | 1366x768 | 60Hz |
| 5 | Full HD | 1920 x 1080 | 60Hz |
9.3 Mode Display HDMI
| No. | mode | resolution | Refresh rate |
|---|---|---|---|
| 1 | SD | 720x480 | 70Hz |
| 2 | SD | 720x576 | 50Hz |
| 3 | HD | 1280x720 | 50Hz |
| 4 | HD | 1280x720 | 60Hz |
| 5 | Full HD | 1920 x 1080 | 50Hz |
| 6 | Full HD | 1920 x 1080 | 60Hz |
| 7 | UHD | 3840x2160 | 30Hz |
| 8 | UHD | 3840x2160 | 60Hz |
10. RS232 / IP control commands
10.1 Introduction
This section describes the hardware specification and the control protocol via RS232 and IP interface. In the following, all ECUs that can send or receive commands via RS232 and LAN protocol are referred to as "media control".
10.2 Description
10.2.1 Hardware Specification
The connection to RS232 communication is located on the back of the display.
Connector type and pinout:
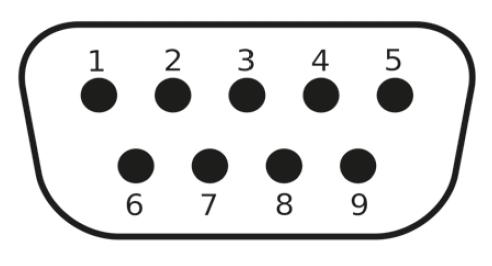
D-Sub 9-pin, male
(Connection to the display)
As a connection cable between PC and display, a crossover cable (null modem) must be used (pins 2 and 3 are crossed).
| PIN | signal | |
|---|---|---|
| 1 | NC | |
| 2 | TXD | to send a command |
| 3 | RXD | to receive a command |
| 4 | NC | |
| 5 | GND | |
| 6 | NC | |
| 7 | NC | |
| 8 | NC | |
| 9 | NC | |
| case | GND |
10.2.2 Settings of the serial interface:
| positions | value | |
|---|---|---|
| baud rate | 38400 bps | (fixed) |
| Bits | 8 | (fixed) |
| Stop bits | 1 | (fixed) |
| parity | none | (fixed) |
| Data stream control | none | (fixed) |
The display uses port 4660 for lan commands.
10.2.3 Network Settings
We recommend the use of the LAN interface with static assignment of the IP address, see Section 7.3.1.2.
10.3 Protocol
10.3.1 General
The RS232 and LAN commands are identical.
10.3.2 Protocol description
10.3.2.1 Command format
| head | Each command always starts with "k" for Kindermann |
| Display ID | The default value is "01". The ID "99" means that the command is sent to all connected displays. In this case, only the display responds with the ID "01". |
| Command Type | For sending a command, there are two command types: • Set command: "s" • Get command: "g" The display always returns one of the following responses to a command: • Valid set command: "y" • Valid Get command: "r" • Invalid Set or Get command: "n" |
| command | The function command |
| value | Three bytes define the value |
| end | each command completes with "cr" |
Structure of a send command (type "s" or "g") and the response command (type "r")
| head | Display ID | Command Type | command | Value 1 | Value 2 | Value 3 | end |
| 1 byte | 2 bytes | 1 byte | 1 byte | 1 byte | 1 byte | 1 byte | 1 byte |
Structure of a response command (type "y" and "n")
| head | Display ID | Command Type | end |
| 1 byte | 2 bytes | 1 byte | 1 byte |
Example 1
Sending a set command with invalid parameter: Setting the brightness of the display to 137.
| head | Display ID | Command Type | command | Value 1 | Value 2 | Value 3 | end | |
| Send (ASCII) | K | 01 | S | D | 1 | 3 | 7 | <CR> |
| Send (hex) | 0x6B | 0x30 0x31 | 0x73 | 0x44 | 0x31 | 0x33 | 0x37 | 0x0D |
| head | ID | type | end | |
| Answer (ASCII) | K | 01 | N | <CR> |
Example 2
Sending a Get command with a valid response: Query the contrast value from the display, the command is valid and the set value is 53.
| head | ID | type | command | Value 1 | Value 2 | Value 3 | end | |
| Send (ASCII) | K | 01 | G | A | 0 | 0 | 0 | <CR> |
| Send (hex) | 0x6B | 0x30 0x31 | 0x67 | 0x61 | 0x30 | 0x30 | 0x30 | 0x0D |
| Answer (ASCII) | K | 01 | R | A | 0 | 5 | 3 | <CR> |
10.3.3 Set Function Commands
|
category |
function |
ASCII command |
remark |
|
power |
from |
k01sA000<CR> |
|
|
one |
k01sA001<CR> |
Not available via LAN, please use |
|
|
source |
android |
k01sB00A<CR> |
|
|
HDMI |
k01sB004<CR> |
||
|
HDMI 1 |
k01sB014<CR> |
||
|
HDMI 2 |
k01sB024<CR> |
||
|
OPS |
k01sB007<CR> |
||
|
DP |
k01sB009<CR> |
||
|
VGA |
k01sB006<CR> |
||
|
AV |
k01sB001<CR> |
||
|
YPbPr |
k01sB003<CR> |
||
|
image |
Freeze screen: Off |
k01s[000<CR> |
|
|
Freeze screen: On |
k01s[001<CR> |
||
|
Backlight: Off |
k01s\000<CR> |
||
|
Backlight: On |
k01s\001<CR> |
||
|
contrast |
k01sCxxx<CR> |
Values for xxx: 000 ~ 100 Requirements: |
|
|
brightness |
k01sDxxx<CR> |
||
|
sharpness |
k01sExxx<CR> |
||
|
saturation |
k01sFxxx<CR> |
||
|
Zoom mode: 16:9 |
k01sM000<CR> |
||
|
Zoom mode: 4:3 |
k01sM001<CR> |
||
|
Color temperature: Standard |
k01sH000<CR> |
Requirements: |
|
|
Color temperature: Warm |
k01sH001<CR> |
||
|
Color temperature: Cold |
k01sH002<CR> |
||
|
clay |
Surround Sound: Off |
k01sI000<CR> |
|
|
Surround Sound: A |
k01sI001<CR> |
||
|
bass |
k01sJxxx<CR> |
Values for xxx: 000 ~ 100 |
|
|
heights |
k01sKxxx<CR> |
||
|
volume |
k01sPxxx<CR> |
||
|
Volume: down |
k01sP200<CR> |
||
|
Volume: high |
k01sP201<CR> |
||
|
Mute: Off |
k01sQ000<CR> |
||
|
Mute: On |
k01sQ001<CR> |
||
|
settings |
Language: English |
k01sN000<CR> |
|
|
Key lock: Off |
k01sR000<CR> |
||
|
Key lock: On |
k01sR001<CR> |
||
|
Touch input: Off |
k01sS000<CR> |
||
|
Touch input: On |
k01sS001<CR> |
||
|
IR lock: Off |
k01sV000<CR> |
||
|
IR lock: A |
k01sV001<CR> |
||
|
input |
number |
k01sT00x<CR> |
Values for x: 0 ~ 9 |
|
Navigation: high |
k01sU000<CR> |
||
|
Navigation: down |
k01sU001<CR> |
||
|
Navigation: left |
k01sU002<CR> |
||
|
Navigation: right |
k01sU003<CR> |
||
|
Enter |
k01sU004<CR> |
||
|
Open source menu |
k01sU005<CR> |
||
|
Open settings |
k01sU006<CR> |
||
|
Exit |
k01sU007<CR> |
||
|
Date: Year |
k01sXYxx<CR> |
Values for xx: 00 ~ 99 |
|
|
Date: Month |
k01sXMxx<CR> |
Values for xx: 01 ~ 12 |
|
|
Date: Day |
k01sXDxx<CR> |
Values for xx: 01 ~ 31 |
|
|
Time: Hour |
k01sYHxx<CR> |
Values for xx: 00 ~ 24 |
|
|
Time: Minute |
k01sYMxx<CR> |
Values for xx: 00 ~ 59 |
|
|
Time: Second |
k01sYSxx<CR> |
Values for xx: 00 ~ 59 |
|
|
Reset to factory settings |
k01sZ000<CR> |
10.3.4 Get Function Commands
|
category |
function |
ASCII command |
Answer (Rx) |
status |
|
|
power |
Power status |
k01gi000<CR> |
Now ON<LF> |
one |
|
|
Now Standby <CR> |
from |
only by RS232 |
|||
|
source |
Source query |
k01gh000<CR> |
k01rh00A<CR> |
Home |
hint: Example: |
|
k01rh004<CR> |
HDMI |
||||
|
k01rh014<CR> |
HDMI 1 |
||||
|
k01rh024<CR> |
HDMI 2 |
||||
|
k01rh007<CR> |
OPS |
||||
|
k01rh009<CR> |
DP |
||||
|
k01rh006<CR> |
VGA |
||||
|
k01rh001<CR> |
AV |
||||
|
k01rh003<CR> |
YPbPr |
||||
|
image |
contrast |
k01ga000<CR> |
k01raxxx<CR> |
Values for xxx: 000 ~ 100 |
|
|
brightness |
k01gb000<CR> |
k01rbxxx<CR> |
|||
|
sharpness |
k01gc000<CR> |
k01rcxxx<CR> |
|||
|
saturation |
k01gd000<CR> |
k01rdxxx<CR> |
|||
|
colour |
k01ge000<CR> |
k01rexxx<CR> |
|||
|
clay |
volume |
k01gf000<CR> |
k01rfxxx<CR> |
Values for xxx: 000 ~ 100 |
|
|
Mute |
k01gg000<CR> |
k01rg000<CR> |
from |
||
|
k01rg001<CR> |
one |
||||
|
settings |
IR lock |
k01gj000<CR> |
k01rj000<CR> |
from |
|
|
k01rj001<CR> |
one |
||||
|
Keylock |
k01gl000<CR> |
k01rl000<CR> |
from |
||
|
k01rl001<CR> |
one |
||||
|
Touch input |
k01gm000<CR> |
k01rm000<CR> |
from |
||
|
k01rm001<CR> |
one |
||||
|
date |
month |
k01gpM00<CR> |
k01rpM11<CR> |
November 14 |
|
|
day |
k01gpD00<CR> |
k01rpD14<CR> |
|||
|
hour |
k01gqH00<CR> |
k01rqH13<CR> |
time: 13:55:21 |
||
|
minute |
k01gqM00<CR> |
k01rqM55<CR> |
|||
|
second |
k01gqS00<CR> |
k01rqS21<CR> |
|||
|
system |
Device Name |
k01gr000<CR> |
k01r1WB8<CR> k01r248<CR> |
WB848 |
|
|
MAC address |
k01gs000<CR> |
k01rs1B0<CR> k01rs2C5<CR> k01rs3CA<CR> k01rs412<CR> k01rs534<CR> k01rs656<CR> |
B0:C5:CA:12:34:56 |
||
11. CE Declaration


12. Typical sources of error
Please check the table below to help you determine the reason for the malfunction that occurred before making a service request.
If you are still unable to completely eliminate the fault according to the instructions in this manual, please contact the Service Center to perform product maintenance: support@kindermann.En
| symptom | Possible cause | solution |
|---|---|---|
| The display does not start; no image is displayed | • Power plug loose • Faults in the power supply | Verify that the power cord is properly connected. |
| The picture shown shows stripes (with active VGA source) | Signal disturbance caused by other electrical devices | • Disconnect circuits of the devices • Replace VGA cable |
| The images shown on the product are disturbed by dotted lines or stripes (with HDMI or DP signal) | Poor transmission quality | Shorten the cable length, reduce the number of connectors, or reduce the resolution or refresh rate. Alternatively, a signal repeater can help. |
| Remote control only works out short distance or not at all | • The receiver of the display is blocked by another object • The battery of the remote control is low • The use of the remote control has been deactivated | • Remove the item in front of the recipient • Replace the batteries • See section 5.2 |
| The touch operation is slow, does not work (Android) | There are too many programs running | Close the programs that you do not need and thus free up memory. |
| OPS cannot be activated, no display, no touch operation | OPS was not used properly | Re-insert the OPS. To do this, make the display powerless. |
| the touch function does not work on externally connected computers | • The USB cable is connected to a USB port connected that is not associated with the video source • The touch USB cable is too long or of poor quality | • Check and change the appropriate interface of the touch USB cable • Use a shorter or active USB cable |
13. Cleaning and maintenance of displays

preparation:
![]() hint:
hint:
Please remove the power supply before you start cleaning and care to avoid electrocution.
Clean screen:
Mix a few drops of mild detergent (neutral soap, dish soap) in lukewarm water. Moisten a soft cloth with the mixture. Wring out the cloth very well.
![]() hint:
hint:
You can add commercially available disinfectants or alcohol, e.B alcohol to the mixture.
However, please do not use microfiber cloths, these can damage the special coating of the front glass and make it unusable when used intensively.
Cleaning the frame:
Use a dry, soft, lint-free cloth. Rub the frame carefully with it.
14. Product Support
Please first contact the reseller from whom you purchased the display.
Alternatively, you can contact our support: https://touchdisplays.eu/support/
15. Warranty conditions
The valid warranty conditions can be found here.
Kindermann GmbH • Mainparkring 3 • D-97246 Eibelstadt • E-Mail: info@kindermann.de • www.kindermann..com