Klick&Show K-FX, K-40, K-WM
Installation & User Guide

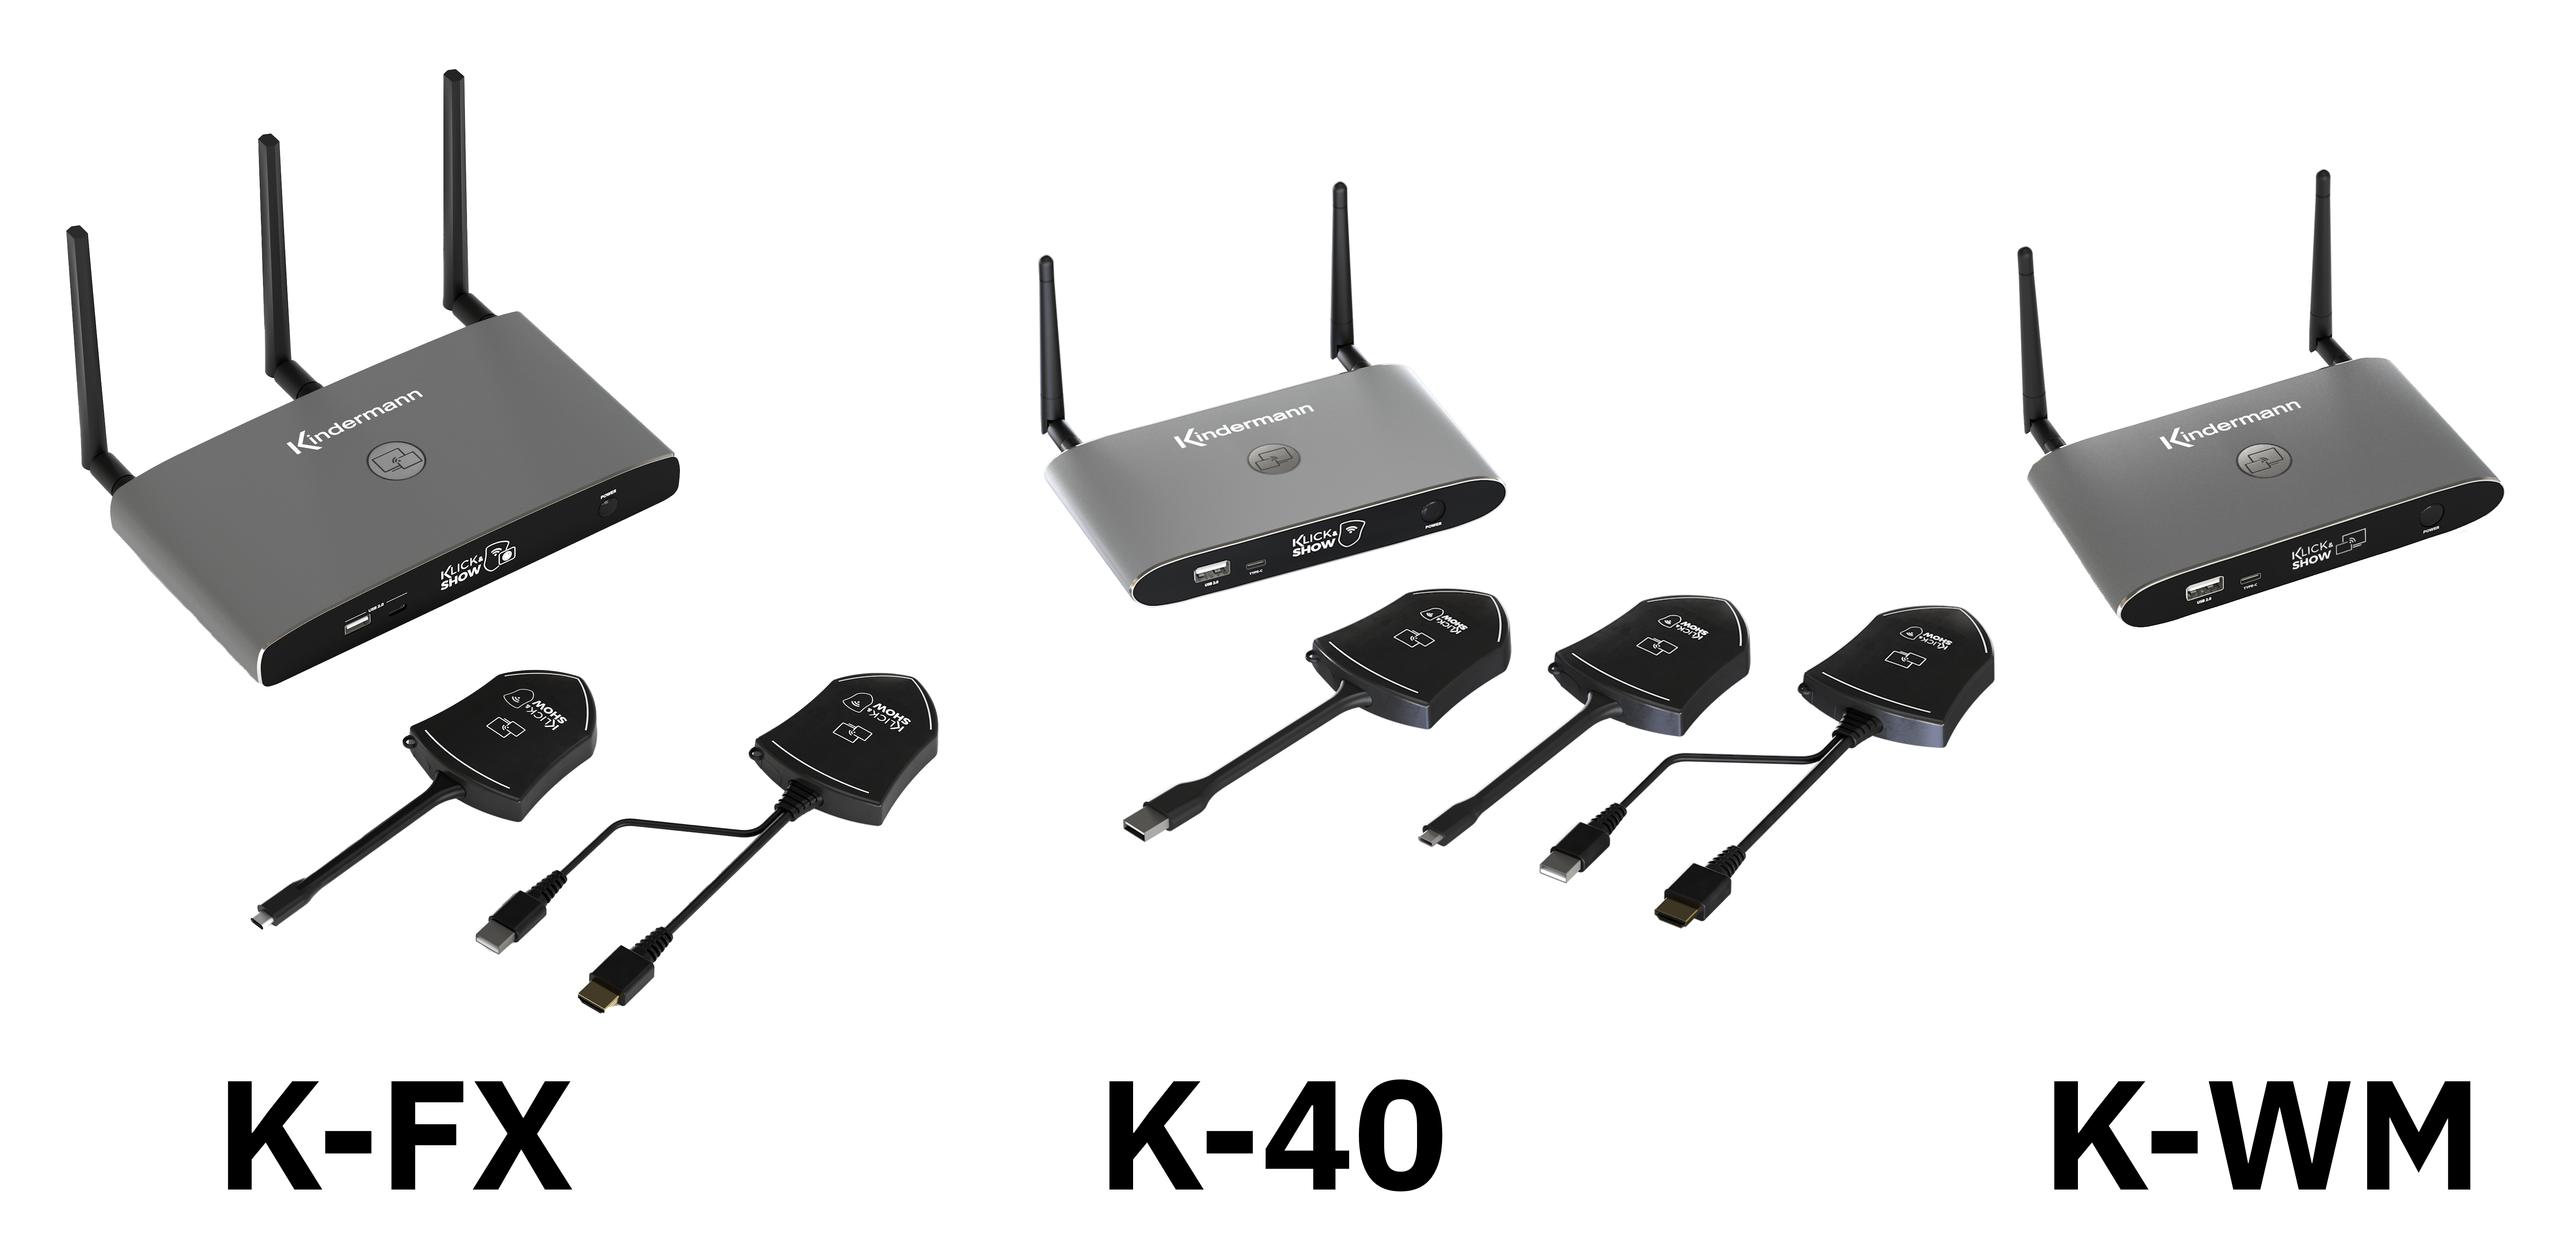
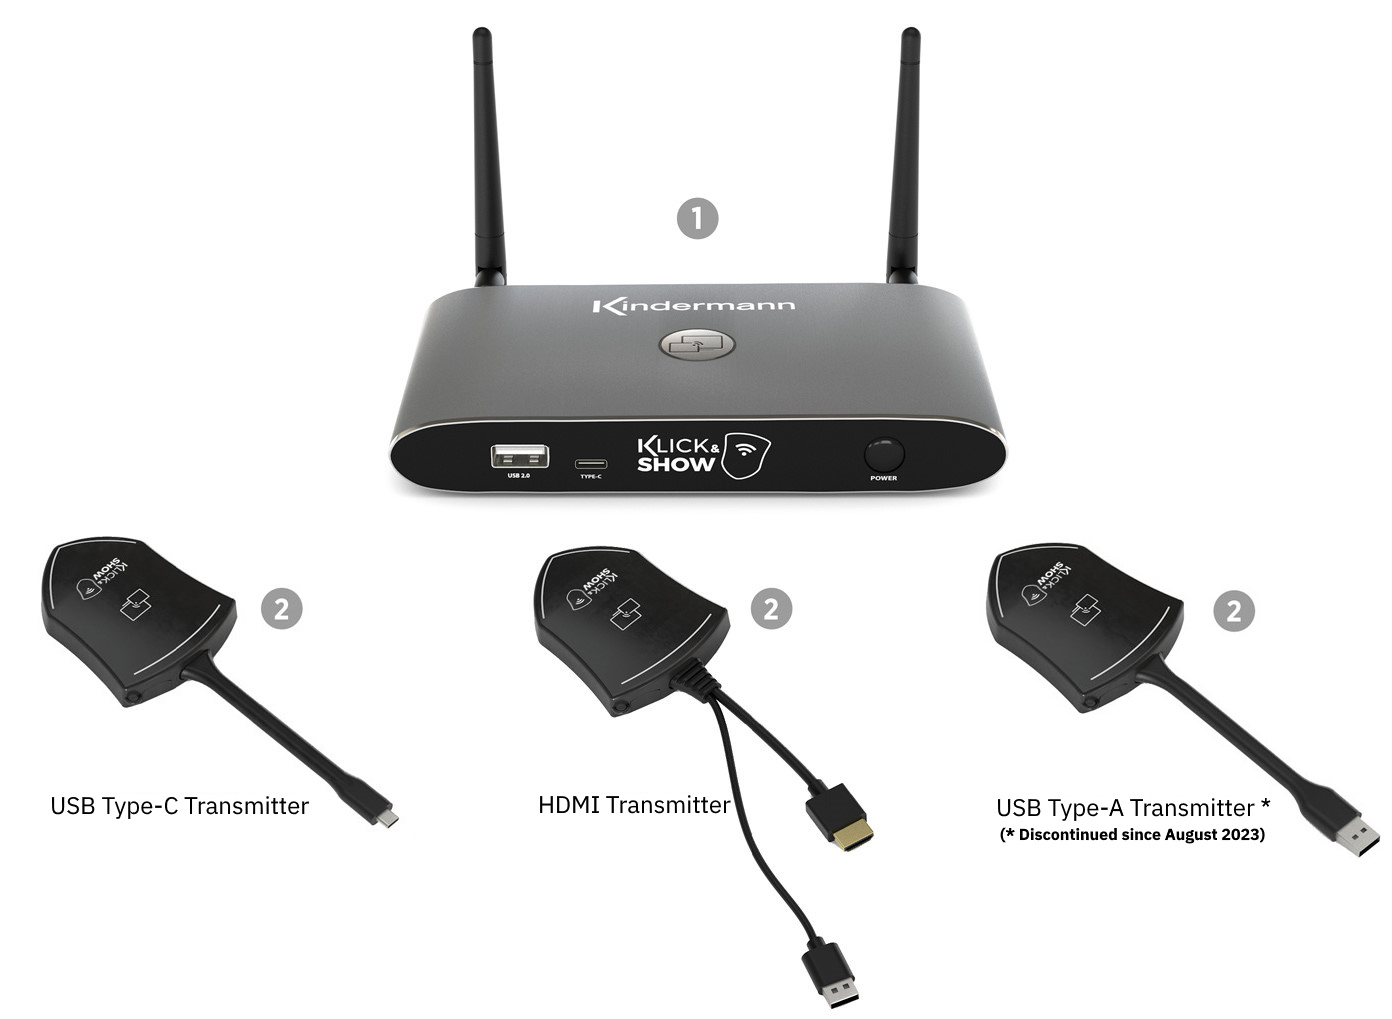
Klick&Show K-42H Kit – Item No. 7488000330
Klick&Show K-42UC Kit – Item No. 7488000312
Klick&Show K-42U Kit (discontinued) – Item No. 7488000310
Klick&Show K-40 Base Unit – Item No. 7488000315
Klick&Show K-WM – Item No. 7488000350
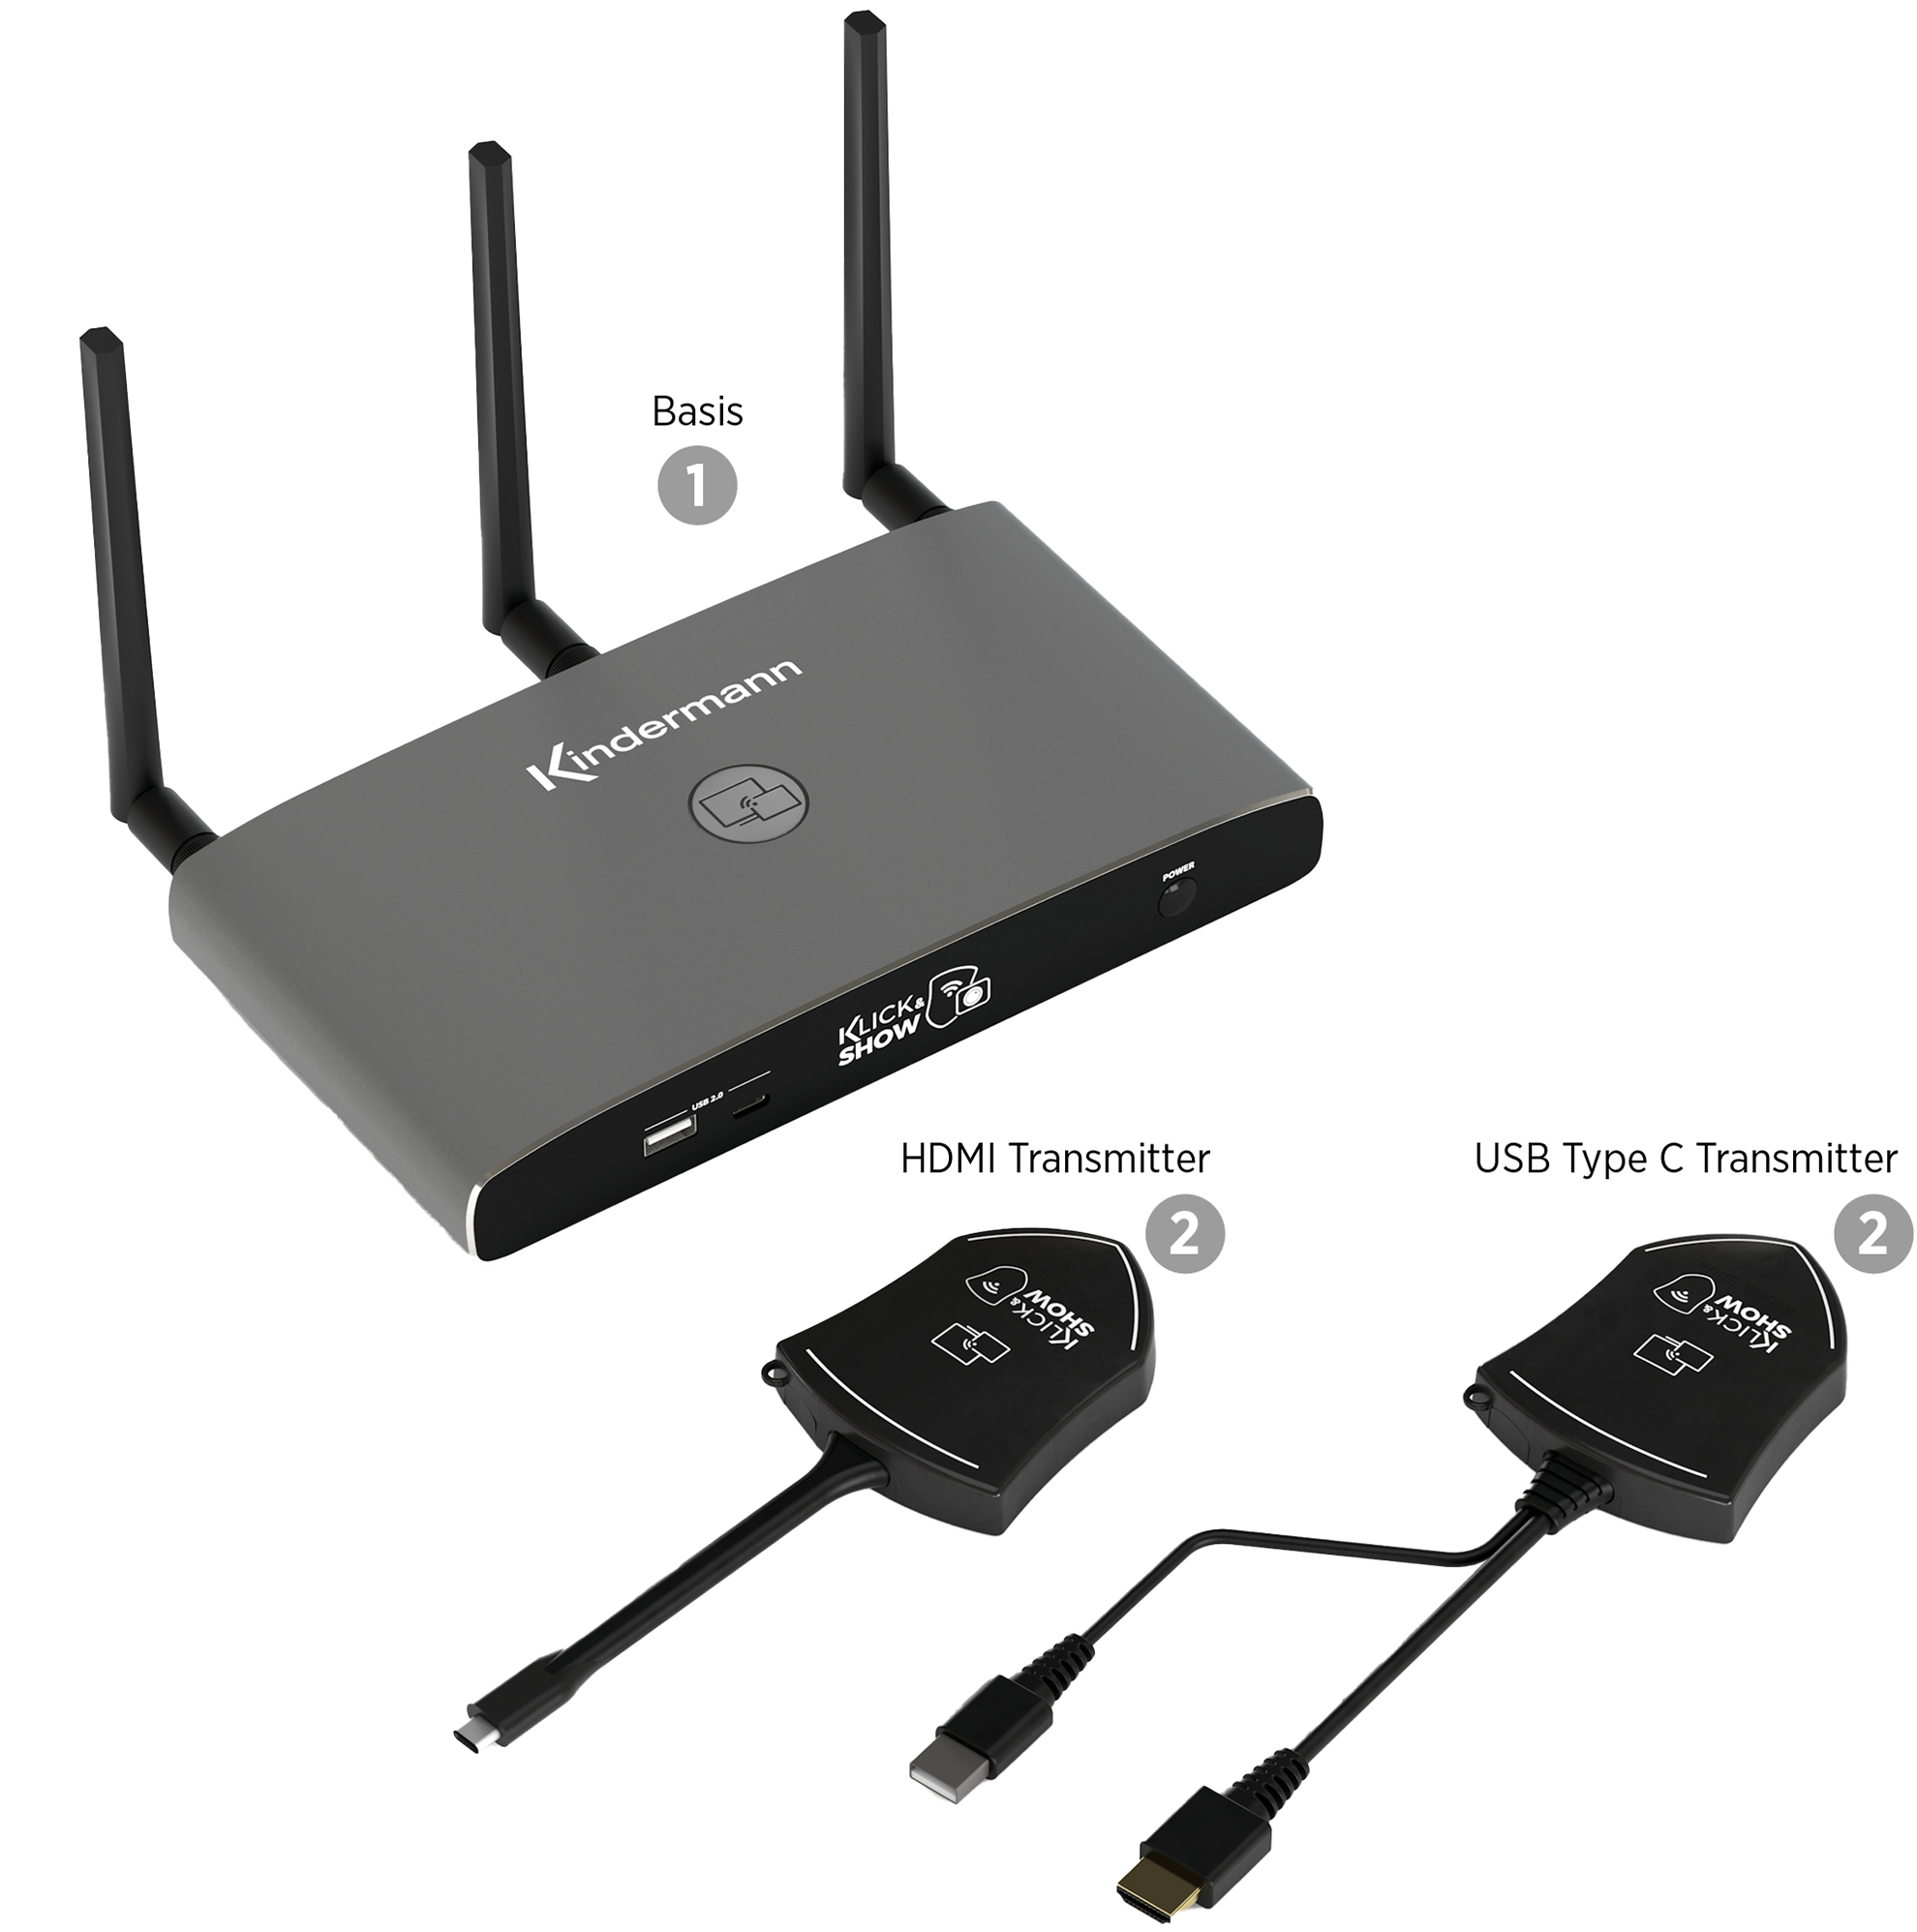
Klick&Show K-FX HDMI Kit – Item No. 7488000342
Klick&Show K-FX USB-C Kit – Item No. 7488000343
Klick&Show K-FX Base Unit – Item No. 7488000340
![]() Note on using this manual:
Note on using this manual:
The following manual is used to describe different types of devices of the Kindermann Klick&Show Product family. Chapters that only refer to certain types of devices are clearly marked. Please note the corresponding notes in the chapter headings (e.g. "K-FX") to ensure that the description applies to your specific device.
If there is no marking, the description applies to all types of devices. Examples of images may differ from your existing device type.
Images represent the following firmware versions:
K-FX: K3095 (January 2023)
K-40: K1082 (January 2023)
K-WM: K1074 (February 2023)
Please make sure that your device is up to date with the latest firmware before finally putting it into operation.
table of contents:
1. Preface
2. Safety instructions
3. Product description
4. Device description
4.1 Connectors and buttons on the base device
4.2. Transmitter (K-FX, K-40)
5. Installation
5.1 Installation of the basic device
5.1.1 Installation and alignment of the WLAN antennas
5.7 Use of touch screens (touchback)
5.8 Use of USB cameras and audio conferencing systems (K-FX)
6. Commissioning & use
6.1.1 Home screen for use via transmitter (K-FX, K-40)
6.1.2 Home screen for use via software
6.1.3 Home screen for use via smartphone or tablet
6.1.4 Homescreen Status Window
6.2.1 Screen sharing via HDMI and USB-C transmitter (K-FX, K-40)
6.2.2 Screen sharing via USB-A transmitter (K-40 )
6.2.3 Screen sharing via WirelessMedia Client for Windows
6.2.4 Screen sharing via WirelessMedia Client for MacOS
6.2.5 Supplementary Operating Instructions for the WirelessMedia Client
6.3 USB-Conferencing (K-FX)
6.3.1 Commissioning of USB conferencing with HDMI or USB-C transmitters (K-FX )
6.3.2 Commissioning USB conferencing with the WirelessMedia Client (K-FX)
6.3.3 Wireless use of camera and audio conferencing (K-FX)
6.4 WirelessMedia2 App for Android
6.5.1 AirPlay on iPad or iPhone
6.5.2 AirPlay Options on MacOS
6.6.1 Using Miracast on Windows
7. Splitscreen, Moderation & Tools
8. Service functions
8.1 Pairing of transmitters ( K-FX, K-40)
8.2 Firmware Update for Transmitter (K-FX, K-40)
8.3 Deleting older versions of WirelessMedia for Windows or MacOS
8.4 Restore factory settings (Reset)
9. Introduction to Network Configuration
9.2.1 Access Point Mode (Basic Configuration)
9.2.2 Access Point Mode with Bridging
9.3.1 Wireless Infrastructure Mode
10. WebUI
10.2 Go to the administration menu
11. Klick&Show configure
11.1.2 Wireless Infrastructure Mode
11.1.3 LAN infrastructure mode
11.2.6 Homescreen Configuration
11.4.1 Transmitter (K-FX, K-40)
11.4.6 Save/install configuration
11.4.7 Serial interface (RS232)
11.6.1 Manually updating firmware( WebUI)
11.6.2 Manually updating firmware (USB)
11.6.3 Automatically Update Firmware (OTA)
11.7.1 Create the startup program automatically
11.8 UCC Device Manager (K-FX)
11.8.1 USB Camera (K-FX)
11.8.2 USB Audio (K-FX)
12. Port shares for use in THE LAN/WLAN
13. Telnet/RS232 commands
14. Technical data
15. Regulatory
15.1 Provision of open source software
16. Troubleshooting
1. Preface
Before using the product, read this instruction manual carefully. The pictures shown in this manual are for reference only and may differ from the real product. Contact your local dealer for assistance with maintenance.
In a constant effort to improve the product, we reserve the right to change features or parameters without prior notice or obligation. For the latest information, please contact your Kindermann Dealer.
2. Safety instructions

- Read the instruction manual carefully.
- Carefully unpack the device and pick up the original packaging and packaging material for possible later shipping.
- Follow basic safety precautions to reduce the risk of fires, electric shocks and injuries to people.
- Never open or modify the device. This can lead to electric shocks or burns.
- The product may only be operated with safety low voltage with the supplied power supply.
- The use of consumables or parts that do not meet the product specifications can lead to damage or malfunction.
- For all maintenance work, contact qualified service personnel.
- The system may only be stored and used in dry environments.
- Place the device in a well-ventilated place to avoid damage from overheating.
- To clean this device, do not use liquid or aerosol cleaners.
- Before cleaning, always unplug the power plug from the socket.
- Unplug the power plug if you are not using the device for a long time.
- Information on the disposal of waste equipment: The device may not be disposed of with household waste, but must be returned via the trade route.
- Before installing, make sure that all components and accessories are included.
- All power switches, plugs, sockets and power cords must be insulated and secure.
- All cables should be connected before switching on.
3. Product description
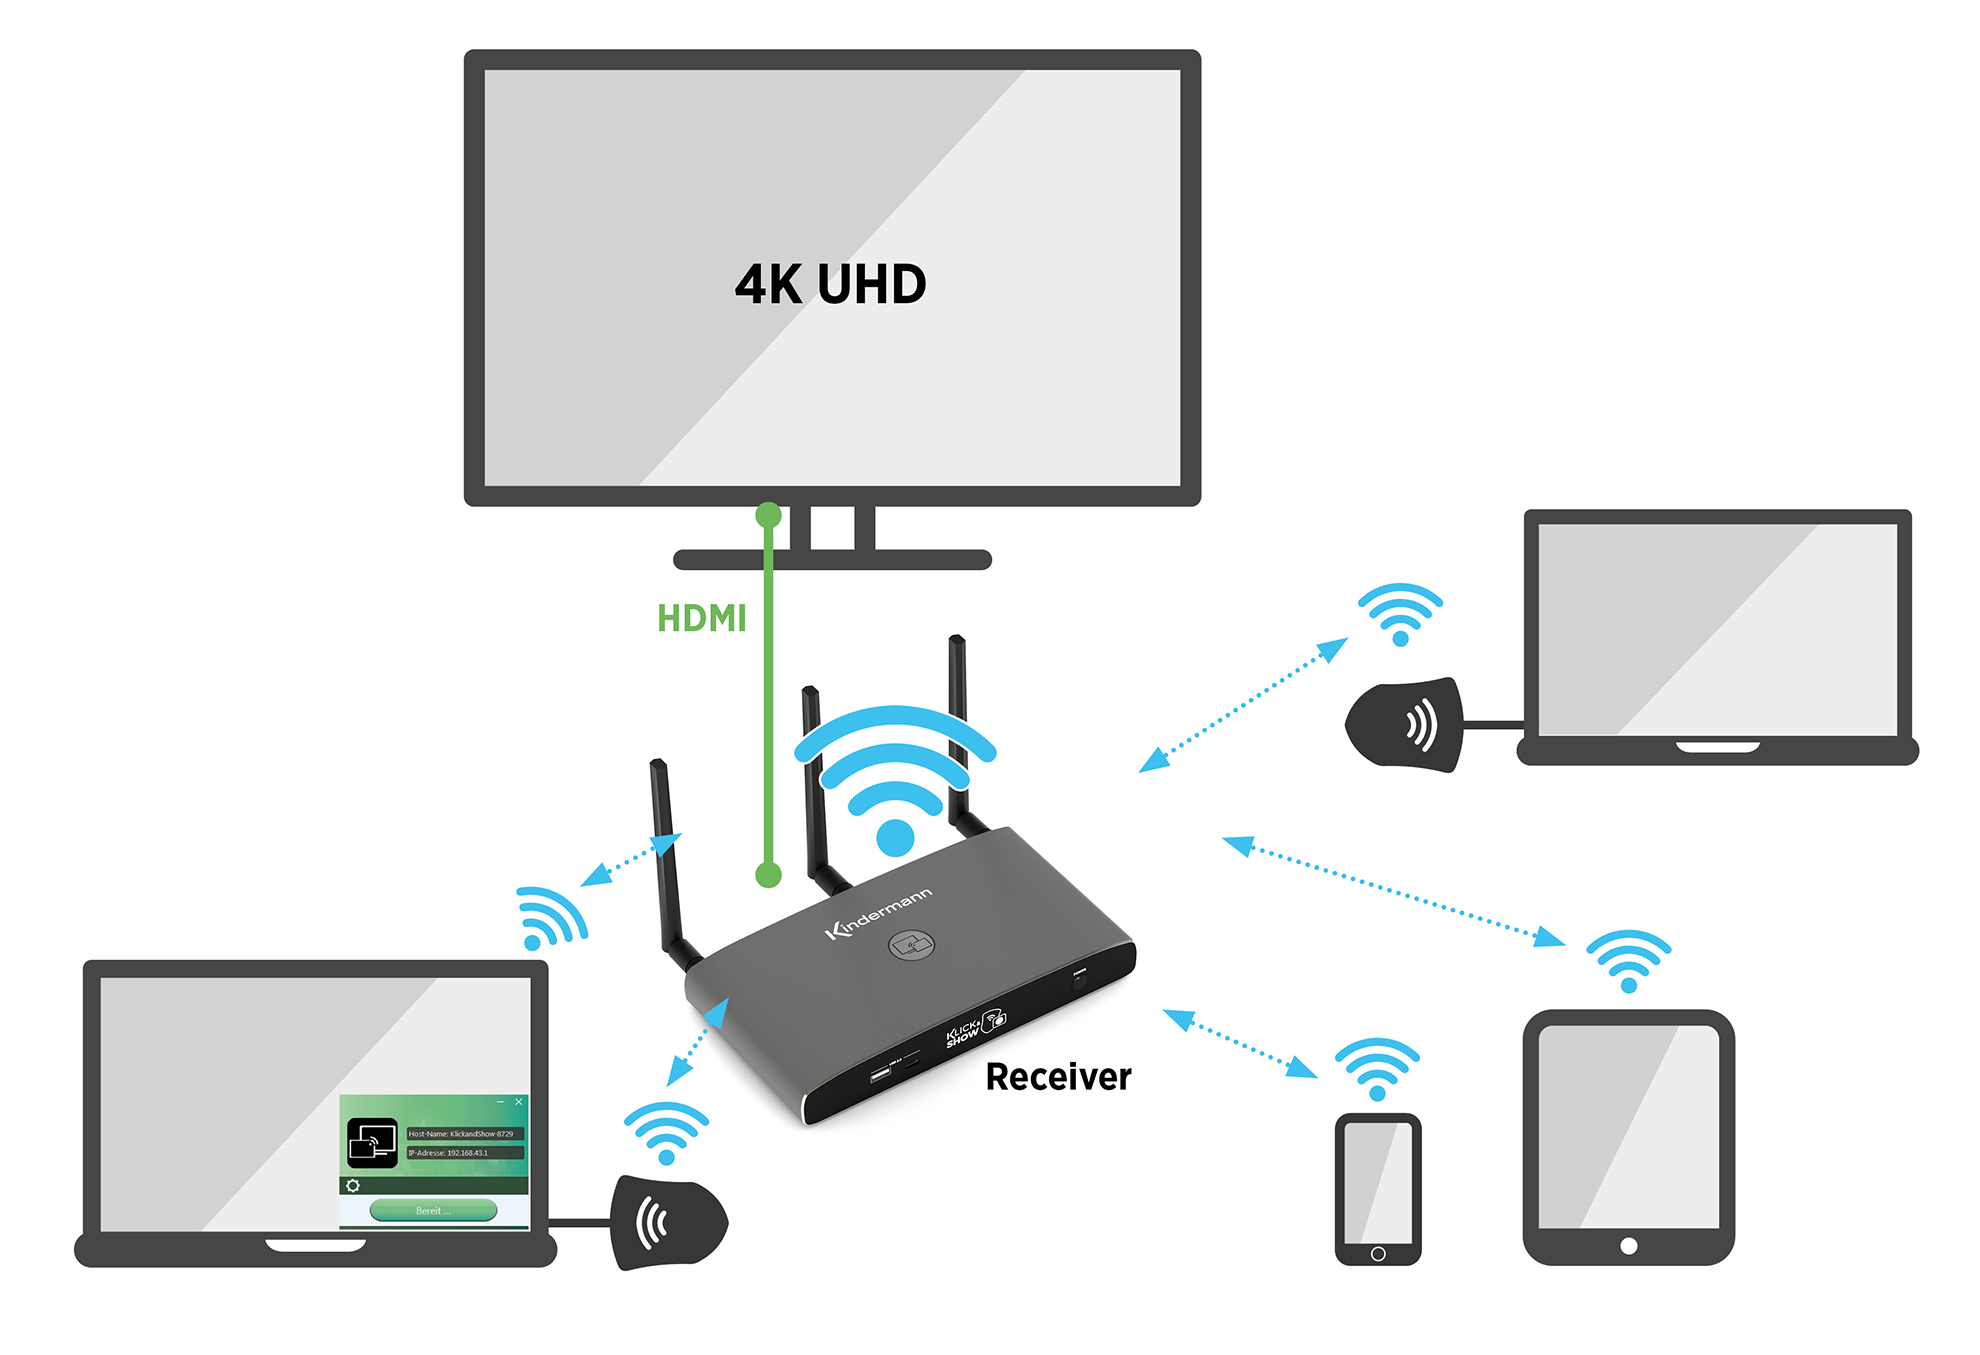
Kindermann Klick&Show K-FX, K-40 and K-WM are wireless presentation systems for huddle spaces, meeting and training rooms, classrooms, etc. where flexible presentation is important. Klick&Show enables the screen of computers, tablets or smartphones to be transmitted wirelessly and presented to a central screen – without lengthy configuration, cables and waiting times. This makes the use of personal devices (BYOD – Bring Your Own Device) a breeze.
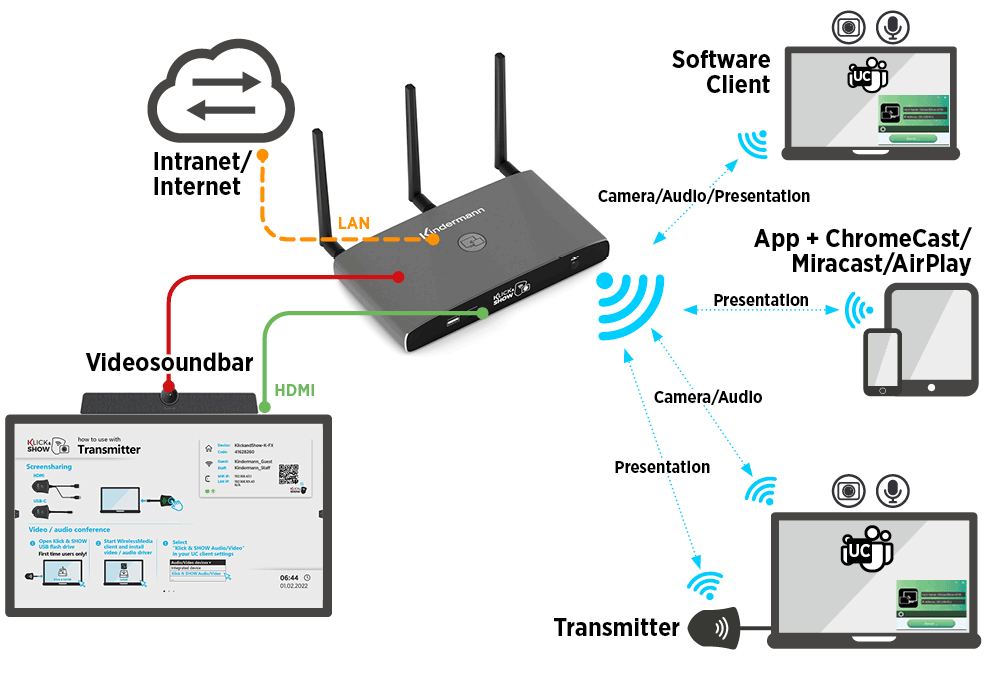
Klick&Show K-FX extends the functionality with a conferencing function for the use of USB cameras, speakerphones, video soundbars, etc. that are permanently installed in the room and connected via USB to the Klick&Show K-FX base. Thanks to USB-over-WiFi, these can be used wirelessly for UC conferencing with a PC or notebook as if they were directly connected.
This makes it easier for hybrid teams to collaborate on video conferences (collaboration between office and home office or on the road), because each meeting room or huddle space can be used easily and spontaneously with your own UC or video conferencing account.
There are various transmission paths to choose from for the wireless transmission of content, first and foremost the Klick&Show Transmitter with HDMI or USB-C interface, which allows the use of KLICK&SHOW make it particularly easy. Both types of transmitters allow you to share the PC screen without installing any software. Klick&Show Transmitters are compatible with the K-FX and K-40 base units.
The " WirelessMedia" software client enables software-based sharing of a PC screen without transmitter for all device types K-FX, K-40 and K-WM and is available for Windows and MacOS operating systems. The software client is also required to use the conferencing function at Klick&Show K-FX and provides wireless data stream transfer of the UC devices connected to the base to the host laptop for UC conferences.
In addition, the generic protocols AirPlay, Miracast and ChromeCast (GoogleCast) are supported for image transmission. These are available directly on the respective platforms without the installation of additional software and are therefore particularly easy and intuitive to use.
For mirroring Android device content, the WirelessMedia2 app is available free of charge from the Google Play Store .
All Klick&Show Device types allow the simultaneous display of up to four device contents in a split-screen display.
3.1 Features/Compatibility
The technical data of the Klick&Show K-40 device series can be found here.
The technical data of Klick&Show K-WM can be found here.
The technical data of the Klick&Show K-FX device series can be found here.
Compatibility with third-party devices:
Klick&Show K-FX is compatible with almost all USB cameras, USB video soundbars, USB speakerphones and professional AEC (Active Echo Cancelation) solutions with USB interface available on the market.
Requirements for USB devices:
- UAC/UVC profile support
- Video encoding in M-JPEG or YUV format
(Due to the lower amount of data and network load, we recommend the use of cameras that support M-JPEG!) - Only devices with integrated AEC (Active Echo Cancelation) are supported, e.B video soundbars, speakerphones, integrated audio room solution with AEC.
3.2 Scope of delivery
Klick&Show K-FX Series (7488000340, 7488000342, 7488000343)
- 1 Kindermann Klick&Show K-FX Base Unit
- 3 WLAN antennas
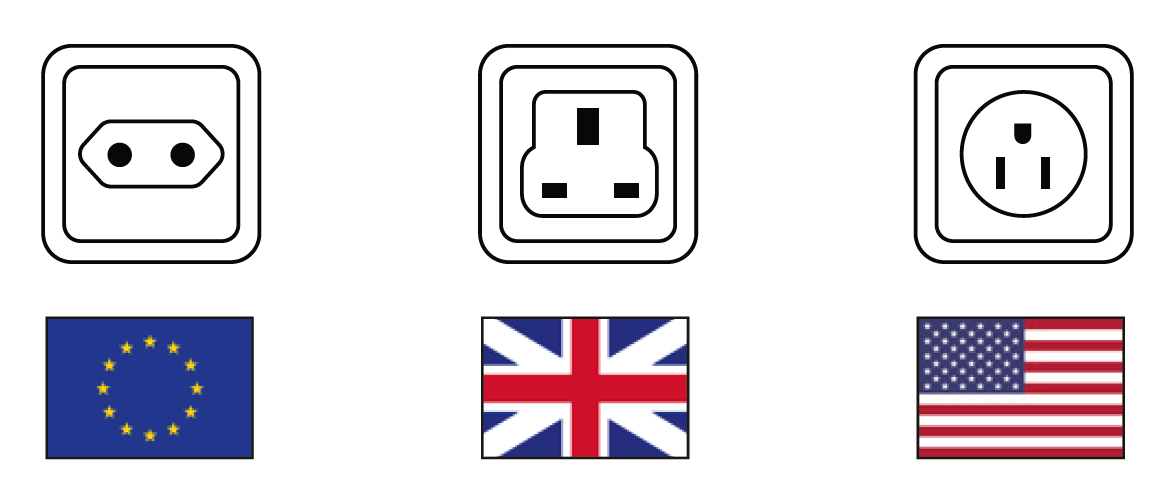
- 1 universal power supply for mains voltage 100 – 240 VAC, 12 VDC/3 A, with USA, EU and UK plug adapter
- 1 Euroblock plug for RS232
- 1 Quick Start Guide Quick Start Guide
- 2 Klick&Show HDMI Transmitter (K-FX HDMI Kit, 7488000342 only)
- 2 Klick&Show USB-C Transmitter (K-FX USB-C Kit, 7488000343 only)
Klick&Show K-40 Series (74880003101, 7488000312, 7488000315, 7488000330)
- 1 Kindermann Klick&Show K-40 Base Unit
- 2 WLAN antennas
- 1 universal power supply for mains voltage 100 – 240 VAC, 12 VDC/1.5 A, with USA, EU and UK plug adapter
- 1 Euroblock plug for RS232
- 1 Quick Start Guide Quick Start Guide
- 2 Klick&Show USB-A Transmitter (K-42U Kit, 74880003101 only)
- 2 Klick&Show HDMI Transmitter (K-42H Kit, 7488000330 only)
- 2 Klick&Show USB-C Transmitter (K-42UC Kit, 7488000312 only)
1) Note: The K-42U kit is no longer available since August 2023
Klick&Show K-WM (7488000350)
- 1 Kindermann Klick&Show K-WM Base Unit
- 2 WLAN antennas
- 1 universal power supply for mains voltage 100 – 240 VAC, 12 VDC/1.5 A, with USA, EU and UK plug adapter
- 1 Euroblock plug for RS232
- 1 Quick Start Guide Quick Start Guide
4. Device description
| No. | name | description |
|---|---|---|
| 1 | Klick&Show Base | Central unit with WLAN access point |
| 2 | Transmitter (K-KX, K-40) | Built-in Wi-Fi function for wireless transmission of the screen. Sensor button on the top to start/stop screen sharing. |
4.1 Connectors and buttons on the base device


| No. | name | description |
|---|---|---|
| 1 | USB-A socket | For pairing the HDMI transmitters (K-FX, K-40) and USB-A transmitters (K-40). For connecting a touchscreen, a mouse and for local firmware updates via USB stick. |
| 2 | USB-C socket | For pairing the USB-C transmitters (K-FX, K-40). For connecting a touchscreen, a mouse and for local firmware updates via USB stick. |
| 3 | Status LED | Red: Startup process Flashing green: Switched on Constant green: Ready for transmission Turquoise: Active transmission |
| 4 | power | Button, for switching on and off to standby |

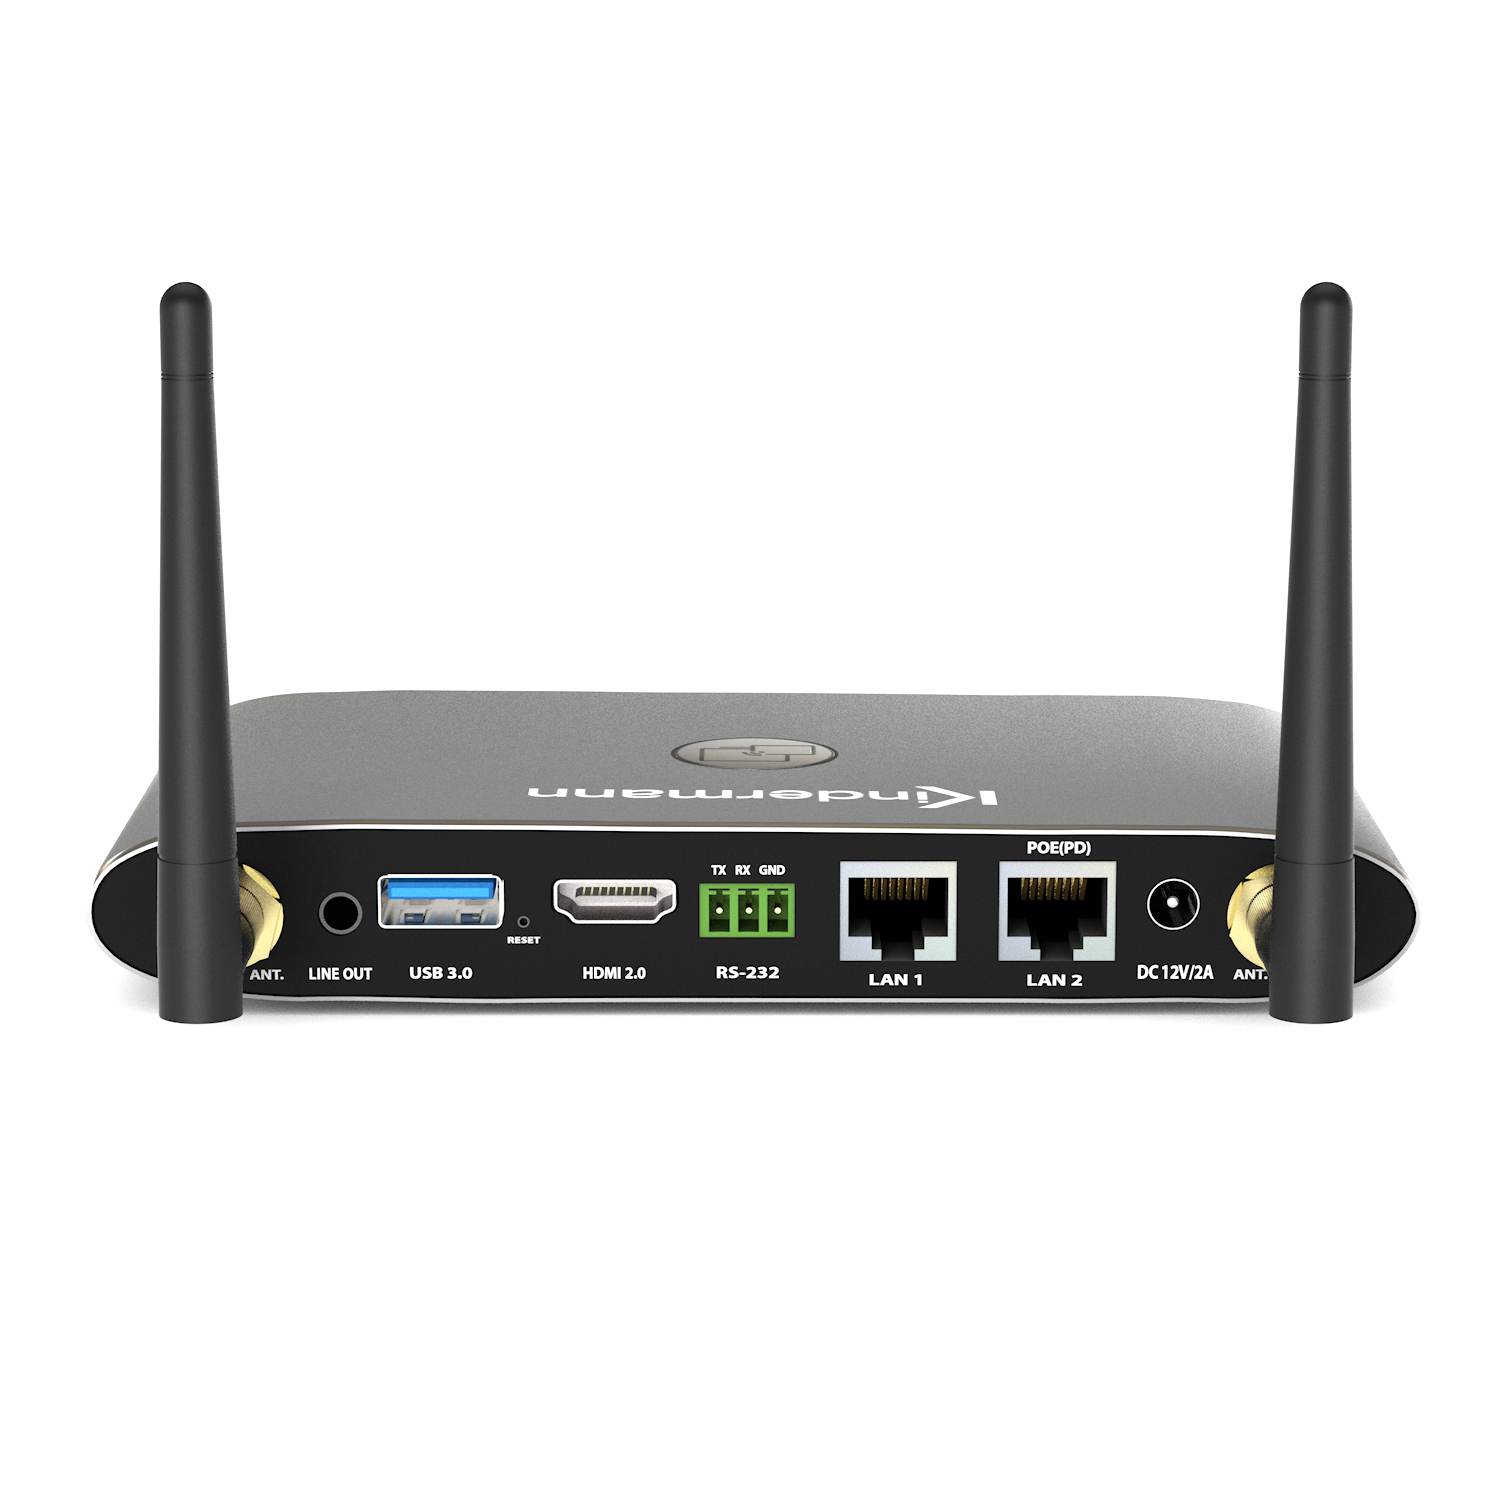
| No. | name | description |
|---|---|---|
| 1 | Antenna | Antenna connection (WLAN antennas included) |
| 2 | LINE OUT | 3.5 mm stereo jack for connection to an analog audio system |
| 3 | RS 232 | 3-pin terminal (included) for receiving and sending RS-232 commands |
| 4 | Reset | Button, resets the device to factory condition |
| 5 | USB-C port, USB 3.2 Gen1 (K-FX: 1x) | For connecting USB camera and USB audio conferencing system. For pairing the USB-C transmitters. For connecting a touchscreen, a mouse and for local firmware updates via USB stick. |
| 6 | USB 3.2 Gen1 port (K-FX: 3x; K-40/K-WM: 1x) | For connecting USB camera and USB audio conferencing system (K-FX). For pairing the transmitters (K-FX, K-40). For connecting a touchscreen, a mouse and for local firmware updates via USB stick. |
| 7 | HDMI 2.0 | HDMI output for connection to displays, projectors, etc. (Supports HDMI 2.0, 4K60Hz) |
| 8 | LAN1 | 100 Mbps, to connect to a network |
| 9 | LAN2 | 1 Gbps, to connect to a network with PoE (Power over Ethernet) support |
| 10 | Mains connection | Connect the supplied power supply to the device and the power supply |
| 11 | Security Slot | Anti-theft device (K-FX) (accessory) |
4.2 Transmitter (K-FX, K-40)
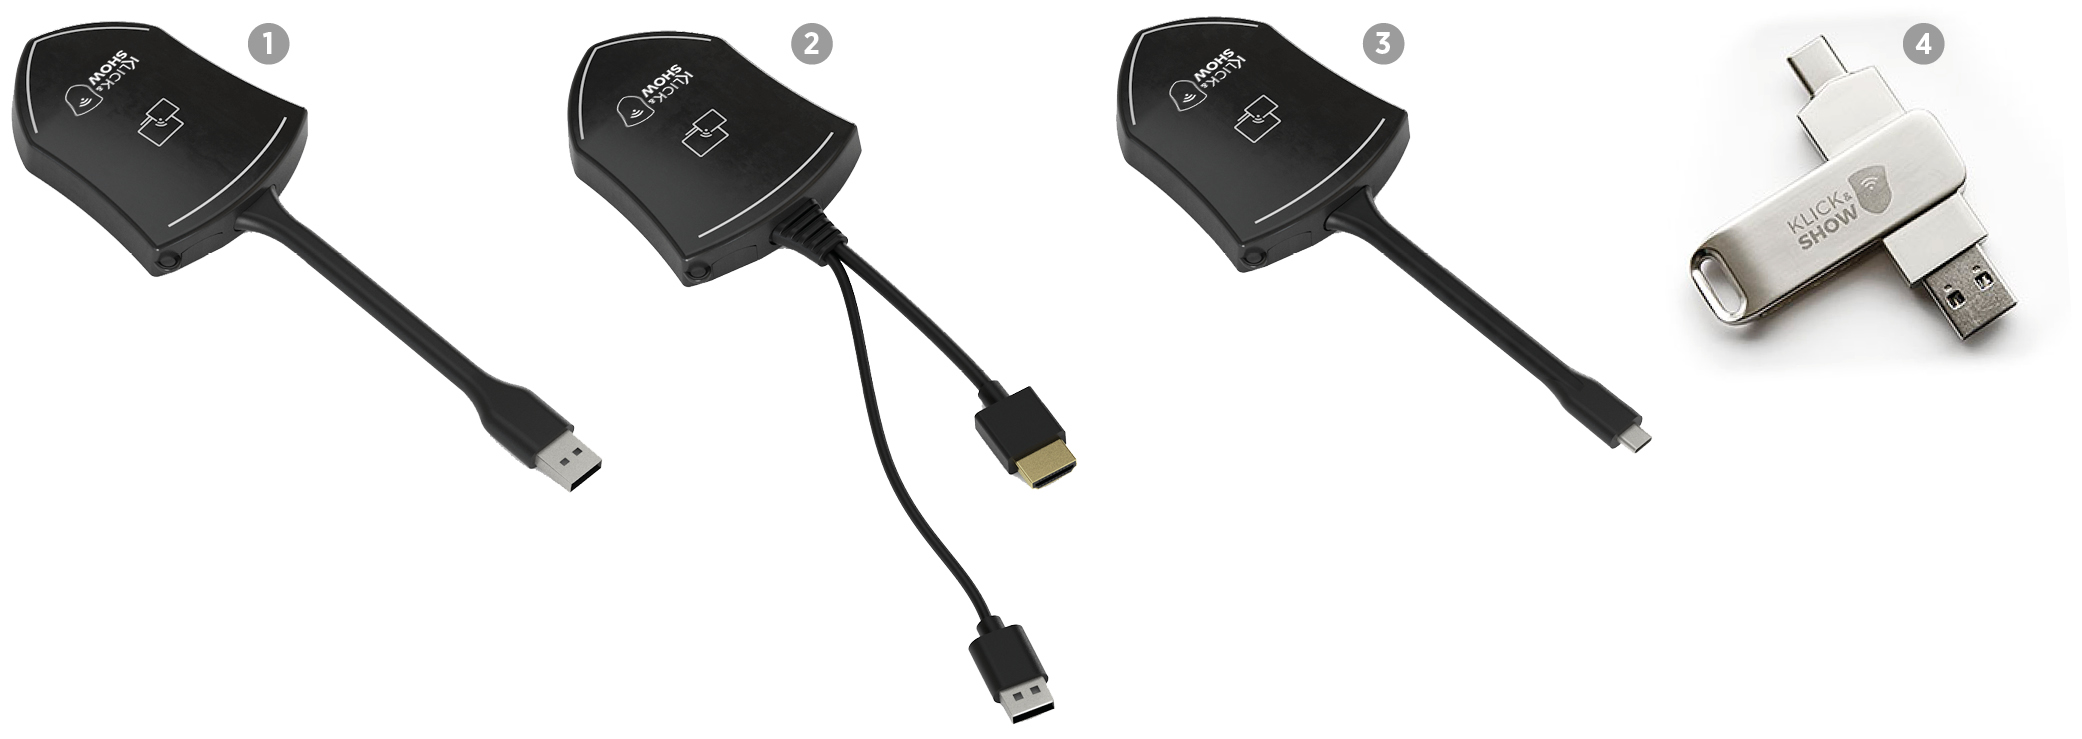
| No. | name | description |
|---|---|---|
| 1 | USB-A Transmitter (K-40) | For connection to the USB-A socket of a computer, for transmitting the screen in conjunction with the WirelseeMedia software client. Note: The USB-A transmitter will no longer be available from August 2023. |
| 2 | HDMI Transmitter (K-FX, K-40) | HDMI connector: transmission of the image signal USB-A connector: For power supply, for transferring touchback information and for pairing with the base |
| 3 | USB-C Transmitter (K-FX, K-40) | USB-C connector: transmission of the image signal (DisplayPort Alt Mode), power supply and for the transmission of touchback information as well as for pairing with the base |
| 4 | USB Tokens | USB storage with the WirelessMedia Software Client for Windows or MacOS |
Status LED in transmitter
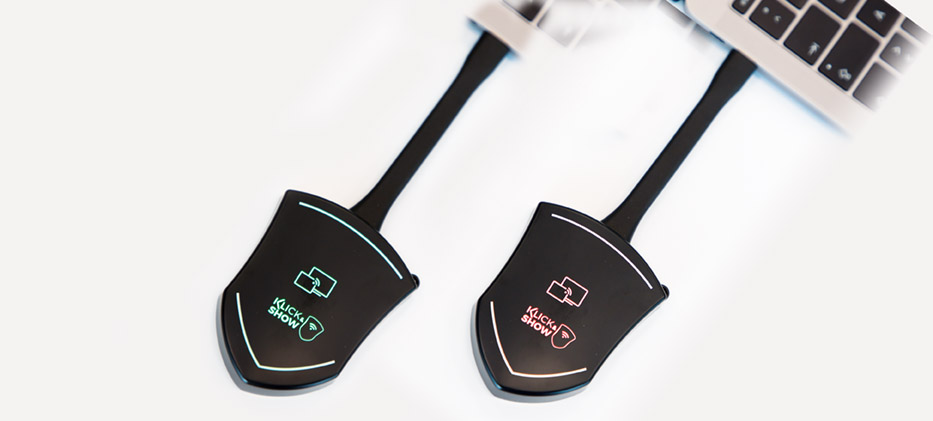
- Permanently green: Ready for transfer
- Permanently red: Active transmission
- At the base: Pairing is finished, you can pull the transmitter off the base
- Flashes green – on the computer:
– 100ms AN; 300ms OFF = initialization/connection establishment
– 500ms AN; 800ms OFF = Connect to WI-FI
– 200ms AN; Get 800ms AUS = IP
– 800ms AN; 200ms OFF = establish communication to the base
– 300ms AN; 100ms OFF = No communication between PC/Laptop and Sensor Button TOUCH
![]() hint:
hint:
The Klick&Show HDMI Transmitter can be used on almost any device with HDMI output. If the device does not have a USB port that can provide the power supply, you can use a standard USB power supply or a power bank.
The Klick&Show USB-C transmitter can be connected to any device. , which supports the so-called "DisplayPort Alternate Mode" for native graphics output on the USB-C port. In addition to PCs or laptops, this also includes mobile devices such as tablets or smartphones.
5. Installation
5.1 Installation of the basic device
The basic device can be placed on a table or mounted on the wall, for example.
![]() hint:
hint:
Please position the base as close as possible to the playback device to avoid problems with HDMI signal transmission.
Tools needed for wall mounting:
• A drill (depending on the type and nature of the wall)
• Screwdriver or cordless screwdriver suitable for the mounting screws
Required mounting accessories (not included):
• 2 x screws (recommended head diameter: 7 mm)
• 2 x Matching dowels
Installation:

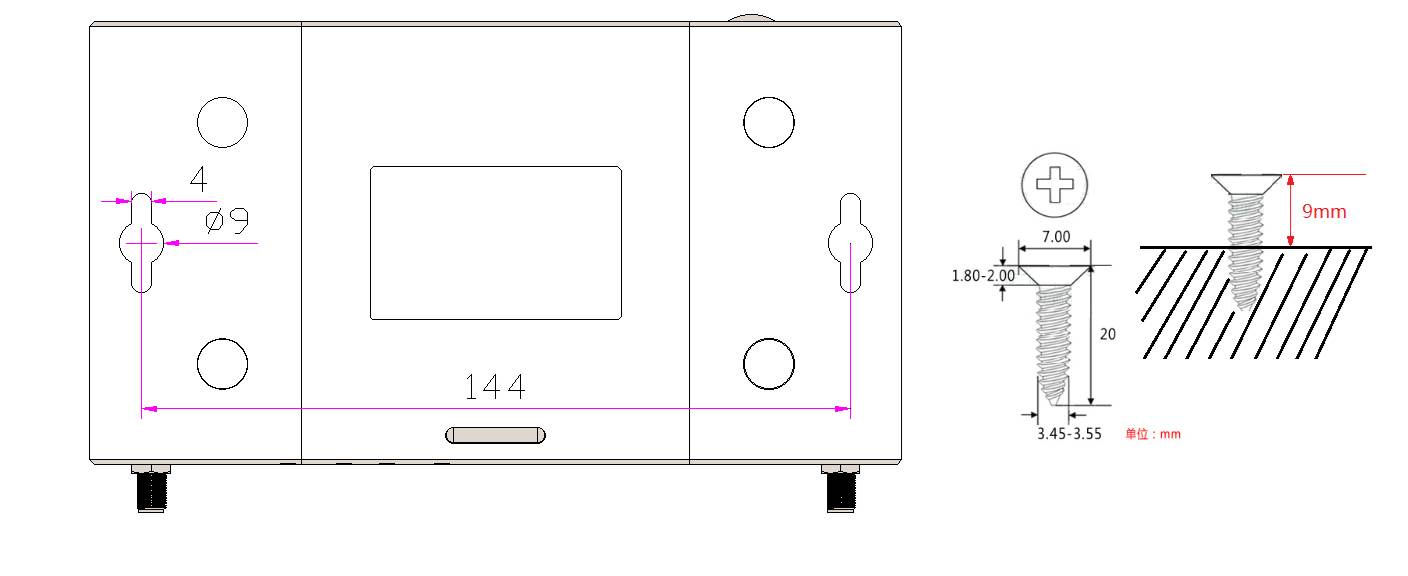
- Drill two holes according to the drawing.
- Turn on the mounting screws. Please leave about 4 mm of space between the wall and the screw head so that the base can be inserted in between.
- Place the base device on the wall so that the screw heads of the two mounting screws reach into the holes of the base. Gently press the device against the wall and slide it down or to the side (depending on the mounting situation).
- If the base is too loose, turn the screws a little further.
5.1.1 Installation and alignment of the WLAN antennas
In order to avoid damage during transport, the antennas are supplied loose and must be installed to optimize reception.
- The antennas should be aligned vertically.
- The antennas should be installed at least 50 cm away from metallic surfaces to avoid unwanted reflections. Likewise, at least a distance of 1 meter to other radio systems in the same frequency band should be maintained (e.B. WLAN access points).
- We recommend a direct line of sight between the base and transmitters and the mobile devices.
- Due to the special radiation properties of the dipole antennas, you should use the Klick & Show Do not install the base directly above or below the transmitters (under/ceiling mounting).
- When installing a Klick&Show Base within an area shielded from radio waves (e.g. 19 inch built-in metal cabinet), considerable quality losses in WLAN transmission are to be expected ("Faraday cage"). If such an installation situation is unavoidable, the supplied WLAN antennas should be separated from the base by means of an extension cable and positioned outside the shielding area.
For more information, see the white paper "Using WiFi extension cables".
5.2 Power supply
The following universal power supplies for mains voltage 100 – 240 VAC are supplied, with various regional adapter attachments:
K-FX: 12 VDC / 3A,
K-40 / K-WM: 12 VDC / 1.5A
Adapter Types:
- Mount the required type plug adapter of your country.
- Connect the power supply to the base device.
- Plug the power supply into a suitable socket.
![]() hint:
hint:
As soon as the power supply is active, the basic device (boot process) starts.
5.3 Power over Ethernet (PoE):
If the network switch supports PoE (Power over Ethernet), the power can also be provided via the network cable on the LAN2 port. The plug-in power supply is then not required.
![]() hint:
hint:
Klick&Show K-40 / K-WM base units require a power supply according to PoE 802.af standard.
That Klick&Show K-FX base unit requires a power supply according to PoE 802.3at (PoE+) in the case of connected USB UC devices.
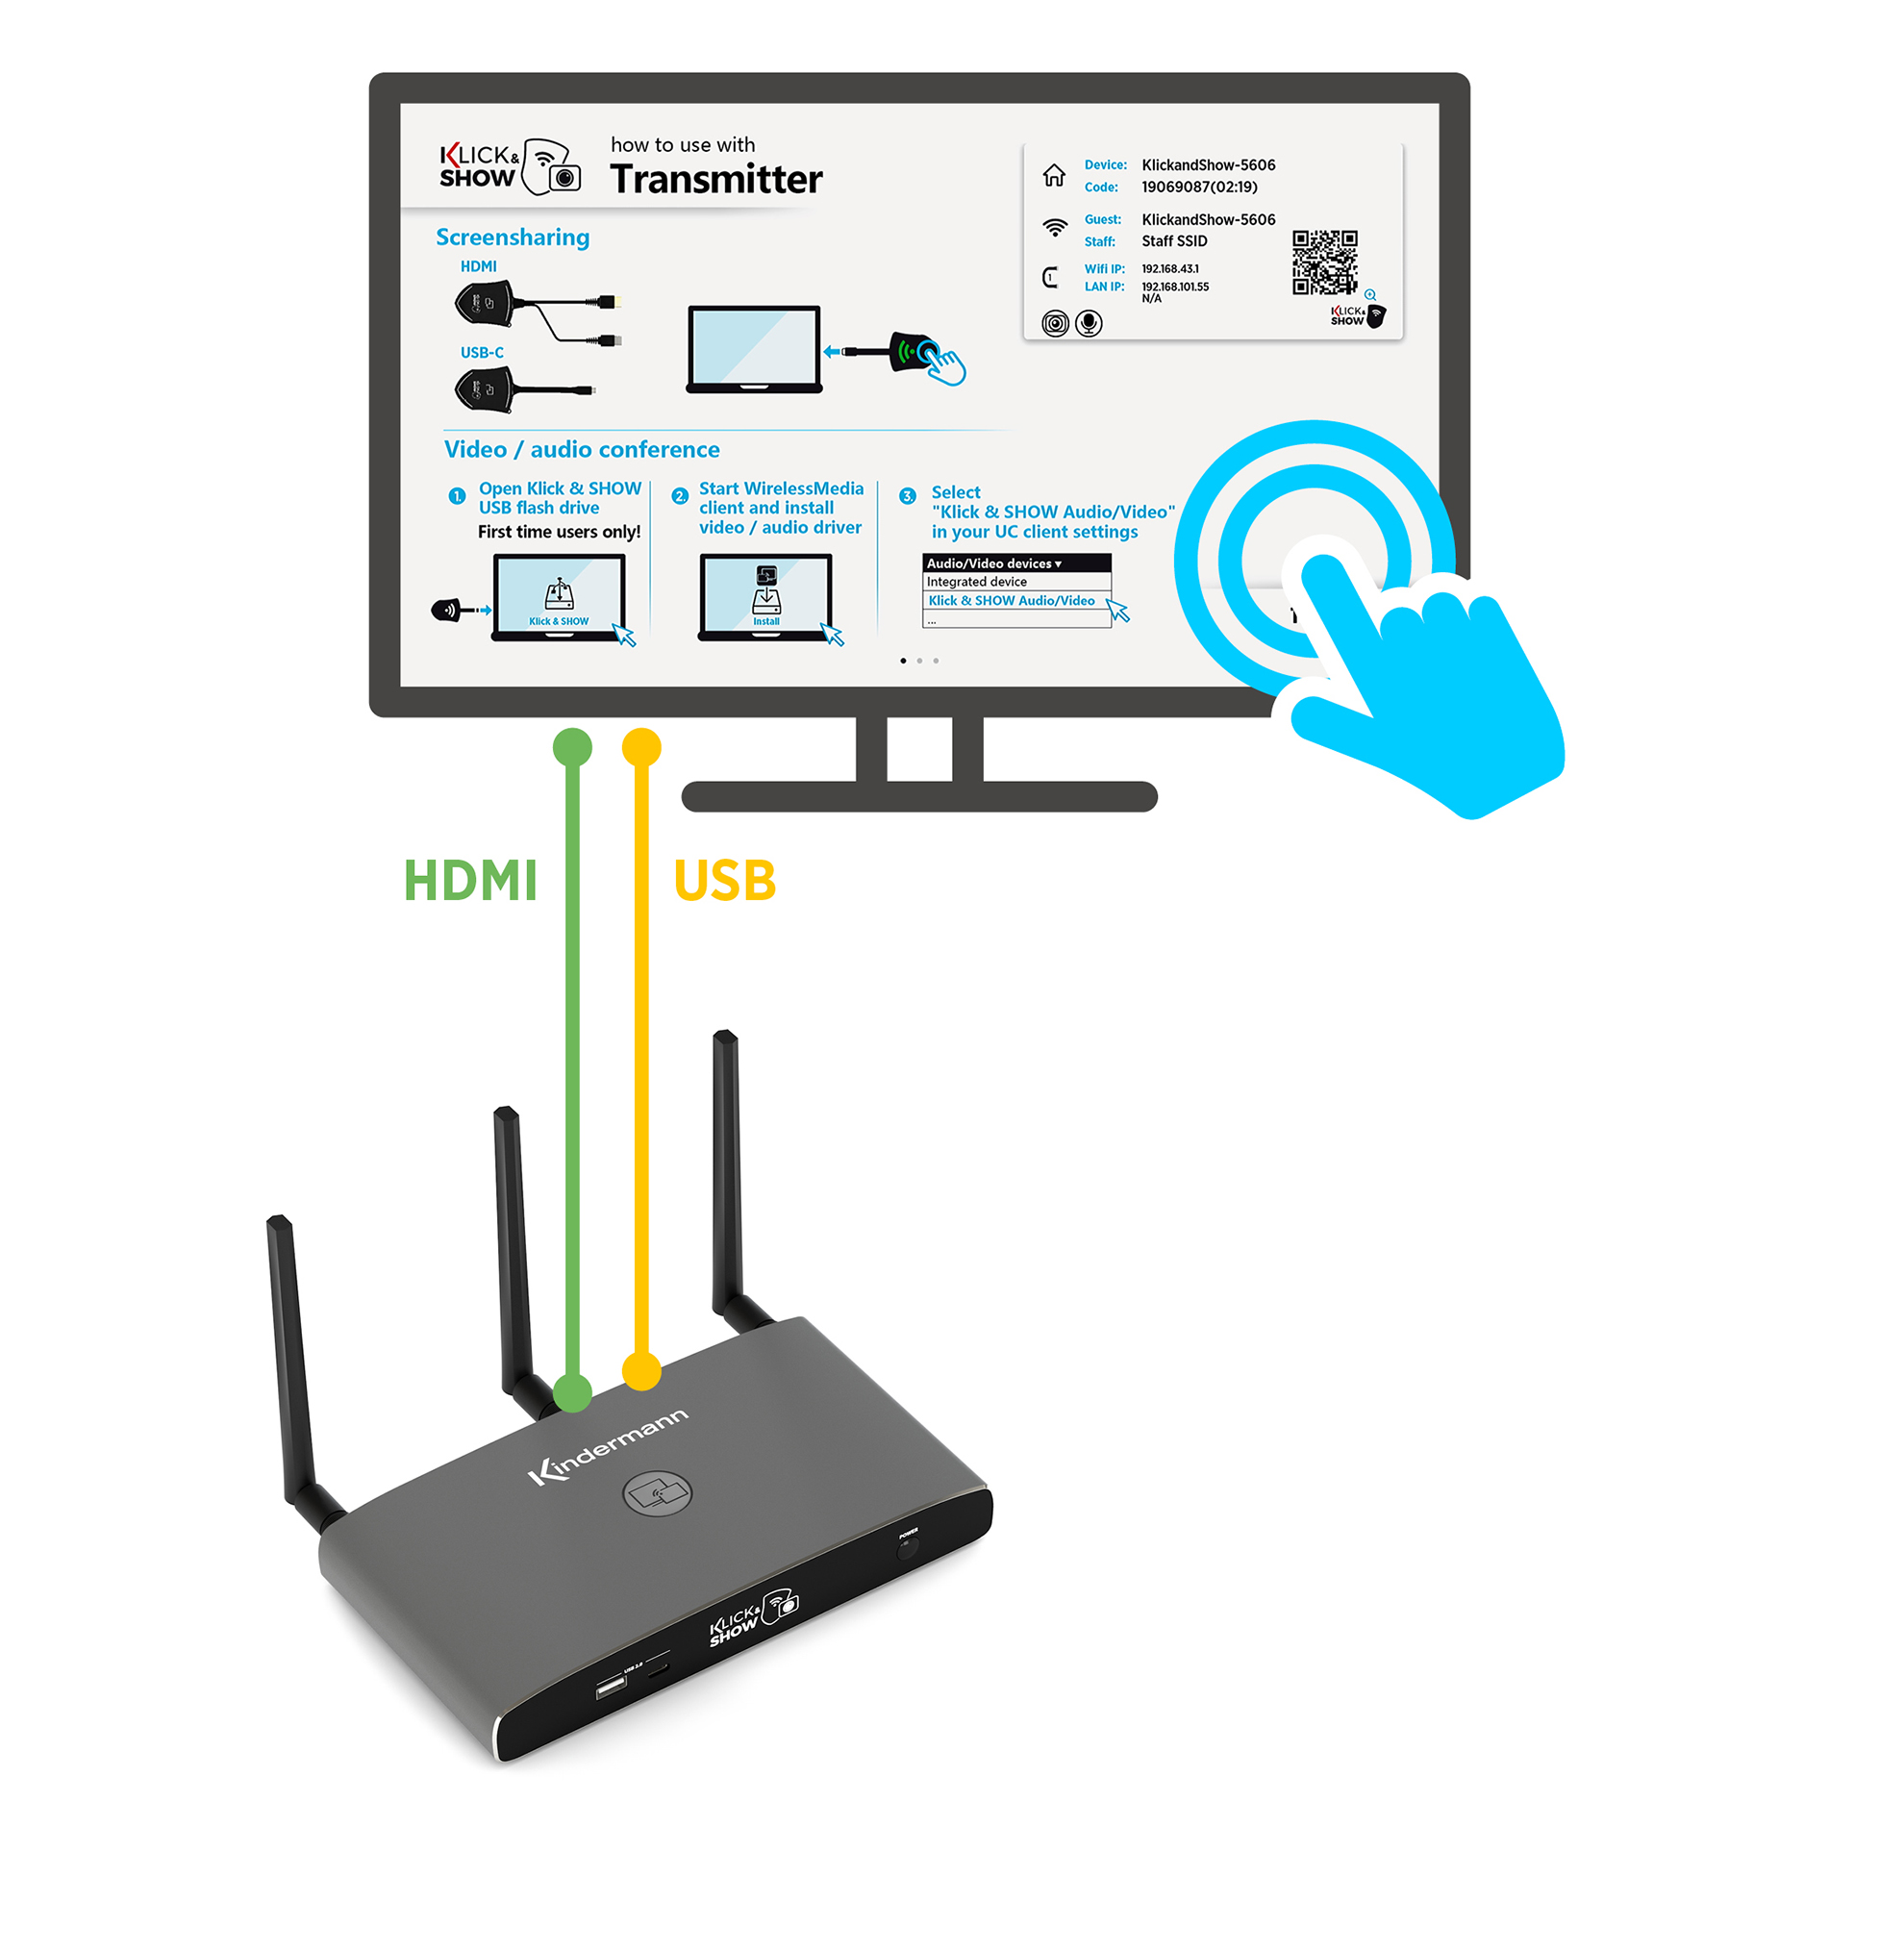
5.4 HDMI port
Connect the HDMI output of the base through a suitable HDMI cable to a display or projector.
![]() hint:
hint:
All Klick&Show Base device types support output resolution up to 4K (3840 x 1920 pixels) at 60Hz refresh rate.
Please make sure to use suitable cables that can transmit this resolution, especially for longer cable runs.
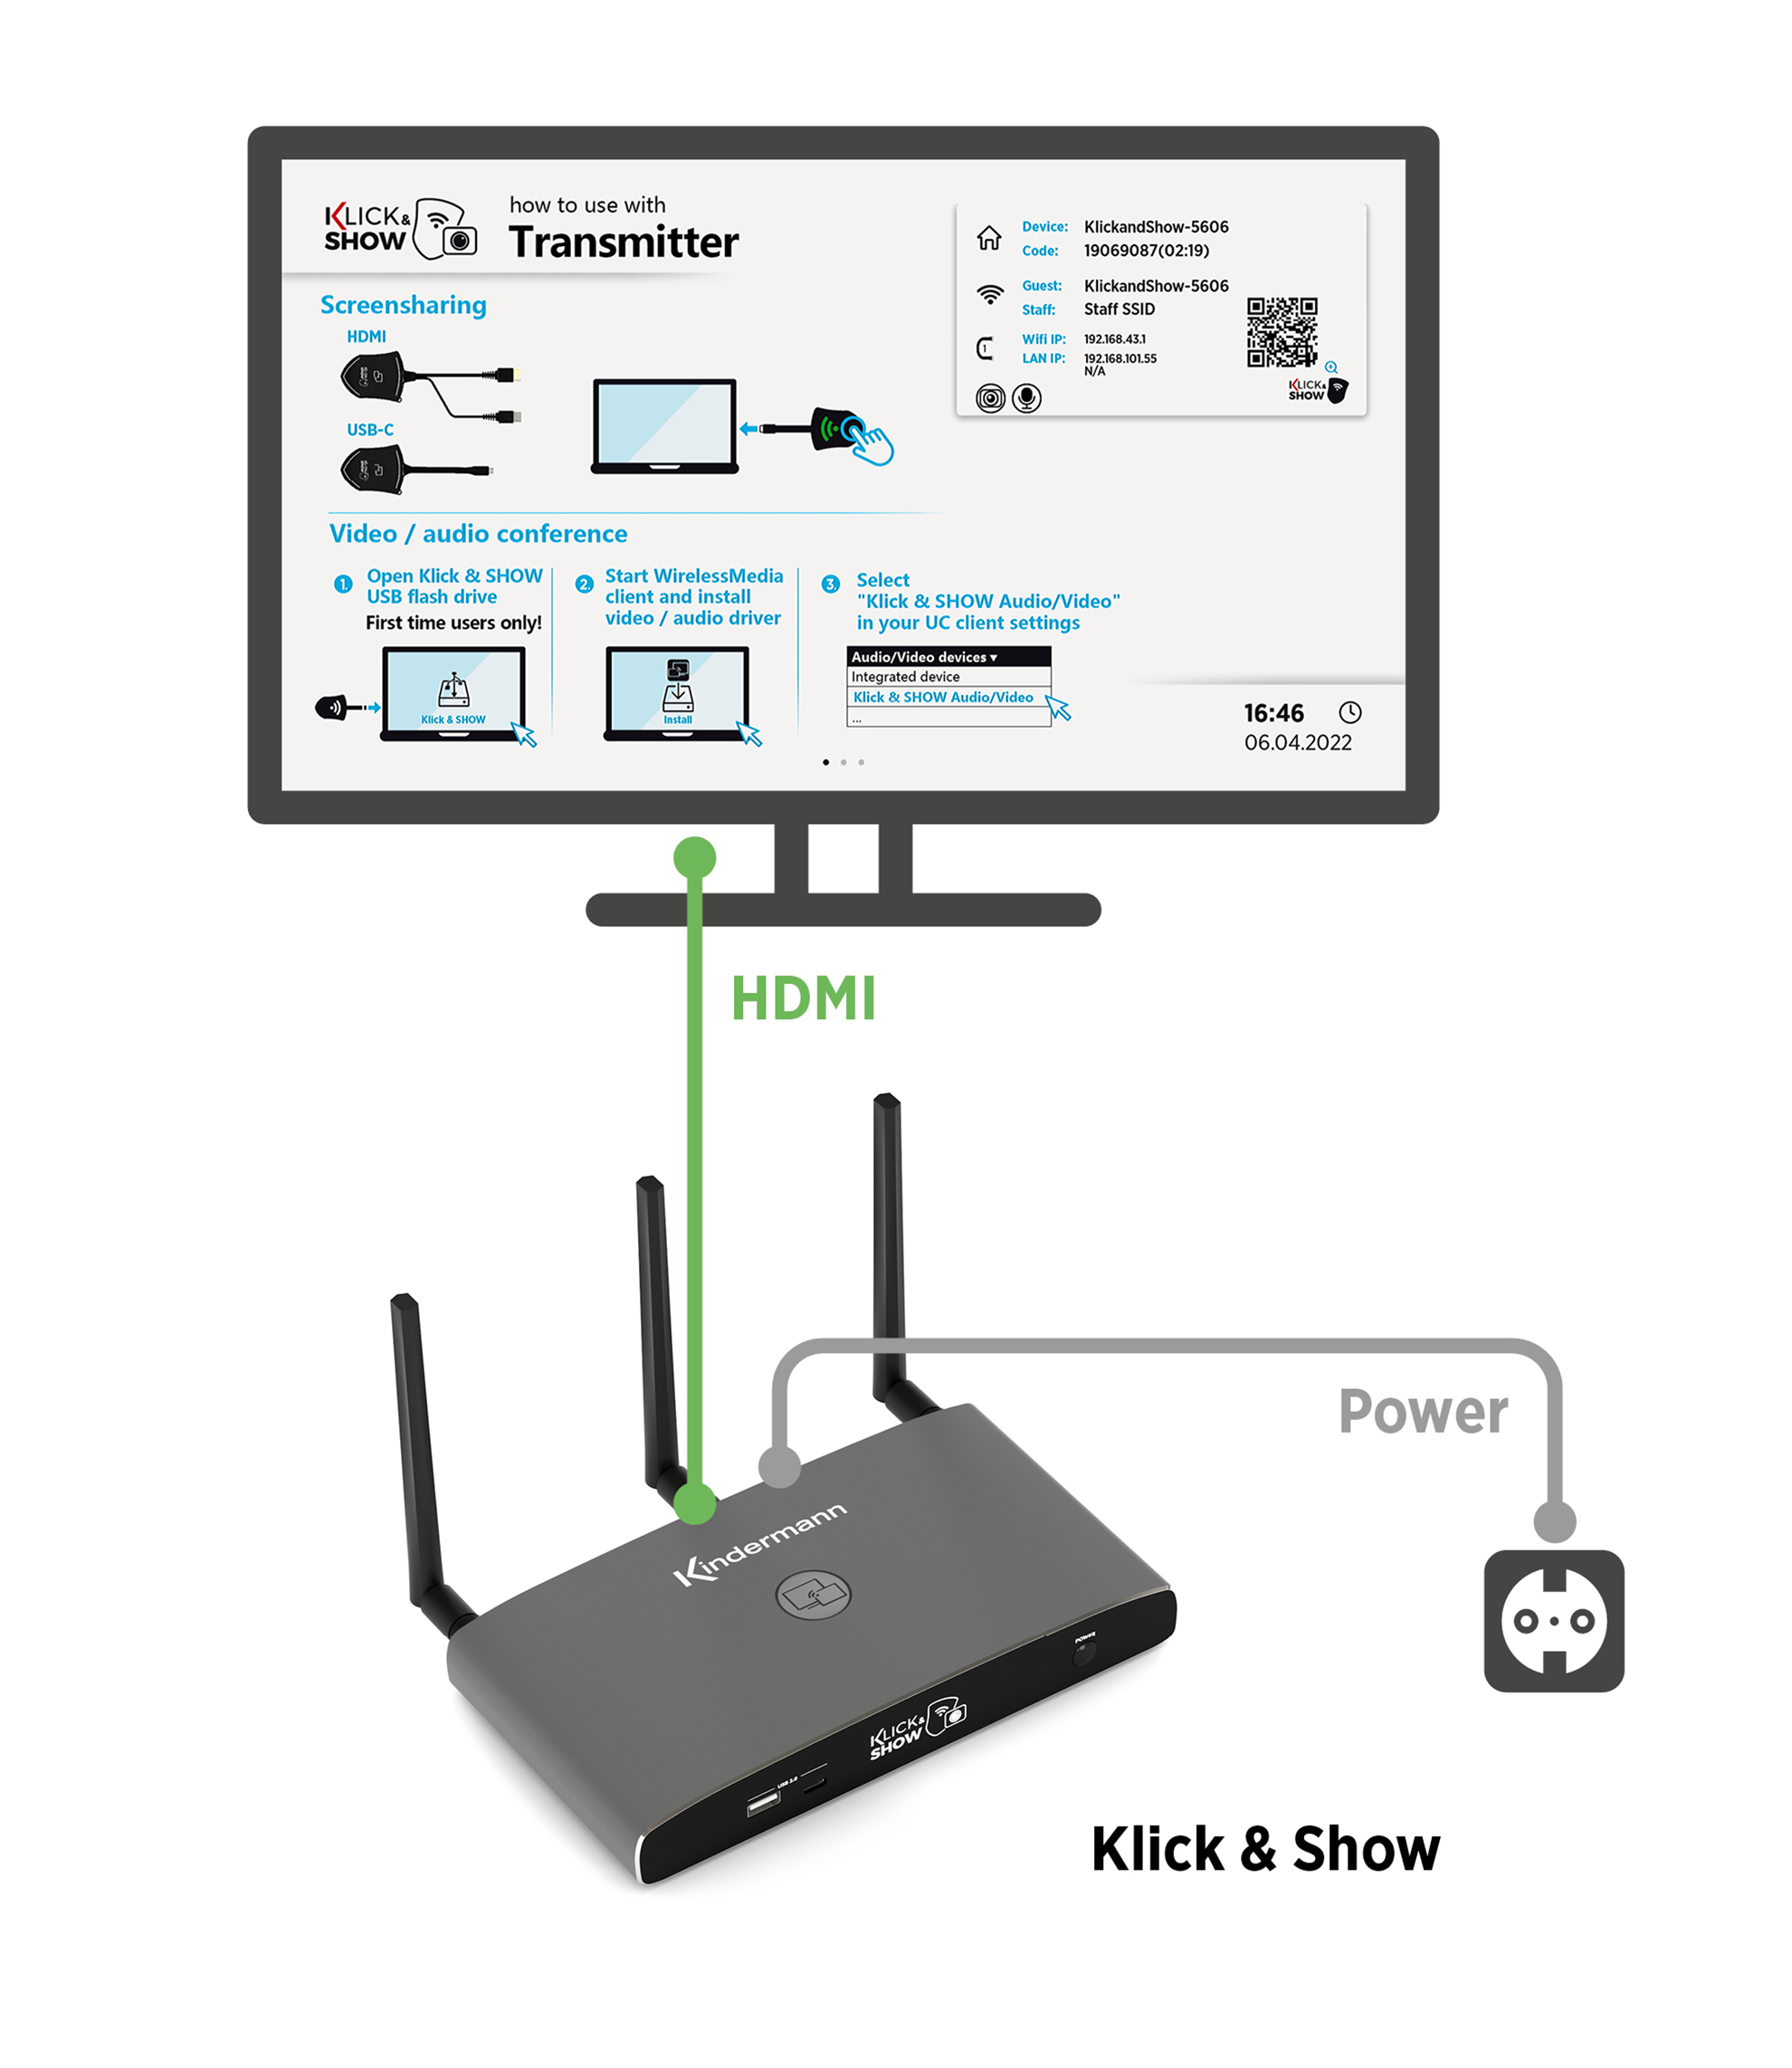
5.5 Audio connectors
The transmitters or the WirelessMedia Software Client transmit the audio signal from the computer together with the video signal to the base device. Even when using native transmission protocols such as Airplay, Miracast and GoogleCast, audio and video are transmitted together.
HDMI audio output:
Image and sound are transmitted digitally via HDMI. A playback device, e.B a display with speakers, can play the sound directly.
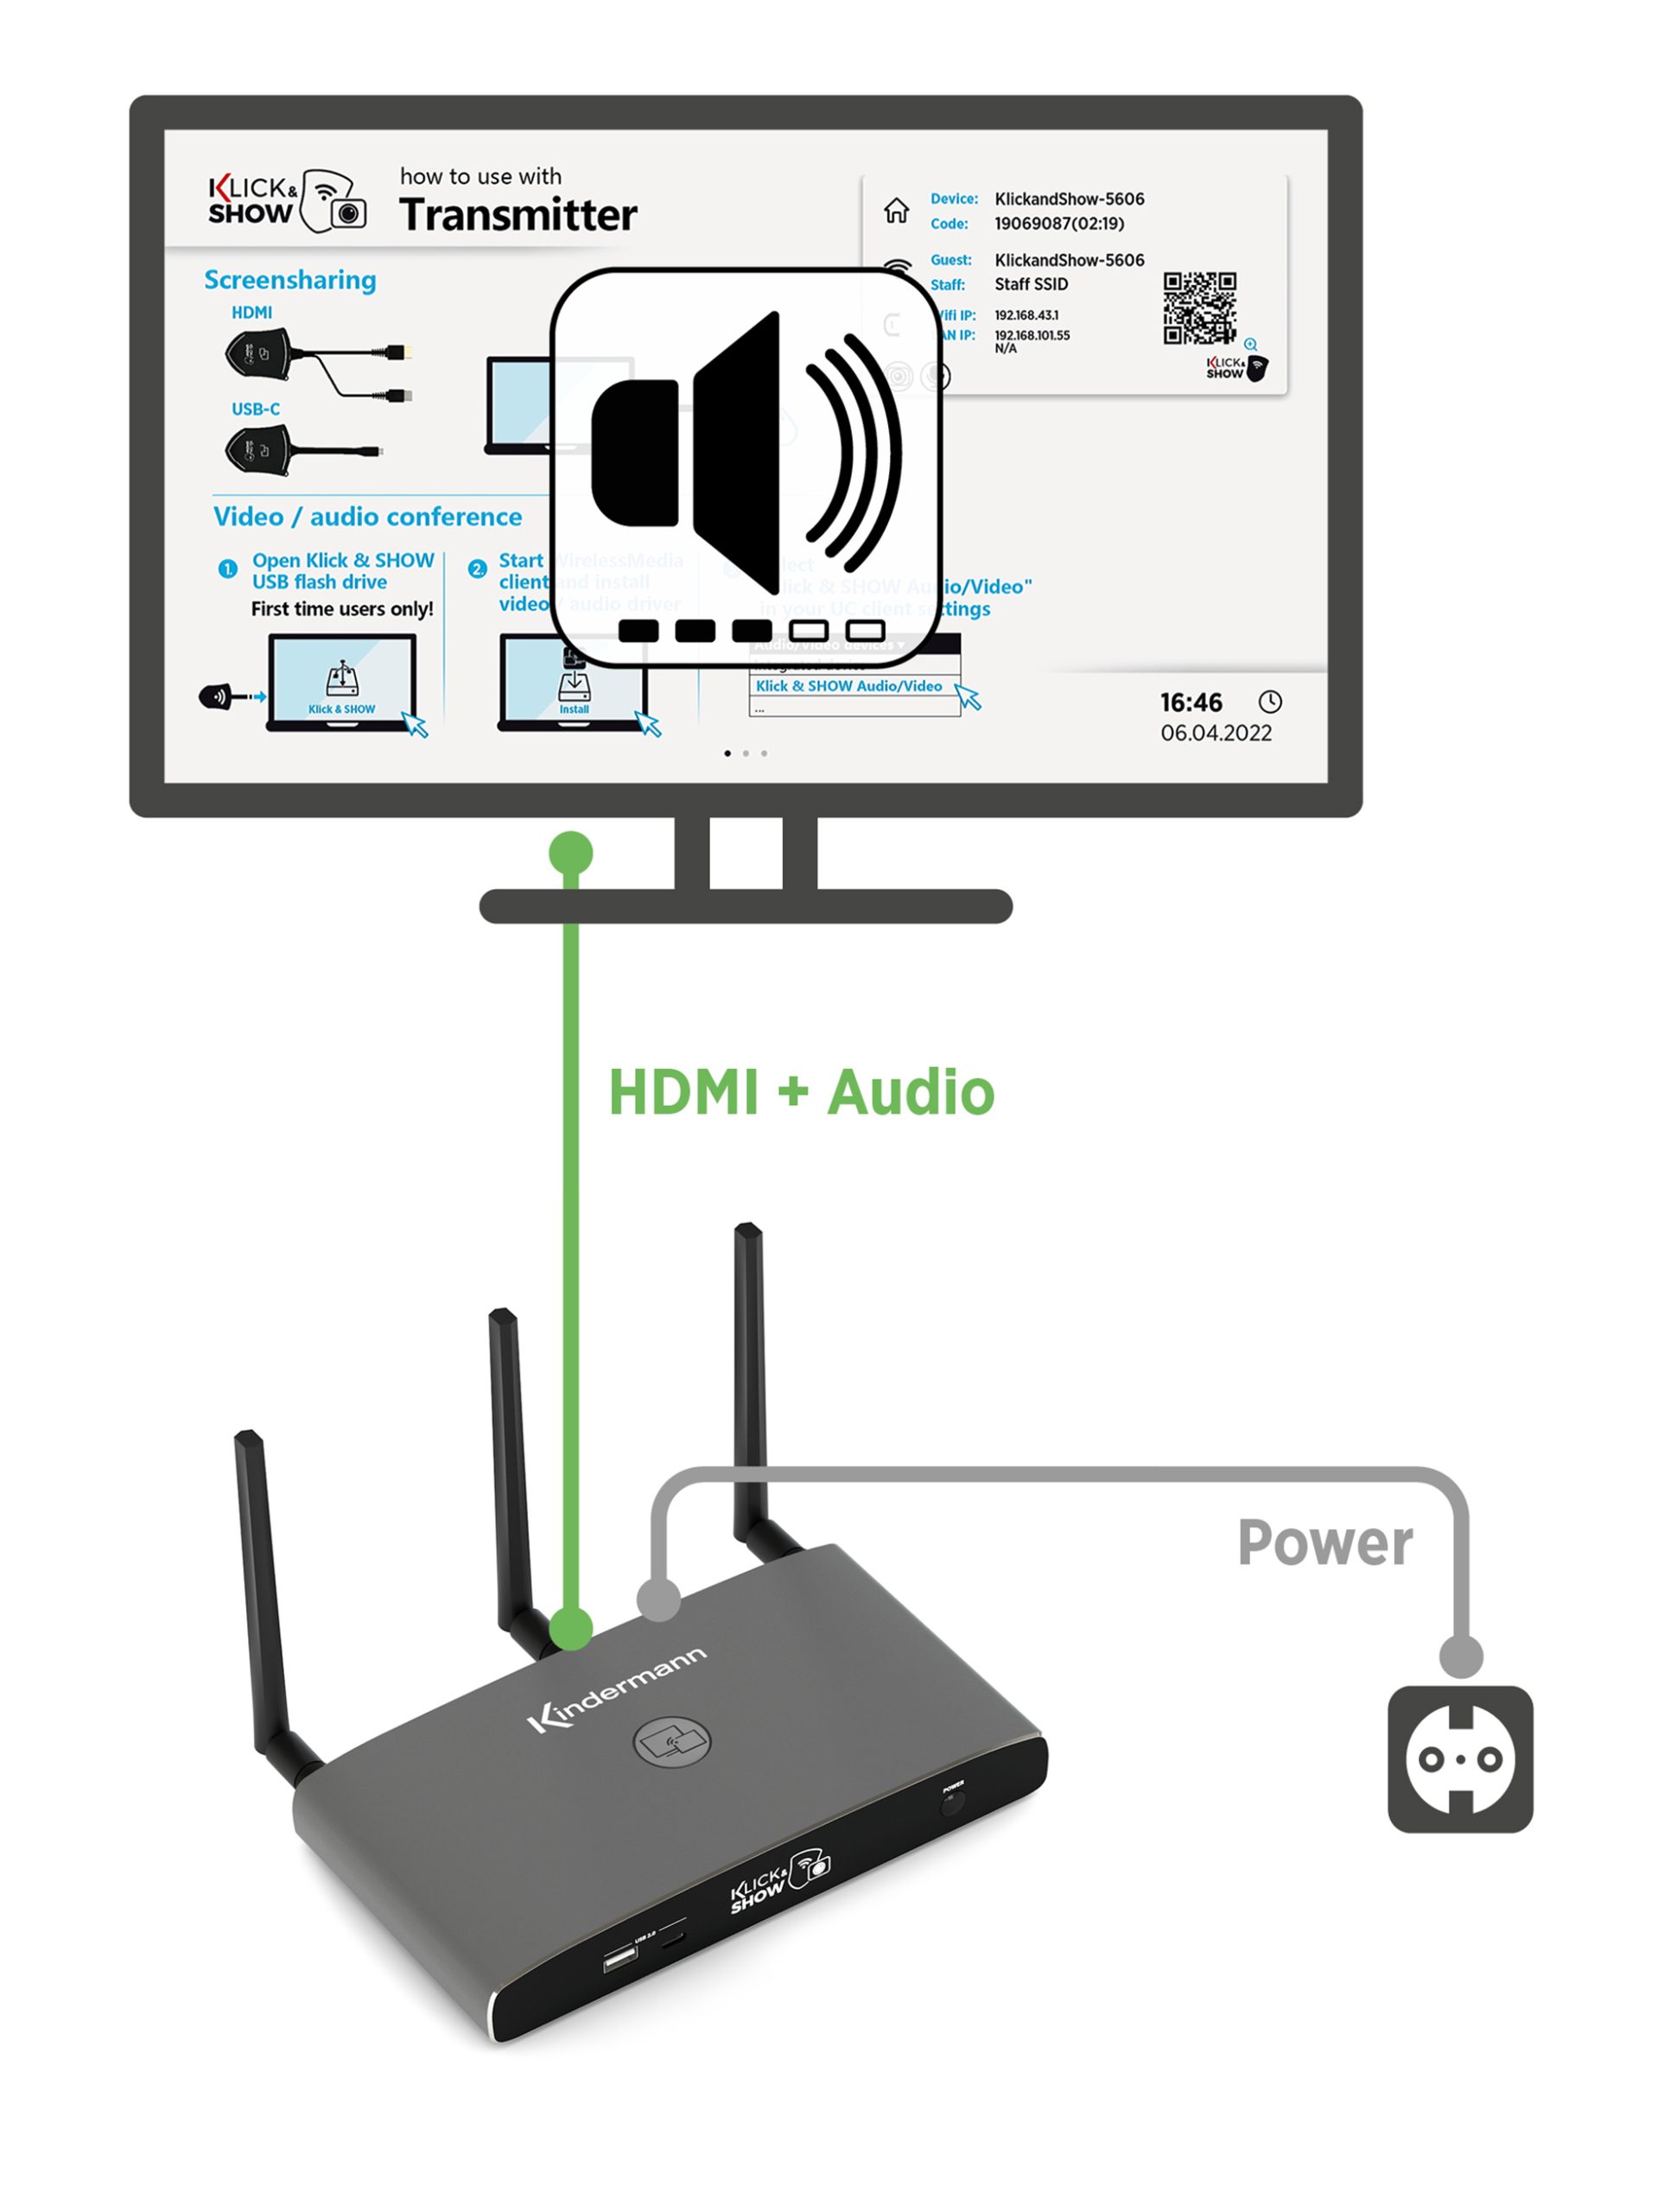
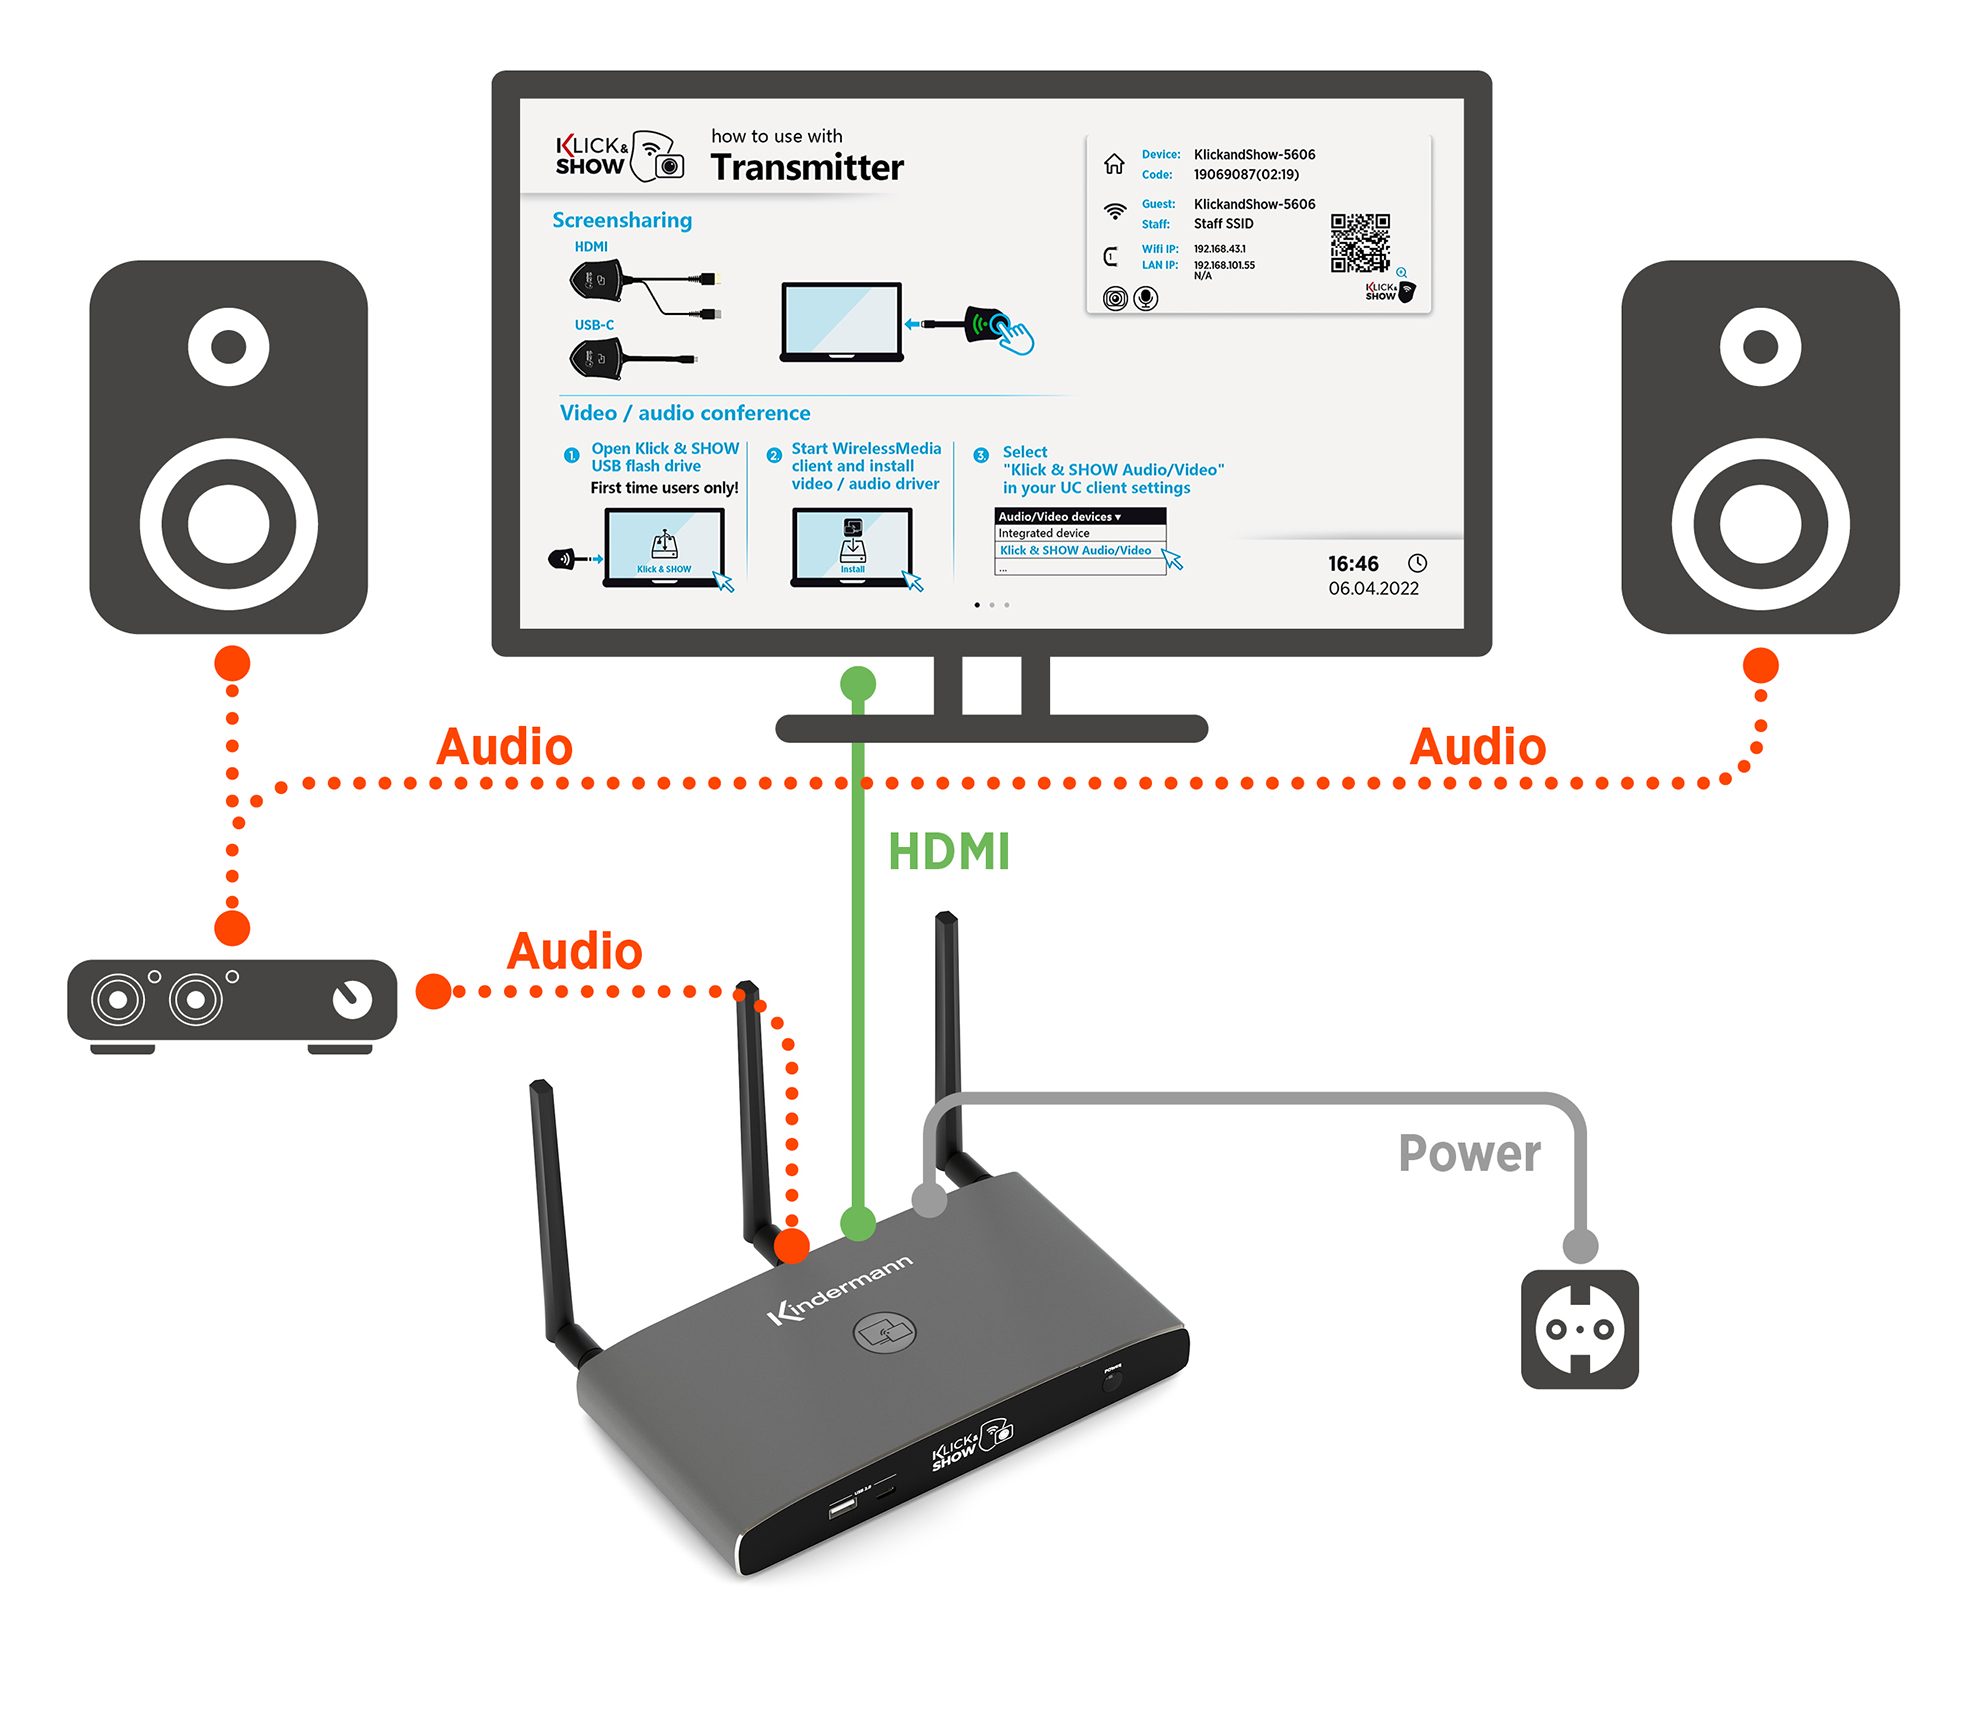
Analog audio output
The sound is output analogously at the jack socket "LINE OUT". Here, active speakers or existing analog audio systems can be connected.
Audio configuration on the PC/laptop
In the factory setting, KLICK&SHOW mute the computer's internal speaker and transmit the sound to the Klick&Show Base as soon as an image is transmitted.
If the transmitter is unplugged or the WirelessMedia Software client is closed, the previous audio configuration of the computer is restored.
Is a USB audio conferencing system connected to the Klick&Show K-FX, the audio output takes place via it.
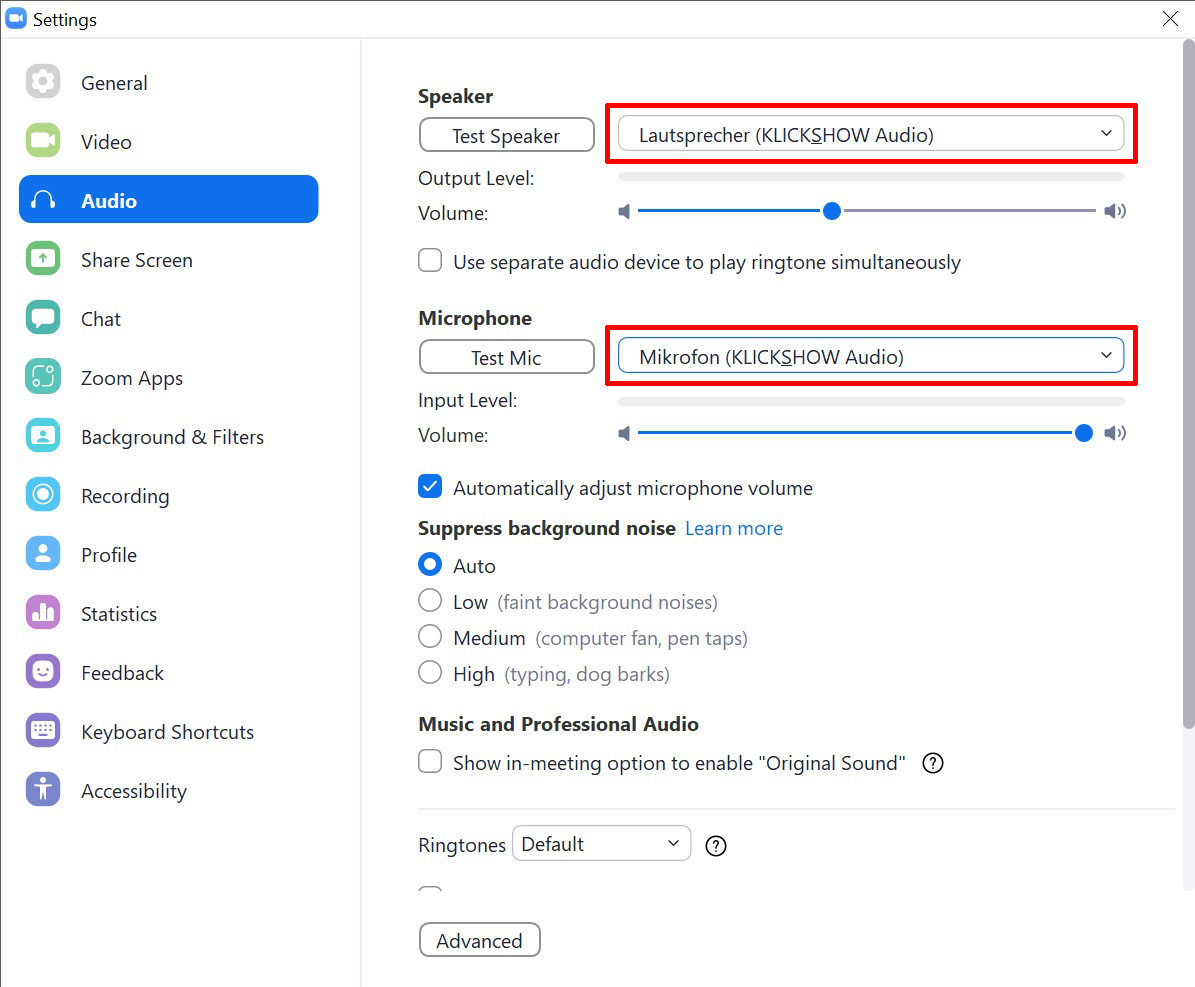
![]() Hint: If there is no audio output via the Klick&Show, please check your computer's audio configuration. Here, the device "Wireless Media" must be selected.
Hint: If there is no audio output via the Klick&Show, please check your computer's audio configuration. Here, the device "Wireless Media" must be selected.
You can adjust the volume via the audio settings of the computer or tablet or smartphone.
5.6 LAN connection
The base can be connected to a network via CAT cable.
Depending on the network configuration, wired Network services are also available via Wi-Fi (bridging).
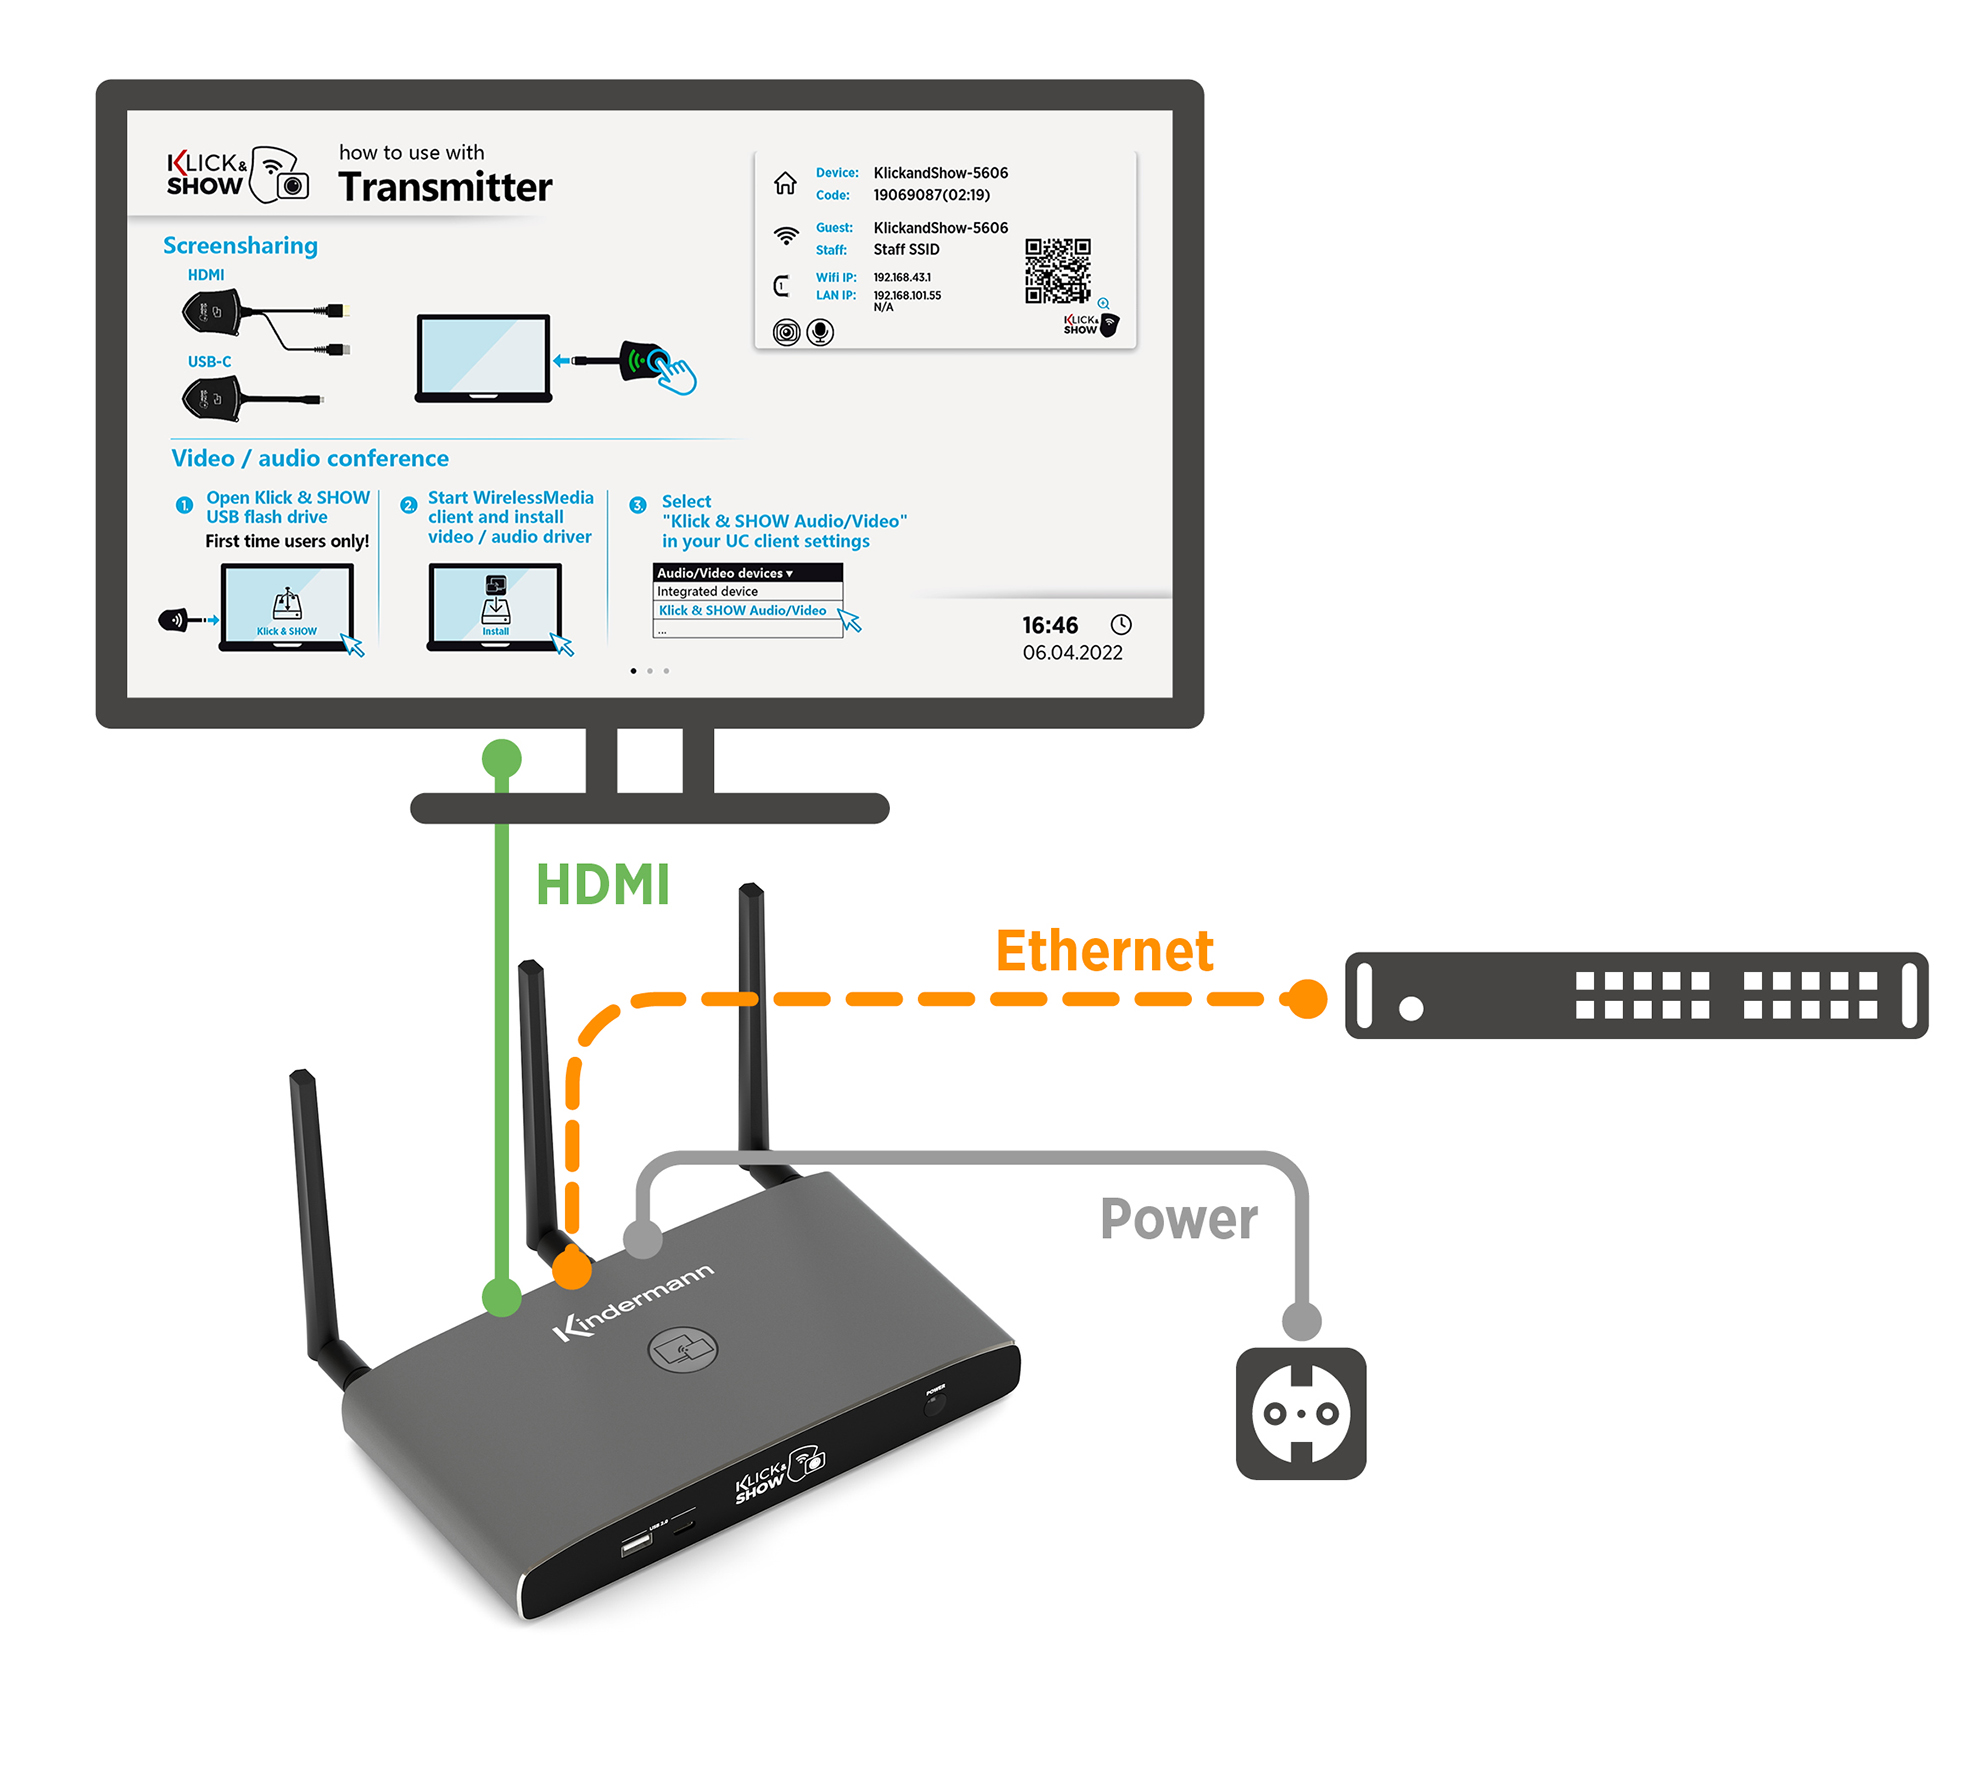
The network connections can be used for:
- Network integration of the base in guest or corporate network
- Over-the-air update (OTA) of the base
- Global administration of many devices using Klick&Show ManageTool Software
- Individual access to individual base devices via the internal WebUI for configuration
- Telnet control of the base
Klick&Show has two separate network interfaces, so it can be connected to two separate networks. The IP addresses used by the Klick&Show from the respective network are displayed on the home screen.
![]() hint:
hint:
Details on network configuration can be found in the chapter WebUI.
5.7 Use of touch screens (touchback)
Klick&Show In addition to image and audio signals, it also transmits touch inputs simultaneously via an interactive display called "touchback". Klick&Show supports the USB-HID protocol. This can be used, for example, to connect interactive touch displays, projectors or whiteboards, but also a mouse to the base via USB in order to
- take over the functions of a mouse, perform multi-touch gestures*, work interactively, etc.
In this way, the contents of an actively played participant laptop can be operated remotely via an interactive main display device. If several laptops are mirrored simultaneously to the main display in split mode at the same time, each laptop can be operated individually from a distance. - to use the moderator function.
- to use the integrated whiteboard/annotation app.
- Onscreen system messages to confirm.
![]() hint:
hint:
*The specific range of functions depends on the range of functions of the touch display, the selected connection and the operating system.
Klick&Show supports the touchback function via the following connection types:
1. WirelessMedia PC-Client for Windows (10-point multi-touch)
2. WirelessMedia PC client for MacOS (1 touchpoint)
3. Miracast on Windows laptops (1 touchpoint, new from September 2023)
5.8 Use of USB cameras and audio conferencing systems (K-FX)
Klick&Show K-FX transforms conventional conference rooms into hybrid meeting rooms, facilitating collaboration between the office and remote participants. It wirelessly connects your notebook to the display and the professional USB camera and audio solution in the room.
This approach is called BYOM (Bring Your Own Meeting). At BYOM, employees can make calls with their own account on their preferred UC platform, whether it's Microsoft Teams, Zoom, Cisco Webex or Google Meet, etc. This also makes spontaneous participation in a hybrid meeting in the conference room child's play.
That Klick&Show K-FX allows the use of USB cameras, USB speakerphones as well as USB video soundbars, etc. which are connected via USB cable to the rear USB 3.0 ports of the Klick&Show K-FX base.
Thanks to USB-over-WiFi for conferncing, they can now be used wirelessly with a PC or notebook as if they were directly connected.
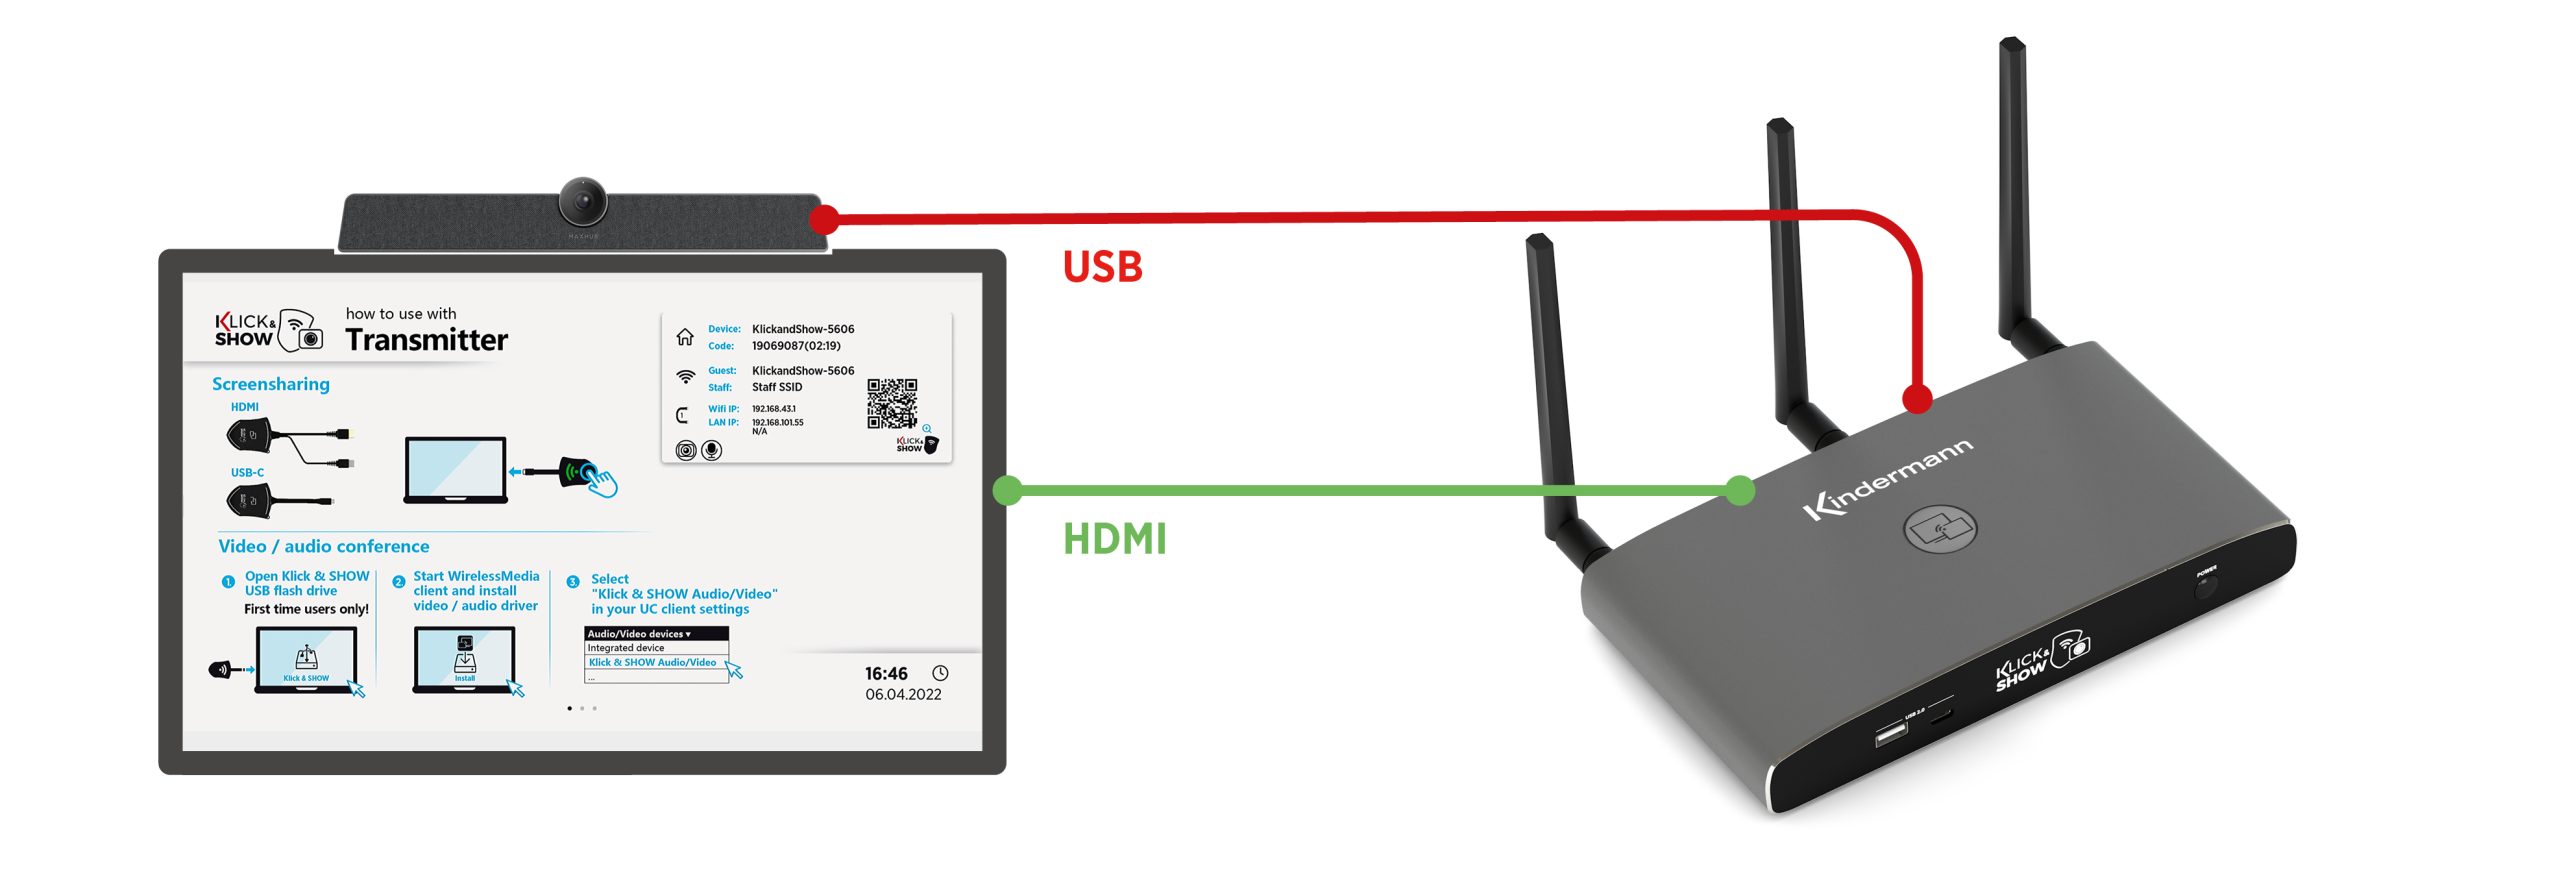
The following device classes are supported:
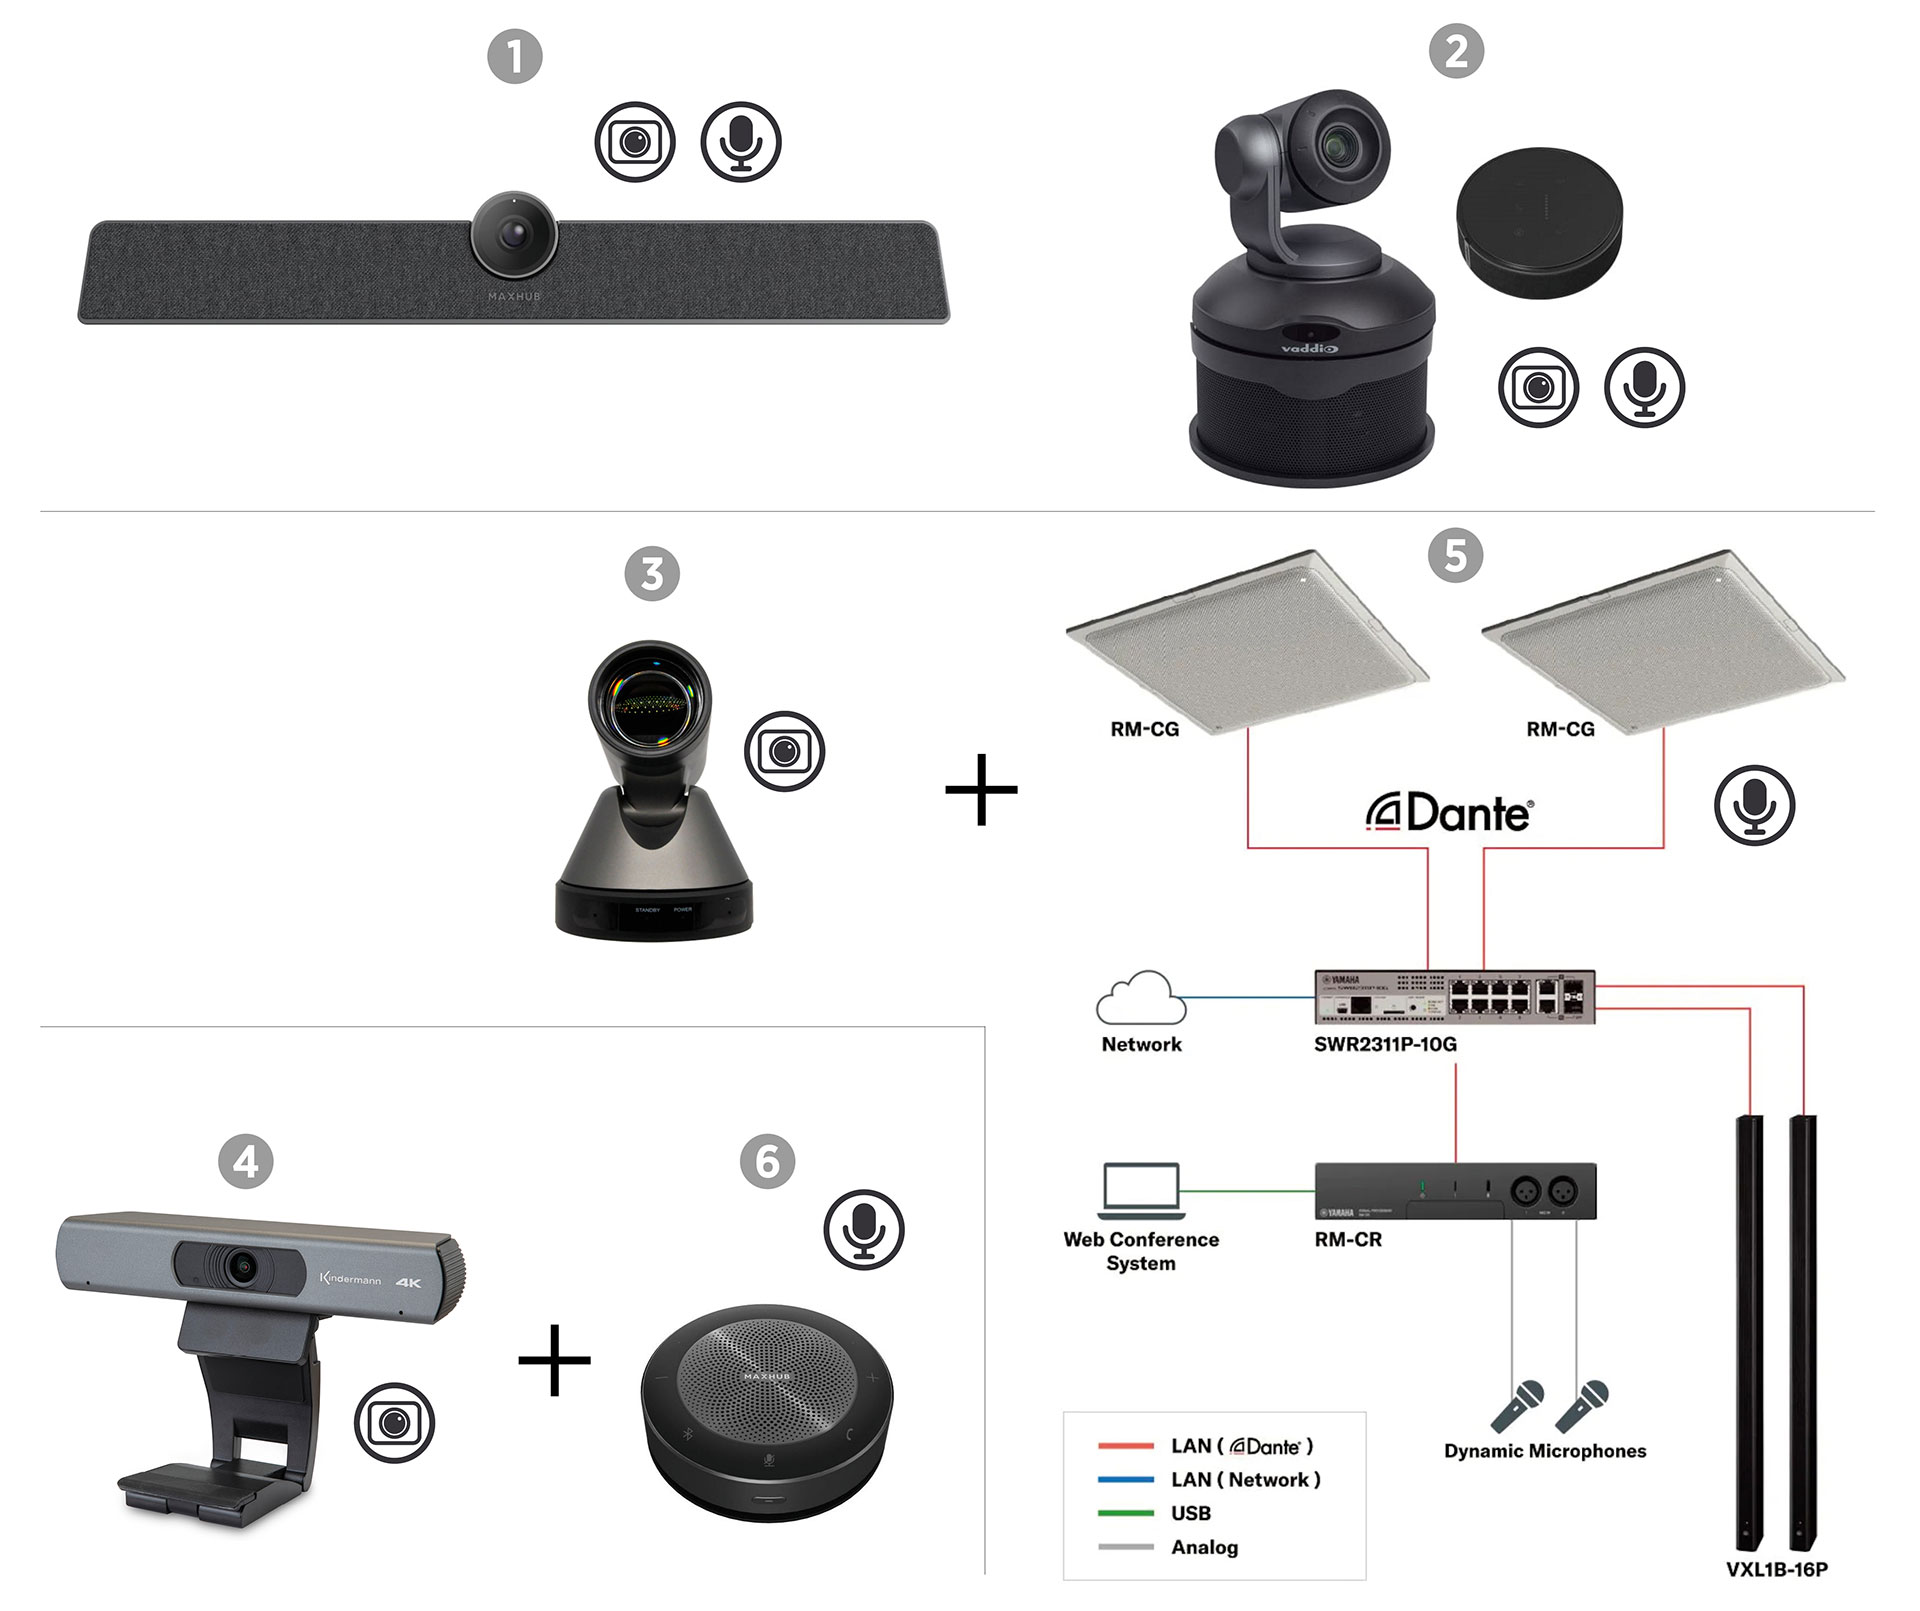
- Audio & video in one device (built-in devices)
- 1. USB video soundbars
- 2. USB-PTZ system solutions incl. microphone and loudspeaker and integrated echo cancelling (AEC)
- Video only
- 3. USB-PTZ cameras
- 4. USB webcams (with microphone)
- Audio only
- 5. Integrated audio room solution with AEC
- 6. Speakerphones
- A combination of the "Video Only" and "Audio Only" solutions.
![]() hint:
hint:
The use of a USB webcam with built-in microphones and the speakers of a display is supported by Klick&Show K-FX not supported, in this case only the video function is provided wirelessly.
Details can be found in the Chapter 3.1.
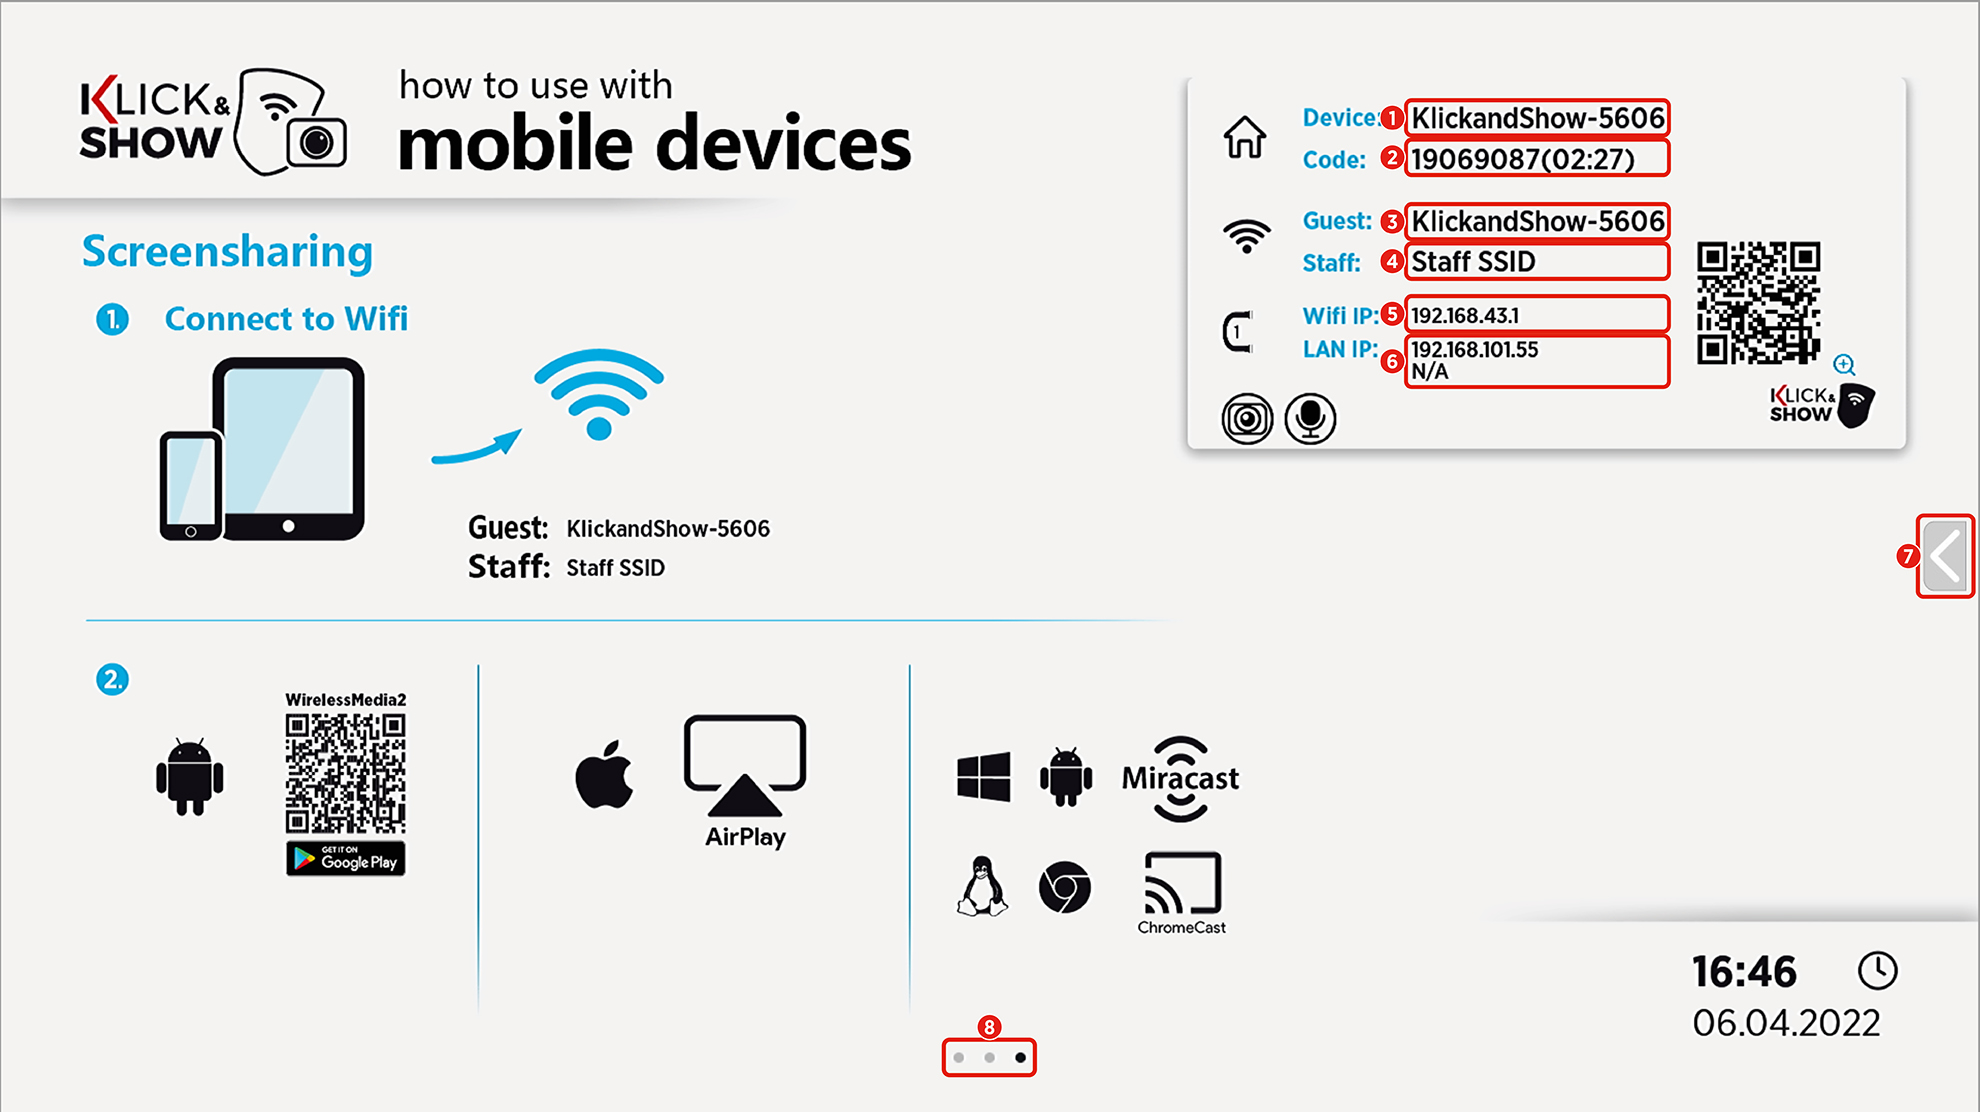
6. Commissioning & use
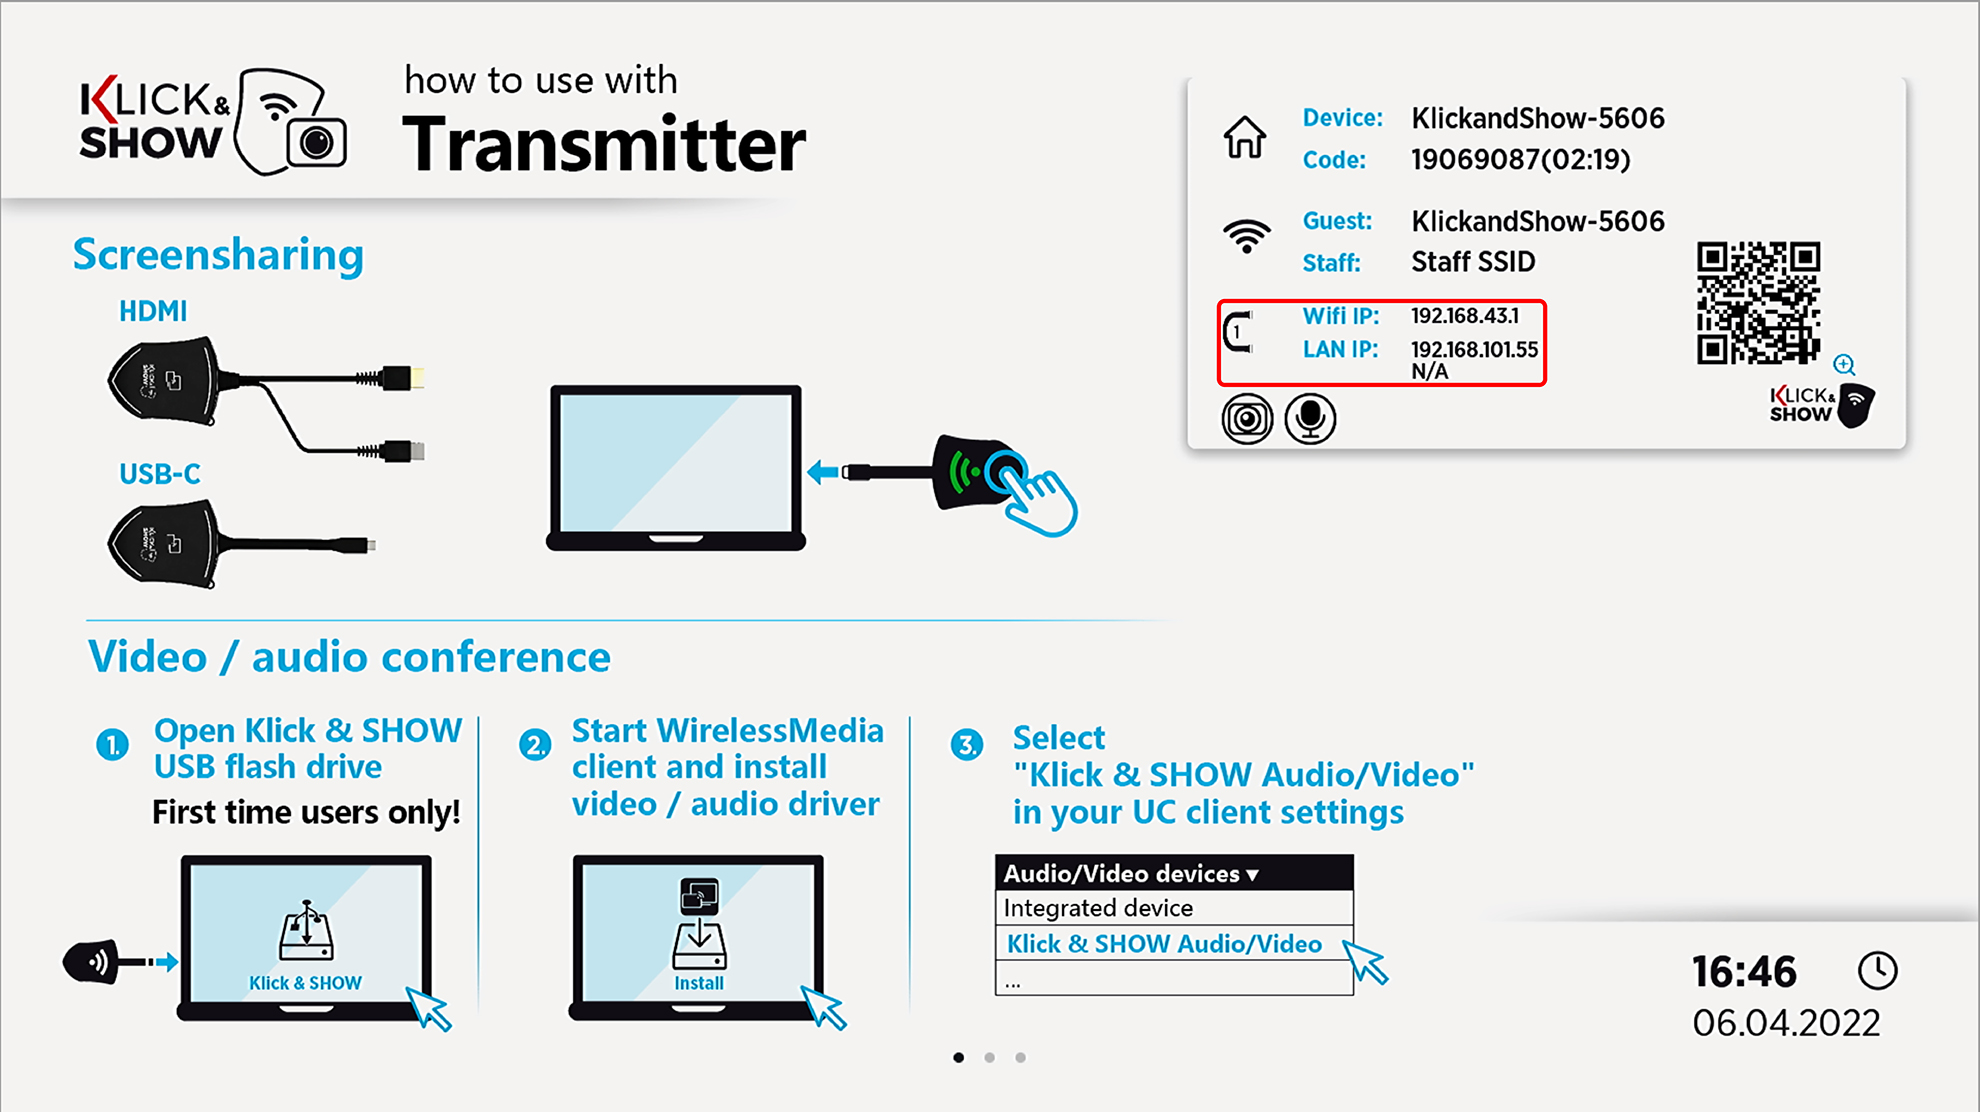
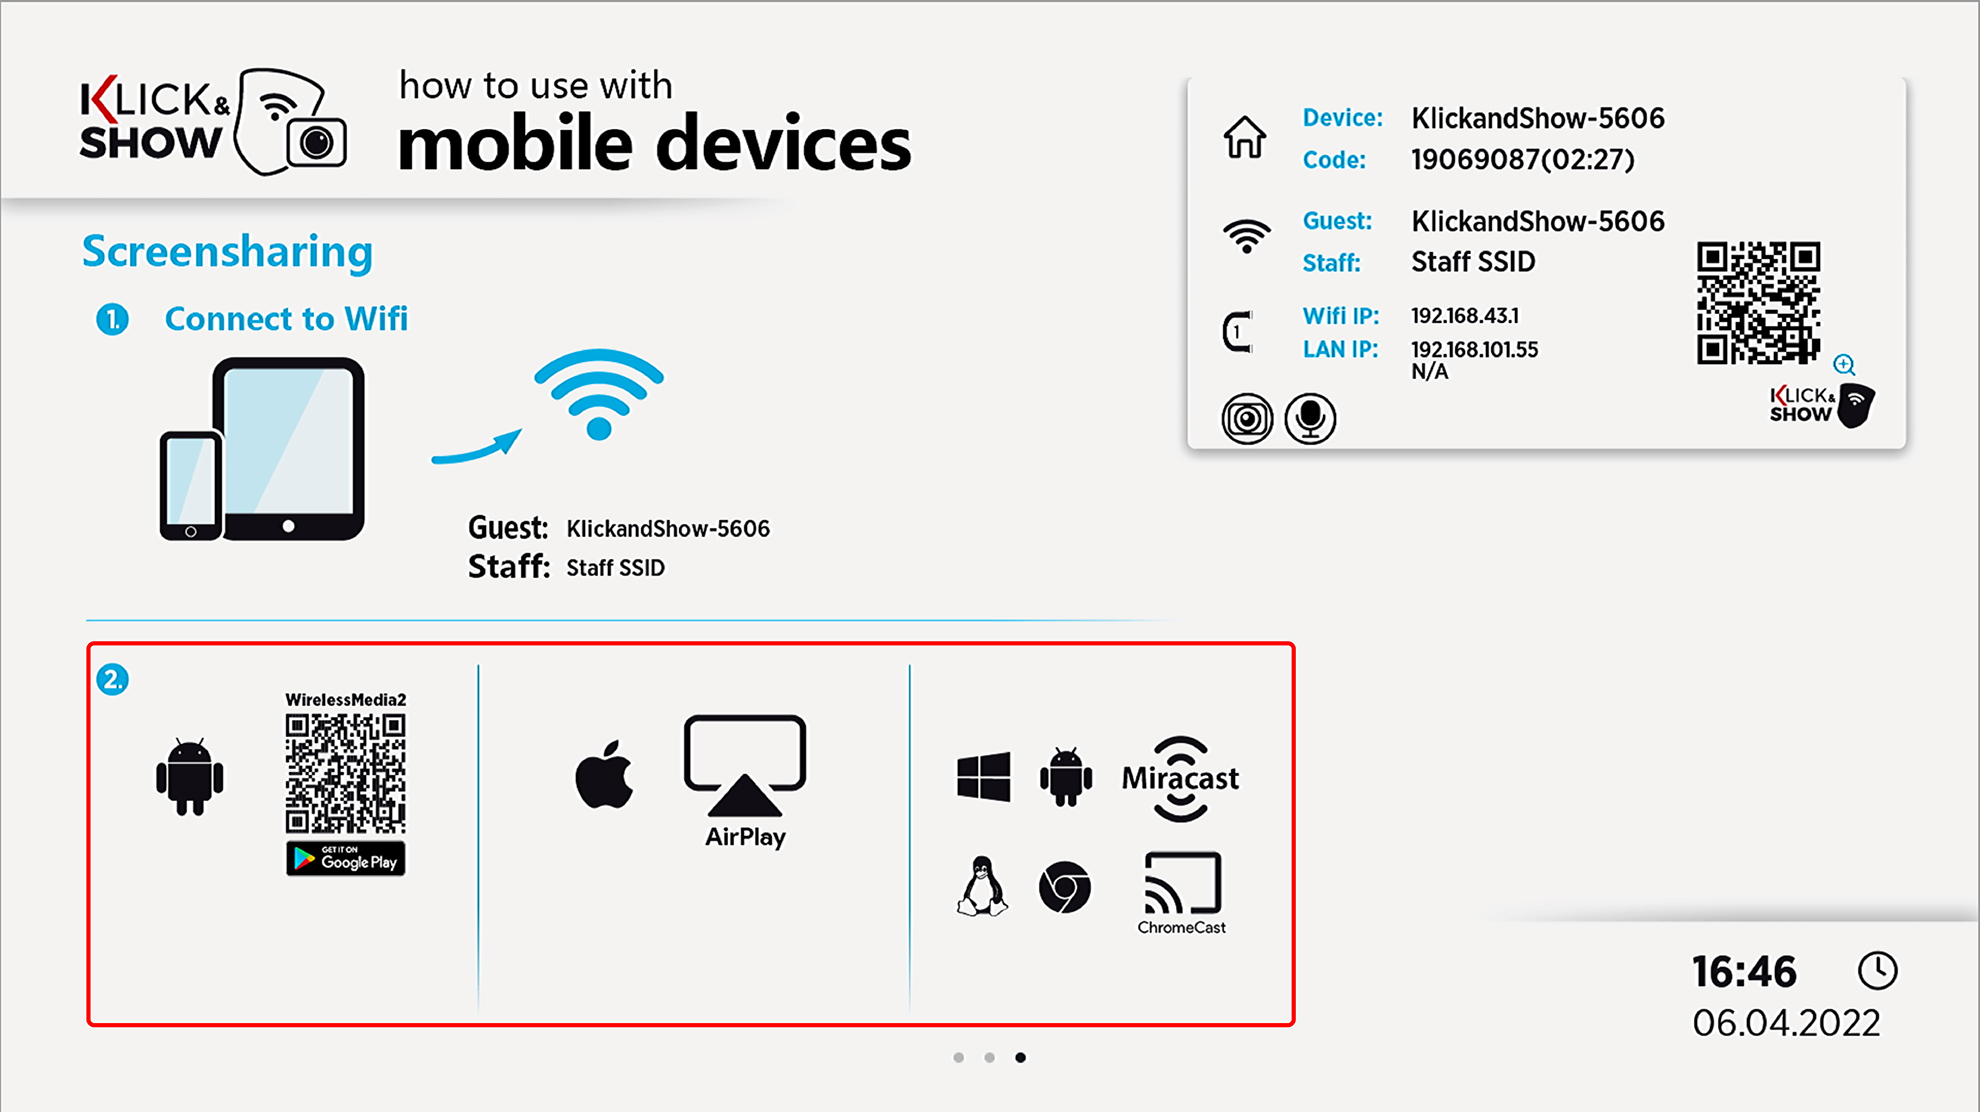
6.1 Home Screen
- Turn on the base device.
- After starting, two (K-WM) or three (K-40, K-FX) alternating home screen pages are displayed alternately:

6.1.1 Home screen for use via transmitter (K-FX, K-40)
6.1.2 Home screen for use via software
6.1.3 Home screen for use via smartphone or tablet
6.1.4 Home screen status window (network/connection information)
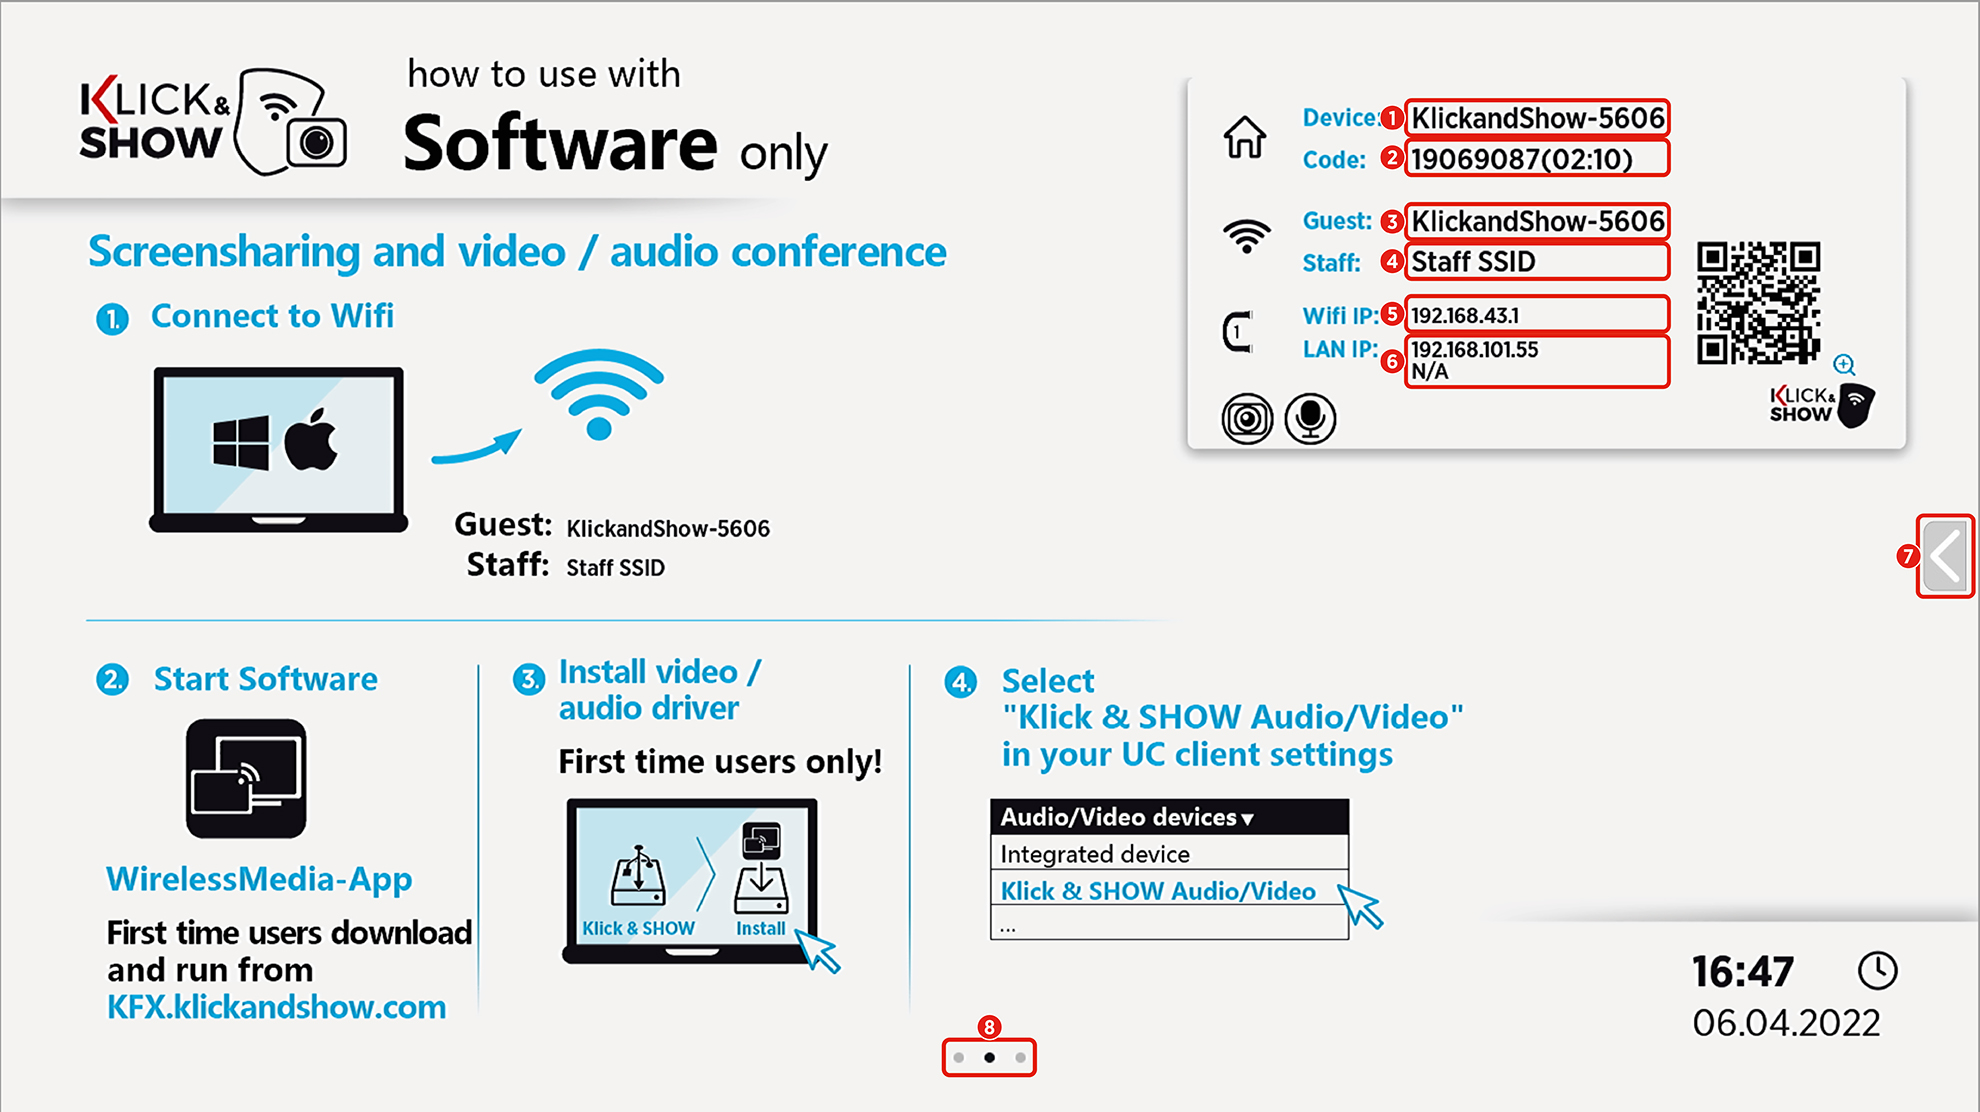
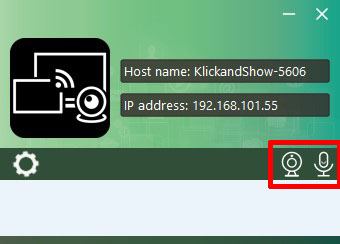
| No. | name | description |
|---|---|---|
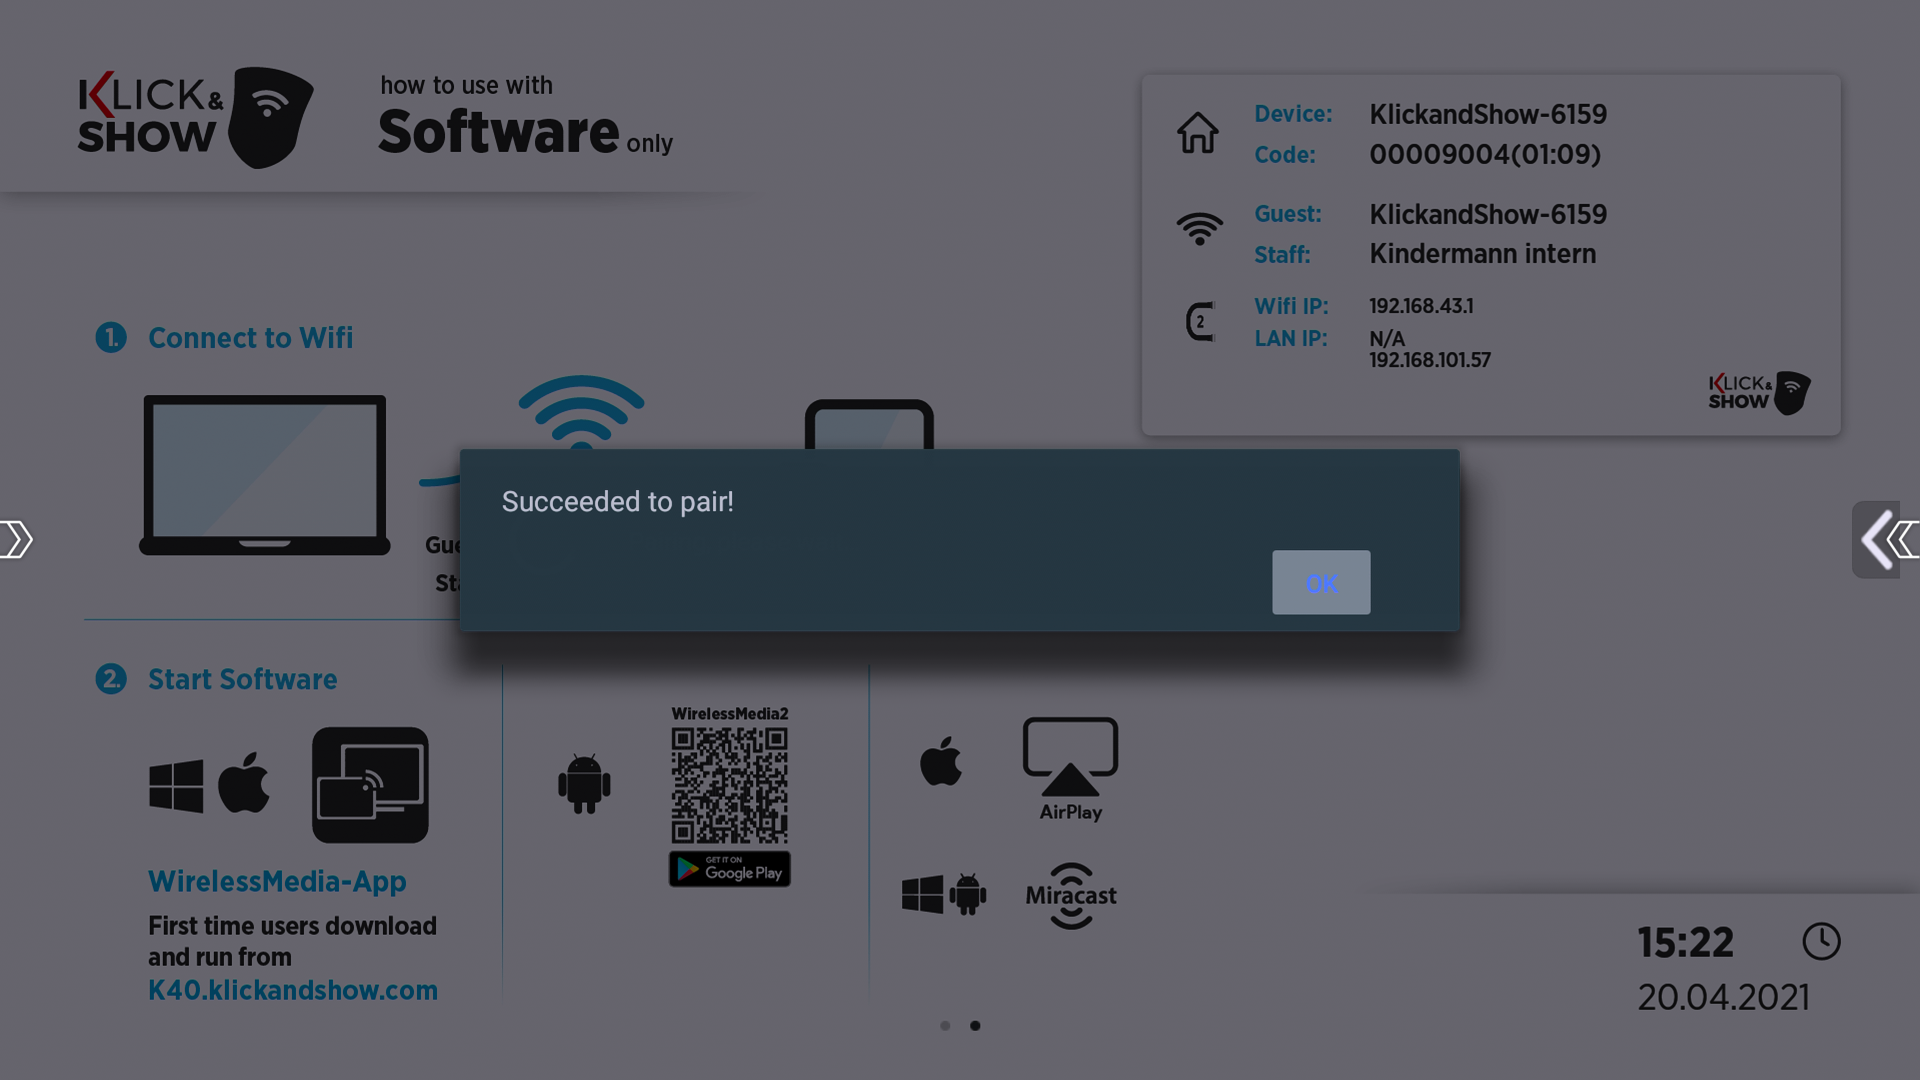
| 1 | device | The device name can be freely assigned. In the factory setting, the name klickandshow-xxxx is In Accesspoint Mode , the device name is also the WLAN identifier (SSID) |
| 2 | code | 8-digit PIN to connect to the Klick&Show. In access point mode , the code is also the WLAN password. (Time to automatic change) |
| 3 | guest | WLAN Name (SSID) for guest users (Text box, the network name must be entered in the network configuration.) |
| 4 | internal | WLAN Name (SSID) for internal users (Text box, the network name must be entered in the network configuration.) |
| 5 | WLAN IP | IP address of the Klick&Show Base in access point mode |
| 6 | LAN IP | IP address of the Klick&Show Basis in the LAN "N/A" = no connection to network or no IP address assigned |
| 6 | Network (Bridging) Status | As a result, participants who are part of the internal Klick&Show Access point are connected to access services that are provided via Ethernet port. Subscriber devices directly connected to the access point can be used, for example, to enable access to the Internet. |
| 7 | Moderation menu Whiteboard App | Does it work? Moderator menu up and down. Provides access to the |
| 8 | Position | Displays the switch between the alternating sides of the home screen. |
6.2 Screen sharing
Klick&Show offers numerous options for transferring image content from participant devices to the main display (screen sharing). Depending on the existing Klick&Show There are various options for screen sharing available from the base device and the participant device used:
- HDMI Transmitter
Compatible with Klick&Show K-FX and K-40, no software required.
Can be used with laptops and other devices with HDMI output, regardless of the operating system. - USB-C Transmitter
Compatible with Klick&Show K-FX and K-40, no software required.
Can be used with laptops and mobile devices that support the so-called "DisplayPort Alternate Mode" graphics output at the USB-C output, regardless of the operating system. - USB-A Transmitter *
Compatible with K-40, requires WirelessMedia Software Client for Windows or MacOS.
*) Note: As of August 2023, the USB-A transmitter will no longer be available as an accessory. - WirelessMedia Software Client
Compatible with Klick&Show K-FX, K-40, K-WM, for purely software-based presentations under Windows and MacOS. - AirPlay Protocol
Available on K-FX, K-40 and K-WM for compatible Apple mobile devices and laptops. - Miracast Protocol
Available on K-FX (standard) and on K-40 /K-WM (when using the optional Klick&Show Miracast USB Adapters) for compatible Windows laptops or Android mobile devices. - GoogleCast Protocol
Available on Klick&Show K-FX, K-40, K-WM for compatible devices.
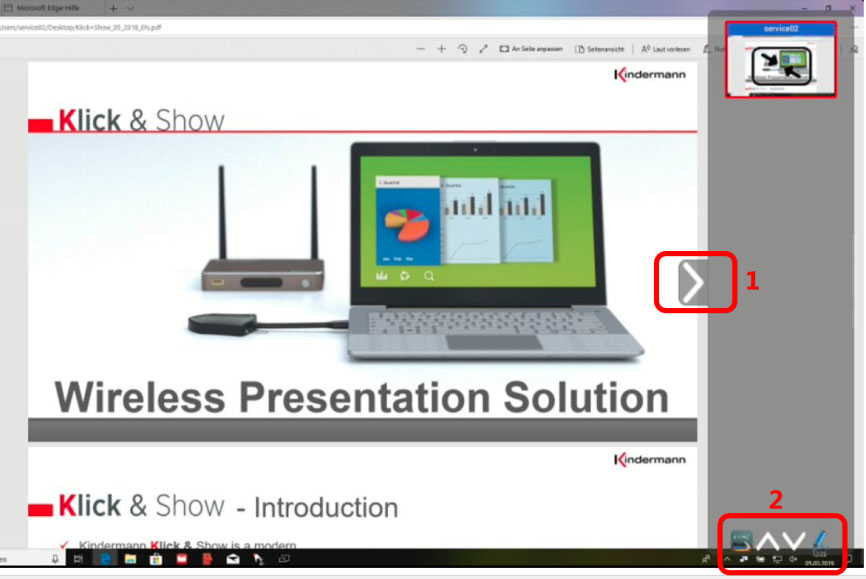
6.2.1 Screen sharing via HDMI and USB-C transmitter (K-FX, K-40)
Connect the HDMI transmitter to the HDMI and USB-A interface or the USB-C transmitter to the USB-C interface of your computer and wait until the transmitter lights up solid green.
Touch the sensor surface of the transmitter to start the transmission. The transmitter will confirm the activation with a slight vibration and a color change of the LED to red.
The screen will now be broadcast and displayed on the connected display. To end the broadcast, tap the transmitter again.
![]() hint:
hint:
The HDMI and USB-C transmitters behave like an external monitor on the computer. No software is required for image transfer. As with connecting external monitors, you can decide whether you want to mirror the content of the primary desktop to the main display or the extended desktop.
To do this, select the keyboard shortcut Windows + P on Windows and go to macOS ![]() > SystemPreferences,clickMonitors,and then clickArrange.
> SystemPreferences,clickMonitors,and then clickArrange.
![]() Hint:
Hint:
The USB-C transmitter can also be used in conjunction with Chromebooks, tablets, smartphones, etc. that have a USB-C port. The specific range of functions depends on the hardware of your device and the respective software. For video transmission, the USB-C port of your device must support the so-called DisplayPort alternate mode operating mode. This operating mode may not be available on older laptops or is not available on all existing USB-C interfaces of your device.
For the functionality of your device, please refer to the manual.
Whether your device supports touchback depends primarily on the operating system.
6.2.2 Screen sharing via USB-A transmitter* (K-40)
![]() Hint:
Hint:
*) The USB-A transmitter is no longer available as of August 2023.
Unlike the HDMI and USB-C transmitters, the USB-A transmitter requires software that captures the screen content several times per second (screen grabbing) and encodes it into a video stream. The USB-A transmitter then transmits this video stream via WLAN to the Klick&Show Base device, which outputs the captured content via HDMI to the display device.
The required software is the WirelessMedia Software Client, which is available for Windows and MacOS operating systems.
A description of the commissioning and use of the WirelessMedia Software Client can be found in chapter 6.2.3. (for Windows) or in chapter 6.2.4 (for MacOS).
If you Klick&Show To use the K-40 in conjunction with a USB-A transmitter for the first time, you must first run the WirelessMedia Client. If the program has been executed once, the WirelessMedia Client is started automatically when the transmitter is plugged in.
![]() Hint:
Hint:
No admin rights are required to run the WirelessMedia Client. However, an entry is made in the registry. In the Autostart section, the WirelessMediaAutoStartC3.exe service is set up, which ensures that the WirelessMedia Client starts automatically when the USB-A transmitter is plugged in.
If, for example, a group policy (e.g. via Active Directory) blocks the installation of "auto-starting software", you can use the "WirelessMedia Portable for Windows" version. This does not require any installation at all. However, the "Portable" version of the client must be started manually before each use!
Plug the transmitter into a USB-A port of your computer. As soon as the LED indicator of the dongle lights up solid green and the color of the WirelessMedia Client changes to green, the system is ready for use.
Now you can touch the surface of the transmitter to activate the transmission or you can click with the mouse on the "Show" button in the WirelessMedia Software Client. The transmitter will confirm the activation with a color change to red. The WirelessMedia Client also turns red.
Your computer's screen will now be broadcast to the base and displayed on the connected main display. The user name of the computer is briefly displayed.
To end the broadcast, tap the transmitter again or click the red "Stop" button in the WirelessMedia Client.
After use, you can simply untract the transmitter from your computer.
6.2.3 Screen sharing via WirelessMedia Client for Windows
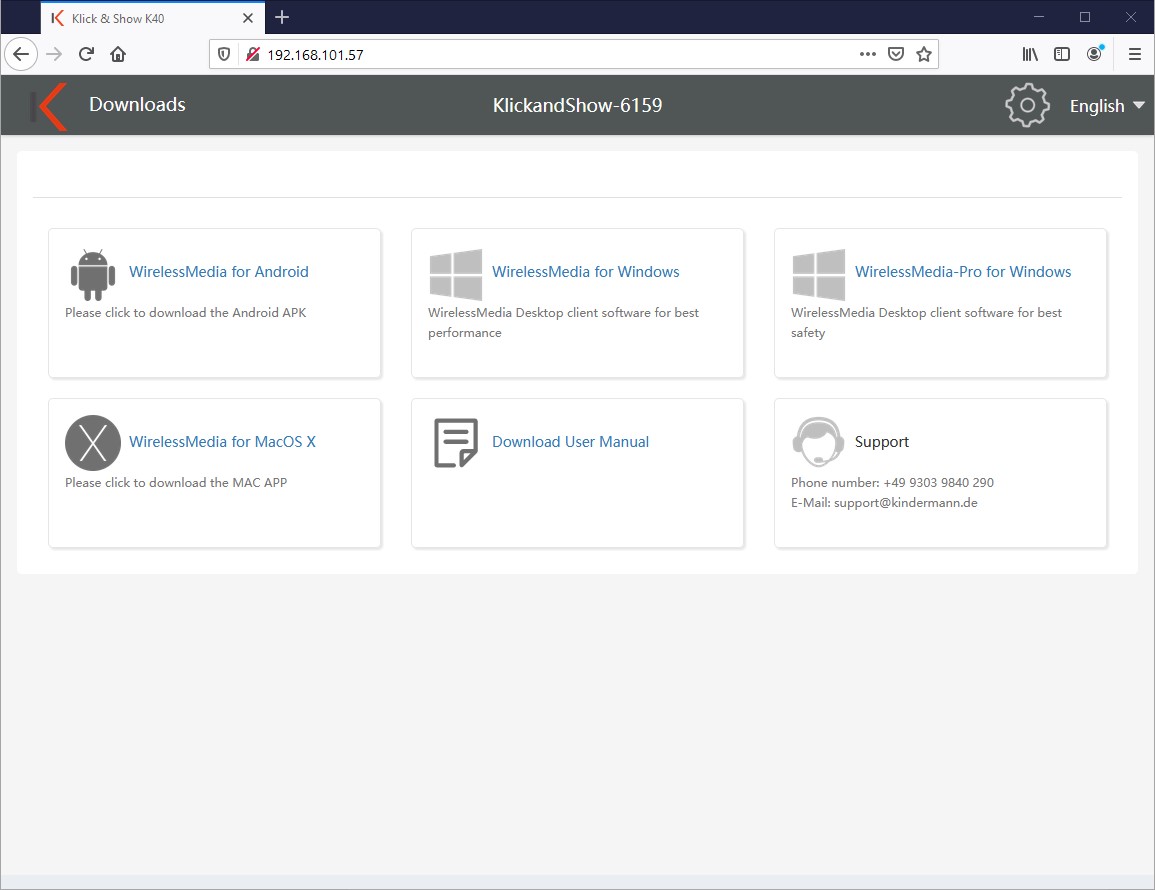
If the WirelessMedia Client is not yet available on your computer, you have the following options to choose from:
- By download from www.klickandshow.com/client/
- By download from the Klick&Show Base
To do this, enter the IP address displayed on the home screen into the browser and download the "WirelessMedia App" app to match your operating system.
Connect to a Klick&Show Basic as described at the beginning of the chapter. Then click on the " Show" button, the window color will change to red, and the screen content will be broadcast. The name of the logged-in user is briefly displayed.
You can minimize the app window. in the windows taskbar you can see if the screen content is transferred ![]()
![]() or not
or not ![]() .
.
To end the transfer, click "Stop", the window color is green again.
To exit the WirelessMedia Clients click on the Close icon (X) or in Windows Sytemtray right-click on the ![]() Icon and then click Exit. A confirmation dialog follows.
Icon and then click Exit. A confirmation dialog follows.
Advanced Features of the WirelessMedia Client for Windows
click the gear icon ![]() in the app to use the "options" or close.
in the app to use the "options" or close.

Options:
- Extended Screen:
If this option is selected, the Klick&Show like an external monitor, i.e. a second "virtual" screen is set up and transmitted.
If you want to transfer with Klick&Show (pause), the extended desktop remains active until you either deselect the "Extended Screen" function in the APP or close the WirelessMedia App. Alternatively, you can use the key combination "Windows + P" in the Windows configuration to select "PC screen only" or "Duplicate".

![]() hint:
hint:
When the Extended Screen feature is enabled for the first time, a driver is installed.
The installation process requires administrator rights.

- Keep aspect ratio:
This option is active by default. This ensures that the image on the source device and on the display have the same proportions. If you deselect the function, the image is stretched to the overall width and thus possibly distorted.
- Lowest latency (mouse):
The option is active by default. The mouse pointer is displayed without any perceptible delay (~20 ms) during movements, which significantly improves ergonomics.
However, the mouse cursor is always displayed as an arrow symbol on the main display in all applications, regardless of whether it changes its shape on the PC monitor.
Deactivated: The shape of the mouse pointer (e.g. arrow or hand) on the display corresponds to the actual shape in the application. The movement of the pointer occurs with a small delay (100 – 150 ms). - Stream Mode:
This option allows you to choose between two presets for encoded transmission of image information.
– Fluent priority: In the case of fast-moving images, the quality is somewhat reduced in favor of a smooth display.
– Quality priority: In order to ensure the highest possible playback quality, the data rate is increased for fast-changing images, such as video transmission. This can lead to a slight but noticeable delay (latency).
- Volume: The slider can be used to adjust the playback volume on the output display or on the analog output of the Klick&Show basis can be regulated during an active transmission.
6.2.4 Screen sharing via WirelessMedia Client for MacOS
If the WirelessMedia Client is not yet available on your computer, you have the following options to choose from:
- By download from www.klickandshow.com/client/
- By download from the Klick&Show Base
To do this, enter the IP address displayed on the home screen into the browser and download the "WirelessMedia App" app to match your operating system.
Connect your MacBook to the "GUEST" or "EMPLOYEE" Wi-Fi network displayed on the home screen.
Is the Klick&Show Base connected to a network via CAT cable, all other computers in this network also have access to the Klick&Show Base.
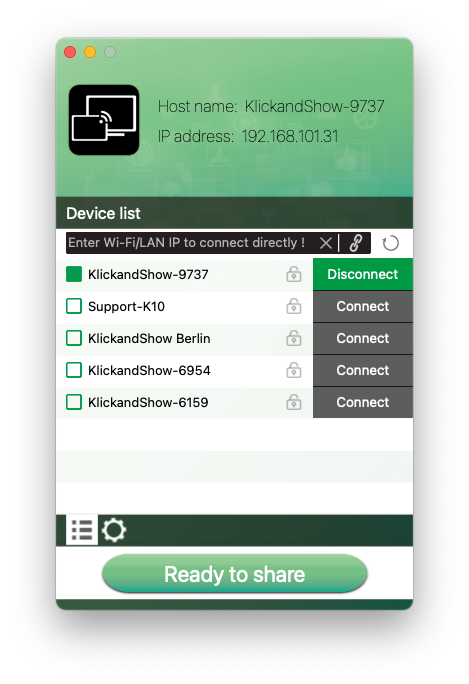
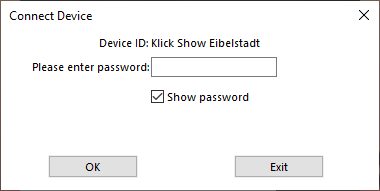
Run the "WirelessMedia Client" ![]() with a double-click. A list of all available Klick&Show in network is displayed. Choose the Klick&Show that you want to connect to, and then click "Connect".
with a double-click. A list of all available Klick&Show in network is displayed. Choose the Klick&Show that you want to connect to, and then click "Connect".
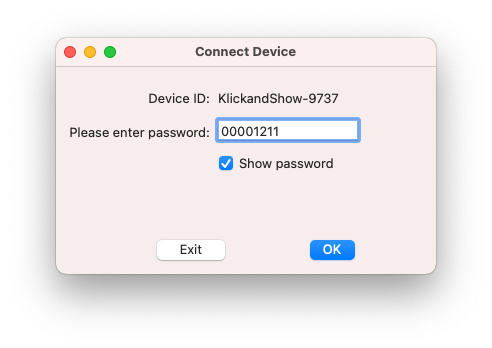
As a rule, access is password-protected ![]() .
.
Enter the 8-digit "code" that is displayed on the home screen. When you have successfully connected to the base, the WirelessMedia Client changes color to green.
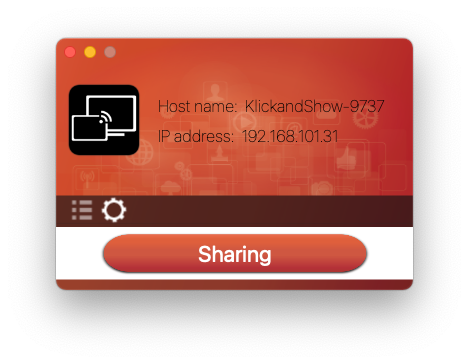
Now click on the " Show" button, the window color will change to red and the screen content will be broadcast. The name of the logged-in user is briefly displayed.
You can minimize the app window. In the MacOS status bar shows an icon ![]() the current connection status.
the current connection status.
To end the transfer, click on "Stop", the window color will change back to green.
![]() Hint:
Hint:
If the desired Klick&Show Base does not appear in the list, you can enter the IP address directly in the black box and then click the ![]() click.
click.
In this case, your computer is either not connected to the same network (segment) or there are network-side restrictions that block an automatic search.
In this case, please contact your network administrator.
To exit the WirelessMedia Clients click on the Close icon (red dot) or in the system tray with the right mouse button on the ![]() Icon and then click Exit. A confirmation dialog follows.
Icon and then click Exit. A confirmation dialog follows.

Advanced features of the WirelessMedia Client for MacOS
click the gear icon ![]() in the app to use the "options" or close.
in the app to use the "options" or close.
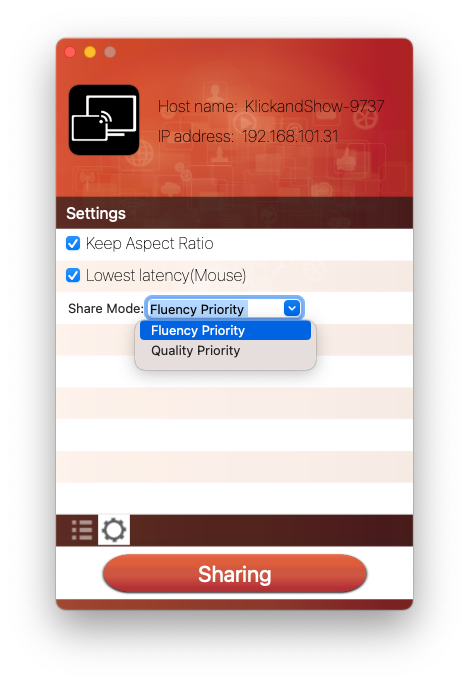
Options:
- Keep aspect ratio:
This option is active by default. This ensures that the image on the source device and on the display have the same proportions. If you deselect the function, the image is stretched to the overall width and thus possibly distorted.
- Lowest latency (mouse):
The option is active by default. The mouse pointer is displayed without any perceptible delay (~20 ms) during movements, which significantly improves ergonomics.
However, the mouse cursor is always displayed as an arrow symbol on the main display in all applications, regardless of whether it changes its shape on the PC monitor.
Deactivated: The shape of the mouse pointer (e.g. arrow or hand) on the display corresponds to the actual shape in the application. The movement of the pointer occurs with a small delay (100 – 150 ms). - Share Mode:
This option allows you to choose between two presets for encoded transmission of image information.
– Fluent priority: In the case of fast-moving images, the quality is somewhat reduced in favor of a smooth display.
– Quality priority: In order to ensure the highest possible playback quality, the data rate is increased for fast-changing images, such as a video transmission. This can lead to a slight but noticeable delay (latency).
6.2.5 Supplementary Operating Instructions for the WirelessMedia Client
If the WirelessMedia version does not match the firmware of the base, you will be informed by a message after starting the app:
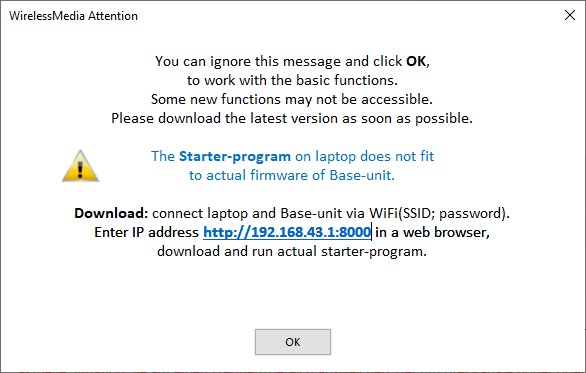
In this case, delete the previous version and install the current one.
![]() Hint:
Hint:
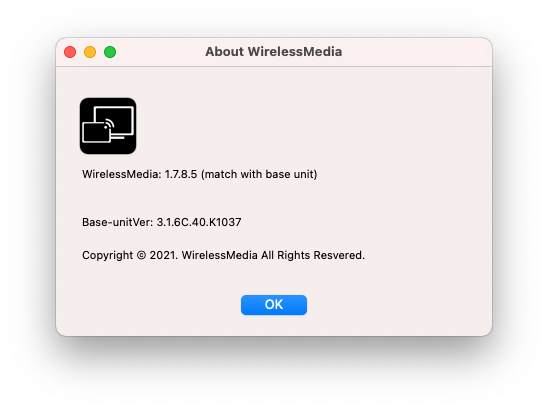
A right-click on the icon ![]() in the taskbar, the Klick&Show Context menu. The software tells you versions of the base device, the transmitter and the WirelessMedia Client.
in the taskbar, the Klick&Show Context menu. The software tells you versions of the base device, the transmitter and the WirelessMedia Client.
6.3 USB-Conferencing K-FX)
Klick&Show K-FX transforms traditional conference rooms into hybrid meeting rooms, facilitating collaboration between the office and remote participants. The USB conferencing function connects your laptop to existing USB devices in your conference room, such as video or sound bars, cameras and hands-free kits.
In this concept, known as BYOM (Bring Your Own Meeting), employees can make audio/video conferencing calls through their own account on their preferred UCC platform, be it Microsoft Teams, Zoom, Cisco Webex, or Google Meet, etc.
6.3.1 Commissioning of USB conferencing with HDMI or USB-C transmitters (K-FX)
![]() Hint:
Hint:
The conferencing function (BYOM – Bring Your Own Meeting), i.e. the wireless return transmission of USB camera and USB audio conferencing signals for UC conferences, is only available for Windows 10 / 11 and MacOS.
Aother operating systems (e.g. Linux) are not supported.
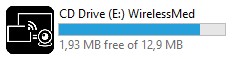
Connect the transmitter to the computer as described in Chapter 6.2.1. In addition to the screen sharing feature (which does not require a driver), the transmitter is recognized as a "CD drive" (non-writable memory) on which the WirelessMedia Client is mounted.
When using transmitters, they take over the (driverless) mirroring of device content to the main display, while the WirelessMedia Software Client receives the data streams transmitted backwards from the USB devices via laptop WiFi and makes them available on the laptop for use by web conferencing applications such as Microsoft Teams, Zoom, WebEX, etc.

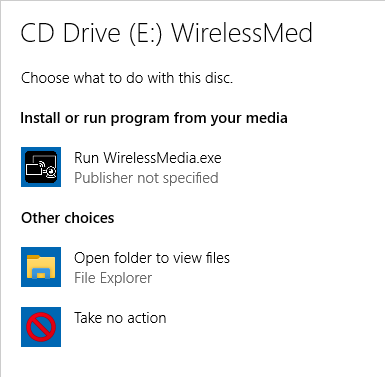
Under Windows 10/11, an AutoPlay message window automatically appears when the transmitter is connected. Click on this message window and confirm that you want to run WirelessMedia.exe from this disk. If, in rare cases, the AutoPlay function is deactivated on your computer, either activate it beforehand or start the WirelessMedia .exe manually from the virtual CD-ROM drive by double-clicking on Windows Explorer.
The Windows Autoplay hint window only needs to be observed on the first run. After the first successful start-up, the autoplay message can be ignored, as the already installed WirelessMedia Client opens automatically in the background after plugging in the transmitter.
If a USB camera and/or a USB audio conferencing system has been connected to the K-FX base, the software checks whether the necessary drivers are already installed on the system. The first time you use it, the WirelessMedia software will prompt you to install the drivers.
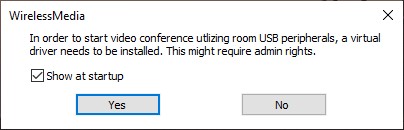

![]() Hint:
Hint:
To use the conferencing (BYOM) functions under K-FX, administration rights are required during installation.
Alternatively, the WirelessMedia Client and the function drivers for the Windows operating system can be pre-installed via central software distribution.
The MSI installation package can be found on the download page.
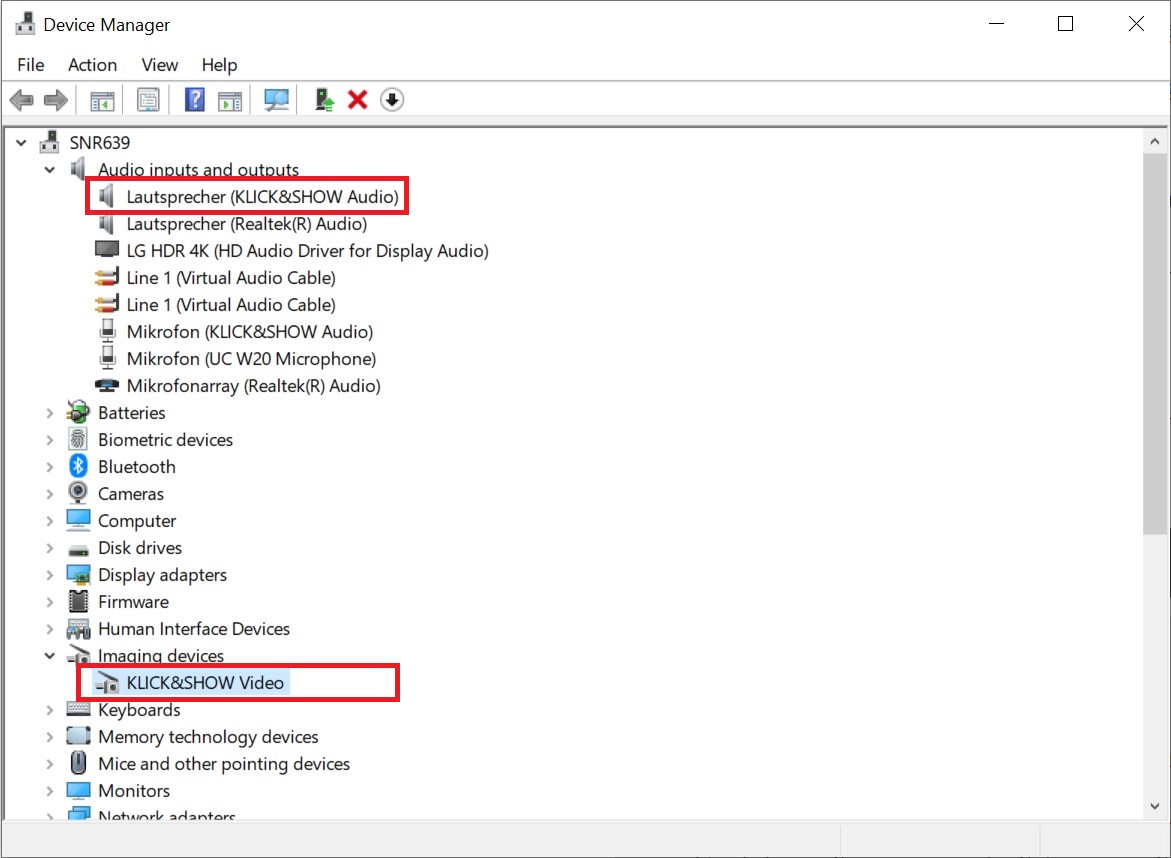
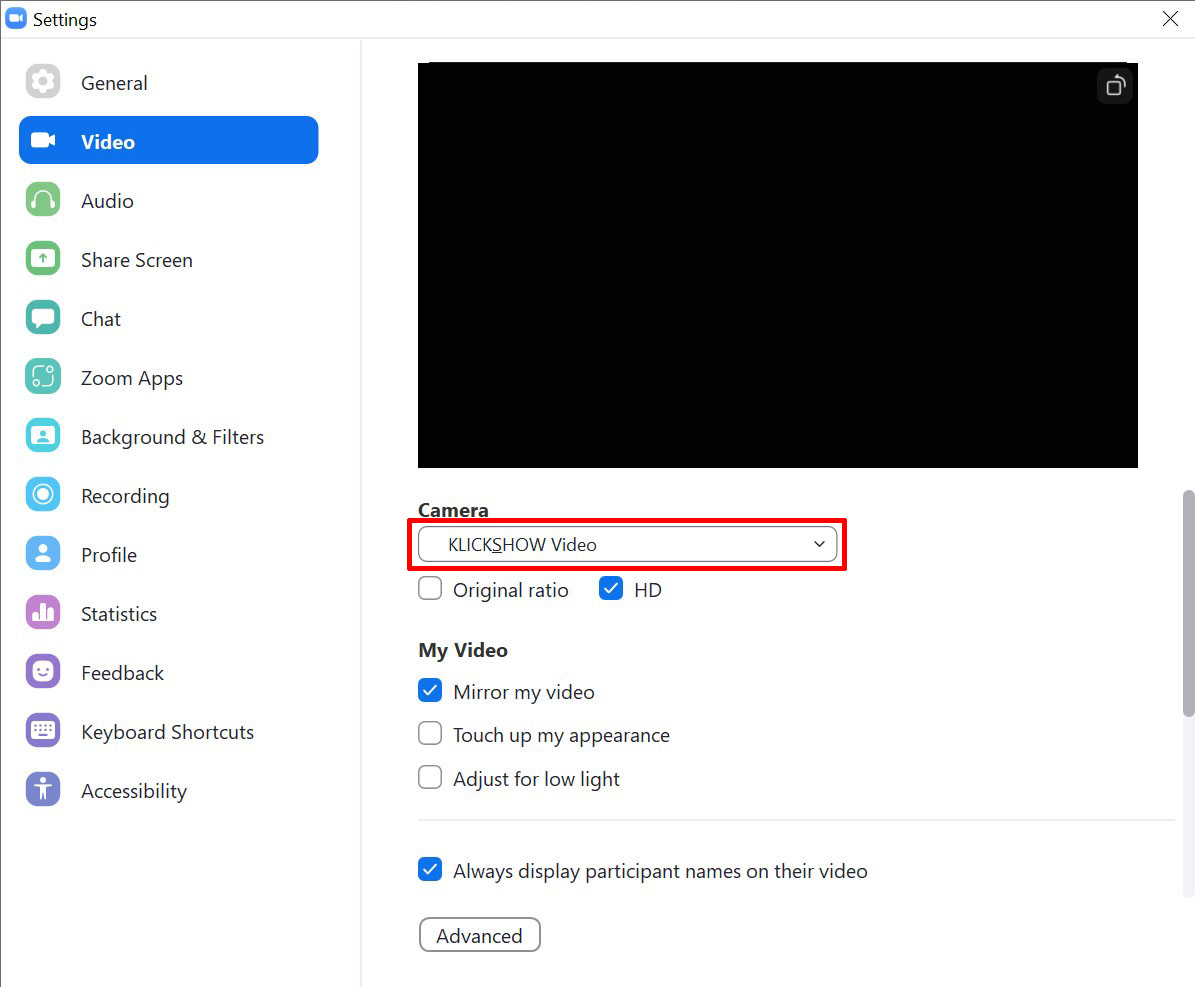
After successful installation, a virtual camera "Klick&Show Video" and a virtual audio device "Klick&Show Audio" as a microphone or playback device.
![]() hint:
hint:
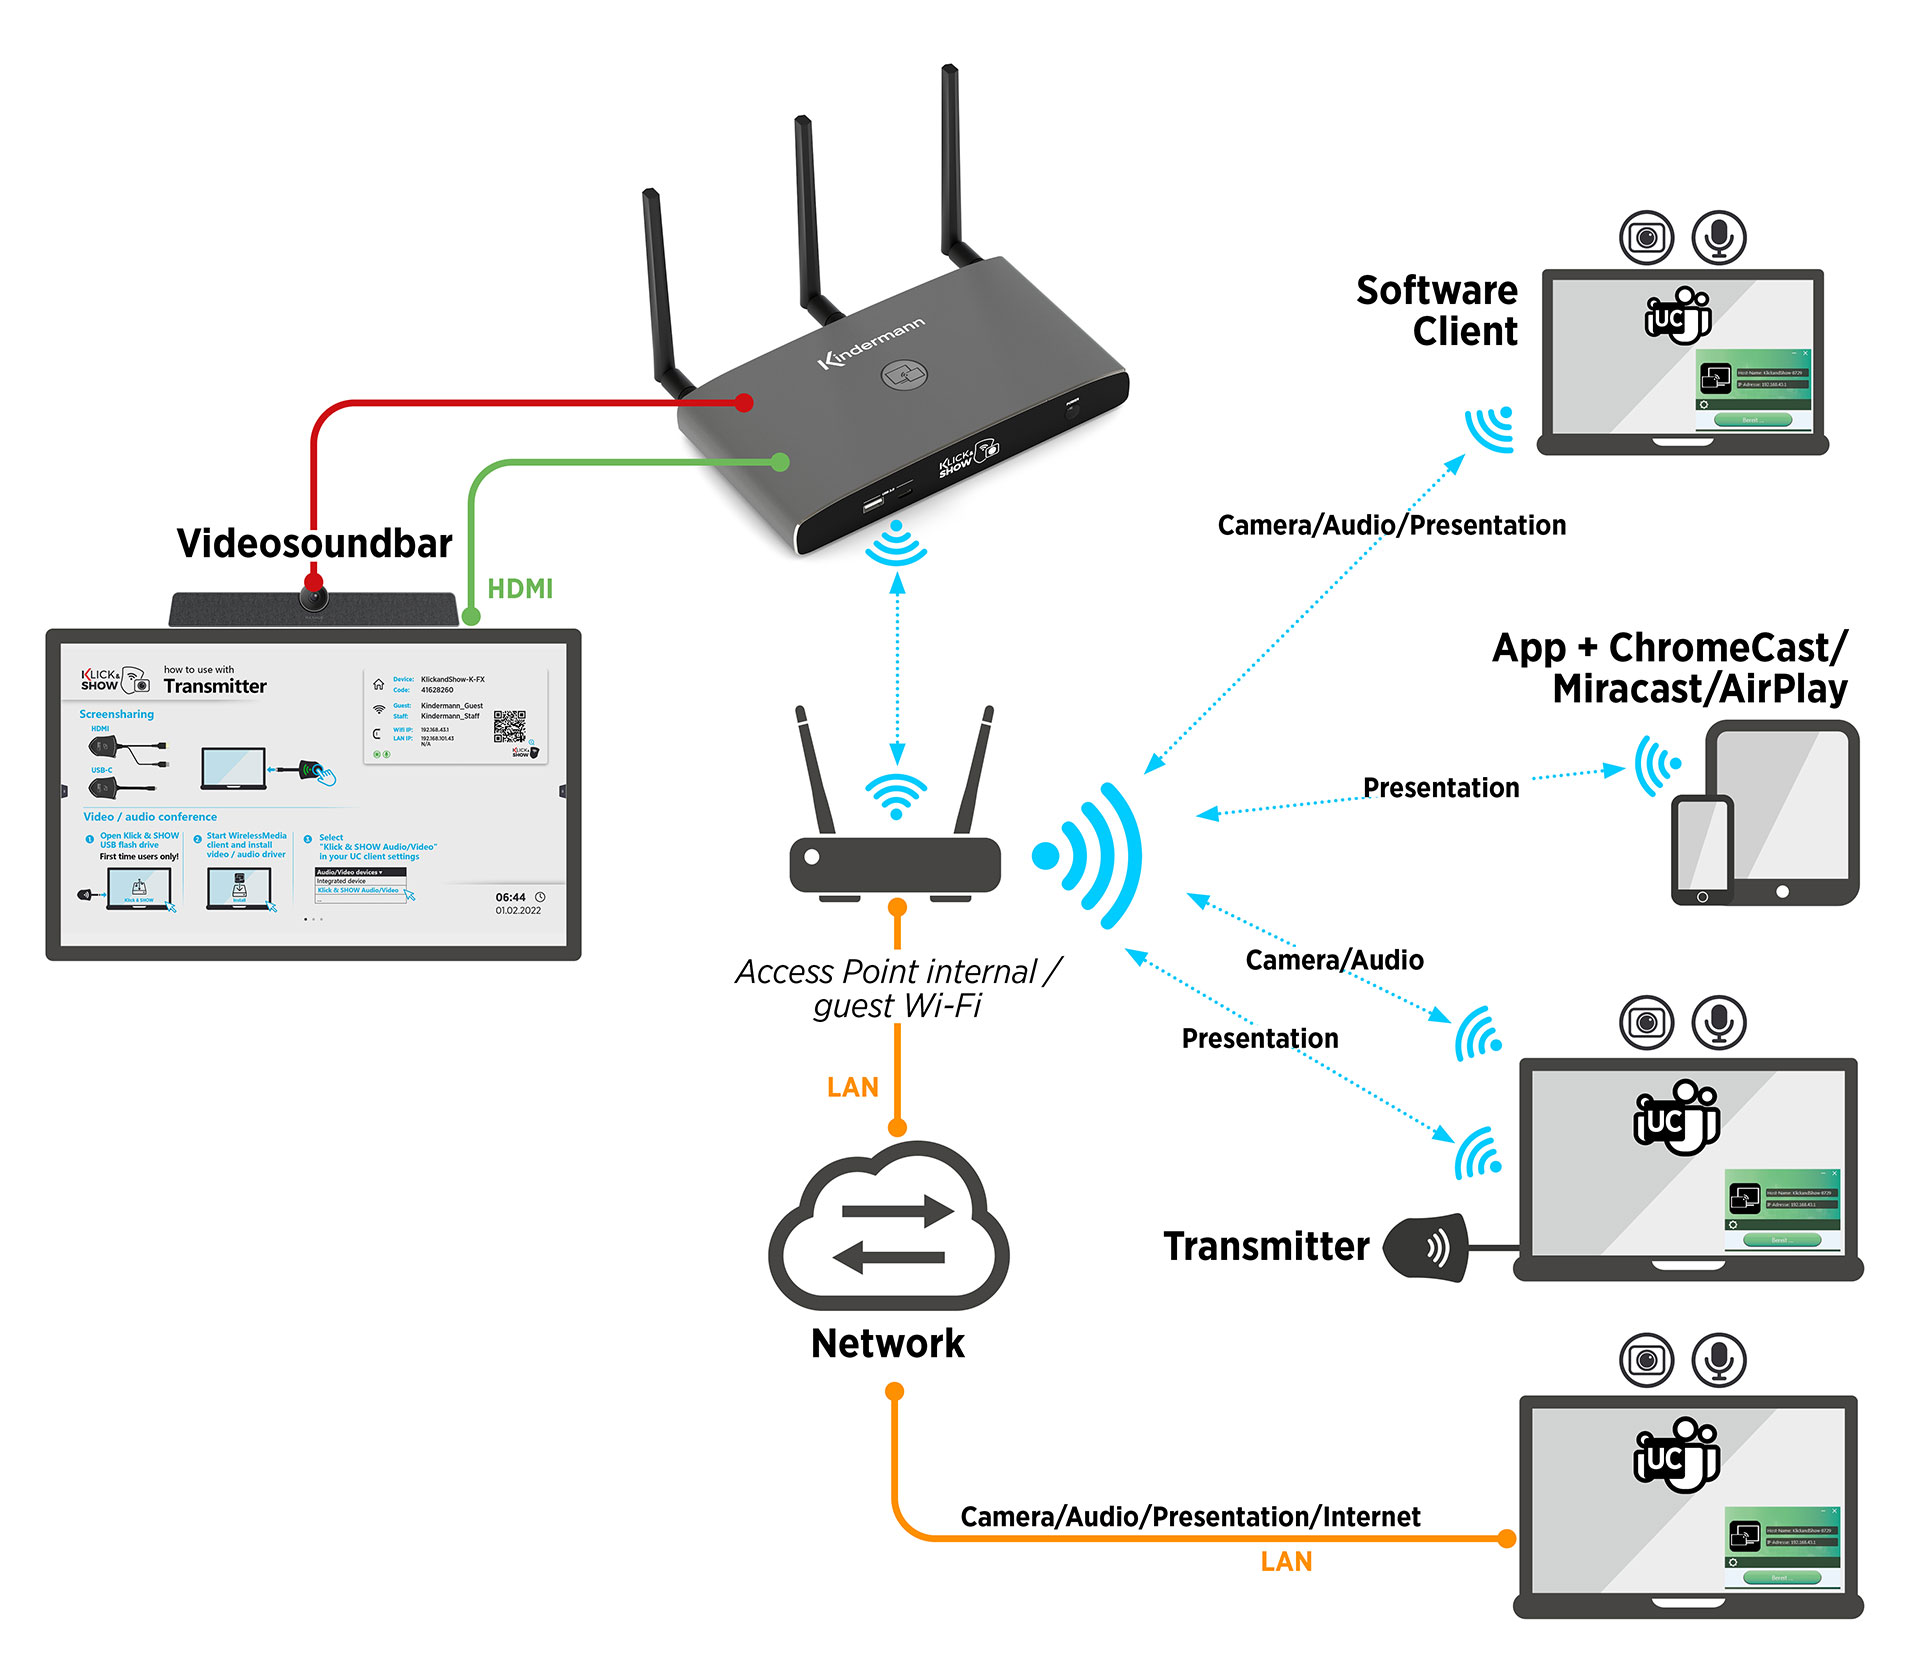
The data transfer for screen sharing takes place via the WLAN module integrated in the transmitter, but the USB data from the camera and audio conference is transmitted separately directly via the network connection of the computer.
That Klick&Show For this purpose, the K-FX base unit must be connected to the network either wired (LAN port 1 or 2) or wirelessly, so that the participant's laptop used as the host computer of a UC conference is located both in the same network of the base (for receiving the USB device data streams) and on the Internet (for conducting the UC conference).
If the subscriber laptop and base are already in the same network address range, a connection is immediately established to receive the USB device data streams. In the other case, if the laptop is connected to a foreign network at the beginning, from which the Klick&Show If the base is not accessible, the WLAN connection must be changed accordingly.
The WirelessMedia Client then automatically notifies the user of the need to change the network and also carries out the change independently after confirmation. As a rule, the WLAN password is transferred when pairing the transmitters, so that manual entry is not necessary.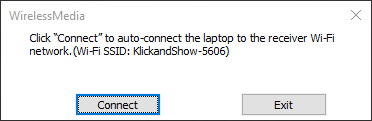
For information about network configuration, see the Chapter Network Settings.
6.3.2 Commissioning USB conferencing with the WirelessMedia Client (K-FX)
If the WirelessMedia Client is not yet available on your computer, you have the following options to choose from:
- By download from www.klickandshow.com/client/
- By download from the Klick&Show Base
To do this, enter the IP address displayed on the home screen into the browser and download the "WirelessMedia App" app to match your operating system.
Connect your computer to the "GUEST" or "EMPLOYEE" Wi-Fi network that is displayed on the home screen.
Run the "WirelessMedia Client" ![]() by double-clicking. A list of all available Klick&Show in network is displayed. Choose the Klick&Show that you want to connect to, and then click "Connect".
by double-clicking. A list of all available Klick&Show in network is displayed. Choose the Klick&Show that you want to connect to, and then click "Connect".
As a rule, access is password-protected ![]() .
.
Enter the 8-digit "code" that is displayed on the home screen. When you have successfully connected to the base, the WirelessMedia Client changes color to green.


![]() Hint:
Hint:
If the desired Klick&Show Base does not appear in the list, you can enter the IP address directly in the black box and then click the ![]() click.
click.
In this case, your computer is either not connected to the same network (segment) or there are network-side restrictions that block an automatic scan.
In this case, please contact your network administrator.
If a USB camera and/or a USB audio conferencing product has already been connected to the K-FX base, the software checks whether the necessary drivers are already installed on the system. The first time you use it, the WirelessMedia software will prompt you to install the drivers.
![]() Hint:
Hint:
Administration rights are required for installation.
Alternatively, the WirelessMedia Client and the function drivers for the Windows operating system can already be pre-installed via central software distribution.
The MSI installation package can be found on the download page.
After successful installation, a virtual camera " Klick&Show Video" and a virtual audio device "Klick&Show Audio" as a microphone or playback device.
6.3.3 Wireless use of camera and audio conferencing (K-FX)
To connect the USB camera or USB audio conferencing solution wirelessly at Klick&Show In order to be able to use K-FX, the last step is to change the device configuration in the software client of the UCC application.
Example Microsoft Teams:

Example Zoom:
In other UCC software clients, the setting must be made accordingly.
![]() Hint:
Hint:
In all UCC software clients there is a test function for the audio and video setting. With this you can also ensure the correct functioning of Klick&Show test.
In order to understand the basic function of retransmitting USB video and audio signals from the Klick&Show To test K-FX Basis via the existing network to the laptop, the "Camera App" can also be used under Windows, for example.
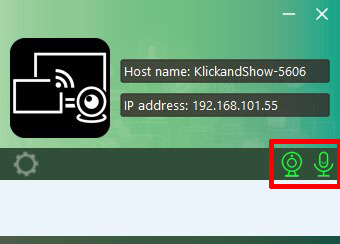
As soon as the camera or audio transmission is used, the color on the icons on the home screen and in the WirelessMedia Client changes to green for status feedback.
6.4 WirelessMedia2 App for Android
How do I get the WMedia2 Android app?
Use of the WMedia2 Android App
Connect your Android device to the "GUEST" or "EMPLOYEE" Wi-Fi network that is displayed on the home screen.
Is the Klick&Show Base connected to a network via CAT cable, all other computers in this network also have access to the Klick&Show Base.
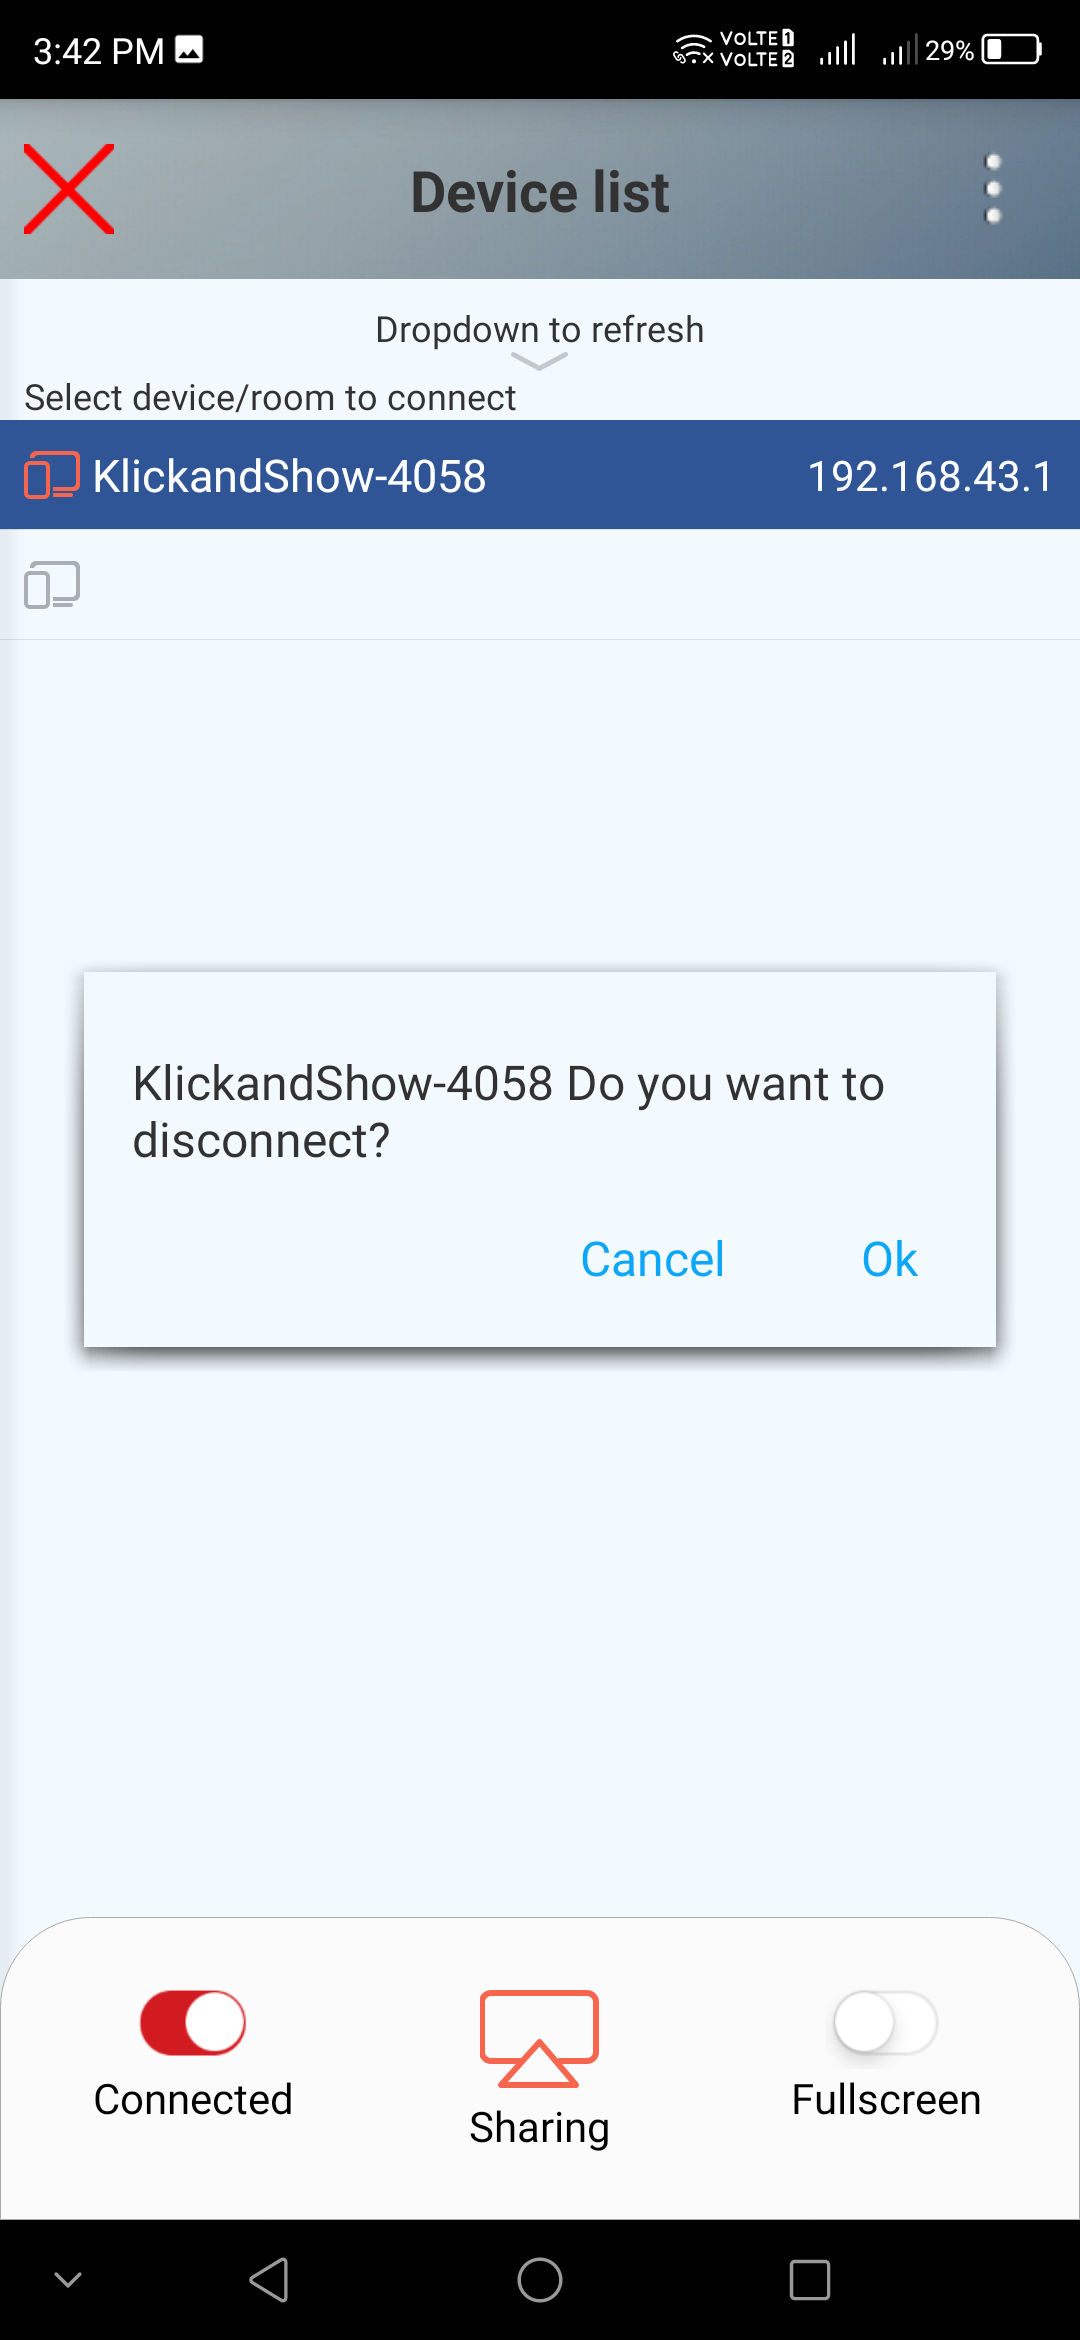
Open the WirelessMedia app. The available Klick&Show Devices appear on the network.
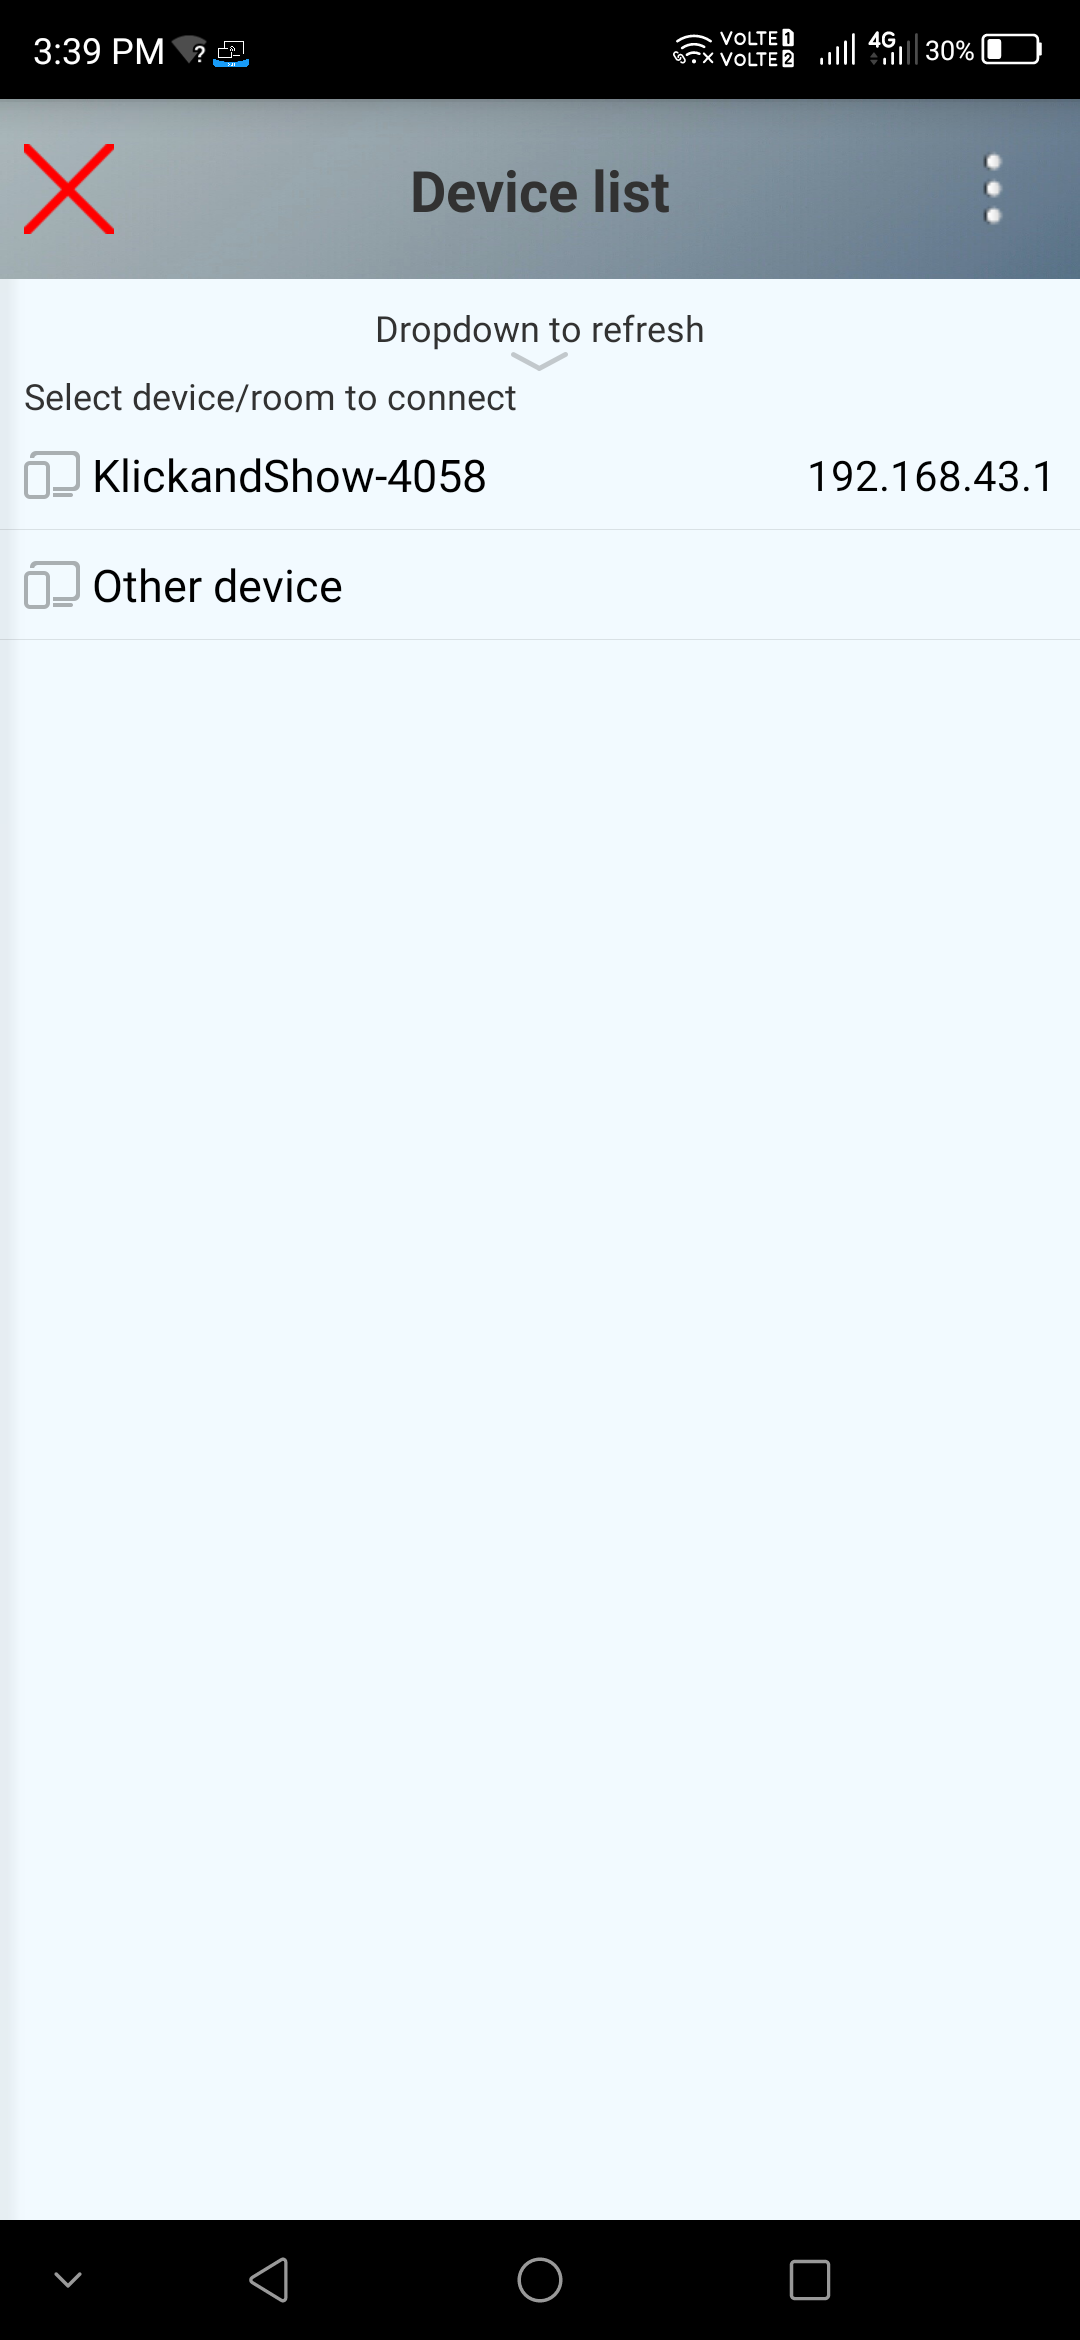
![]() Hint:
Hint:
To update the available Klick&Show Devices, drag the "Dropdown refresh" arrow down.
You can use the "Other device" list entry to enter the IP address directly into the black field and then click on the icon. If the desired Klick&Show Base not shown in the list, your mobile device is either not connected to the same network (segment) or there are network-side restrictions that block automatic scanning.
In this case, please contact your network administrator.
Select the desired device from the list and, if necessary, enter the 8-digit code that is displayed on the home screen.
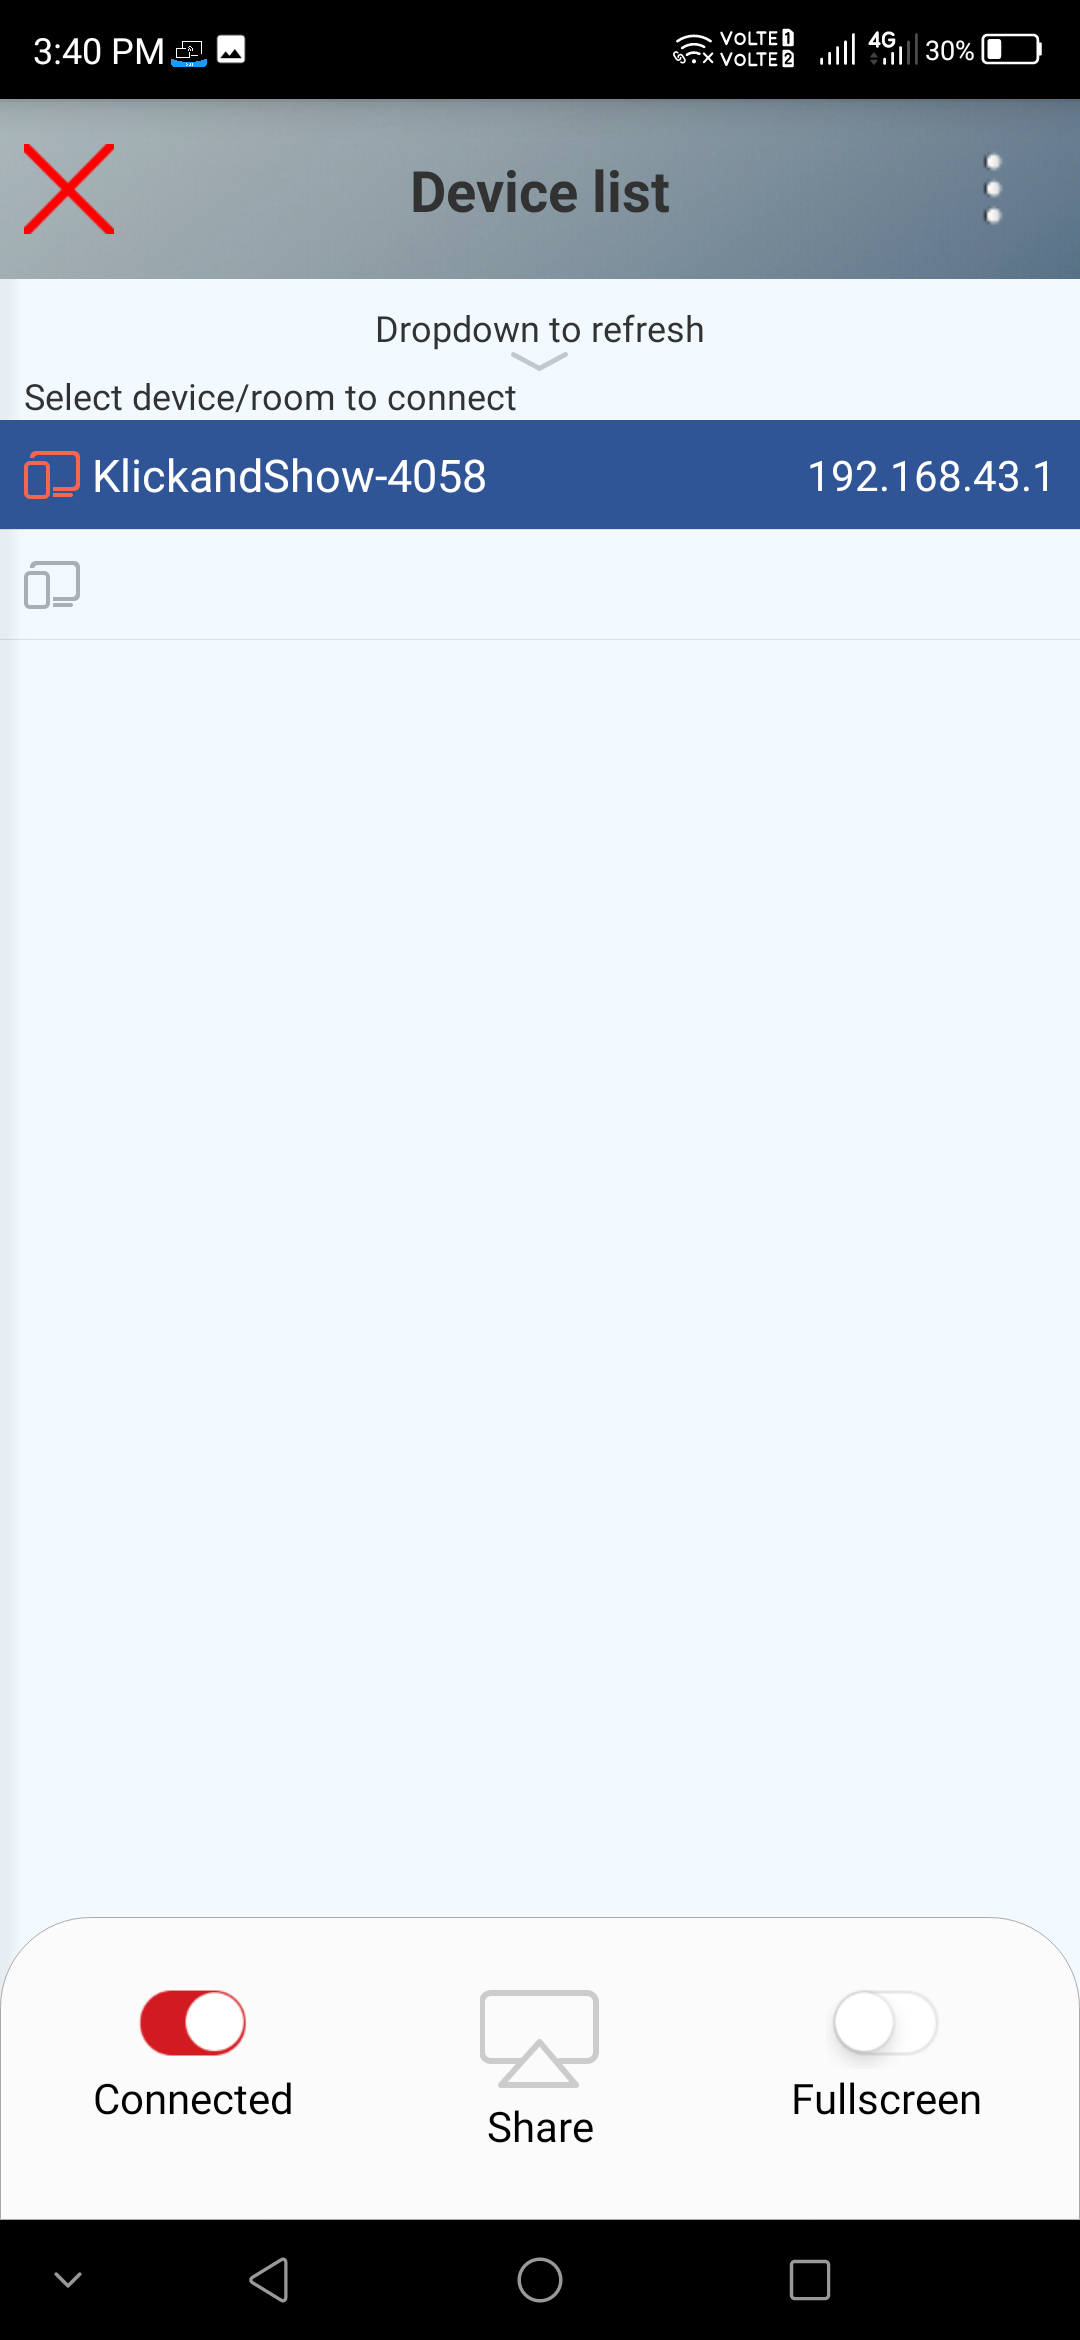
Before you can transfer your screen, a security query from Android will appear, indicating that you are sharing your screen with everyone.

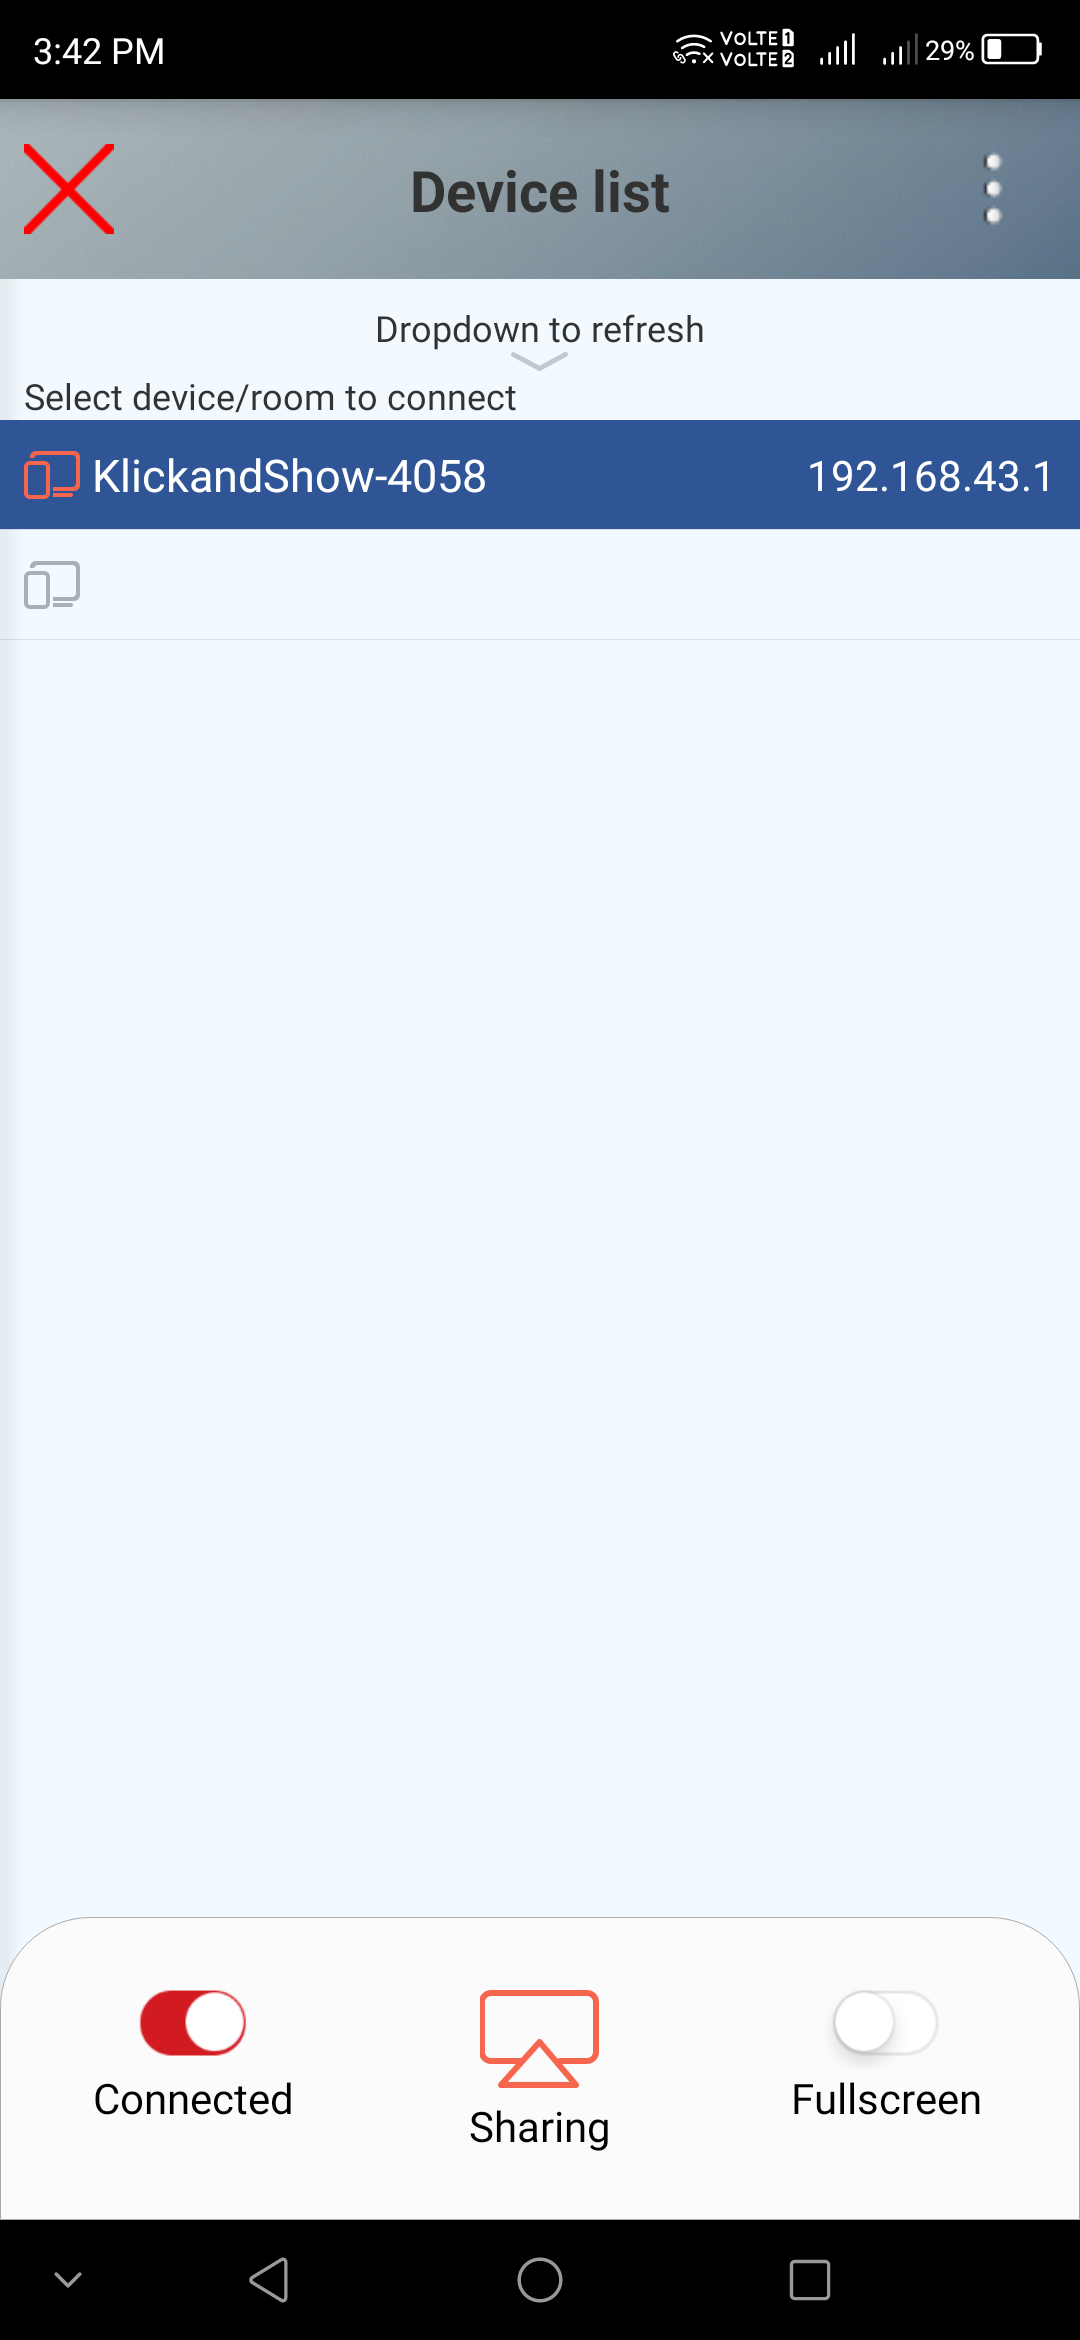
To start the transfer, tap "Share". To stop the transfer, disable "Sharing".
The "Fullscreen" option is available when more than one participant is presenting at the same time and the Klick&Show shows a split image on the display. By activating this function, your Android device will be displayed in full screen and the other active transfer(s) will be terminated.
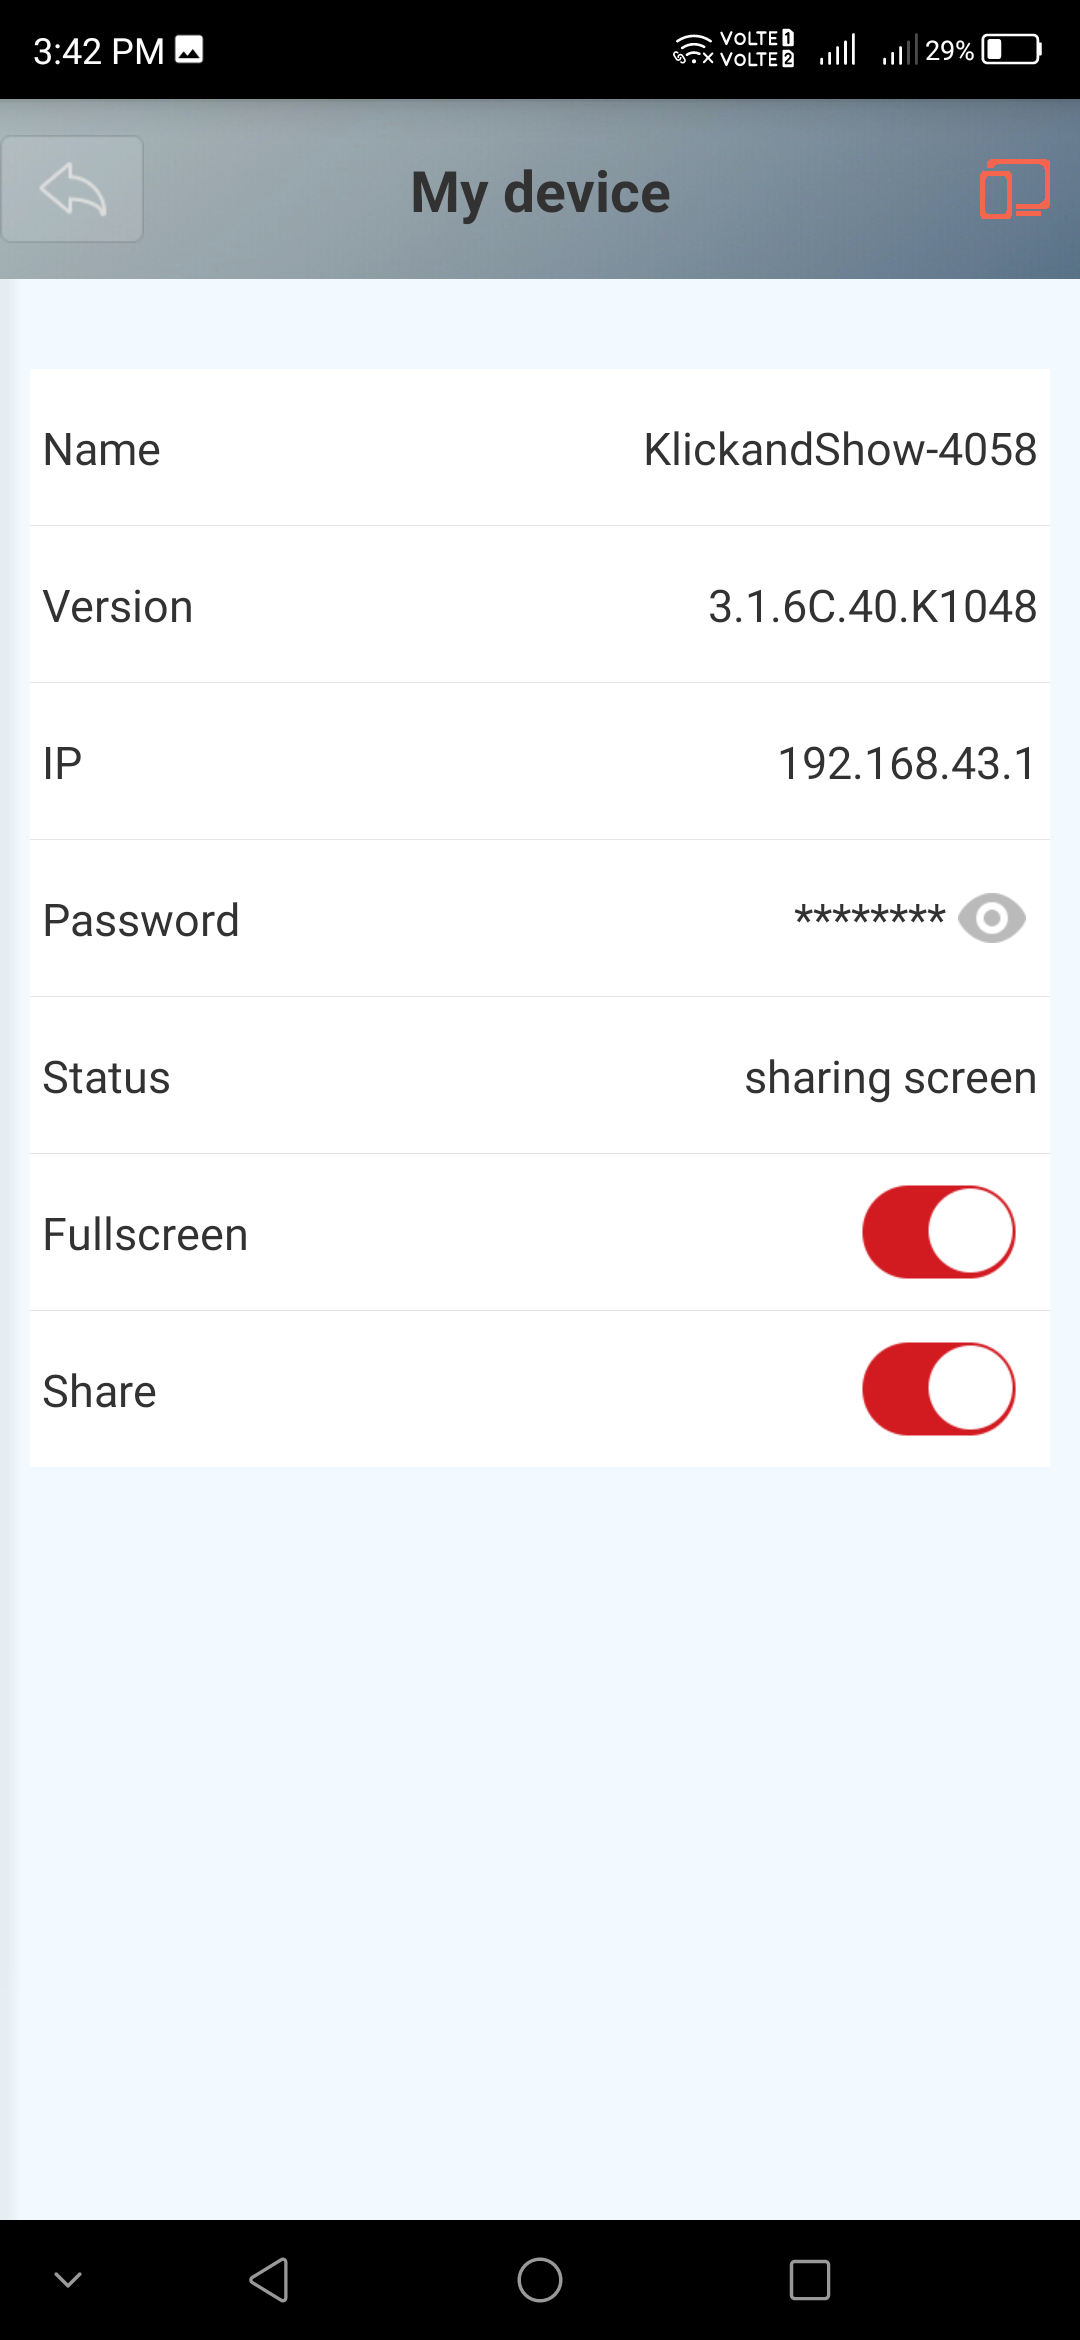
By clicking on the device name, you will get more detailed information about the selected Klick&Show.
To disconnect, click on "Sharing" and confirm the security question.
![]() hint:
hint:
Details about the split screen function can be found in chapter 7.1
6.5 Use of AirPlay
Devices that work with a current version of MacOS, iPad OS or iOS can use Apple's own streaming service "AirPlay".
Connect your Apple device to the "GUEST" or "EMPLOYEE" Wi-Fi network that is displayed on the home screen.
Is the Klick&Show Connected to a network via CAT cable, all other computers in this network also have access to the Klick&Show Base.
6.5.1 AirPlay on iPad or iPhone
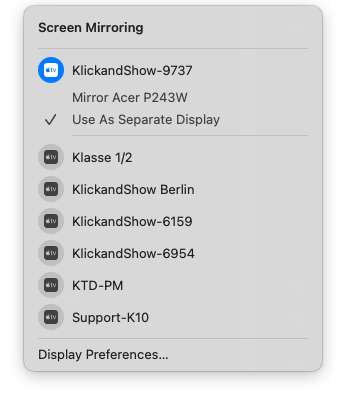
On your Apple device, open the Control Center and select "Screen Mirroring". If your device is connected to the same network as the Klick&Show , it will appear in the list. Choose the one you want Klick&Show to connect.
Depending on the selected security settings in the base unit, you may be prompted to enter the 8-digit code that is displayed on the home screen (see Chapter 11.5 Security Settings).

Now your screen content becomes the Klick&Show mirrored and shown on the connected display. You can recognize the active transfer by the AirPlay icon in the status bar: ![]()
To stop the transfer, open the control panel again with the appropriate gesture and select "Stop Mirrroring".
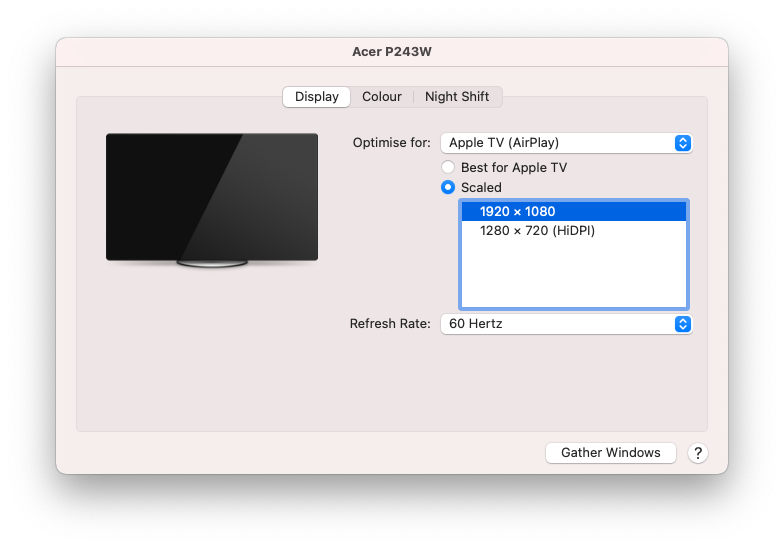
6.5.2 AirPlay Options on MacOS
On MacOS, AirPlay allows more options.
- Use as an "extended screen"
This will make the Klick&Show treated as an additional (extended) screen. - Quality setting (scaling)
This allows you to choose between high display quality and improved performance.
![]() hint:
hint:
Starting with MacOS Monterey, Airplay only supports 4-digit PINs. In this case, a window is displayed in which the 4-digit code is displayed when the connection is established. These are the last 4 digits of the 8-digit code.
6.6 Use of Miracast
Klick & Show supports both Miracast operating modes, the "Wifi direct mode" known from consumer electronics, in which a direct (peer-to-peer) connection is established between the transmitter and the receiver WLAN, and the professional infrastructure mode (MS MICE).
For MS MICE, Klick&Show operate in one of the two infrastructure modes and the computer or mobile device must be connected to the appropriate network.
K-FX already supports these two modes as standard. For K-40 and K-WM the optionally available USB Miracast WiFi adapter is required.
6.6.1 Using Miracast on Windows
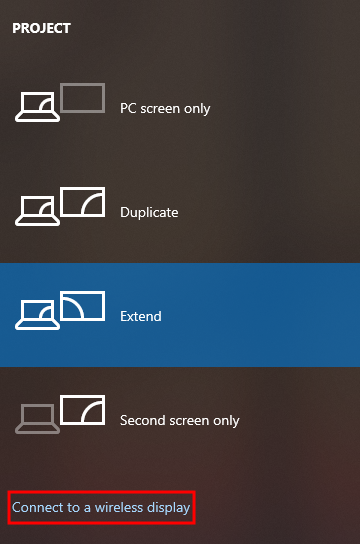
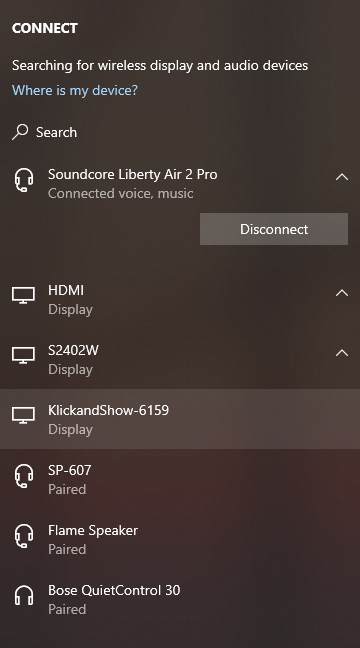
To establish a connection via Miracast, you can optionally use the familiar keyboard shortcut Windows + P and then click on the link marked in red. This will take you to the connection menu, which you can also call up directly with the key combination Windows + K. Choose Klick&Show and enter if necessary. Enter the code that is displayed on the home screen.
Once connected, select the option "Allow mouse, keyboard, touch, and pen input on this device" to enable touchback via Miracast, for example, when using an interactive display connected to the base.

A black bar appears at the top of the screen indicating the connection status.
Here the transmission can also be disconnected again.


6.6.2 Miracast on Android devices
Miracast is available on almost every Android device. However, depending on the manufacturer and Android version, it may be called differently.
In our example, we are using a smartphone with Android 10. Select the "Cast Screen" feature. The available devices are searched. Choose Klick&Show and enter if necessary. Enter the code that is displayed on the home screen.


An active transfer will be in the status bar ![]() displayed. To exit, disable the transfer.
displayed. To exit, disable the transfer.
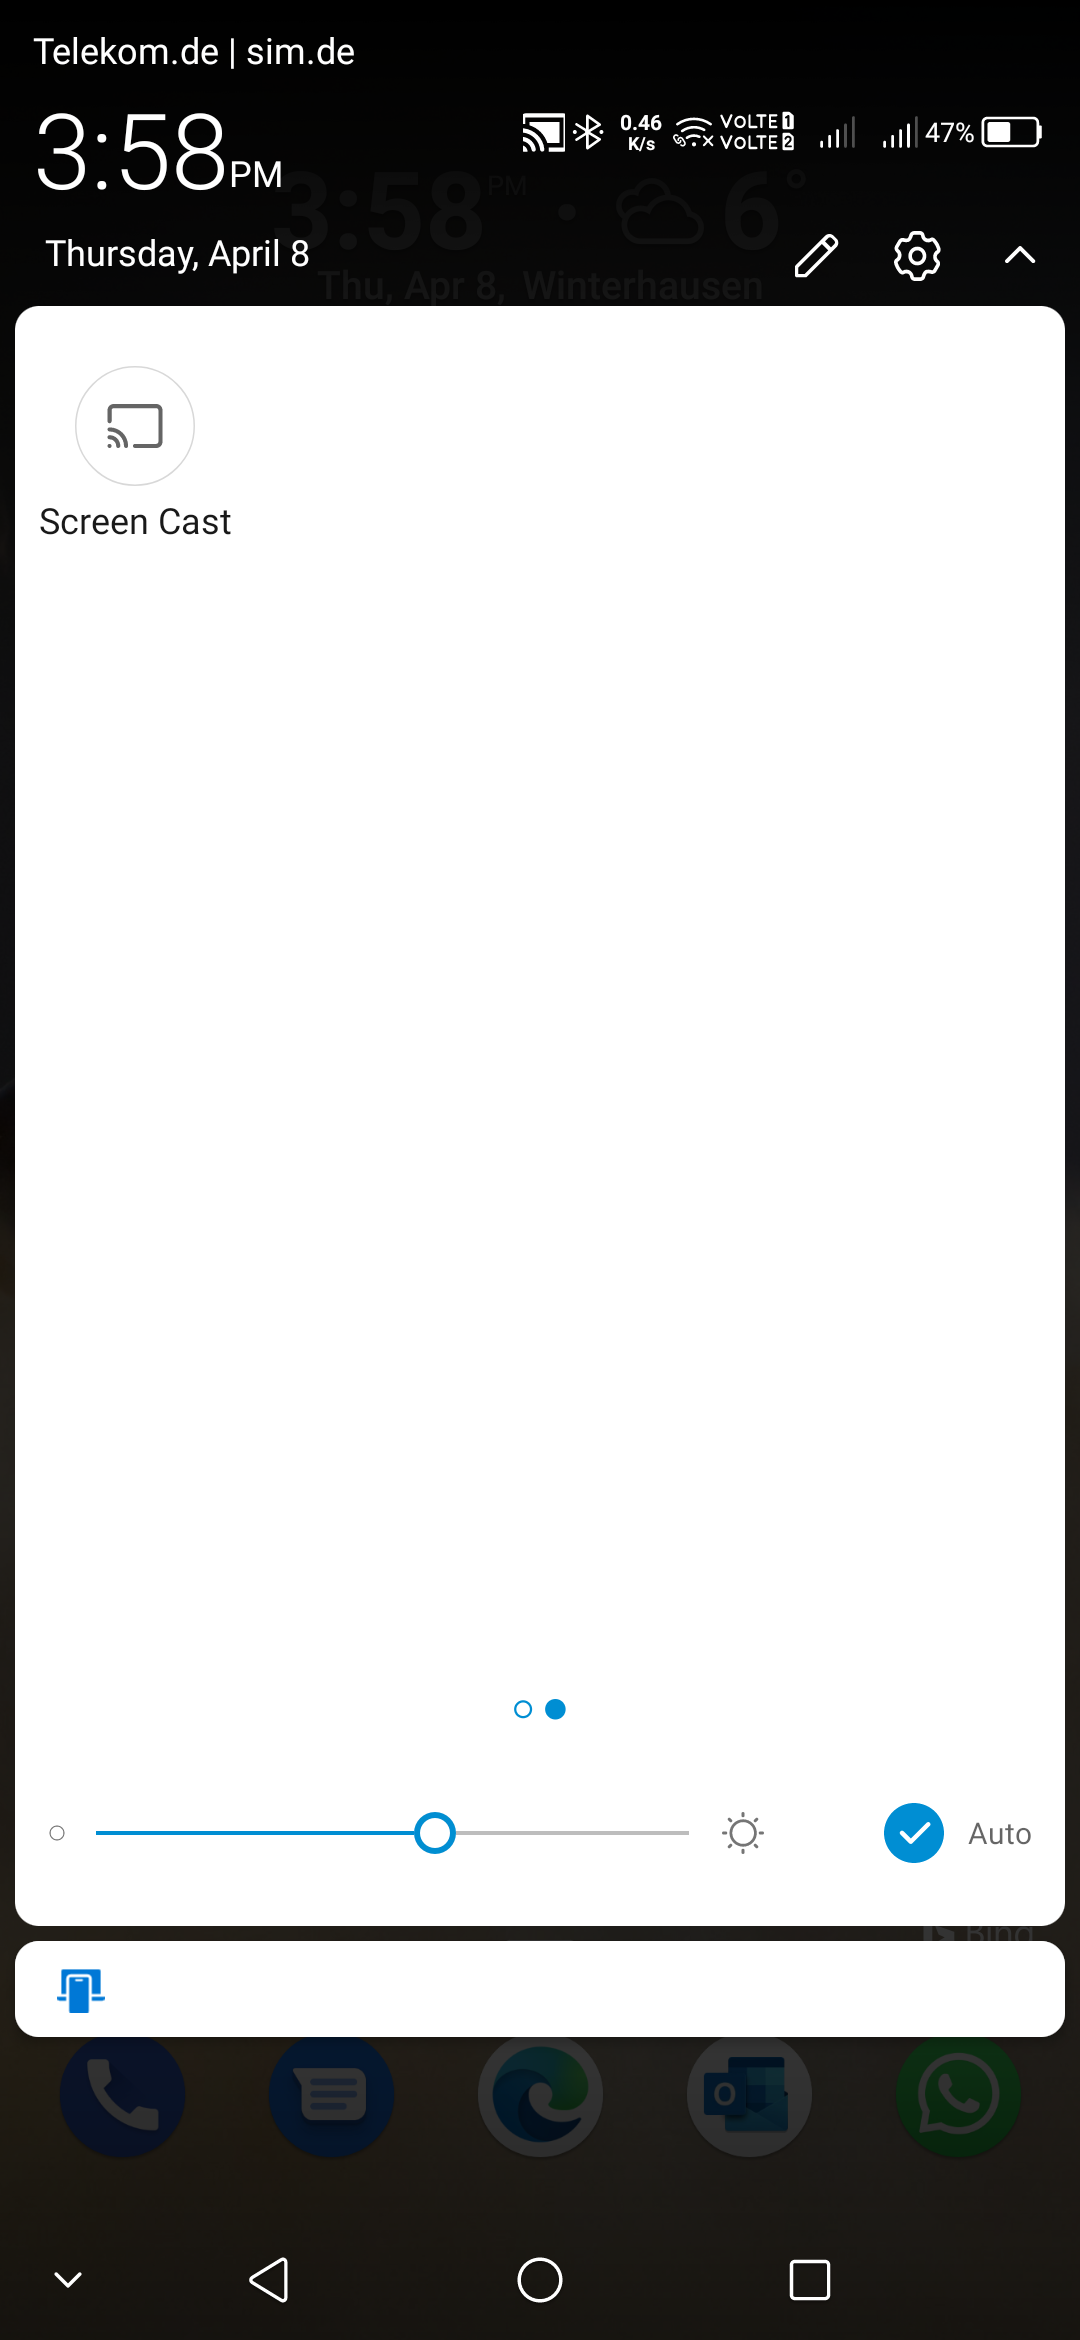
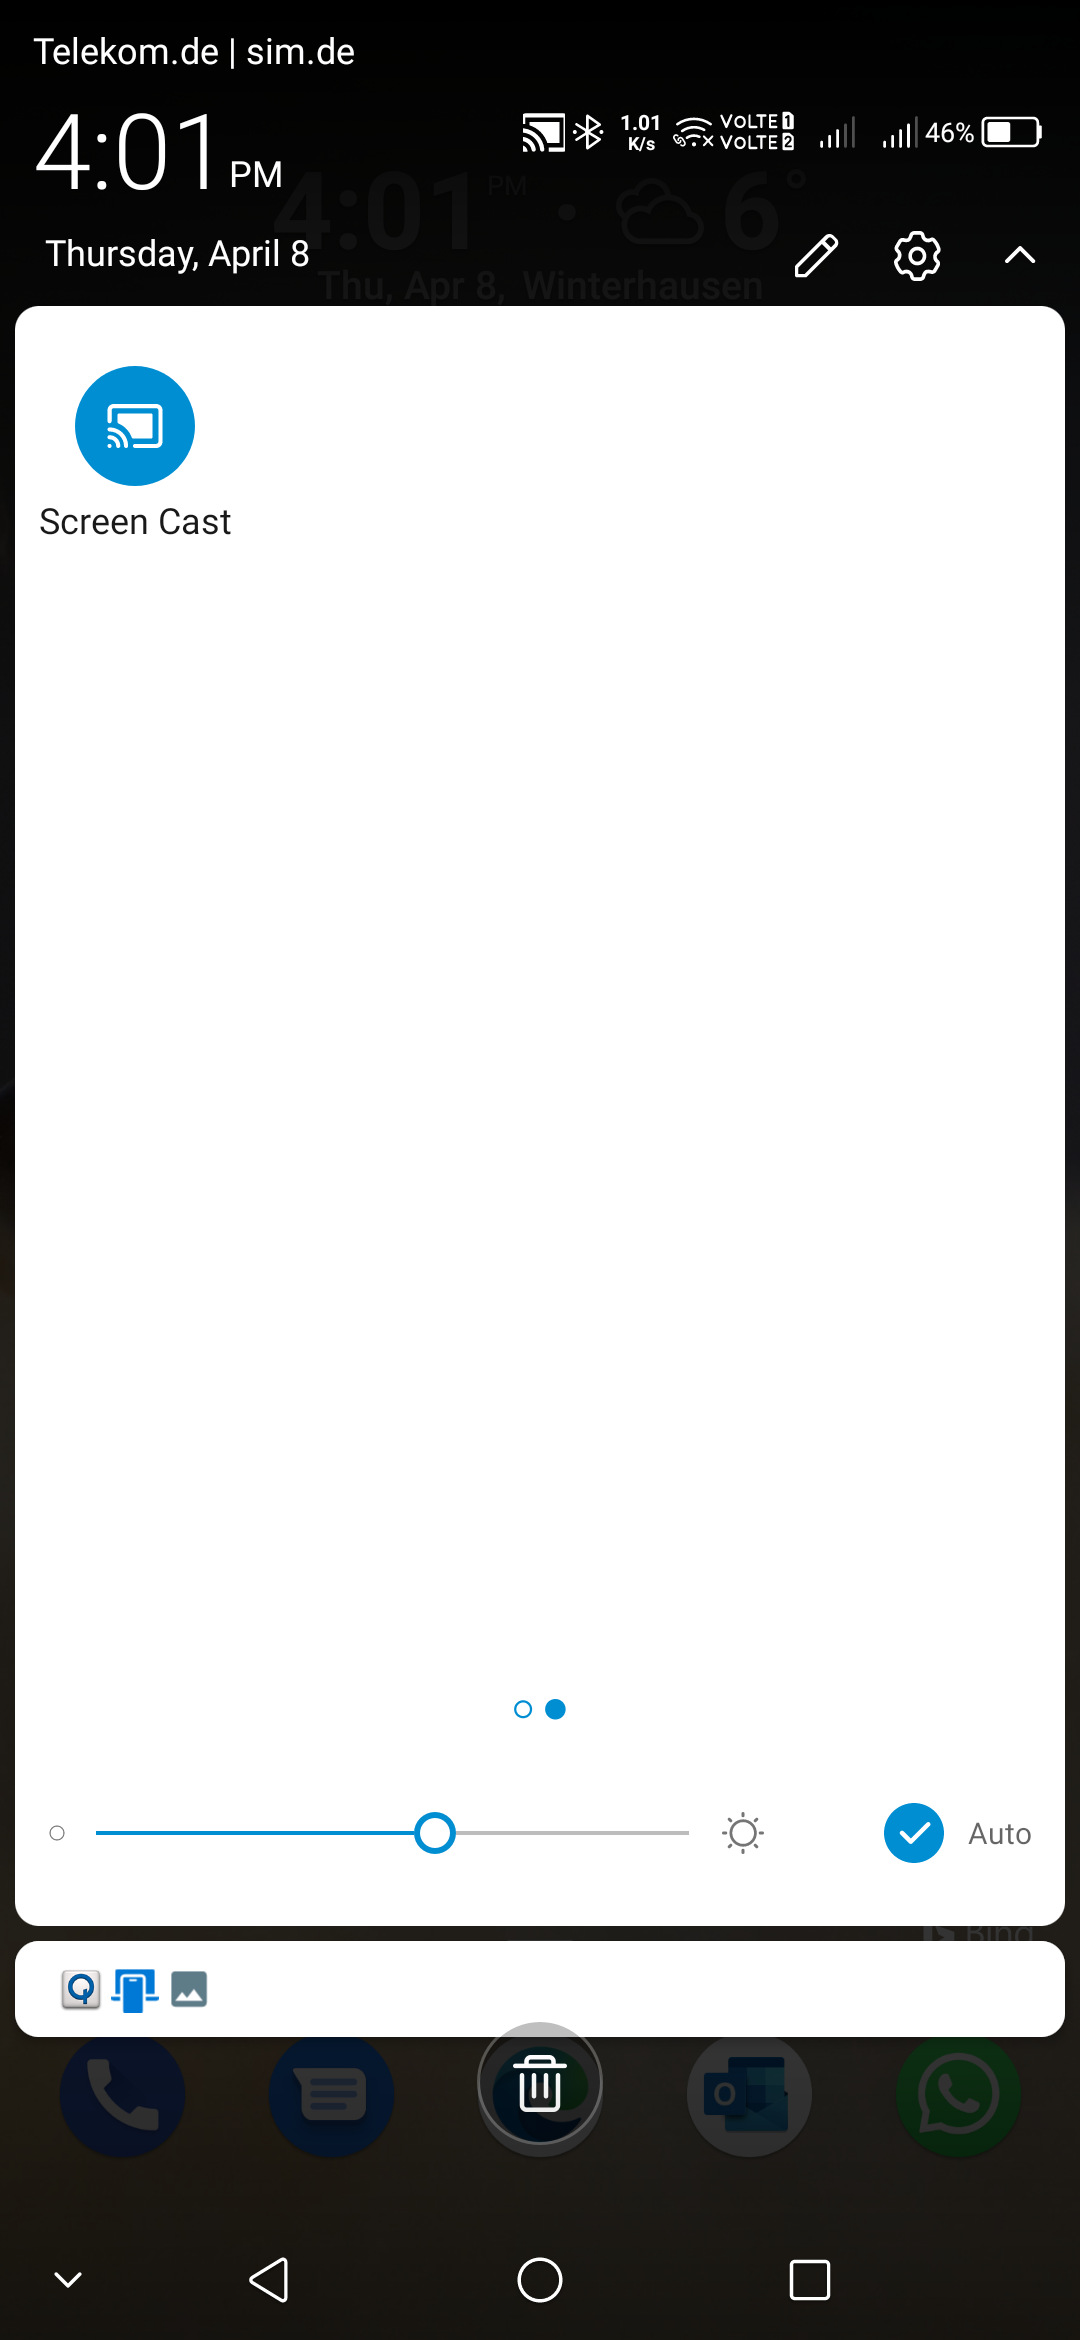
6.7 Use of GoogleCast (ChromeCast)
GoogleCast (often referred to as ChromeCast) is currently available via the Google Chrome/Chromium browser on ChromeOS, Windows, MacOS and Linux platforms. If necessary, please install the browser on your computer.
Connect your device to the "GUEST" or "EMPLOYEE" Wi-Fi network that is displayed on the home screen.
Is the Klick&Show Connected to a network via CAT cable, all other computers in this network also have access to the Klick&Show Base.
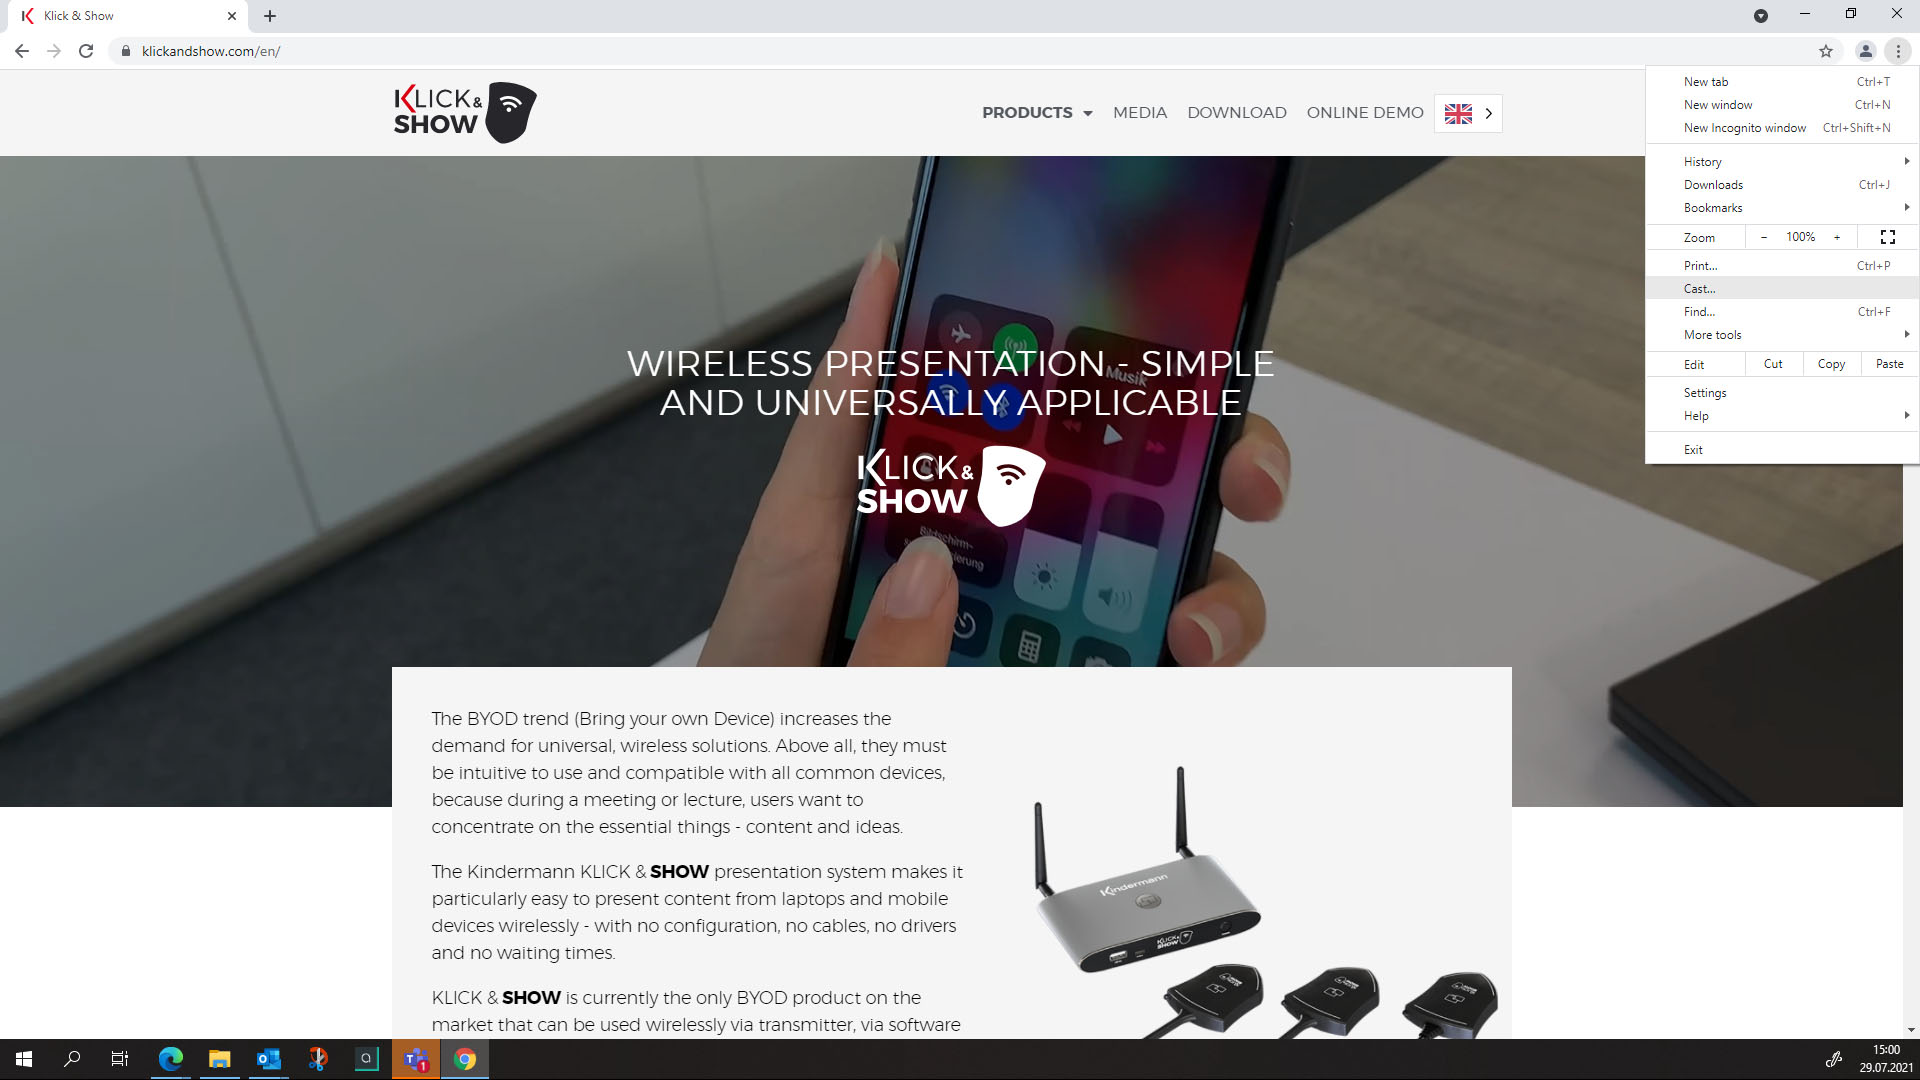
Open the Chrome browser and select top right ![]() > Stream. Then click Sources. Here you can decide which part of your screen they want to share. You can choose between the current browser tap, the entire screen or a file. The selection cannot be changed during an ongoing transfer. If you want to change the source, you must first stop the transfer, select the new source, and start the transfer again.
> Stream. Then click Sources. Here you can decide which part of your screen they want to share. You can choose between the current browser tap, the entire screen or a file. The selection cannot be changed during an ongoing transfer. If you want to change the source, you must first stop the transfer, select the new source, and start the transfer again.
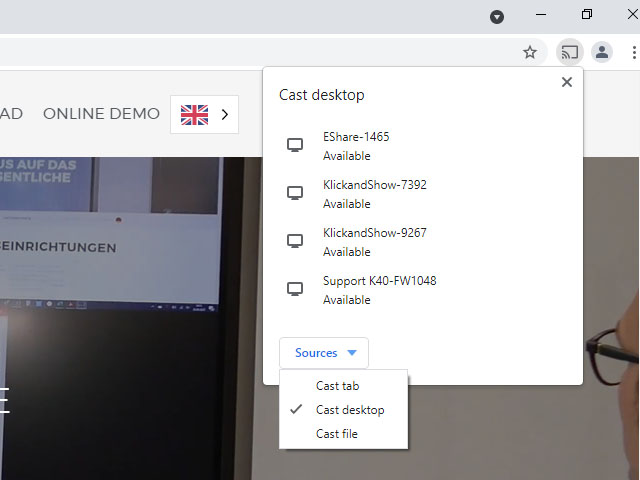
Then select the Klick&Show on which you want to show the content.
To exit, select the same menu or icon ![]() and click Stop.
and click Stop.

7. Splitscreen, Moderation & Tools
Klick & Show offers in addition to the basic function of screen sharing other helpful tools that can support users in the presentation and contribute to a productive meeting.
7.1 Splitscreen
In certain situations, it can be useful to display more than one screen, e.B. to compare different ideas or to show additional information that is difficult to combine on one screen.

Supported here Klick & Show the split-screen display of up to four sources simultaneously. You can select the number and display in the WebUI.

The split-screen function is automatically activated as soon as more than one device simultaneously drives the image transmission. The assignment of the positions is done automatically depending on the order of the presentation.
As soon as a fifth source wants to be displayed, it "pushes" the first one out of the picture.
![]() Hint:
Hint:
To switch its screen from split screen to full screen, you can press and hold the dongle for 2 seconds.
In the WirelessMedia 2 app for Android, the "Full Screen" button performs the same function.
Airplay and Miracast do not support this feature, so all other devices must separate so that these devices can present in full screen.
7.2 Moderation
![]() hint:
hint:
For the best possible user experience, we recommend using the following functions in conjunction with a touch display.
To enter the moderation menu, tap the arrow (1) that appears on the right side of the screen.
The sidebar displays all connected devices and can be brought to the presentation by the presenter. Whether a preview image is displayed depends on the setting or use of a transmitter.
The moderation function is not available for Airplay and Miracast due to technology.
![]() Note:
Note:
This feature can be disabled via the WebUI. In this case, no Pfleil or only a reduced menu is displayed, which allows access to the whiteboard and annotation function.
7.3 Whiteboard App
Tap the ![]() Icon to open the "Whiteboard App" with a blank page.
Icon to open the "Whiteboard App" with a blank page.
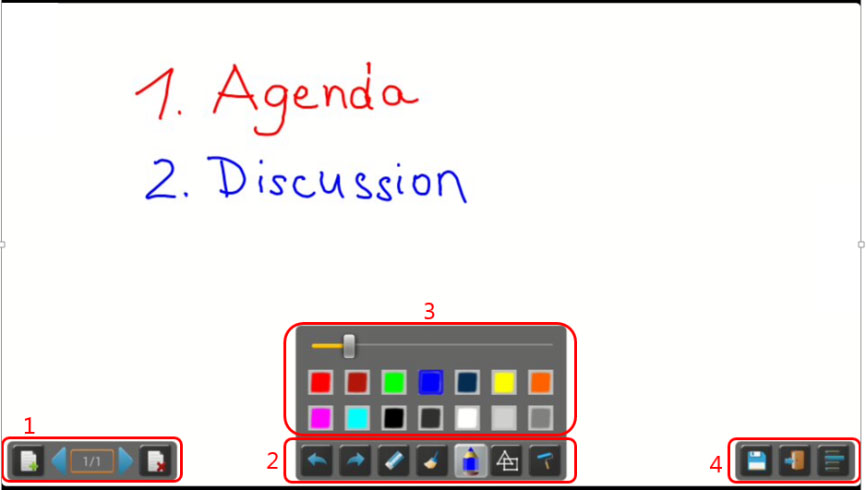
Select a tool from the following table.
| Toolbars #. | Tool Function |
|---|---|
| Toolbar 1 | |
| Toolbar 2 | the pen color can be selected by long tapping the color can be selected by long tapping (the previously created drawing is retained) |
| Toolbar 3 | Appears when the blackboard color, shapes, or pen are pressed and held. |
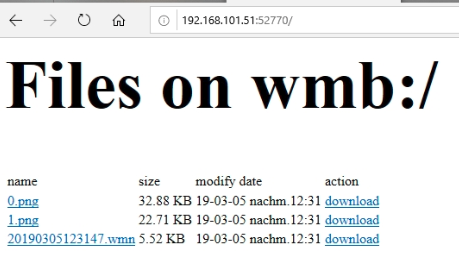
| Toolbar 4 file options | The files can be downloaded from the base via a web address or QR code. |
 | Open: Open WMN file from local storage and continue editing project (Attention: depending on the security setting, the files are deleted regularly) New Project – Opens a new whiteboard file Save as: By entering a file name (as PNG and WMN, for further editing) The files can be downloaded from the base via a web address or QR code. Import from USB data carrier Save as PDF file The files can be downloaded from the base via a web address or QR code. Clear history: – all previously created whiteboards and annotations in temporary memory will be deleted. |
7.4 Annotation (notes)
In contrast to the whiteboard, the annotation function has no background, but works transparently on a "virtual layer" above the displayed video image. The original image remains unchanged.
Tap or click the ![]() to open the function.
to open the function.
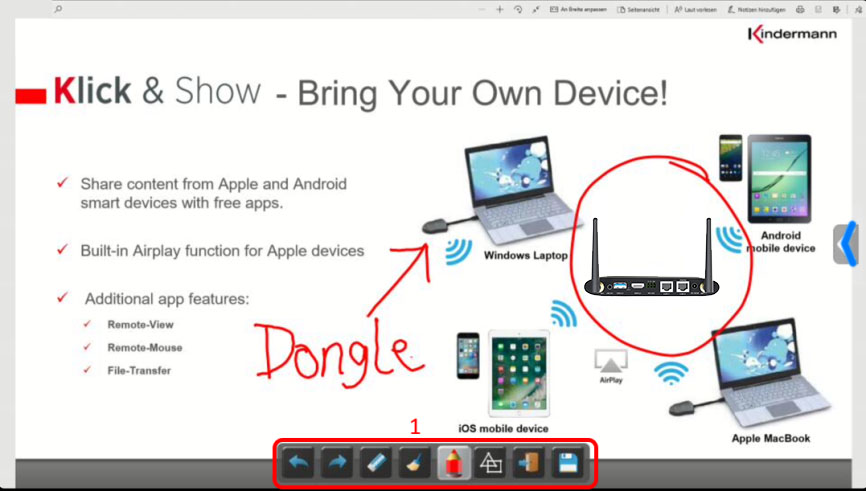
The following tools are available.
| Toolbars #. | Tool Function |
|---|---|
| Toolbar1 | the pen color can be selected by long tapping the color can be selected by long tapping |
Saving Whiteboard/Annotation Files
![]() Hint:
Hint:
As soon as the last Wi-Fi connection to the Klick & Show For security reasons, the memory is automatically deleted so that subsequent users can no longer access the previously stored content.
You can configure this setting individually in the security settings of the WebUI.
When you save a file, you will be shown a QR code and a corresponding web address where the files can be downloaded.
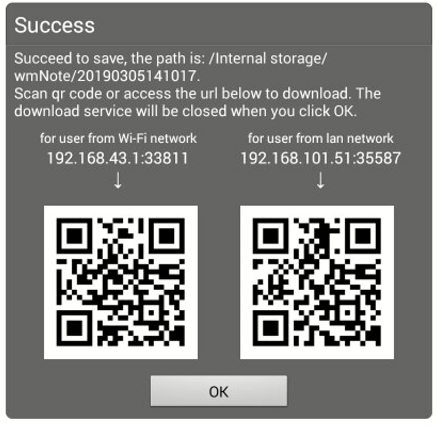
![]() Hint:
Hint:
To access the stored files, your computer or mobile device must be connected to the same (Wi-Fi) network with the Klick & Show condition.
The number after the colon is the network portthat must be shared to access the files.
You can copy the WMN file(s) to a USB memory and use the "Import from USB Disk" function in the Whiteboard app on the Klick & Show open again and continue editing.
8. Service functions
8.1 Coupling of transmitters (pairing)
If you Klick&Show as a set, the transmitters included in the set are already coupled to the respective base at the factory and are immediately ready for use. However, as soon as you change the network configuration or if you purchase additional transmitters, for example, you will have to re-pair them.
![]() Note: What does pairing mean?
Note: What does pairing mean?
The base and transmitter communicate with each other via WLAN. As with a computer or mobile device, the transmitter must know which WLAN network (SSID) to connect to and which password it uses. This information is exchanged during pairing. At a certain point in time, a transmitter can only be operated with one Base be coupled. The transmitter automatically connects to the last paired base.
Plug the transmitter's USB port into one of the USB sockets on the Klick&Show Base. The transmitter will be automatically detected and the process will start. In a first step, if necessary. first checked the firmware of the transmitter and, if necessary, automatically carried out an update. This may take a few minutes. A message on the main screen will show the history. The actual pairing then takes place in a second step.

If you see the success message on the screen, you can simply pull off the transmitter. Proceed accordingly with all other transmitters.
8.2 Firmware Update for Transmitters
We develop Klick&Show to add new functions or to adapt to changing conditions in the IT environment. For this purpose, we provide regular firmware updates that are installed on the base.
In order to load the new firmware onto the transmitters, they must be plugged in there after updating the base.
The transmitter will be automatically detected and the process will start. The process can take up to a few minutes. The transmitter must not be removed from the base until then.


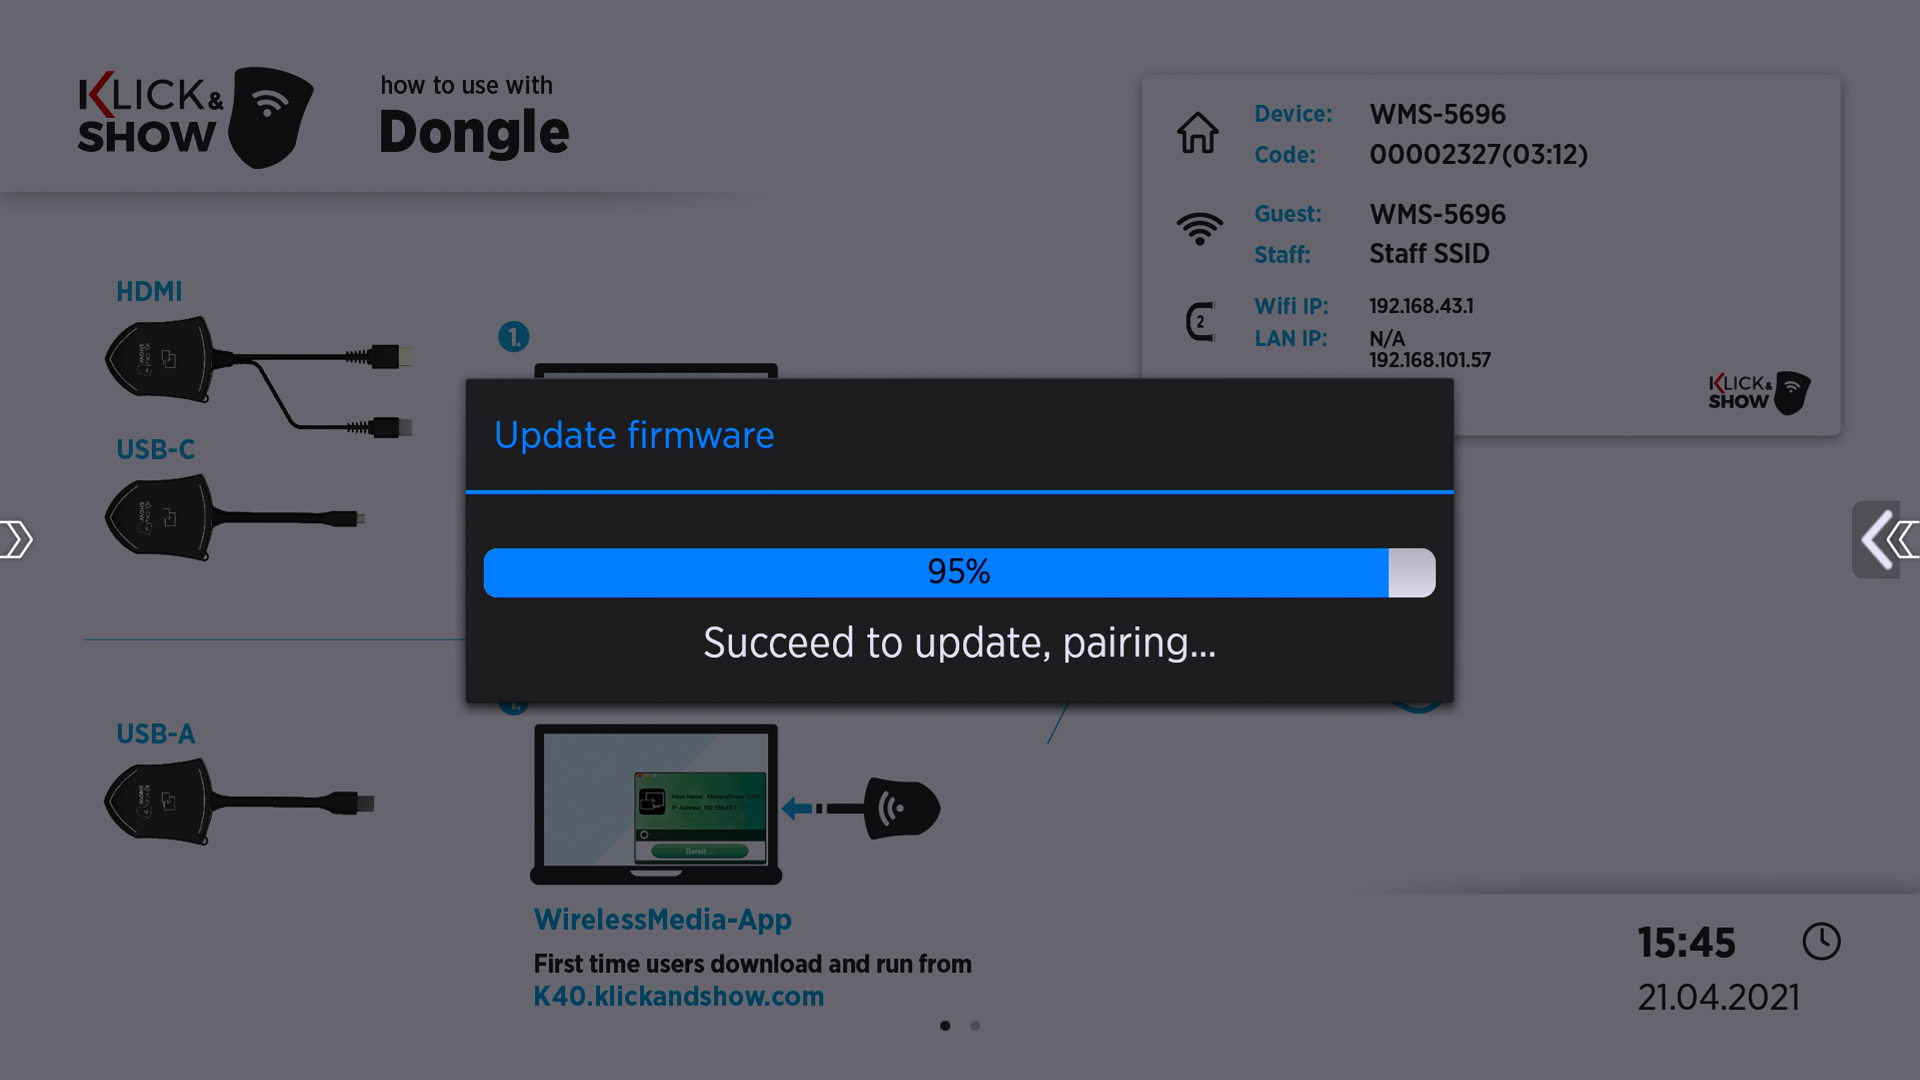
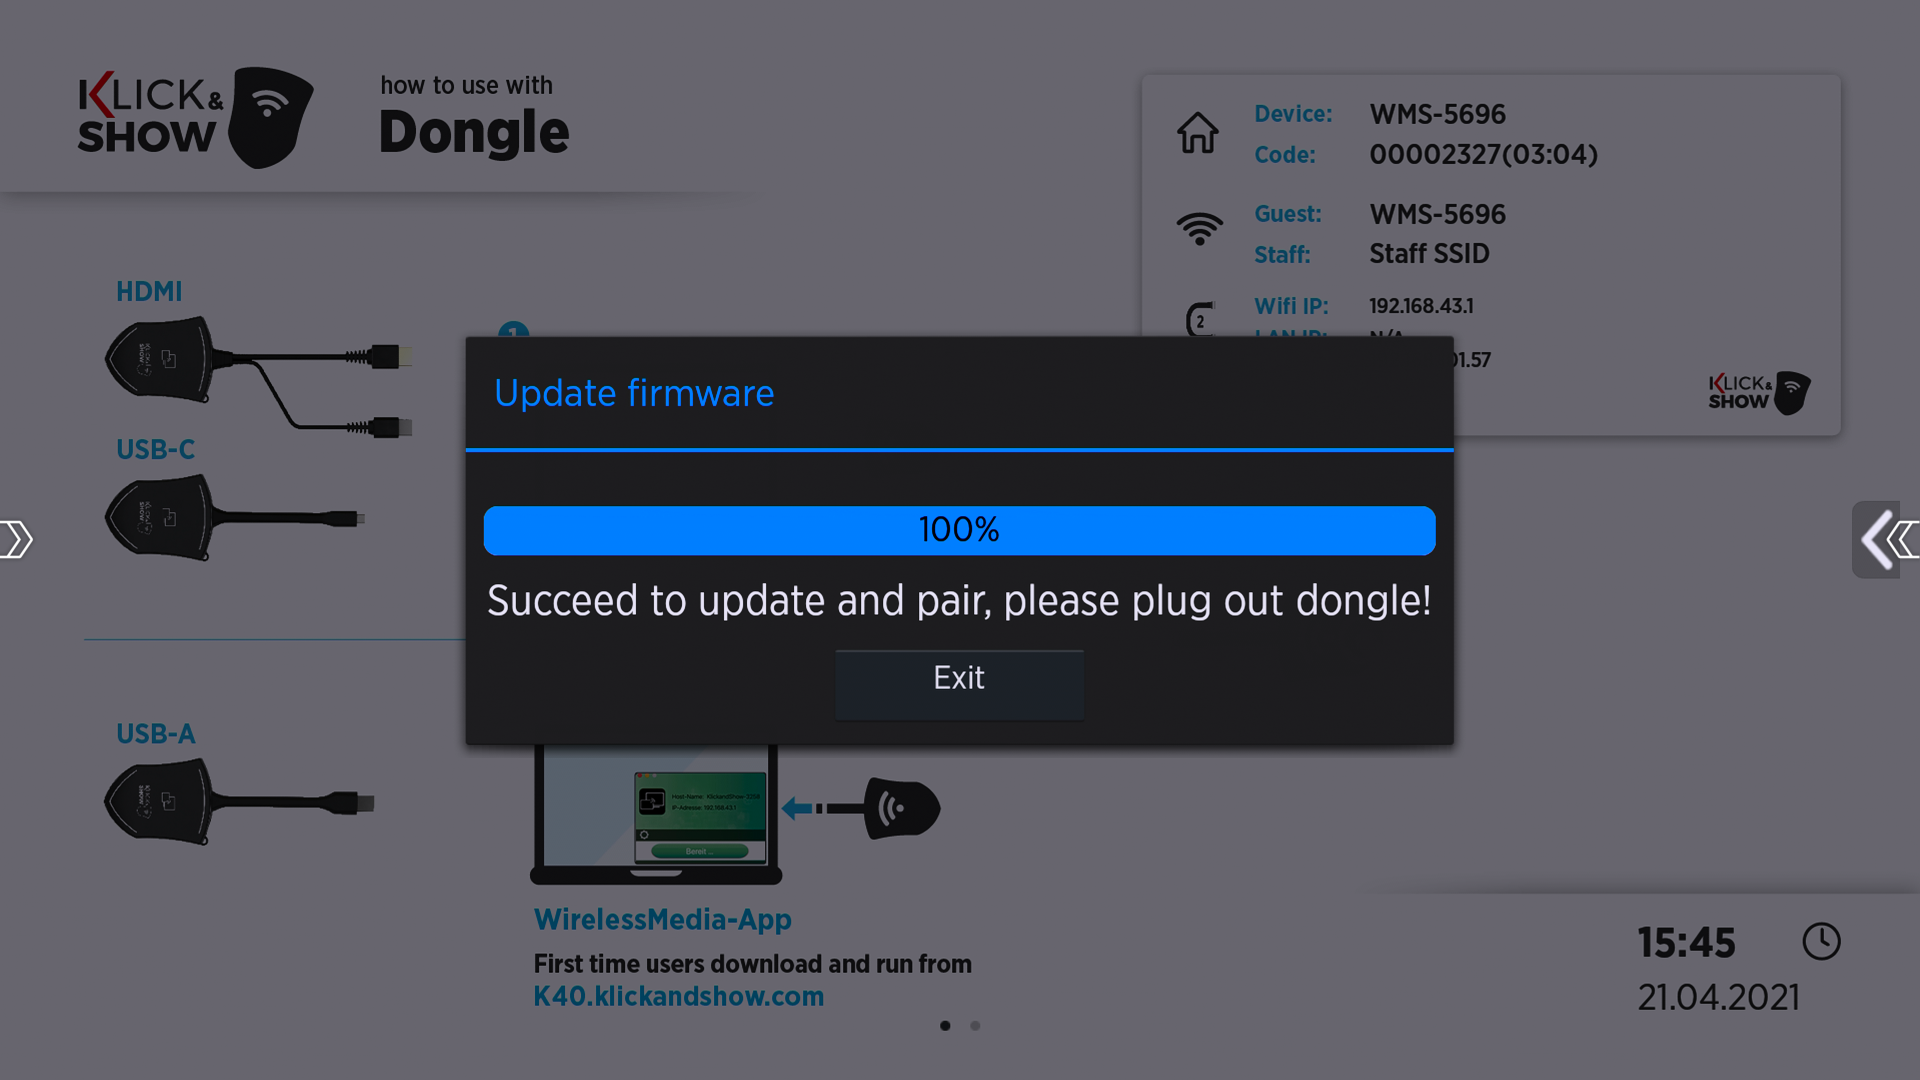
If you see the success message on the screen, you can simply pull off the transmitter.
![]() hint:
hint:
Firmware updates for the transmitters are also transmitted to the transmitters in the background during use.
For installations with multiple devices, we recommend using the ManageTool. This allows all transmitters at the workplace to be coupled to any base.
8.3 Delete older versions of WirelessMedia for Windows
If you receive an error message when you manually run the WirelessMedia Client or plug the USB-A transmitter into a laptop, even though all programs have been updated, it is likely that an older version is active on your computer.
The cleaning tool WindowsClear or MacClear can delete the traces of the old version. Run this file and start the current version of the starter program.
8.4 Restore factory settings (Reset)
A hardware reset is triggered by pressing the reset button on the Klick&Show Base. Alternatively, you can also initiate this via the administration interface . Both ways lead to the same result.
![]() hint:
hint:
You can save the current configuration and read it back in after the reset.
- Turn on the base device.
- Once you see the home screen, press the reset button with a sharp object, such as a bent paper clip. Press and hold the button for at least 2 seconds until the "Factory Reset" message appears. Klick&Show will restart after another 3 seconds with the factory settings.
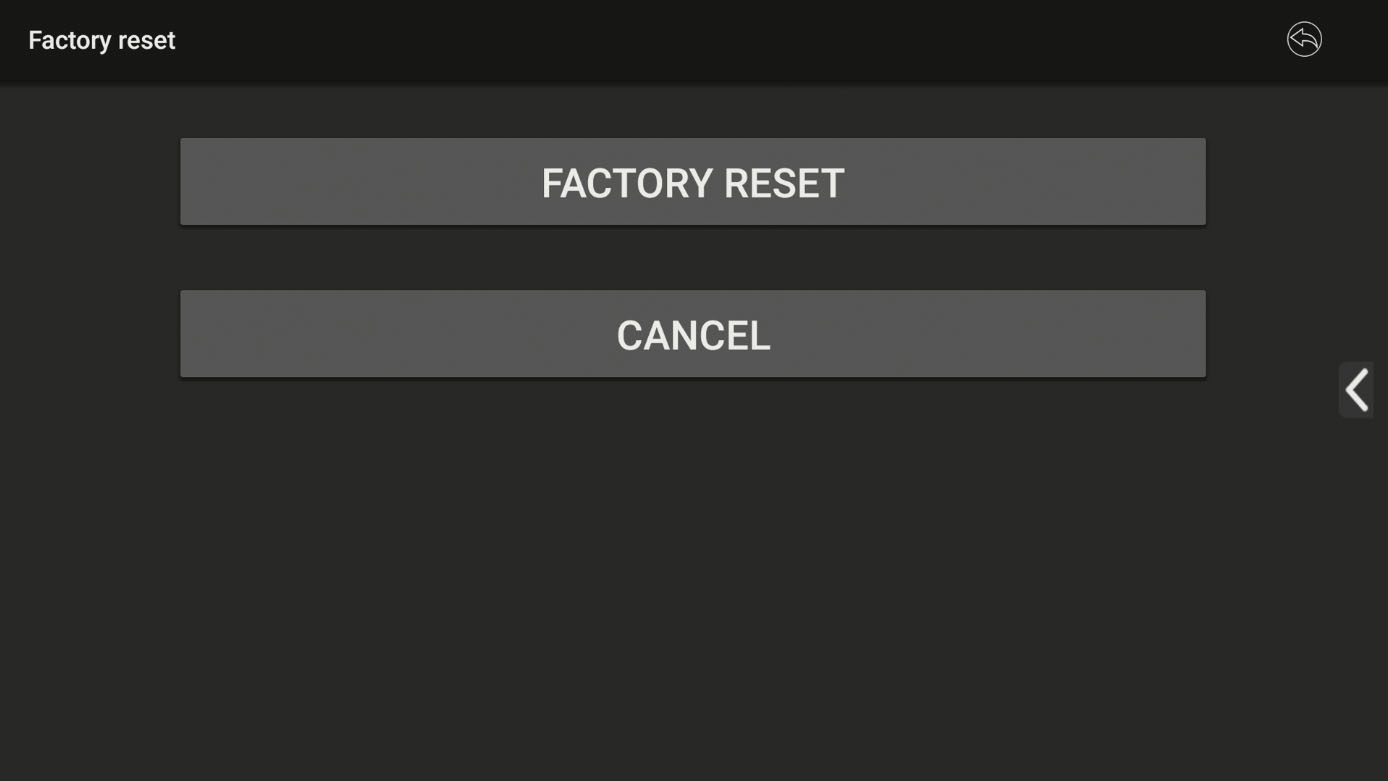
- If you have no display connected, hold down the reset button until the LED display on the top lights up red to perform the reset.
![]() Note:
Note:
All settings are lost and Klick & Show needs to be re-set up.
After resetting to factory settings, all transmitters must be paired (paired) again with the base device.
9. Introduction to Network Configuration
9.1 Basic rules for WLAN
To ensure that the radio signals do not interfere with each other, "WLAN hygiene" is essential, i.e. You must ensure that only one access point broadcasts on each WLAN channel and, if necessary, on the directly adjacent channels. Otherwise, the signals overlap and interfere with each other. In the best case, the data rate decreases, in the worst case, data transmission is no longer possible.
There are various professional WLAN scanners on the market that help for a quick overview, but also free apps, such as the Wifi Analyser, which visually represent conflicts.
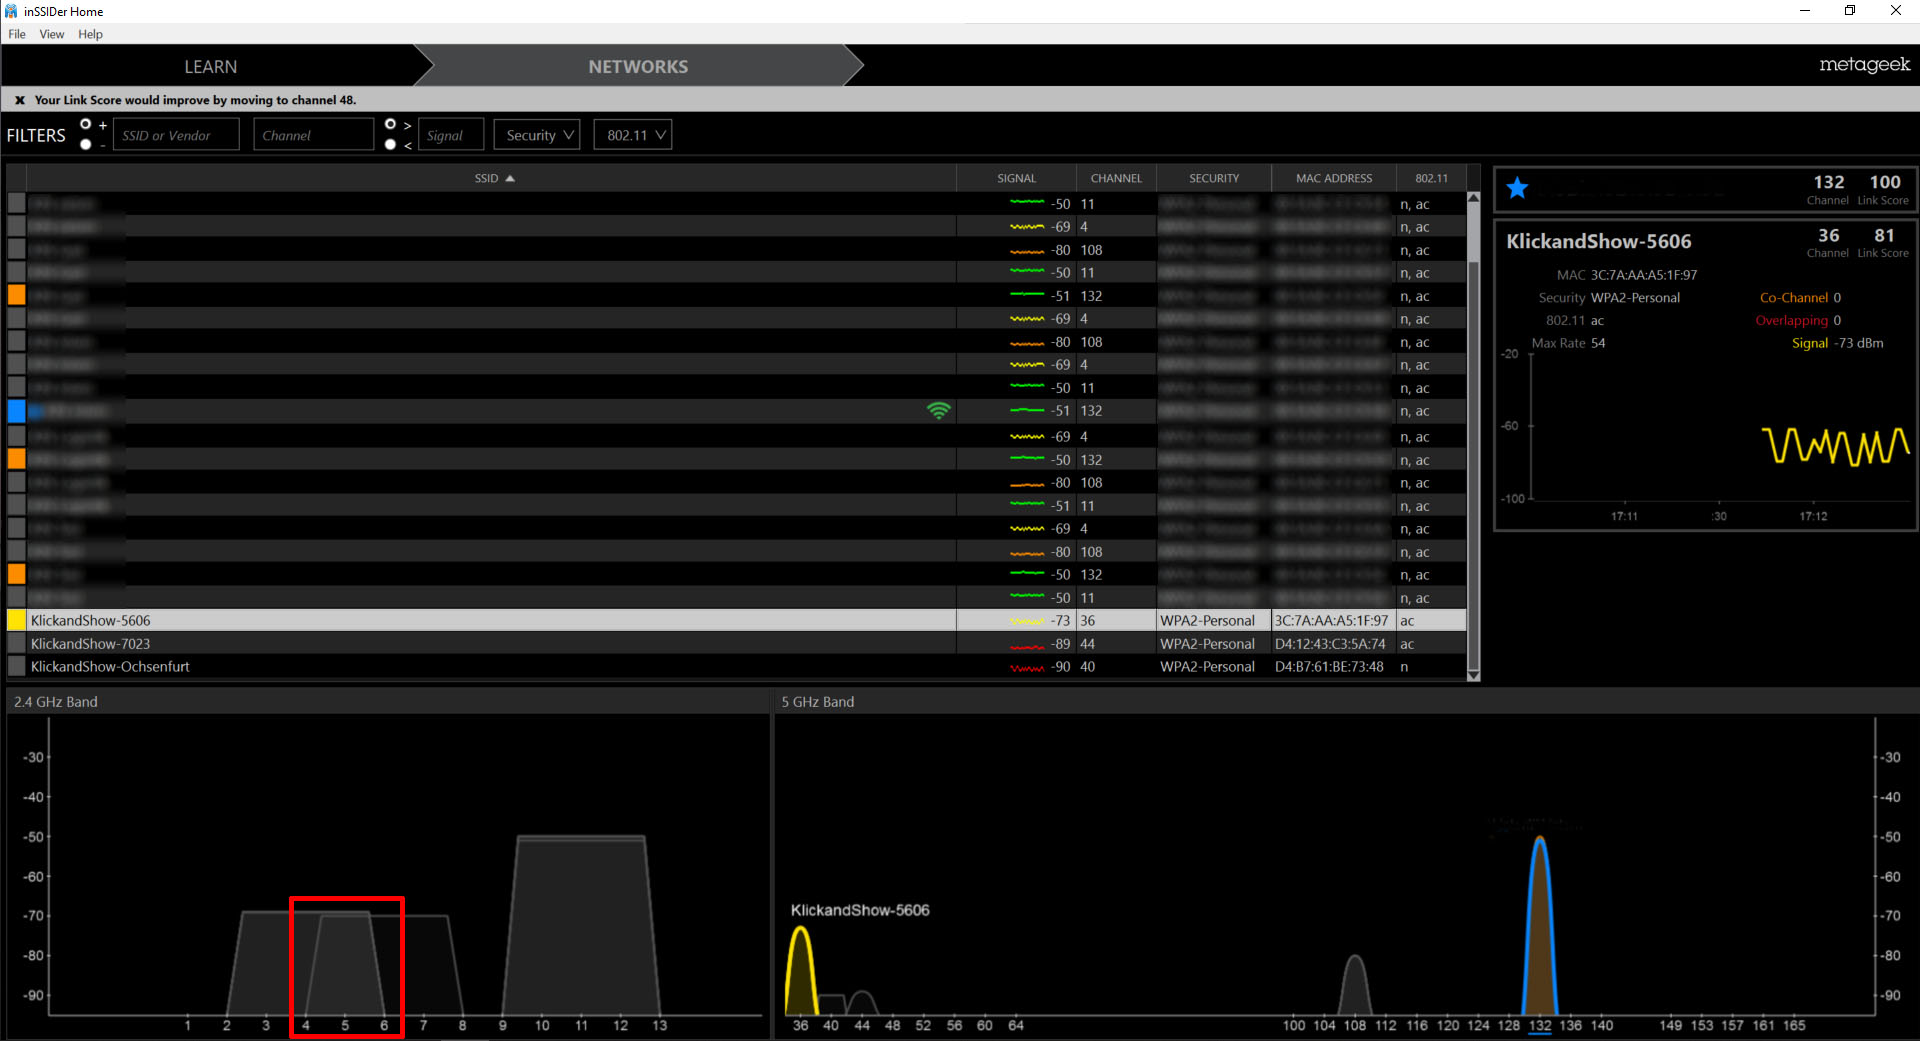
Difference between 2.4 GHz and 5 GHz frequency band
Two frequency bands are available worldwide for the use of WLAN. Both have advantages and disadvantages.
- 2.4 GHz
- For technical reasons, longer range or better penetration
due to the lower radio frequency - Few canals, mostly heavily frequented
- Lower bandwidth per channel
- Oldest standard – highest distribution and compatibility
- For technical reasons, longer range or better penetration
- 5 GHz
- Due to technical reasons, short range and poorer radio penetration
- More channels, usually less frequented
- More bandwidth per channel
- Compatible with modern, Wi-Fi-enabled devices
![]() hint:
hint:
We recommend using the channel in the 5 GHz band.
In order to achieve the best transmission quality, we propose a "line of sight" between the Klick&Show base and the transmitter or mobile device, so that radio transmission can take place unhindered. Avoid proximity to objects made of metal or other dense materials.
In difficult installations, it may make sense to install the antennas with an extension in a better place for reception, e.B. outside a technical rack.
Please pay particular attention to the explanations in chapter 5.1.1 Installation and alignment of the WLAN antennas.
9.2 Available Network Modes
Klick&Show supports three network modes:
In factory condition, all Klick&Show Base units are delivered with preset access point mode, whereby the base unit provides its own internal WLAN access point to which all transmitters, computers and mobile devices can connect.
There are several reasons why it may be useful to extend or change this factory default setting:
- Providing a connection to the Internet for:
- Access to external information and content
- Conducting hybrid meetings (web conferences) with external participants (K-FX series only)
- Providing a connection to the corporate network for:
- Access to local information and content
- Wireless use of USB conferencing devices in web conferencing (K-FX series only)
- Remote administration of multiple Klick&Show Devices
- Automatic firmware update of Klick&Show
- Use of separate networks for employees and guests
- Targeted administration of used WLAN channels
- ... and more
![]() Hint:
Hint:
Depending on your Klick&Show Depending on the type of device (K-FX, K-40, K-WM) and the intended usage scenario, a connection to the corporate network may be optional or mandatory. Therefore, please note the overview of the supported network modes and the options for connecting to the corporate network in the following chapters.
Which network mode is particularly advantageous depends on your personal usage scenario. The following chapters provide information on this. First of all, however, some general notes:
- The integrated access point offers a particularly simple commissioning and use, therefore the access point mode is preset at the factory. This mode is distributed if there are comparatively few rooms in a building with Klick&Show , all of which then use their own Wi-Fi. For additional functions (provision of Internet to connected devices, BYOM conferencing with K-FX, remote administration, etc.), one (or two) additional wired network connection via LAN can be added at any time, even in access point mode.
- The two at Klick&Show available infrastructure modes (wireless infrastructure and LAN infrastructure) primarily disable the standalone access point of the Klick&Show Base. Instead, the base devices are integrated into the corporate network either wirelessly or wired. This can be useful in larger rollouts where many Klick&Show systems in comparatively close proximity. In such a scenario, there would be a risk that there would not be a sufficient number of free Wi-Fi channels available and that several devices would have to share the same Wi-Fi channels, which could lead to a loss of quality in transmission quality.
The use of the infrastructure modes then leads to better "Wi-Fi hygiene", as the transmission of the Klick&Show data streams then run over the existing Wi-Fi channels of the corporate network. However, it should be borne in mind that the required bandwidth must then also be ensured. (see note below.) - In both infrastructure modes, but also in access point mode after expansion with LAN connection, Klick&Show accessible via the existing infrastructure and can be administered centrally. This is convenient and secure, as enterprise networks are usually actively managed and achieve a higher level of security.
- For hybrid access from the guest network, Klick&Show for example, can be integrated into a separate network segment that can be reached from both the internal and the guest network.
![]() Hint:
Hint:
If the transmission of subscriber content takes place either partially or completely over the corporate network, please remember to provide sufficient bandwidth for the network!
You can expect a data rate of 2 – 10 Mbps per active screen sharing (K-FX, K-40, K-WM).
For each active video transmission from the USB camera (for web conferences with K-FX), an additional data stream of 10 – 100 Mbps is generated.
In this context, you should be aware that in the case of a wireless connection of the base and especially the transmitters, their transmitting/reception quality – and thus the resulting transmission quality – depends largely on the structural conditions (distance of the company access point and materials to be penetrated with the WiFi signal). In particular, the function of the transmitters can be impaired in such cases, due to the comparatively compact integrated antennas. In the event of such an impairment, the use of the access point mode is recommended, whereby the transmitters are now coupled to the base located in the immediate vicinity, possibly supplemented by further connections to the company network via LAN ports 1/2 and optional bridging.
![]() hint:
hint:
The instructions for configuring the different modes can be found from Chapter 11.
9.2.1 Access Point Mode (Basic Configuration)
At the first start-up or after the reset to the factory settings starts Klick & Show in access point mode, in which the base unit provides its own WLAN access point to which all transmitters, computers and mobile devices connect. The parameters of this access point (SSID name, WLAN frequency range, WLAN channel) can be changed via the web menu of the Klick&Show Configure the base.
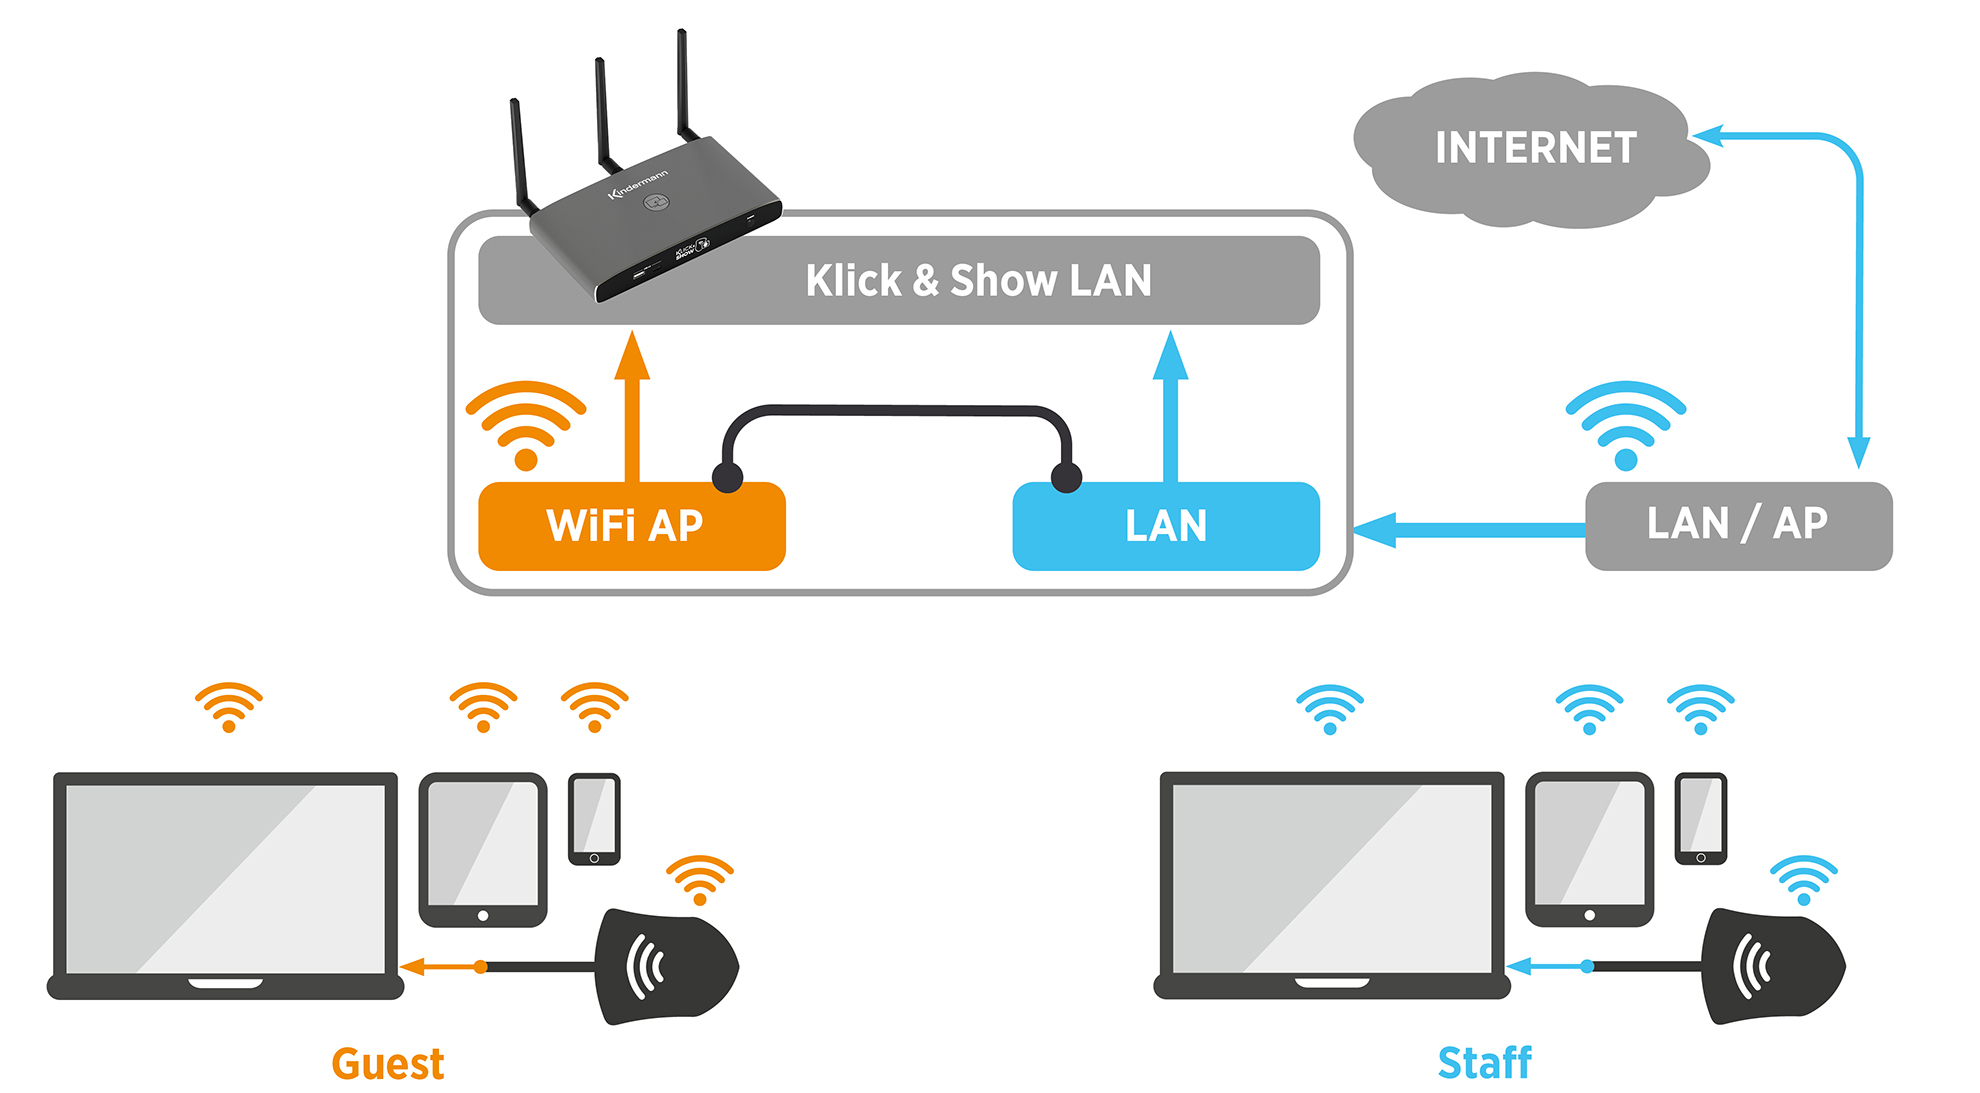
For additional functions (provision of Internet to connected devices, BYOM conferencing with K-FX, remote administration, etc.), one (or two) additional wired network connections via LAN can be added at any time, even in access point mode . In this case, an additional "bridging" can be activated for one of the LAN ports, which is briefly explained below:
In the "stand-alone mode" of the base, user terminals that are connected to the internal Klick&Show Access point, initially no access to the Internet or any other network share.
However, such access can very easily be made possible by so-called "bridging". To do this, a wired connection must first be established from the corporate network to either LAN port 1 or LAN port 2 to provide these network services. Subsequently, via the web menu of the Klick&Show Base the bridging to be enabled to one of the LAN ports. Subscriber devices connected to the base's access point can now be connected to the LAN-provided network at the same time. See chapter 9.2.2 below Access Point Mode with Bridging.
In the access point mode, a connected LAN cable can be used to open up further possibilities even without activated bridging , such as external access to the base for remote maintenance or the rear transfer of connected USB conference devices for BYOM calls in the event of Klick&Show K-FX.
![]() hint:
hint:
In AccessPoint mode, the 8-digit code displayed on the home screen is also the WLAN password.
9.2.2 Access Point Mode with Bridging
In this configuration, the Klick&Show Base unit (K-FX, K-40, K-WM) additionally wired (CAT cable) connected to another network and the "bridging" for this LAN port is activated via the Klick&Show Web menu. This network connection is then established within the Klick&Show and is therefore also available to users who want to connect their device directly to the Klick&Show access point.
By connecting a wired network, it is very easy to divide the network into guest network and employee network in access point mode. However, enabling bridging can be a security risk in this case. Please note the following warning.
![]() ATTENTION:
ATTENTION:
It depends on the configuration of the wired network whether only the Internet access or the complete access to the company and/or campus network is shared in this way.
Therefore, please check this step very carefully and close the Klick&Show not without prior approval of the IT department to a network cable.
In this configuration, the WLAN password and thus possibly the complete access to your network is in plain text on the home screen!
When bridging is active, the icon ![]() for "Connected network (LAN + WLAN)" on the home screen.
for "Connected network (LAN + WLAN)" on the home screen.
In the WebUI configuration menu of the base, you can set whether the bridging should be done either from LAN port 1 or LAN port 2. This is then indicated by a small "1" or "2" in the symbol ![]() .
.
You can also operate both network accesses separately (without bridging), then the Klick&Show Base still accessible from the wired network. However, user terminals that are connected to the base's access point via Wi-Fi cannot use the services of the wired network.
The icon ![]() for "separate networks (LAN + WLAN)" is displayed on the home screen.
for "separate networks (LAN + WLAN)" is displayed on the home screen.
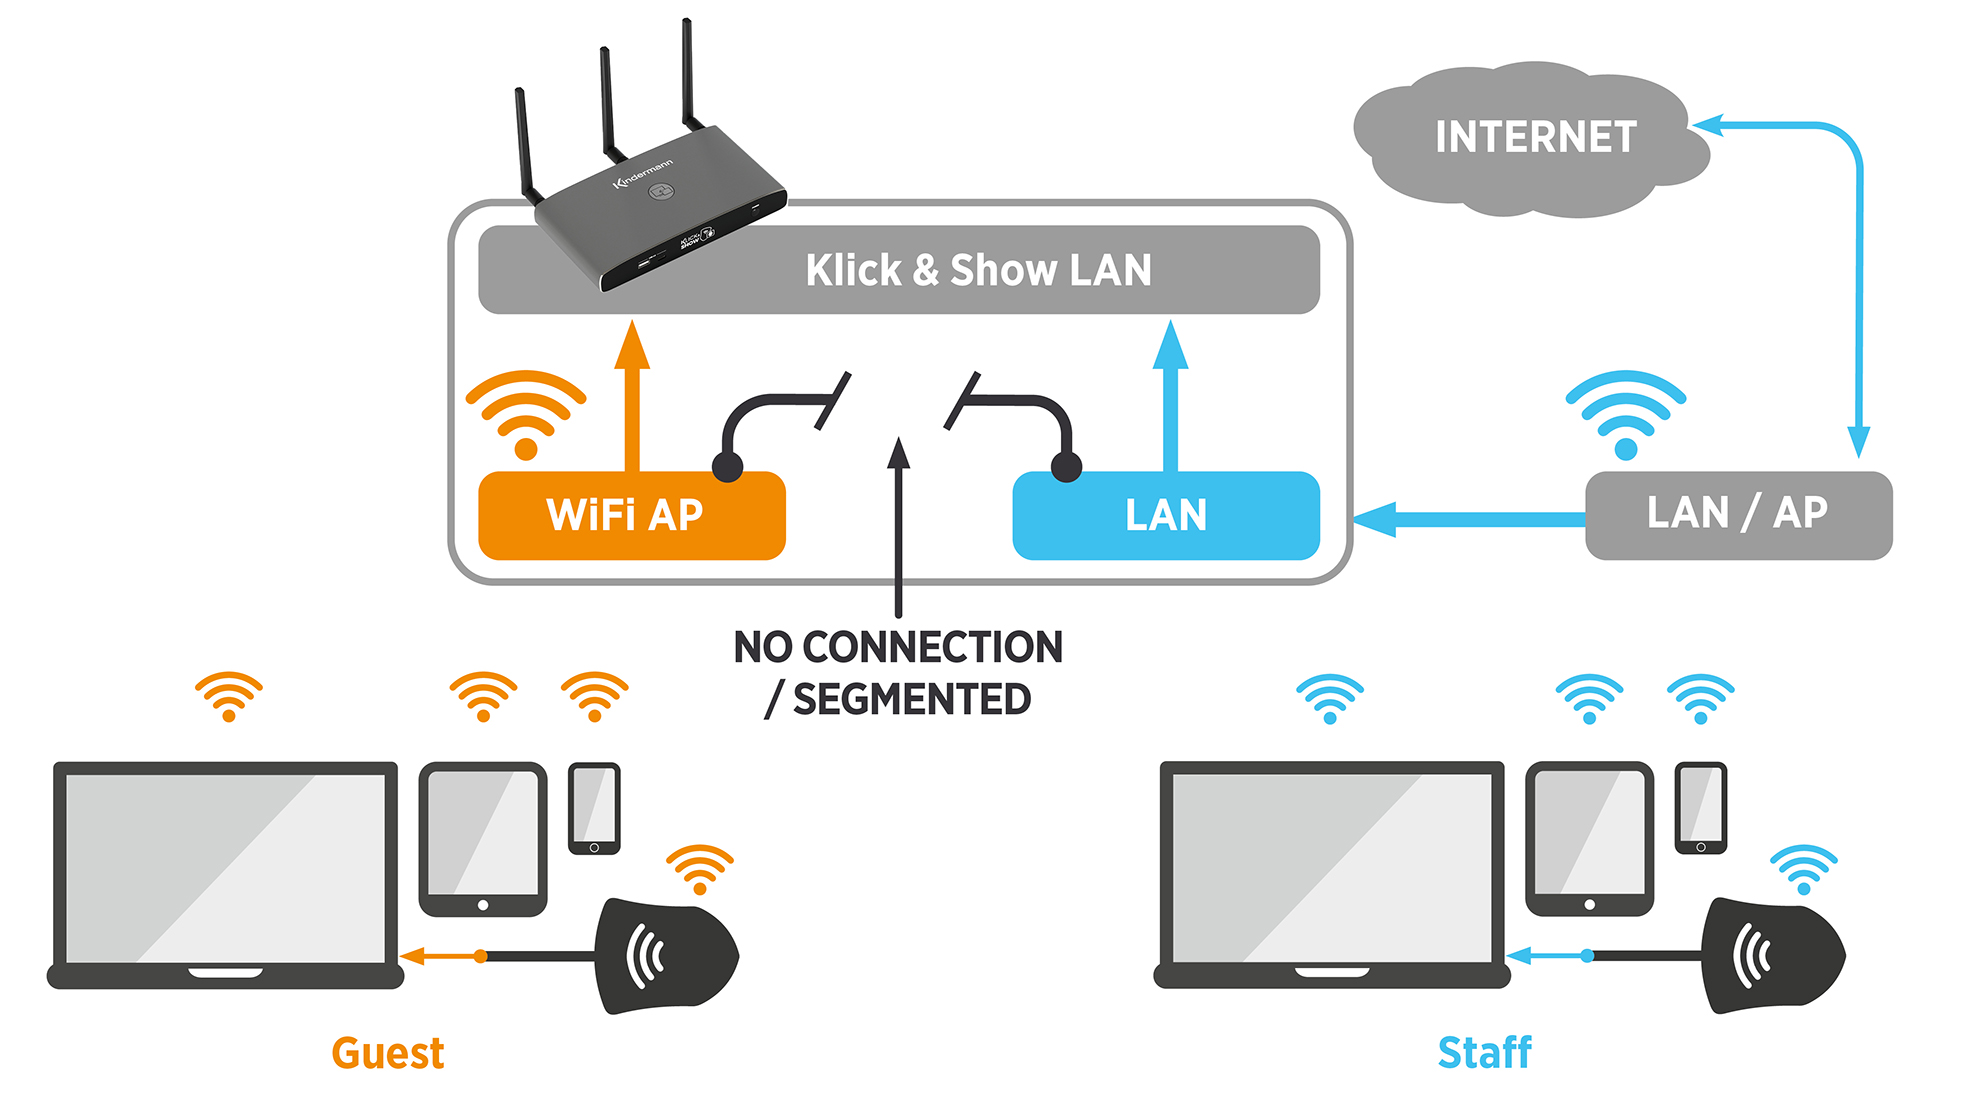
For example, a secure separation between the guest and company network can be realized. Guests and transmitters connect directly to the Wi-Fi of the Klick&Show Employees use the internal network infrastructure and thus retain their access to network drives, etc.
9.3 Infrastructure modes
The infrastructure modes allow you to: Klick&Show fully integrated into a structured network. This can be done via Wi-Fi or cable. The internal access point of the Klick&Show In both cases, the base is deactivated, or in the wireless infrastructure mode the WLAN functional unit of the base is only used as a "station" in client mode.
![]() hint:
hint:
We recommend the use of infrastructure modes if the following criteria are met:
1. Existing, powerful, administered Wi-Fi network
2. Client devices are operated and administered over the same network
3. Use of many click & shows (in the immediate vicinity)
Please coordinate details as well as the necessary access authorizations and port approvals with the responsible network administrator.
9.3.1 Wireless Infrastructure Mode
In Wireless Infrastructure mode, the internal WLAN function unit of the Klick&Show Base operated as a "station" in the "WLAN client" operating mode and connects the base wirelessly to an existing access point of the company network. The transmission of content by means of Klick&Show Transmitter or WirelessMedia software client is also done via this network. The access parameters required for the external access point (SSID, password) are specified during configuration via the web menu of the Klick&Show Base deposited. By pairing, the transmitters receive the necessary connection information to connect to the network.
In addition to the wireless connection between Klick&Show base and external access point in "Wireless Infrastructure Mode", additional wired network connections can be provided using LAN ports 1 and 2. Another external access point could also be connected here, for example to enable separation of employee and guest networks. Both access points would then be able to enable connected participants to transmit content on an equal footing. When configuring in the web menu of the base, it can be specified whether the transmitters should be paired either via the wirelessly connected access point or via the wired access point on a LAN port.
9.3.2 LAN infrastructure mode
In LAN infrastructure mode, the internal WLAN function unit of the Klick&Show Base completely shut down. This can be useful if numerous other WLAN networks are already operating at a short distance and available channels may be occupied. In order to avoid conflicts in wireless data transmission and, as a result, a deterioration in the transmission quality of Klick&Show, the transmission can then be carried out in a targeted manner via an existing access point of the company network.
In LAN infrastructure mode, the base is connected to an access point of an external network via a network cable via either LAN port 1 or 2. The transmission of content by means of Klick&Show Transmitter or WirelessMedia software client is also done via this network. The access parameters required for the external access point (SSID, password) are specified during configuration via the web menu of the Klick&Show Base deposited. By pairing, the transmitters receive the necessary connection information to connect to the network.
In addition to the wired connection between Klick&Show base and external access point in "LAN infrastructure mode", an additional wired network connection can be provided by means of a remaining LAN port. Another external access point could also be connected here, for example to enable separation of employee and guest networks. Both access points would then be able to enable connected participants to transmit content on an equal footing. When configuring in the web menu of the base, it is possible to specify which external access point is to be used to pair the transmitters, as long as it is connected to one of the LAN ports.
![]() Note on the use of the BYOM function in the case of Klick&Show K-FX:
Note on the use of the BYOM function in the case of Klick&Show K-FX:
To conduct BYOM web conferences at KLick&Show K-FX requires that:
– a connection to the Internet can be established from the user's end device,
– a network connection can take place between the user's laptop and the USB conference devices connected to the base
With regard to the individual network modes mentioned above, the following notes must be observed so that BOTH conditions can be met at the same time:
1) Access Point Mode: A wired network connection must be made in such a way that the wirelessly connected user terminals are located in the same network area as the base device and access to the Internet is possible.
2) Wireless Infrastructure Mode: In this operating mode, there is an immediate connection to the corporate network that meets both of the above requirements and enables BYOM.
3) LAN infrastructure mode: In this operating mode, there is an immediate connection to the company network that fulfills both of the above requirements and enables BYOM.
This applies both to the use of transmitters on a K-FX base and to purely software-based BYOM connections via WirelessMedia PC client, since even when transmitters are used, the rear data stream of the USB conference devices always takes place directly to the WLAN of the user's laptop.
10. WebUI
10.1 Home – Software Download
All members of the Klick&Show product family (K-FX, K-40, K-WM) have a uniform, web-based graphical user interface, hereinafter referred to as WebUI, which can be accessed via browser.
![]() hint:
hint:
The WebUI can be accessed in the browser by entering the IP address, which is displayed in the network status field of the home screen.
Depending on whether the internal access point is active and/or wired connections have been established via LAN 1/2, several IP addresses may be displayed. Each of these addresses provides access to the WebUI.
On the "home page", which is accessible without password protection, users can download the latest software clients and access the online help.
Integrators or the internal IT department can enter the contact details of the user helpdesk here. In the delivery state and as a default setting, the contact details of Kindermann registered.
10.2 Go to the administration menu
Call up the WebUI of the respective Klick&Show via its IP address in the browser. A click on the gear icon ![]() In the upper right corner, the login window opens. Enter the login password here.
In the upper right corner, the login window opens. Enter the login password here.
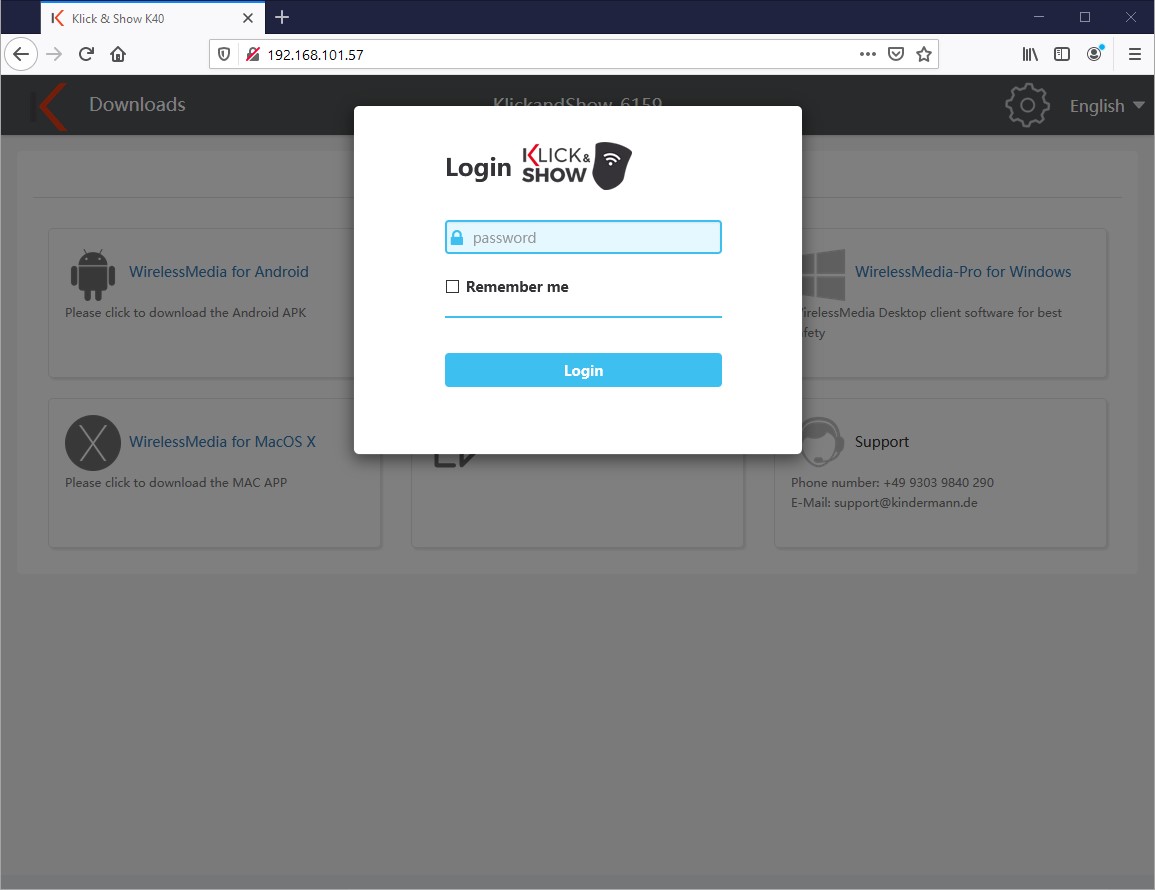
The default password on delivery or after a reset is "admin".
![]() hint:
hint:
You can change the admin password or deactivate the password query in the menu item Security Settings. If you forget the password, you must reset the base to factory settings via reset.
After logging in, you have access to all configuration options of the system.
11. Klick & Show configure
11.1 Network settings
11.1.1 Access Point Mode
![]() hint:
hint:
Changes to the network configuration can only be made via a wired networkconnection!
In the menu Network Settings -> WLAN configuration, select the button "Edit" to set up the WLAN connection.

Step 1:

Now you can change the device name of your Klick&Show Change base. We recommend using a name that speaks for itself , e.g. based on the room name. The default name is "KlickandShow-xxxx".
In Access Point Mode, the device name is also the WLAN id (SSID)!
![]() hint:
hint:
The name can only contain letters "a-z", "A-Z", digits "0-9" and the characters "-_". National special characters can lead to problems e.B. with Apple AirPlay.
Step 2:

In the next step, select the network operating mode "Access Point Mode" so that it works Klick&Show as an access point. Transmitters and mobile devices connect directly to the Klick&Show Base.
![]() hint:
hint:
An explanation of the different modes can be found in Chapter 9. The two infrastructure modes are described in the following chapters.
Step 3:
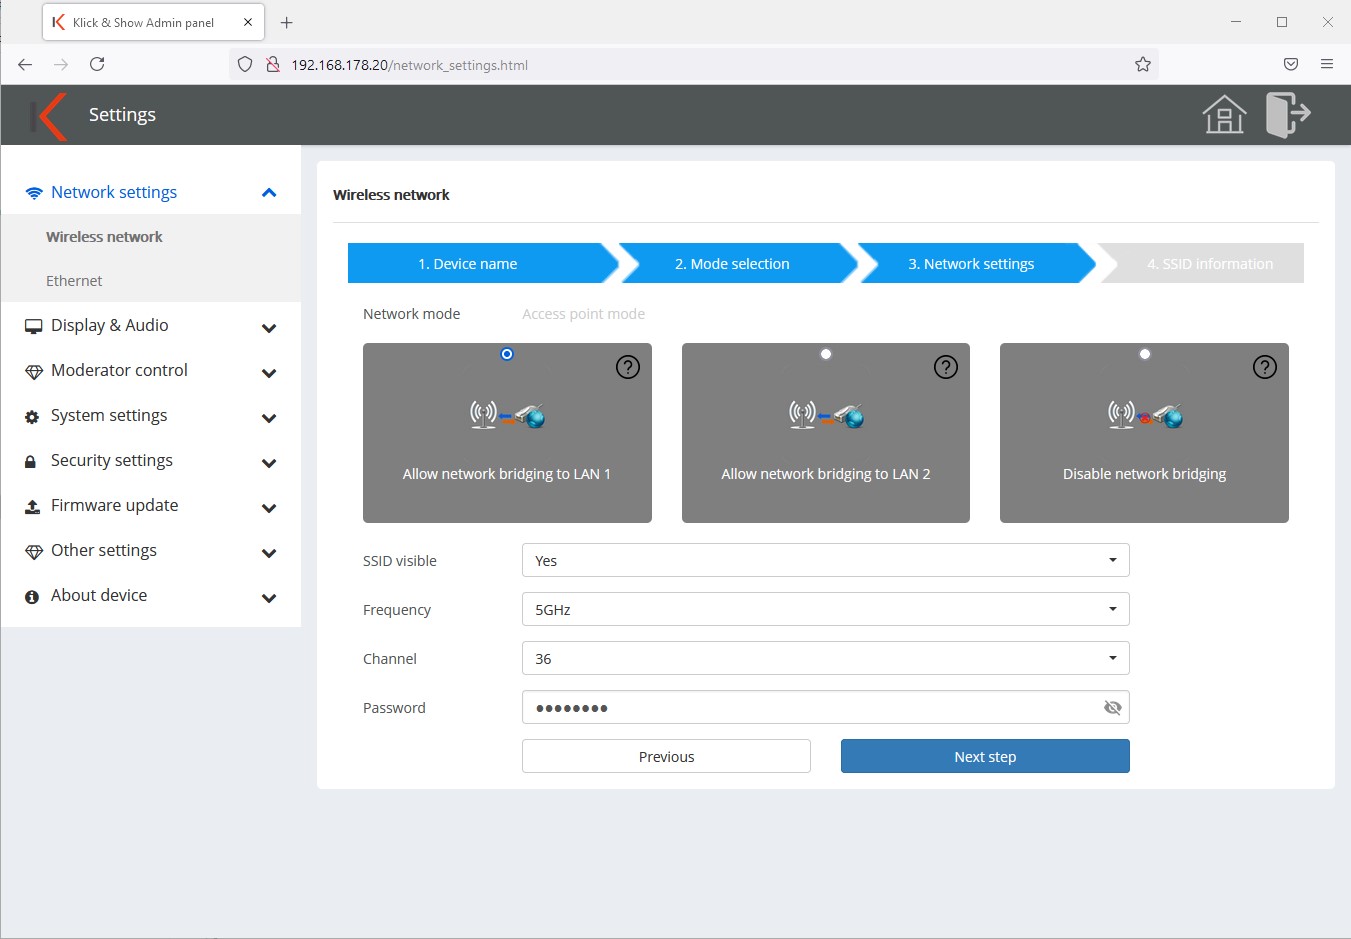
In step 3, you perform the actual network configuration. Select whether the wired network connection on LAN port 1 or 2 should be accessible via WLAN via the access point (bridging) or not.
Furthermore, you can carry out the WLAN configuration of the access point at this point.
- Show SSID: Yes/No
The default is Yes. If you select "No", the Wi-Fi network ID is hidden, i.e. it is not displayed in the list of available networks. However, if you know the SSID, you can manually connect to the Wi-Fi network. - Frequency band: 2.4 or 5 GHz
- Channel: Choose a free Wi-Fi channel
- Password: The WLAN password is automatically assigned in the standard configuration and updated at specified intervals, so the field can remain empty.
If you want to work with your own permanent password, you have the option to assign one at this point.
In this case, the change interval must also be defined as "Never"!
Step 4:

Here you can enter the WLAN SSID information for a guest or company or campus network. These are displayed on the home screen (3 and 4).
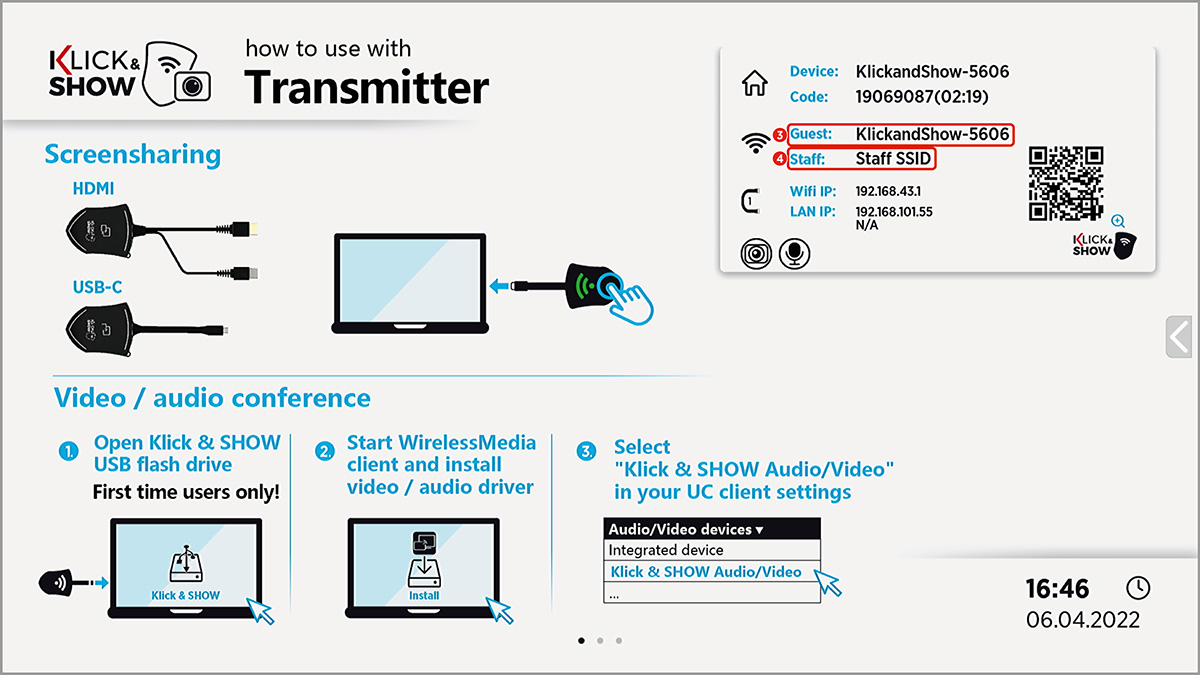
![]() hint:
hint:
This is a pure information field. You do not make any network configurations at this point.
Step 5:
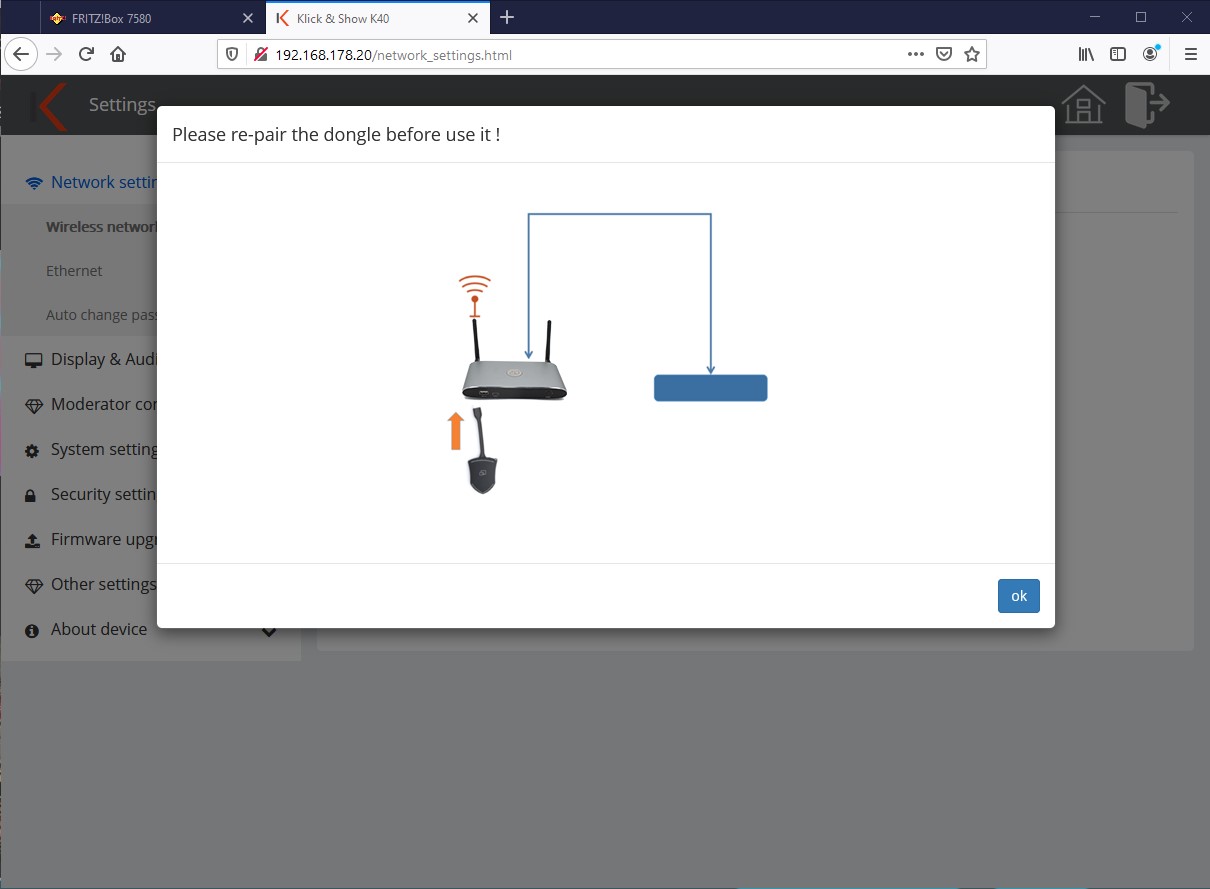
Finally, you will be reminded to recoup (pair) the dongles after the changes to the network configuration.
11.1.2 Wireless Infrastructure Mode
In this mode, the Klick&Show System integrated into an existing WLAN network.
![]() hint:
hint:
Changes to the network configuration can only be made via a wired network connection!
In the menu Network Settings -> WLAN configuration, select the button "Edit" to set up the WLAN connection.

Step 1:
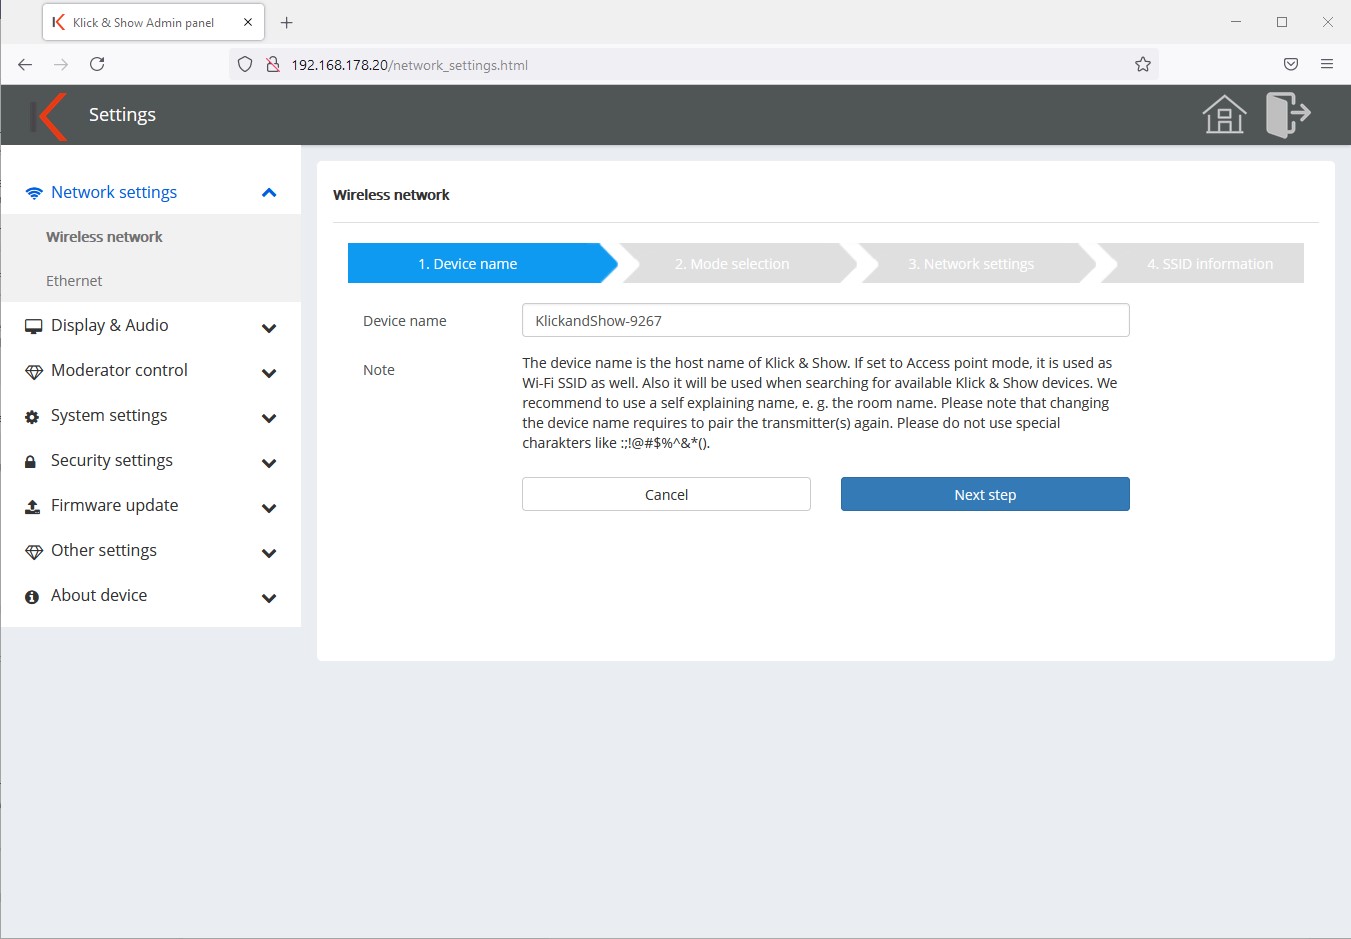
Now you can change the device name of your Klick&Show Change base. We recommend using a name that speaks for itself , e.g. based on the room name. The default name is "KlickandShow-xxxx".
The device name is displayed on the home screen as well as in the list of available Click&Shows in a network, e.g. in the WirelessMedia Software Client.
Step 2:
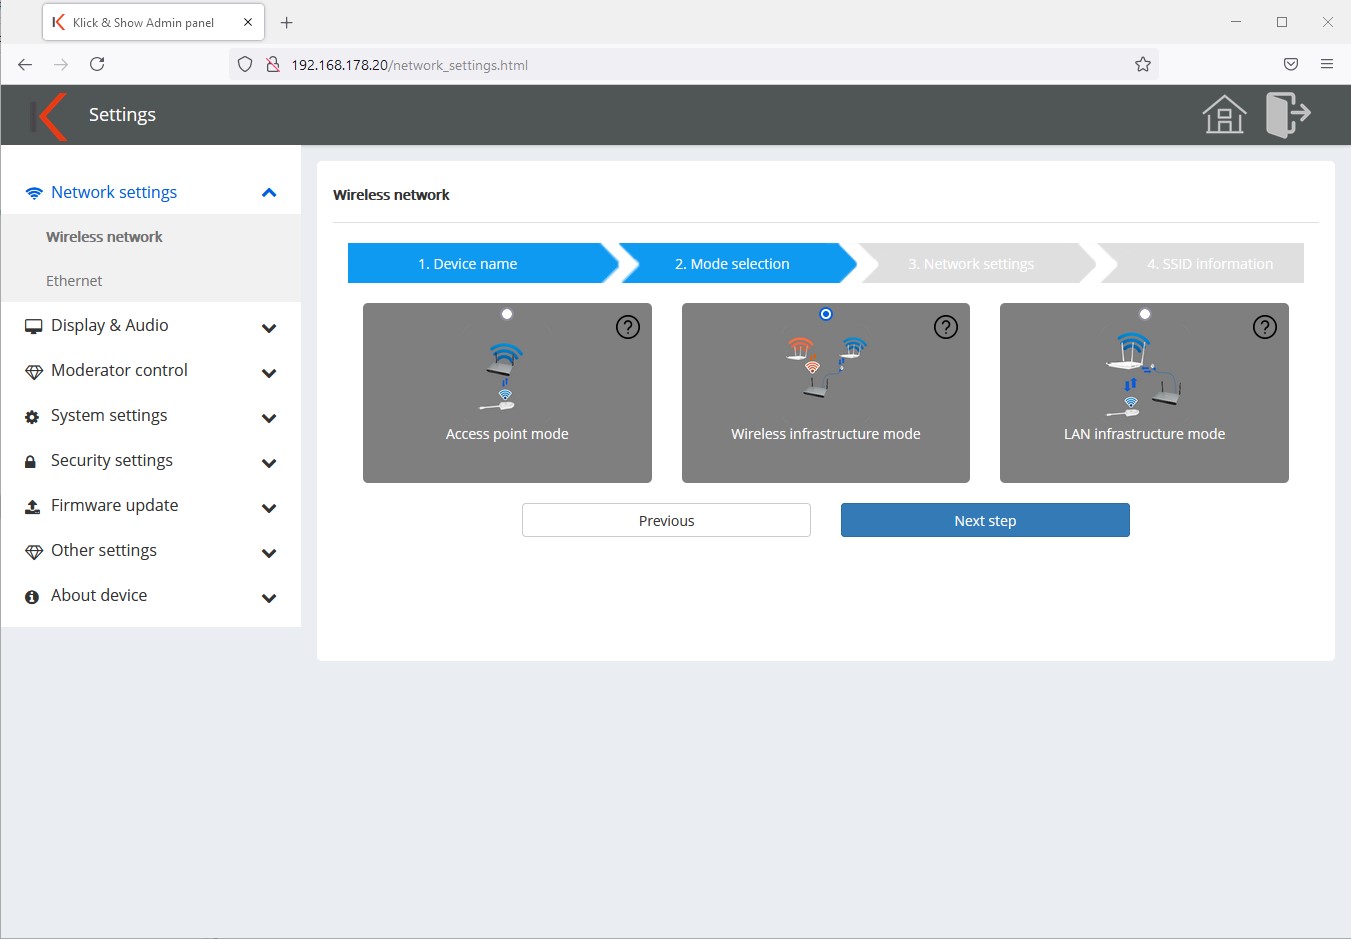
In the next step, select the network operating mode "Wireless Infrastructure Mode".
![]() hint:
hint:
An explanation of the different modes can be found in Chapter 9. The two infrastructure modes are described in the following chapters.
Step 3:

In step 3, select the Wi-Fi network with which the Klick&Show Base and the transmitter want to connect. If you want to use separate Wi-Fi networks, you have to configure them accordingly so that the transmitter can communicate with the base.
Decide if you want to use the Klick&Show want to connect to a 2.4 or 5 GHz Wi-Fi network. Depending on the situation, please activate or deactivate the checkbox "ONLY 5GHz".
Now, from the list of found networks, select the SSID in which you want to Klick & Show and enter the Wi-Fi password in the field below. Klick&Show will try to log in to the WLAN immediately after entering the password. The status icon gives you feedback on whether the registration was successful or not.
![]() hint:
hint:
If the desired SSID does not appear in the list of found networks, repeat the scan operation or verify that you have selected the correct frequency range.
When choosing, make sure that the level is as high as possible to ensure a stable and high-performance connection.
Step 4:

Here you can manually enter the WLAN SSID information for a guest or company or campus network. These are displayed on the home screen (3 and 4).
![]() hint:
hint:
This is a pure information field. You do not make any network configurations at this point.
Step 5:

Finally, you will be reminded to recoup (pair) the dongles after the changes to the network configuration.
11.1.3 LAN infrastructure mode
In this mode, the Klick&Show connected to a structured network via a wired network (LAN) connection. Configuring the Ethernet settings can be found in the next chapter 11.1.4.
![]() hint:
hint:
Changes to the network configuration can only be made via a wired network connection!
In the menu Network Settings -> WLAN configuration, select the button "Edit".
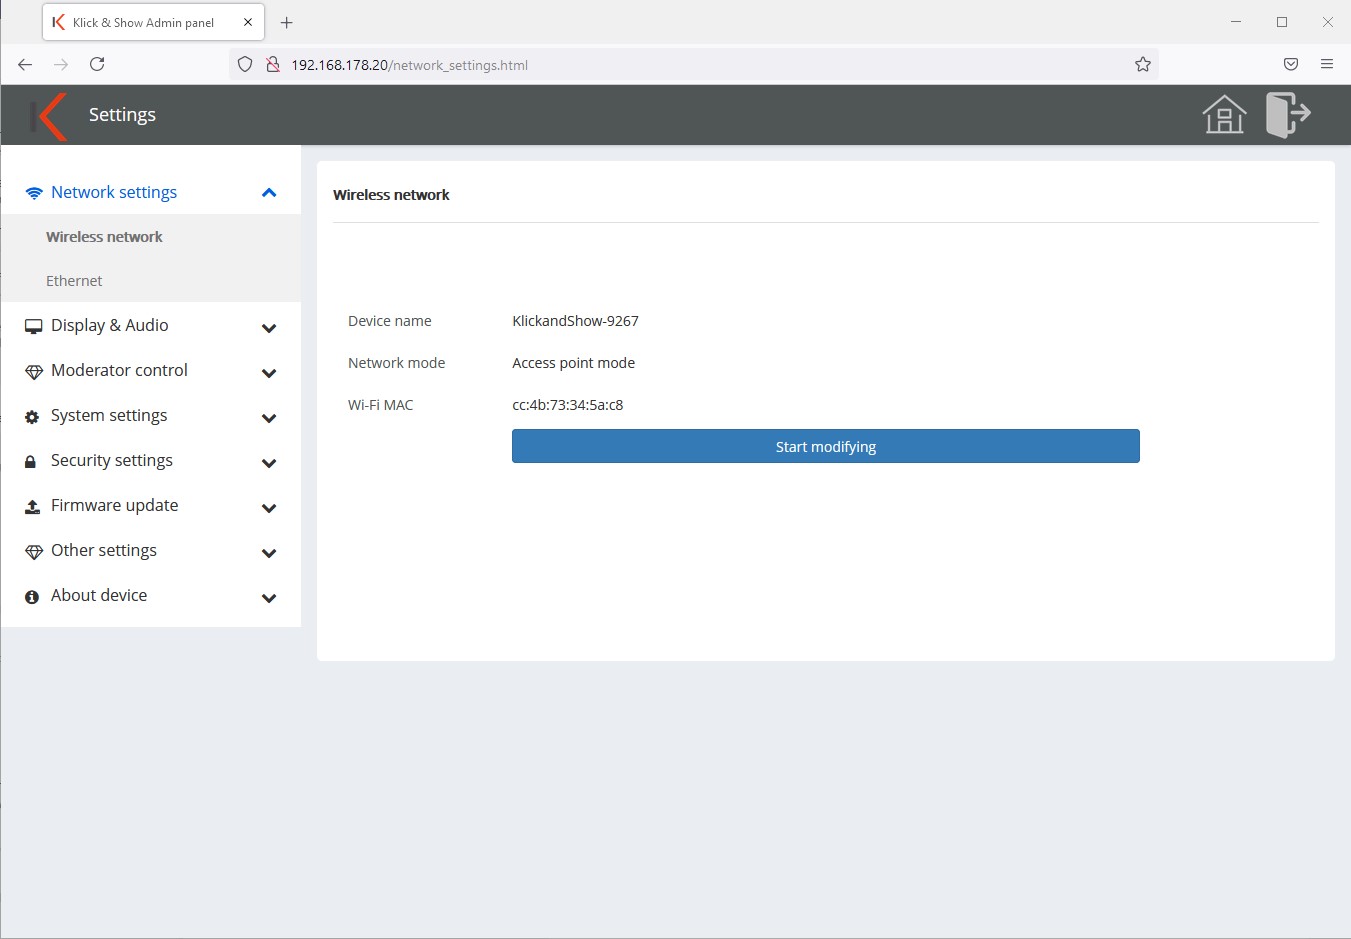
Step 1:

Now you can change the device name of your Klick&Show Change base. We recommend using a name that speaks for itself , e.g. based on the room name. The default name is "KlickandShow-xxxx".
The device name is displayed on the home screen as well as in the list of available clicks and shows on a network, e.g. in the WirelessMedia Software Client.
Step 2:

In the next step, select the operating mode "LAN Infrastructure Mode".
![]() hint:
hint:
An explanation of the different modes can be found in Chapter 9. The two infrastructure modes are described in the following chapters.
Step 3:
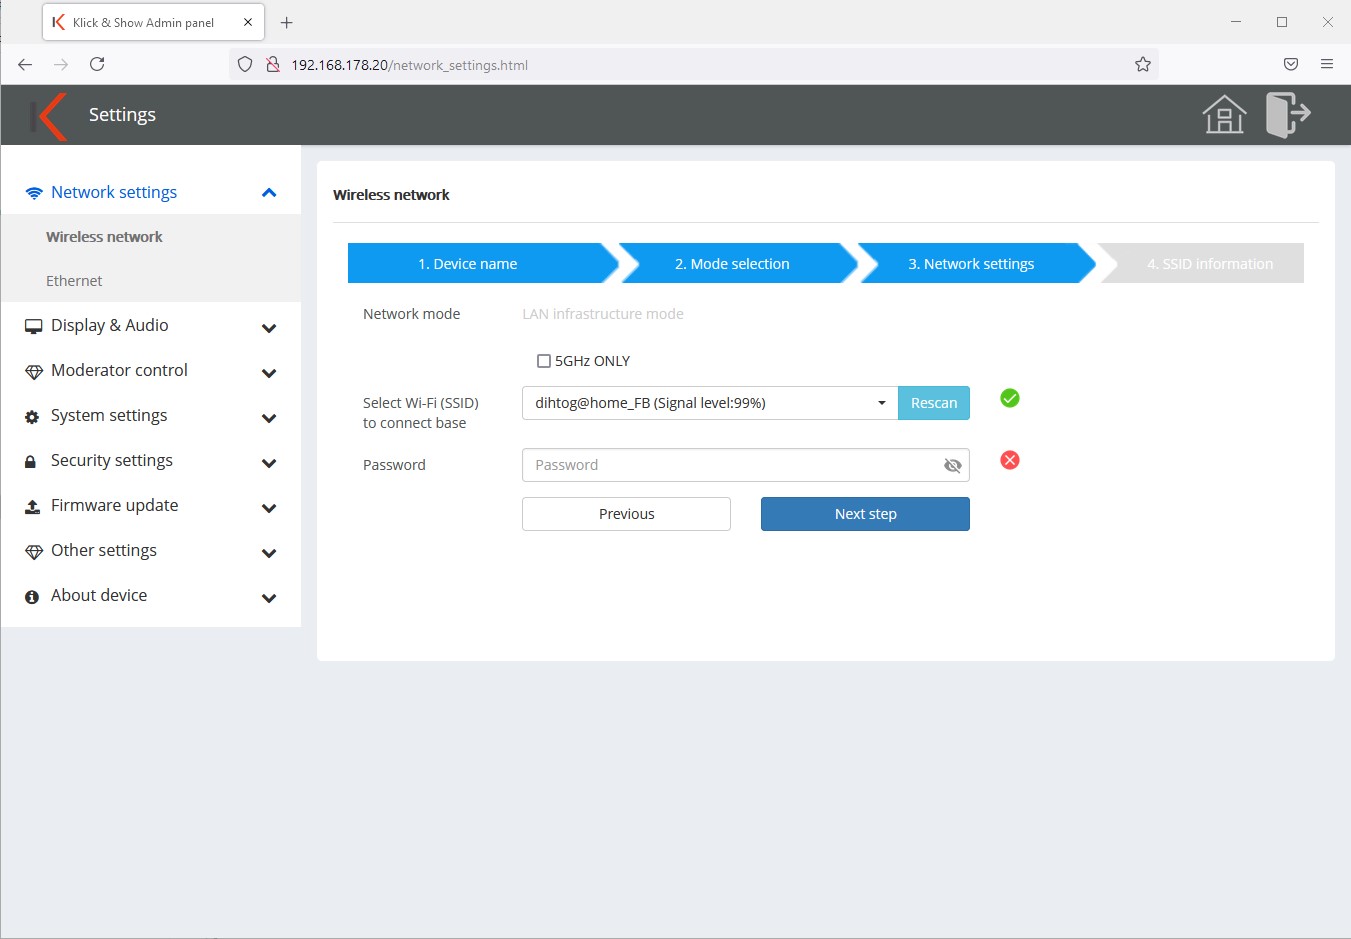
![]() Hint:
Hint:
In LAN infrastructure mode, the internal WLAN access point is switched off. In order to be able to use the transmitters anyway, they must connect to a WLAN network via which communication with the Klick&Show is possible. You can select this network at this point. The access data is transmitted to the transmitters by pairing.
Decide whether you want to use the Klick & Show with a 2.4 or 5 GHz WLAN network. Depending on this, please activate or deactivate the checkbox "ONLY 5 GHz".
Now select the SSID from the list of found networks in which you Klick & Show Transmitter and enter the WLAN password in the field below. Klick & Show will try to log in to the WLAN immediately after entering the password. The status icon gives you feedback whether the registration was successful or not.
![]() hint:
hint:
If the desired SSID does not appear in the list of found networks, repeat the scan operation or verify that you have selected the correct frequency range.
When selecting, make sure that the displayed level is as high as possible to ensure a stable and high-performance connection.
Step 4:
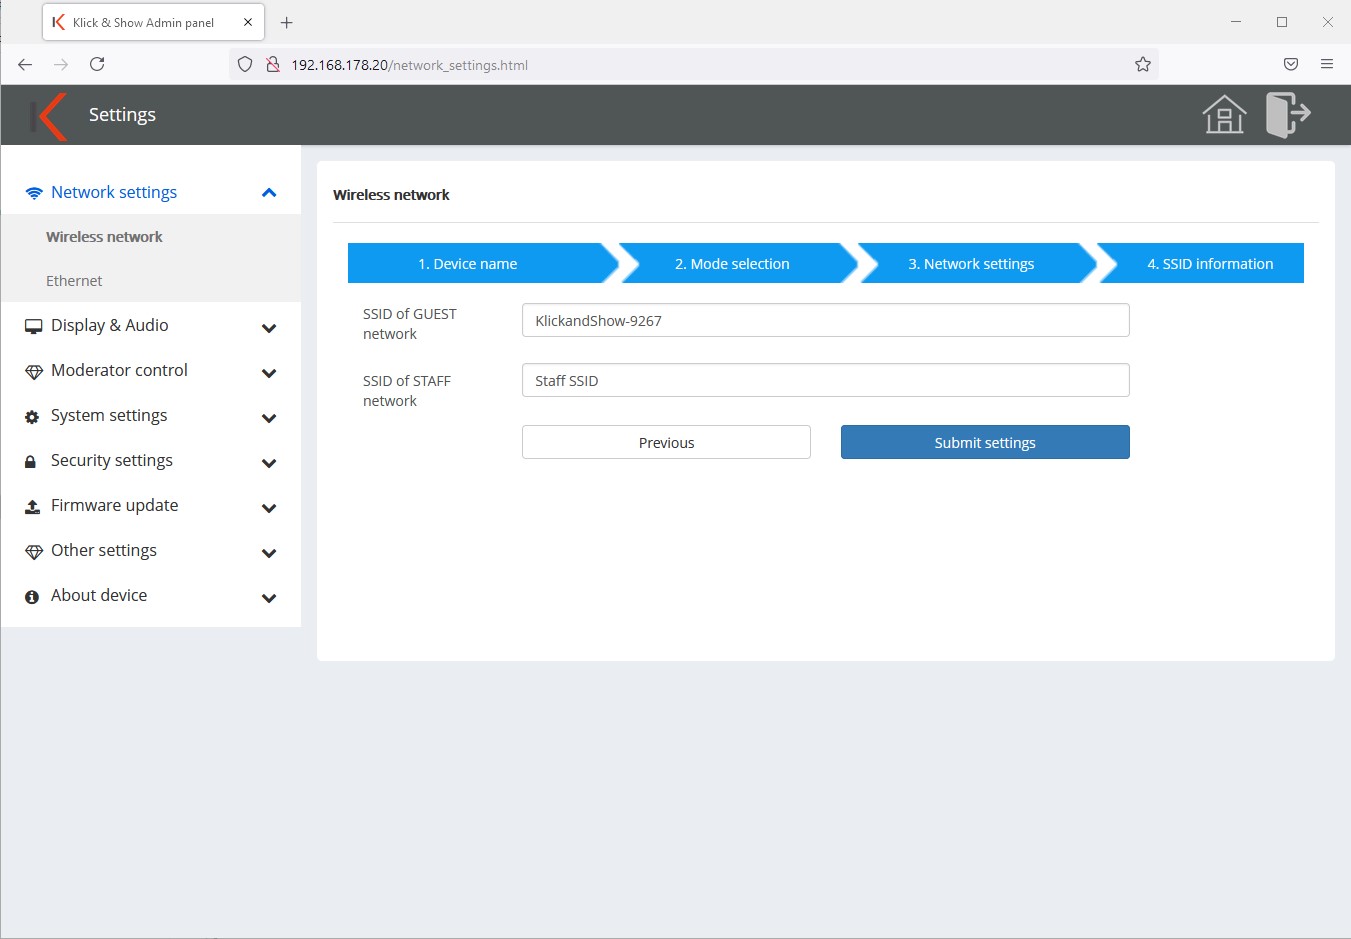
At this point you can manually enter the WLAN SSID information for a guest or company or campus network. These are displayed on the home screen (3 and 4).
![]() hint:
hint:
This is a pure information field. You do not make any network configurations at this point.
Step 5:
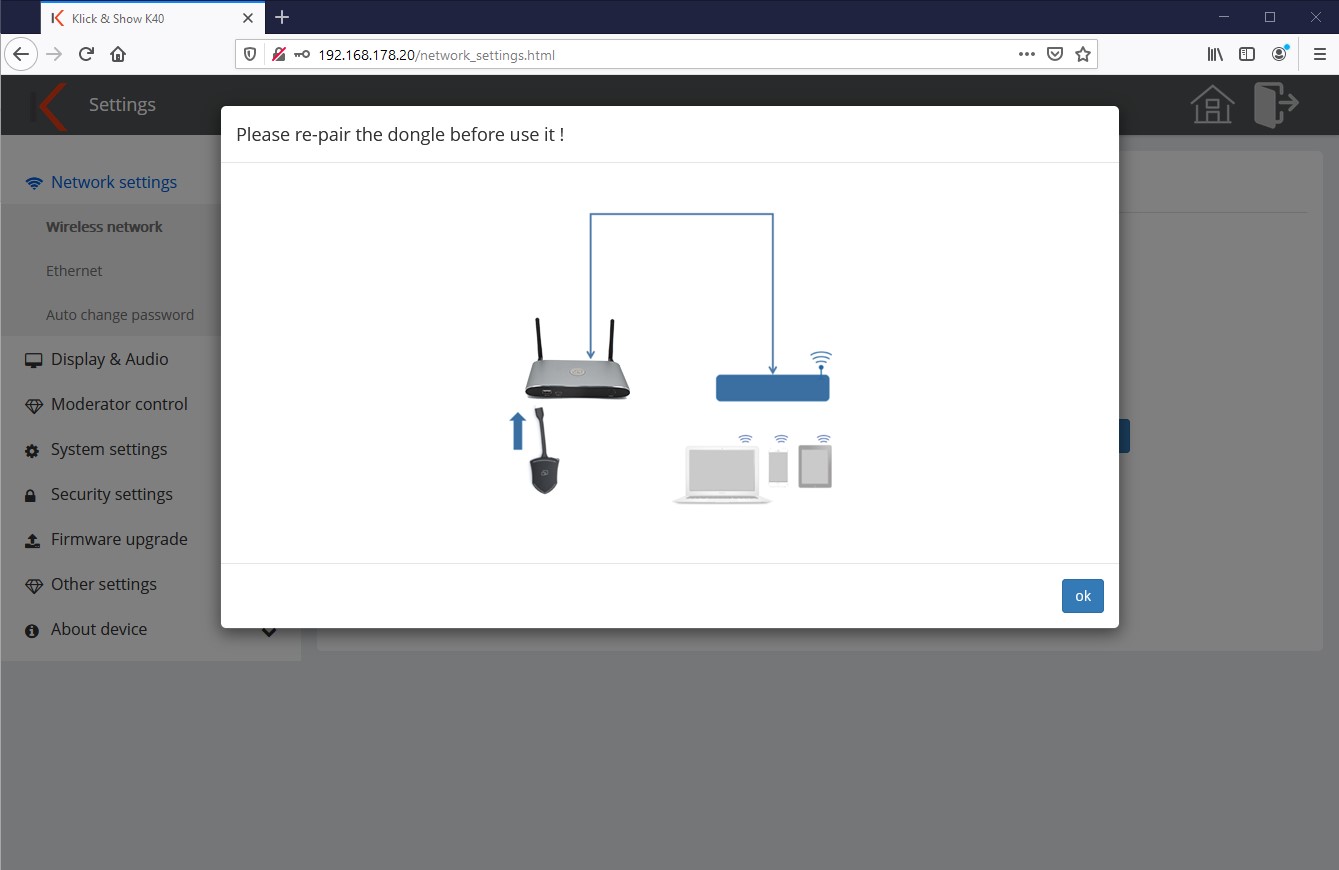
Finally, you will be reminded to recoup (pair) the dongles after the changes to the network configuration.
11.1.4 Network – Ethernet
From the Network Settings menu, select -> Ethernet
![]() Hint:
Hint:
Klick&Show has two LAN ports. These are separated, so both LAN networks remain segmented.
LAN2 also supports the power supply of the device via PoE and is Gigabit capable. Thus, the Klick&Show e.g. be connected to an in-house network and a guest network without establishing a direct connection between the two networks.
To configure, select the tab for the desired LAN port:
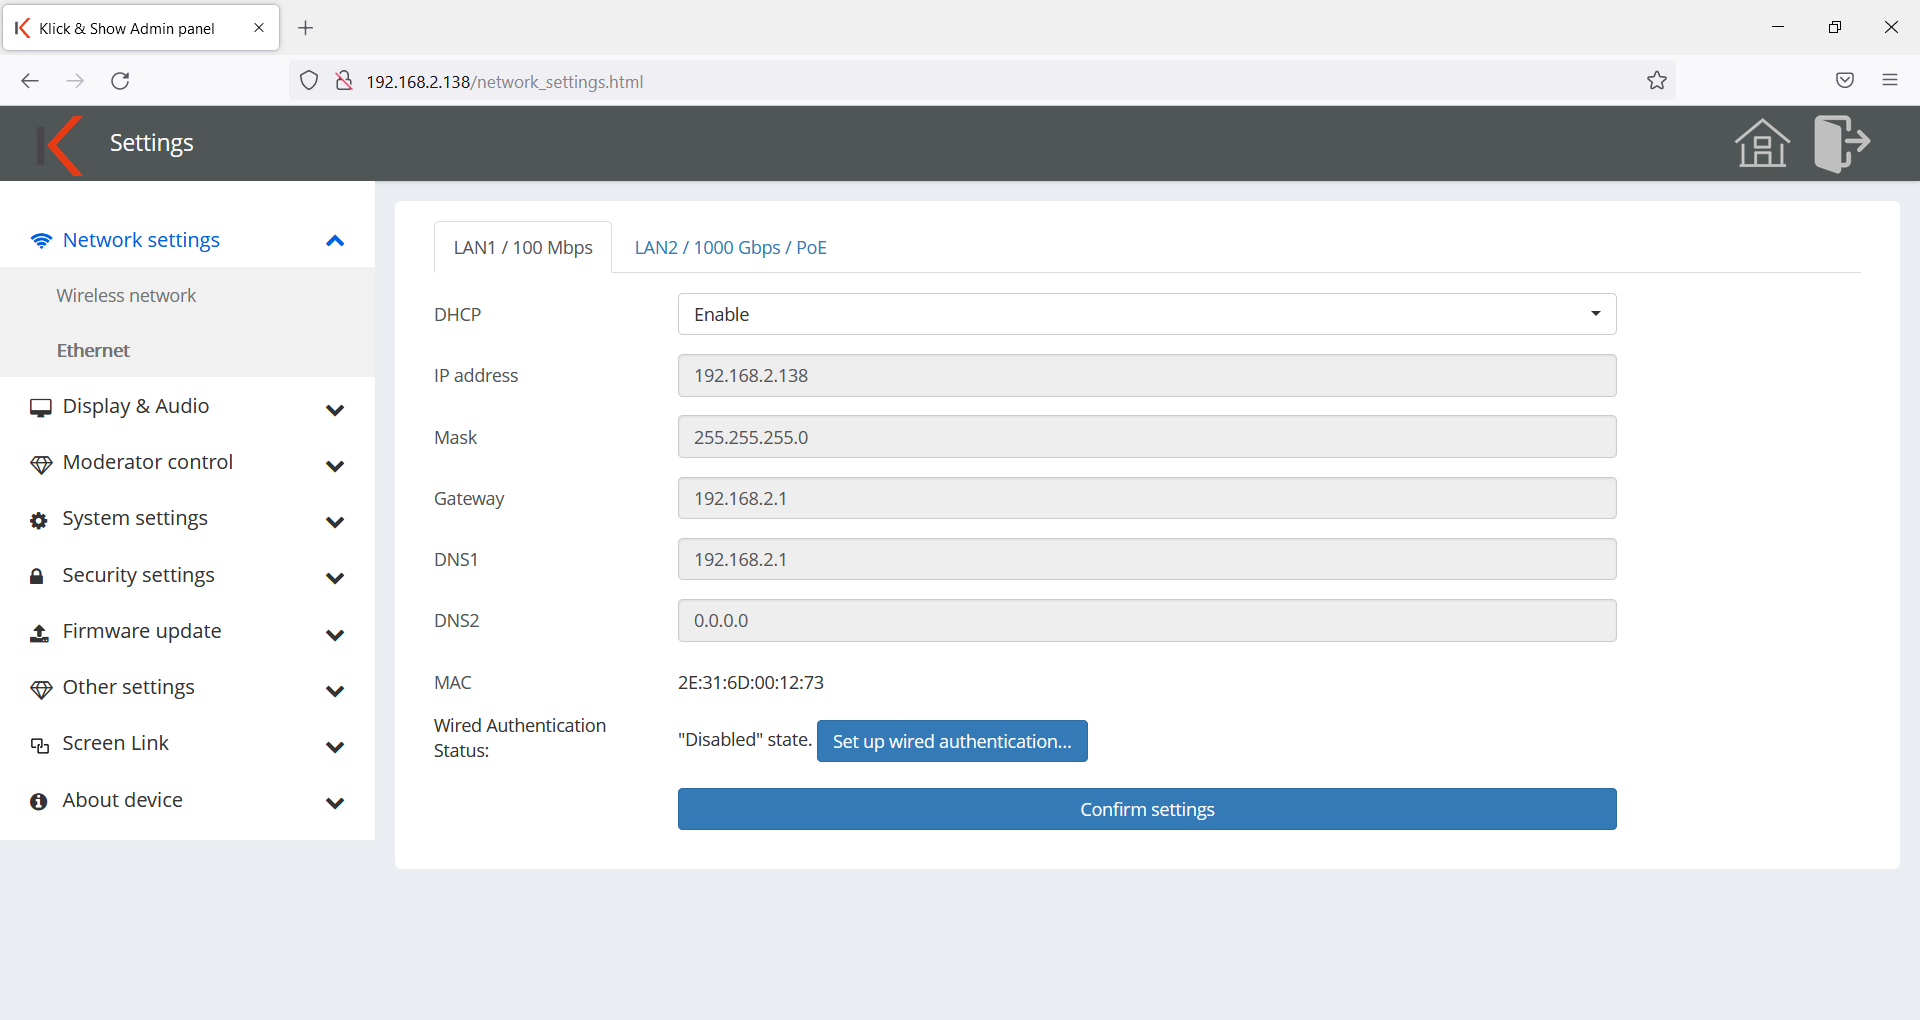
Proxy & IP Settings
- DHCP (Enable): Klick&Show receives its IP address dynamically from a DHCP server on the network.
If DHCP has been enabled, the following items cannot be configured.
DHCP (Disable):Klick&Show is manually assigned a fixed IP address. A static IP can facilitate administration and increase reliability. - IP address: Enter the IP address used by theKlick&Show should be reachable in the network.
- Mask: Enter the network filter mask here.
- Gateway: Enter the IP address of the gateway here – if necessary.
- DNS1: Enter the primary DNS server.
- DNS2:Enter secondary DNS server (optional).
- MAC: Displays the MAC address of the LAN port. This cannot be changed.
To save the settings you have made, click on "Confirm Settings".
The second LAN port can be configured separately according to the above pattern and has its own MAC address.
11.1.5 802.1X Authentication
Optionally, it is possible to configure the Ethernet port individually for each Ethernet port of the Klick&Show Based on a wired authentication, IEEE standard 802.1X will be set up. The IEEE standard 802.1X is a particularly secure method for individual access control to local networks. The standard uses the Extensible Authentication Protocol (EAP) to exchange authentication information. Central authentication and user management is carried out via the RADIUS server (Remote Authentication Dial-In User Service).
![]() Hint:
Hint:
The IEEE 802.1X wired authentication feature can currently only be used in conjunction with the Klick&Show base unit, but not with the Klick&Show Transmitters. This introduces a Klick&Show system in one of the infrastructure networkodi, with the limitation that the Klick&Show transmitter cannot be connected to the RADIUS server of the customer's network. Therefore, in such an environment, it is envisaged that: Klick&Show in "access point network mode", which allows the transmitters to connect to the internal access point of Klick&Show remain connected and only use the Klick&Show The base is wired to the customer's network via Ethernet port and authenticated.
Klick&Show currently supports the following EAP authentication types:
• EAP-TLS (Transport Layer Security)
• EAP-TTLS (EAP Tunneled Transport Layer Security)
• PEAP (Protected Extensible Authentication Protocol)
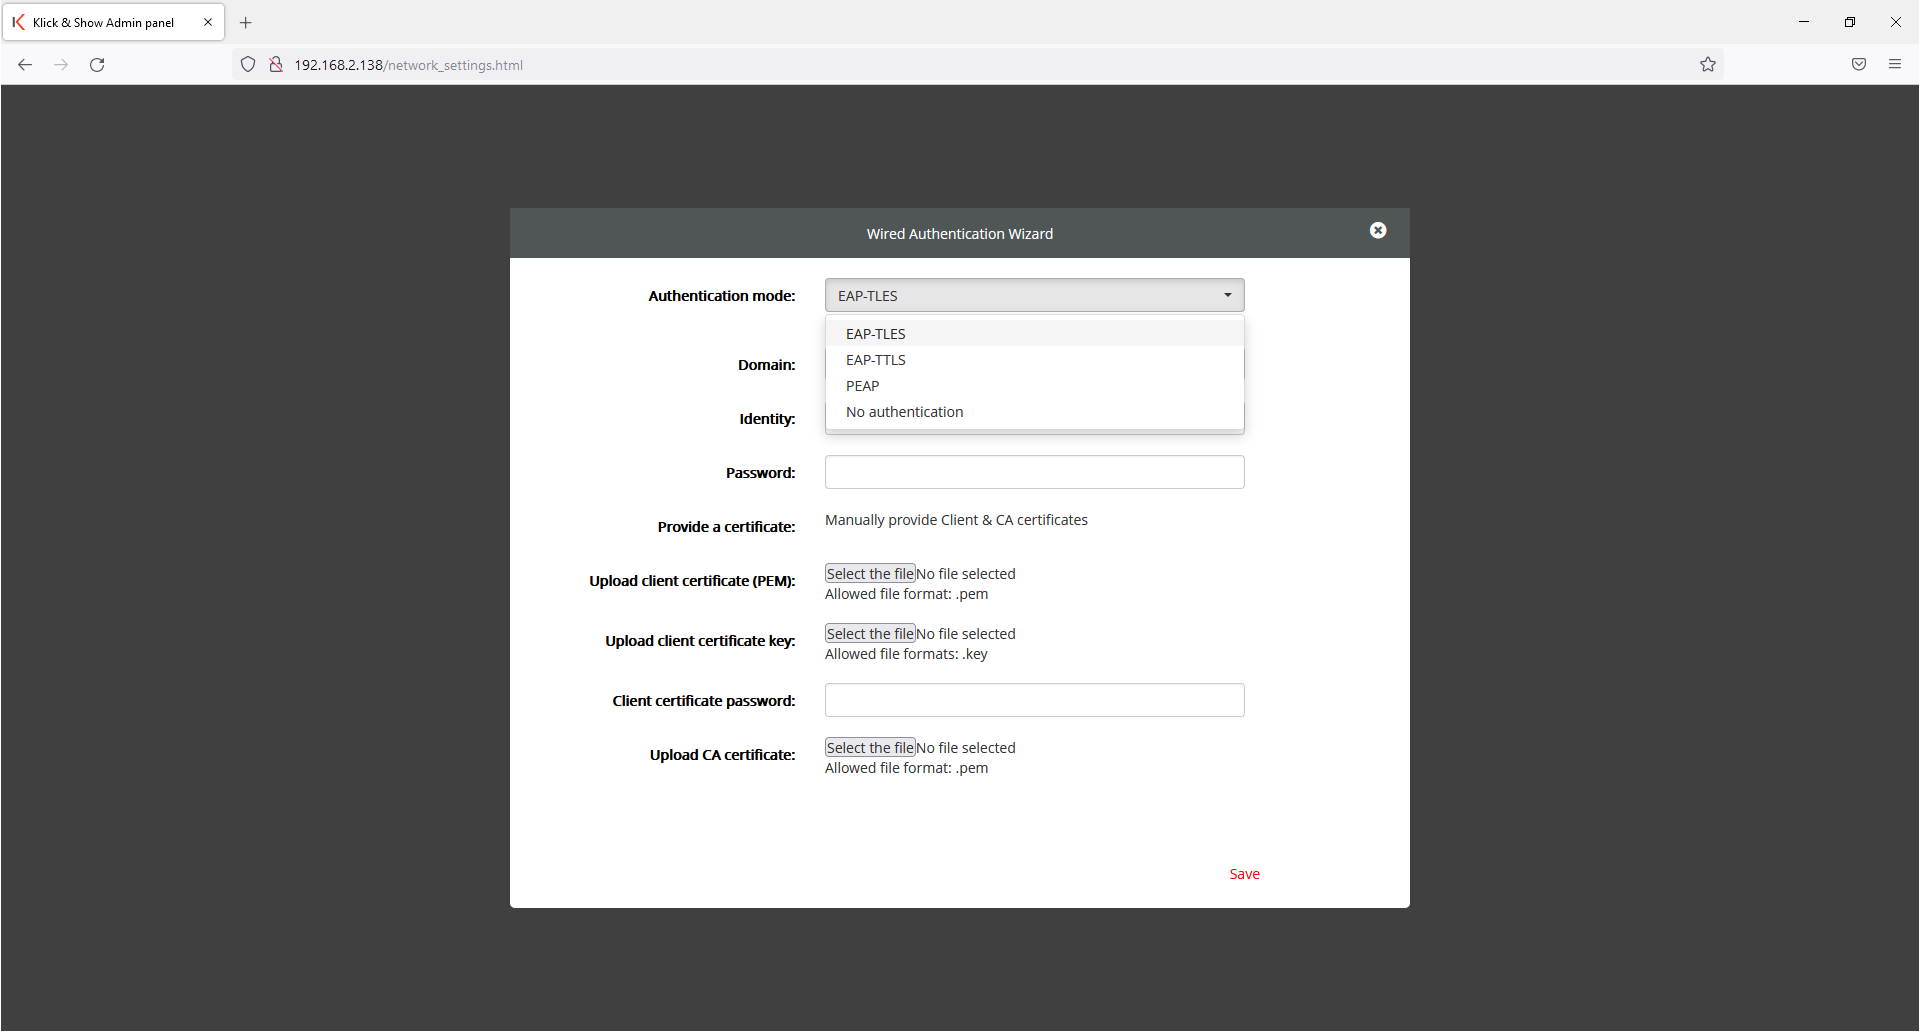
A wizard guides you through entering the required parameters:
Authentication: Selection of EAP-TLS, EAP-TTLS, PEAP and "No authentication"
Domain: Enter the domain listed in the server certificate here
Identity: Enter the "Identity" (e-mail address) associated with the user profile
Password: Enter the password assigned to this user profile here.
For EAP-TLS only, the following section is relevant:
Deploy certificate: Manually deploy client and CA certificates
Upload client certificate (PEM): Provide the client certificate in PEM format here
Upload client certificate key: Provide the certificate key of the client certificate here
Client Certificate Password: Enter the password associated with the client certificate here
Upload CA certificate: Provide the CA certificate here
11.2 Display & Audio
11.2.1 HDMI resolution
Select the resolution and refresh rate that the Klick&Show Base unit at the HDMI output.
The Klick&Show Base unit reads in advance the so-called EDID information of the output device (display, projector). The EDID is a data structure with which display devices of a connected signal source describe their capabilities.
The resolutions then listed in the list selection field of the WebUI depend on the capabilities of the connected output device (for example, if no 4K-compatible output device is connected, no 4K resolution is offered for selection).
In the "Auto" setting, Klick&Show selects the EDID information of the playback device (e.g. display) and selects the best available setting. If you are not satisfied with the image quality, you can choose a suitable one from the list of available resolutions.

![]() hint:
hint:
If the newly selected resolution cannot be displayed, the previously active resolution is displayed again after approx. 15 s.
11.2.2 CEC
CEC is the Consumer Electronics Control (protocol) standardized by the HDMI organization. Klick&Show supports the command sets for switching on and off. If your playback device
(e.g. display) is also compatible, the display or the Klick & Show Automate the basis about it.
If you select the "Klick&Show through the display", the display switches the Klick&Show Base on or off synchronously with the operation of the display.
If the option "Display through the Klick&Show", the display responds to turning the base on and off or plugging a transmitter into a laptop.
Both options can also be activated.
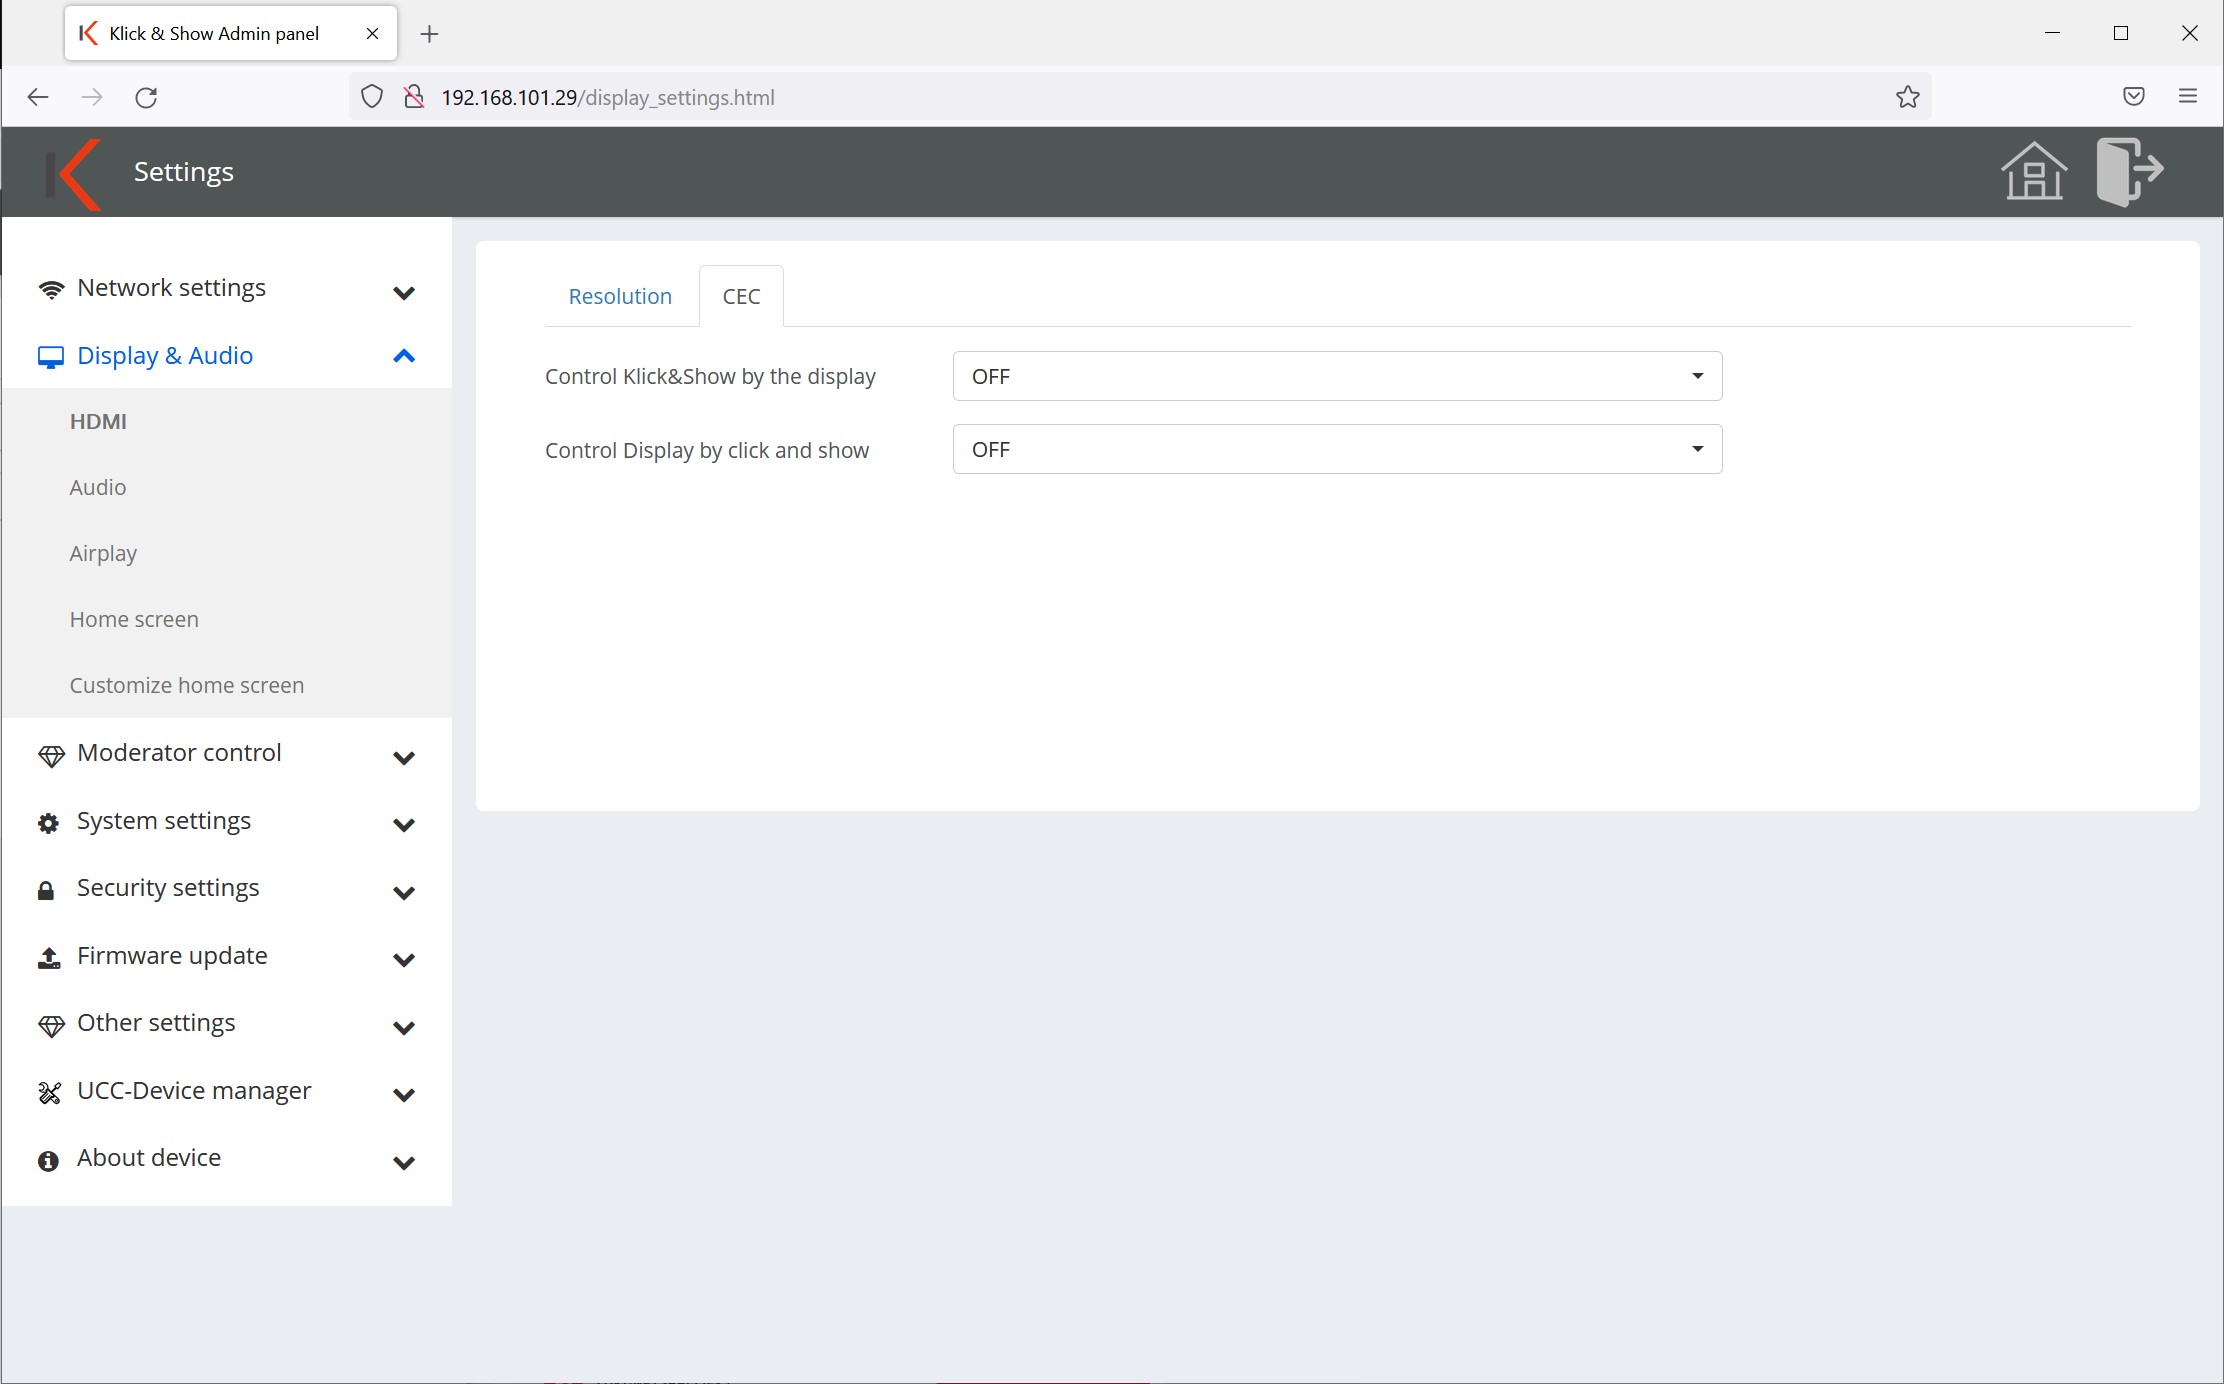
![]() Hint:
Hint:
Please check if the display or projector supports CEC. Sometimes only certain inputs on the device support CEC.
11.2.3 Audio output
The audio output can be done either via the analogue jack output and/or via the digital HDMI output. In the case of: Klick&Show For BYOM conferences, K-FX can also output audio via USB to a connected USB conferencing device, e.g. a video soundbar.
11.2.4 Volume
You can limit the playback volume, e.B. to avoid exceeding a certain level.
11.2.5 AirPlay image quality
Set the image quality of the AirPlay transmission here.
You can choose from:
- High: 1920×1080 (default)
- Medium: 1600×900
- Low: 1280×720
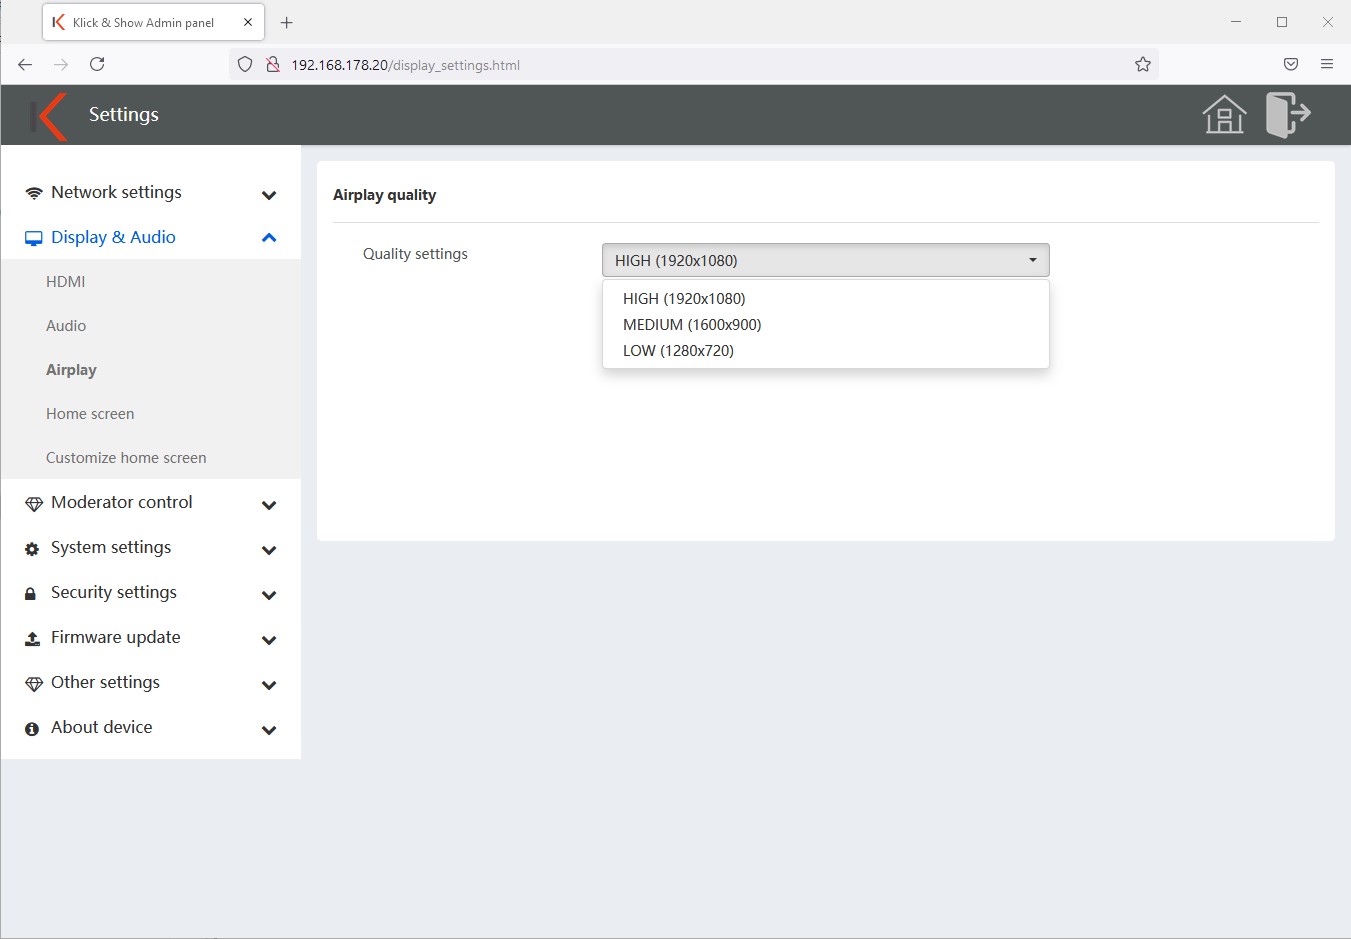
![]() hint:
hint:
The higher the quality the more data is transferred, a lower quality can mean a smoother transmission.
11.2.6 Homescreen Configuration
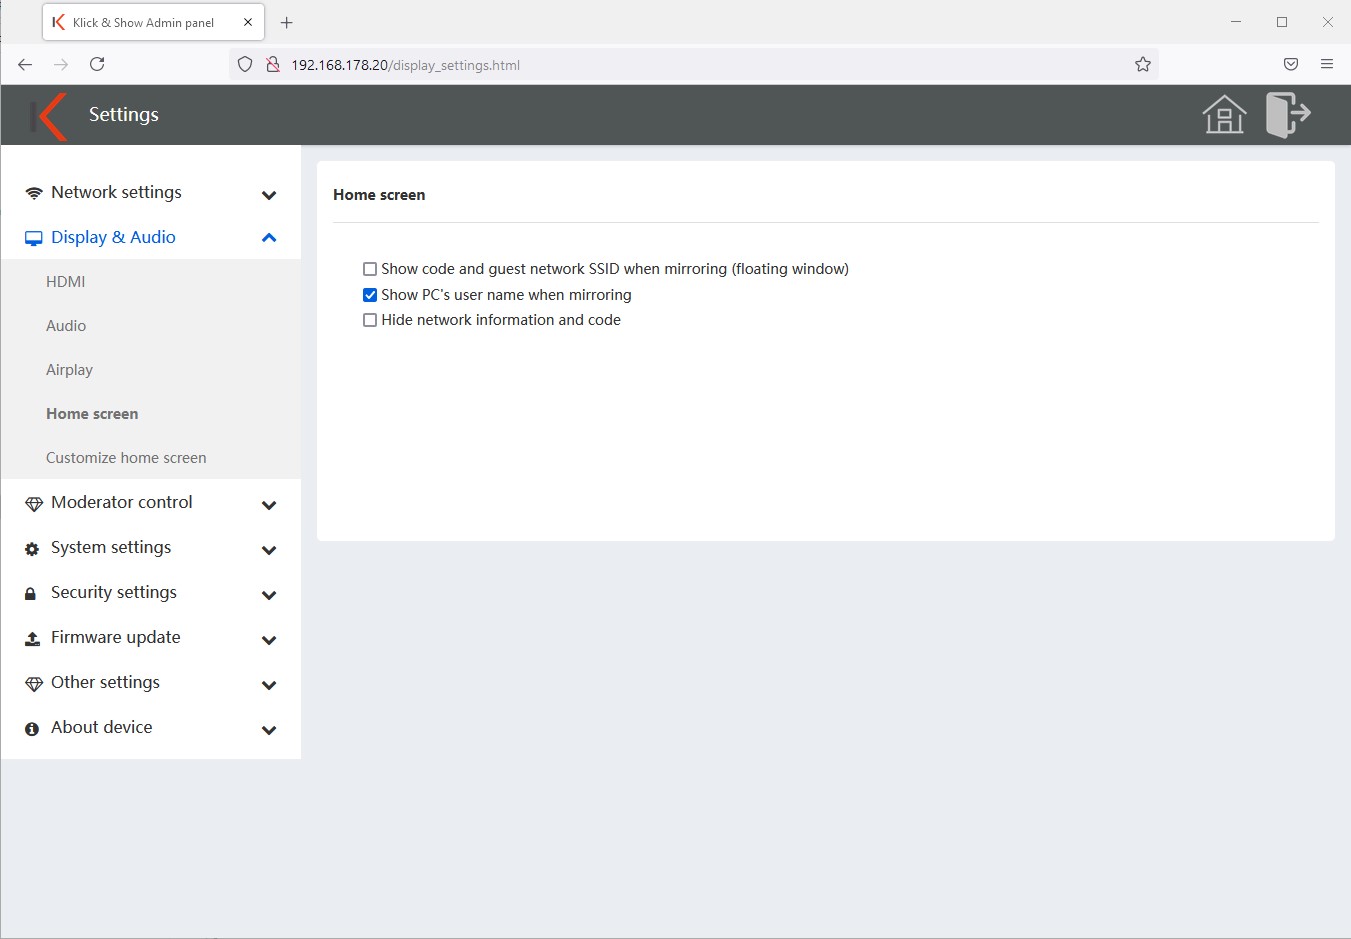
Here you can decide which information is provided by the Klick&Show on the home screen or during the presentation.
- Display the device name and password of the base when mirroring
Displays the guest SSID and code in a small semi-transparent window during transmission.
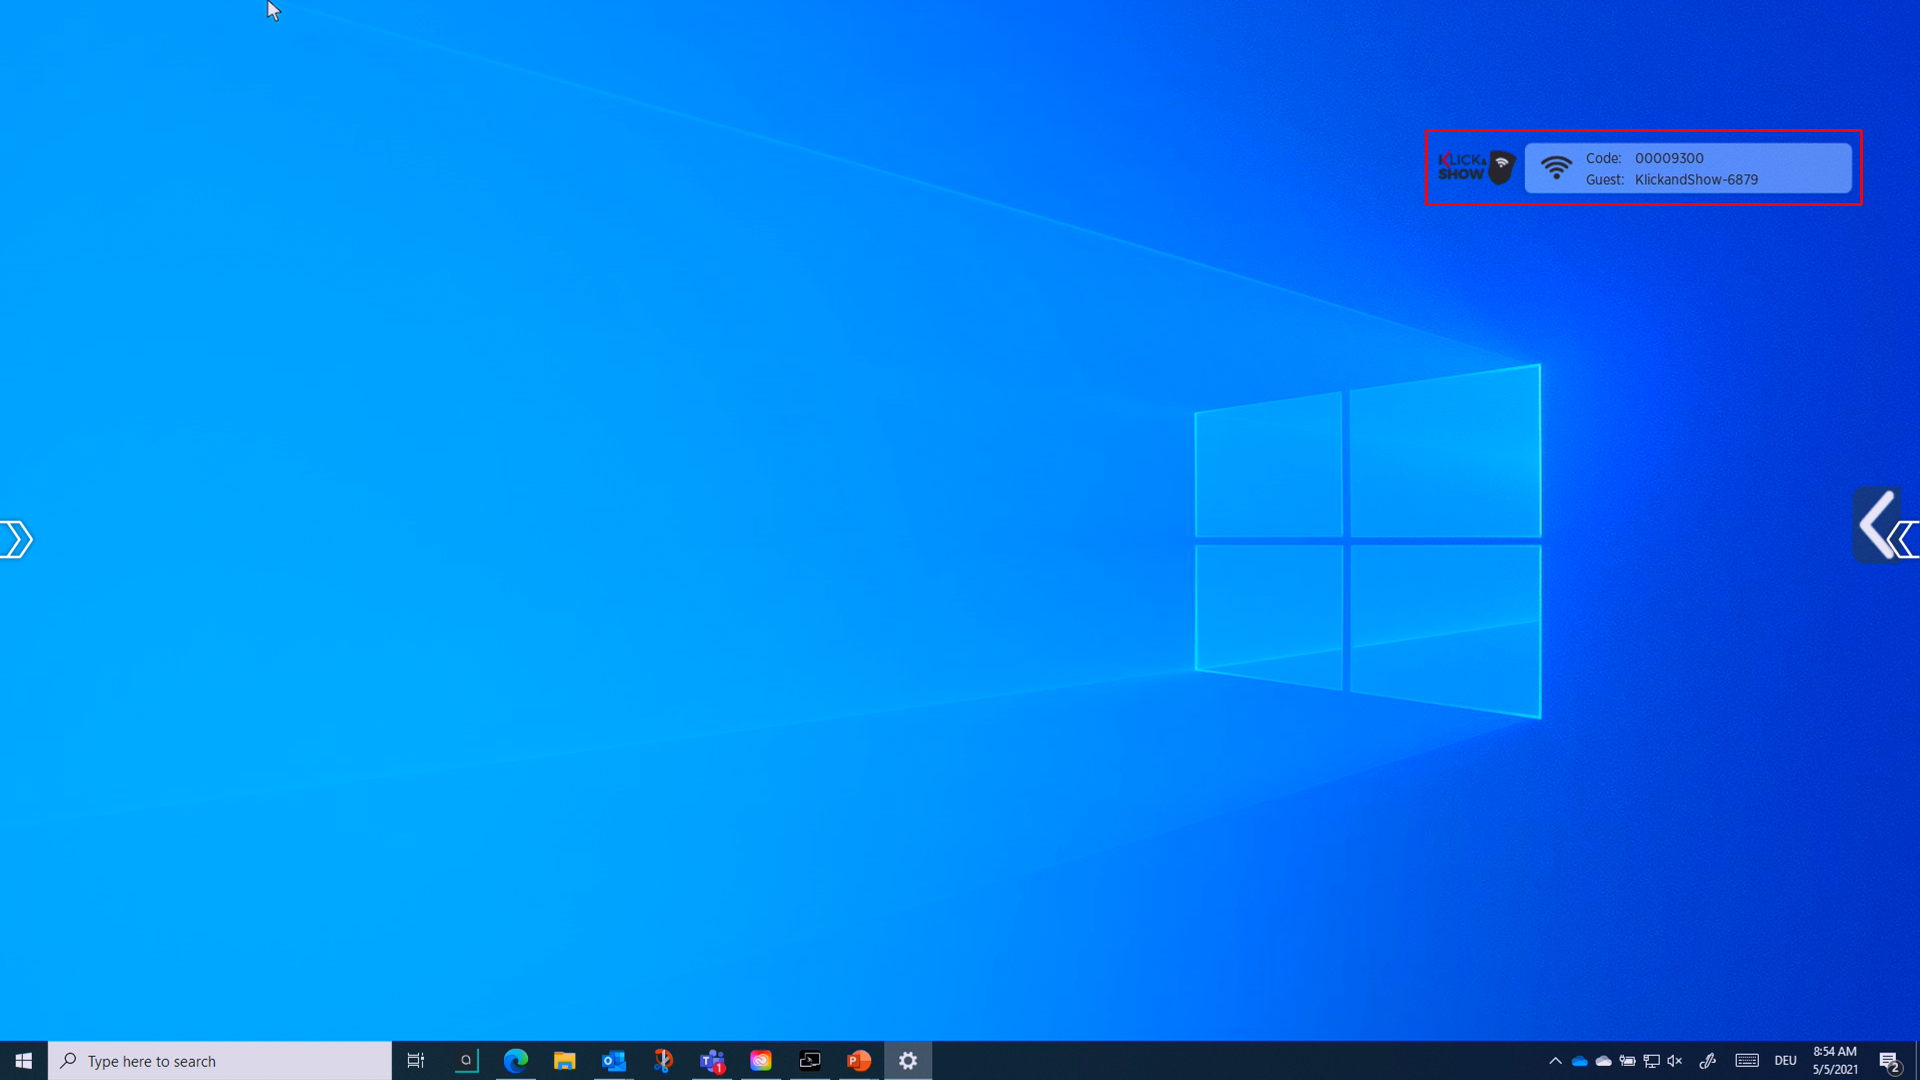
- When mirroring, show the user name of the PC
At the beginning of a transfer, briefly displays the user or device name of the presenter.
- Hide connection information
Hides all connection information (SSIDs, code, IP addresses) on the home screen.
- Set a change interval for the home screen
Defines the time interval in which the individual pages of the home screen are changed.
11.2.7 Home Screen Wallpaper
You can customize the home screen. To do this, click on the "+" and select the desired file.
The individual background image is automatically activated. You can delete the individual home screen wallpapers and/or reactivate the default wallpaper at any time.
![]() hint:
hint:
The file formats jpg, bmp or png in the resolution 1920×1080 and up to a file size of 1 MB can be used. Up to 12 individual homescreen backgrounds can be uploaded. These remain even after a firmware update.
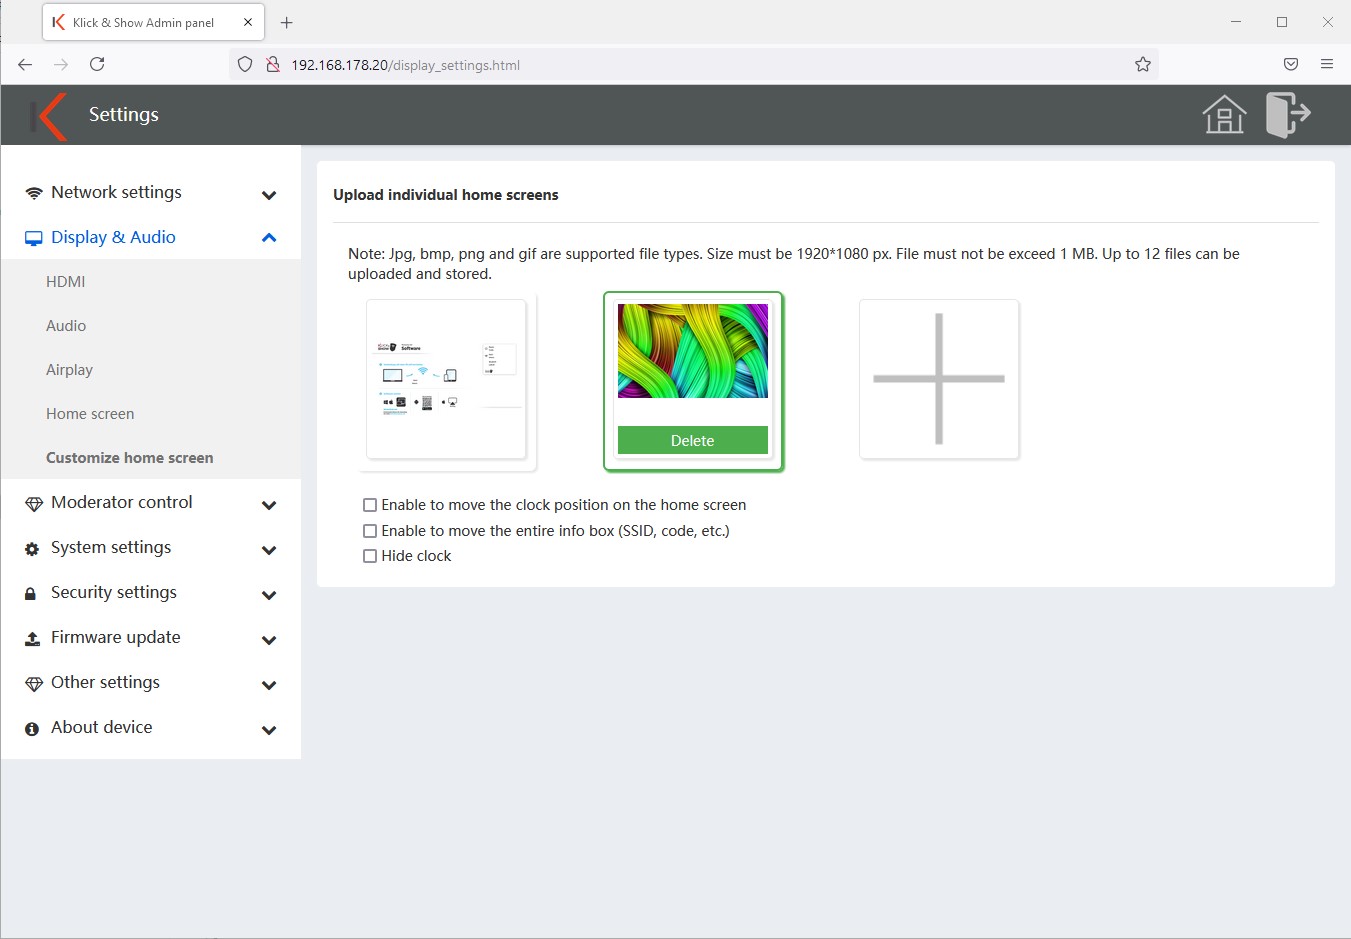
If you choose an individual background, you have three additional settings available.
- Move the position of the watch – if this option is activated, the watch can be moved freely from its default position in the lower right corner of the screen.
- Move the position of the infobox – if this option is activated, the infobox (SSIDs, code, etc.) can be moved freely on the screen from its default position in the upper right corner.
- Hide clock – hides the time and date display on the home screen.
![]() Hint:
Hint:
In order to be able to move the elements, you must use the Klick&Show Operate the base on a touchscreen or temporarily connect it to a mouse.
![]() Hint:
Hint:
Only one file can be loaded as a background. If you want to spread the connection options across multiple pages, as in factory settings, you need to create and upload an animated GIF. We have provided a manual and template in our download area .
11.3 Moderator control
11.3.1 Moderator Control
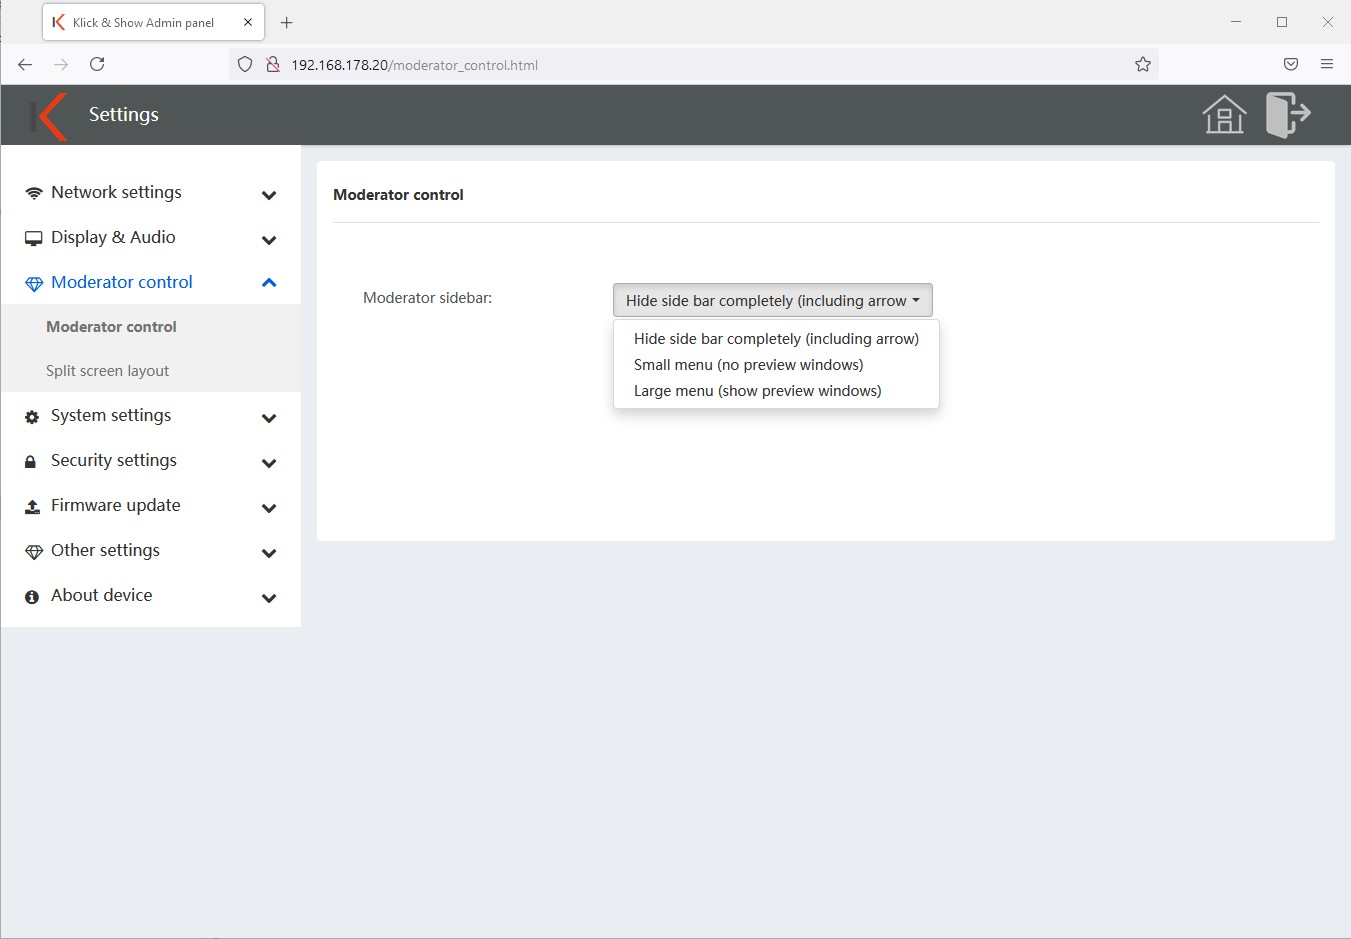
- Disable moderator control
The menu cannot be accessed. - Small menu
A gray arrow appears on the right side of the display. By tapping a menu opens and allows access to the whiteboard or annotation app.

- Large menu
If you activate this function, all connected devices including live preview are displayed and can be selected by tapping and brought to the presentation by the moderator. (Preview available when using the transmitters, wireless media clients for Windows or MacOS.)

11.3.2 Screen layout
Klick&Show allows the simultaneous display of up to 4 devices. To do this, you can select the screen layout at this point.
Different layouts can be selected for the simultaneous use of 2, 3 and 4 sources.
11.4 System Settings
11.4.1 Transmitters
The tab "Transmitter" shows an overview of all connected, send-ready and sending transmitters and software clients that are connected to the base.
Displays the type, Mac address, serial number, software version, device status, and recent activity. The transfer can be started or interrupted via the "Operate" function.
With the "Columns" button at the top right, this information can be shown or hidden individually as required.
![]() hint:
hint:
Connections or transmissions from AirPlay, Miracast and ChromeCast do not support this feature and are therefore not displayed.
Under the "Paired" tab, all transmitters that have ever been connected to this Klick&Show base.
The name of the HDMI and USB-C transmitters can be changed at this point, for example, the room assignment can be made.
The "Remove" button (garbage can) can be used to select individual or all devices and unpair (disconnect). Before the next use at this base, they must then be taught again.
In this way, abusive transmissions of stolen transmitters can be prevented.
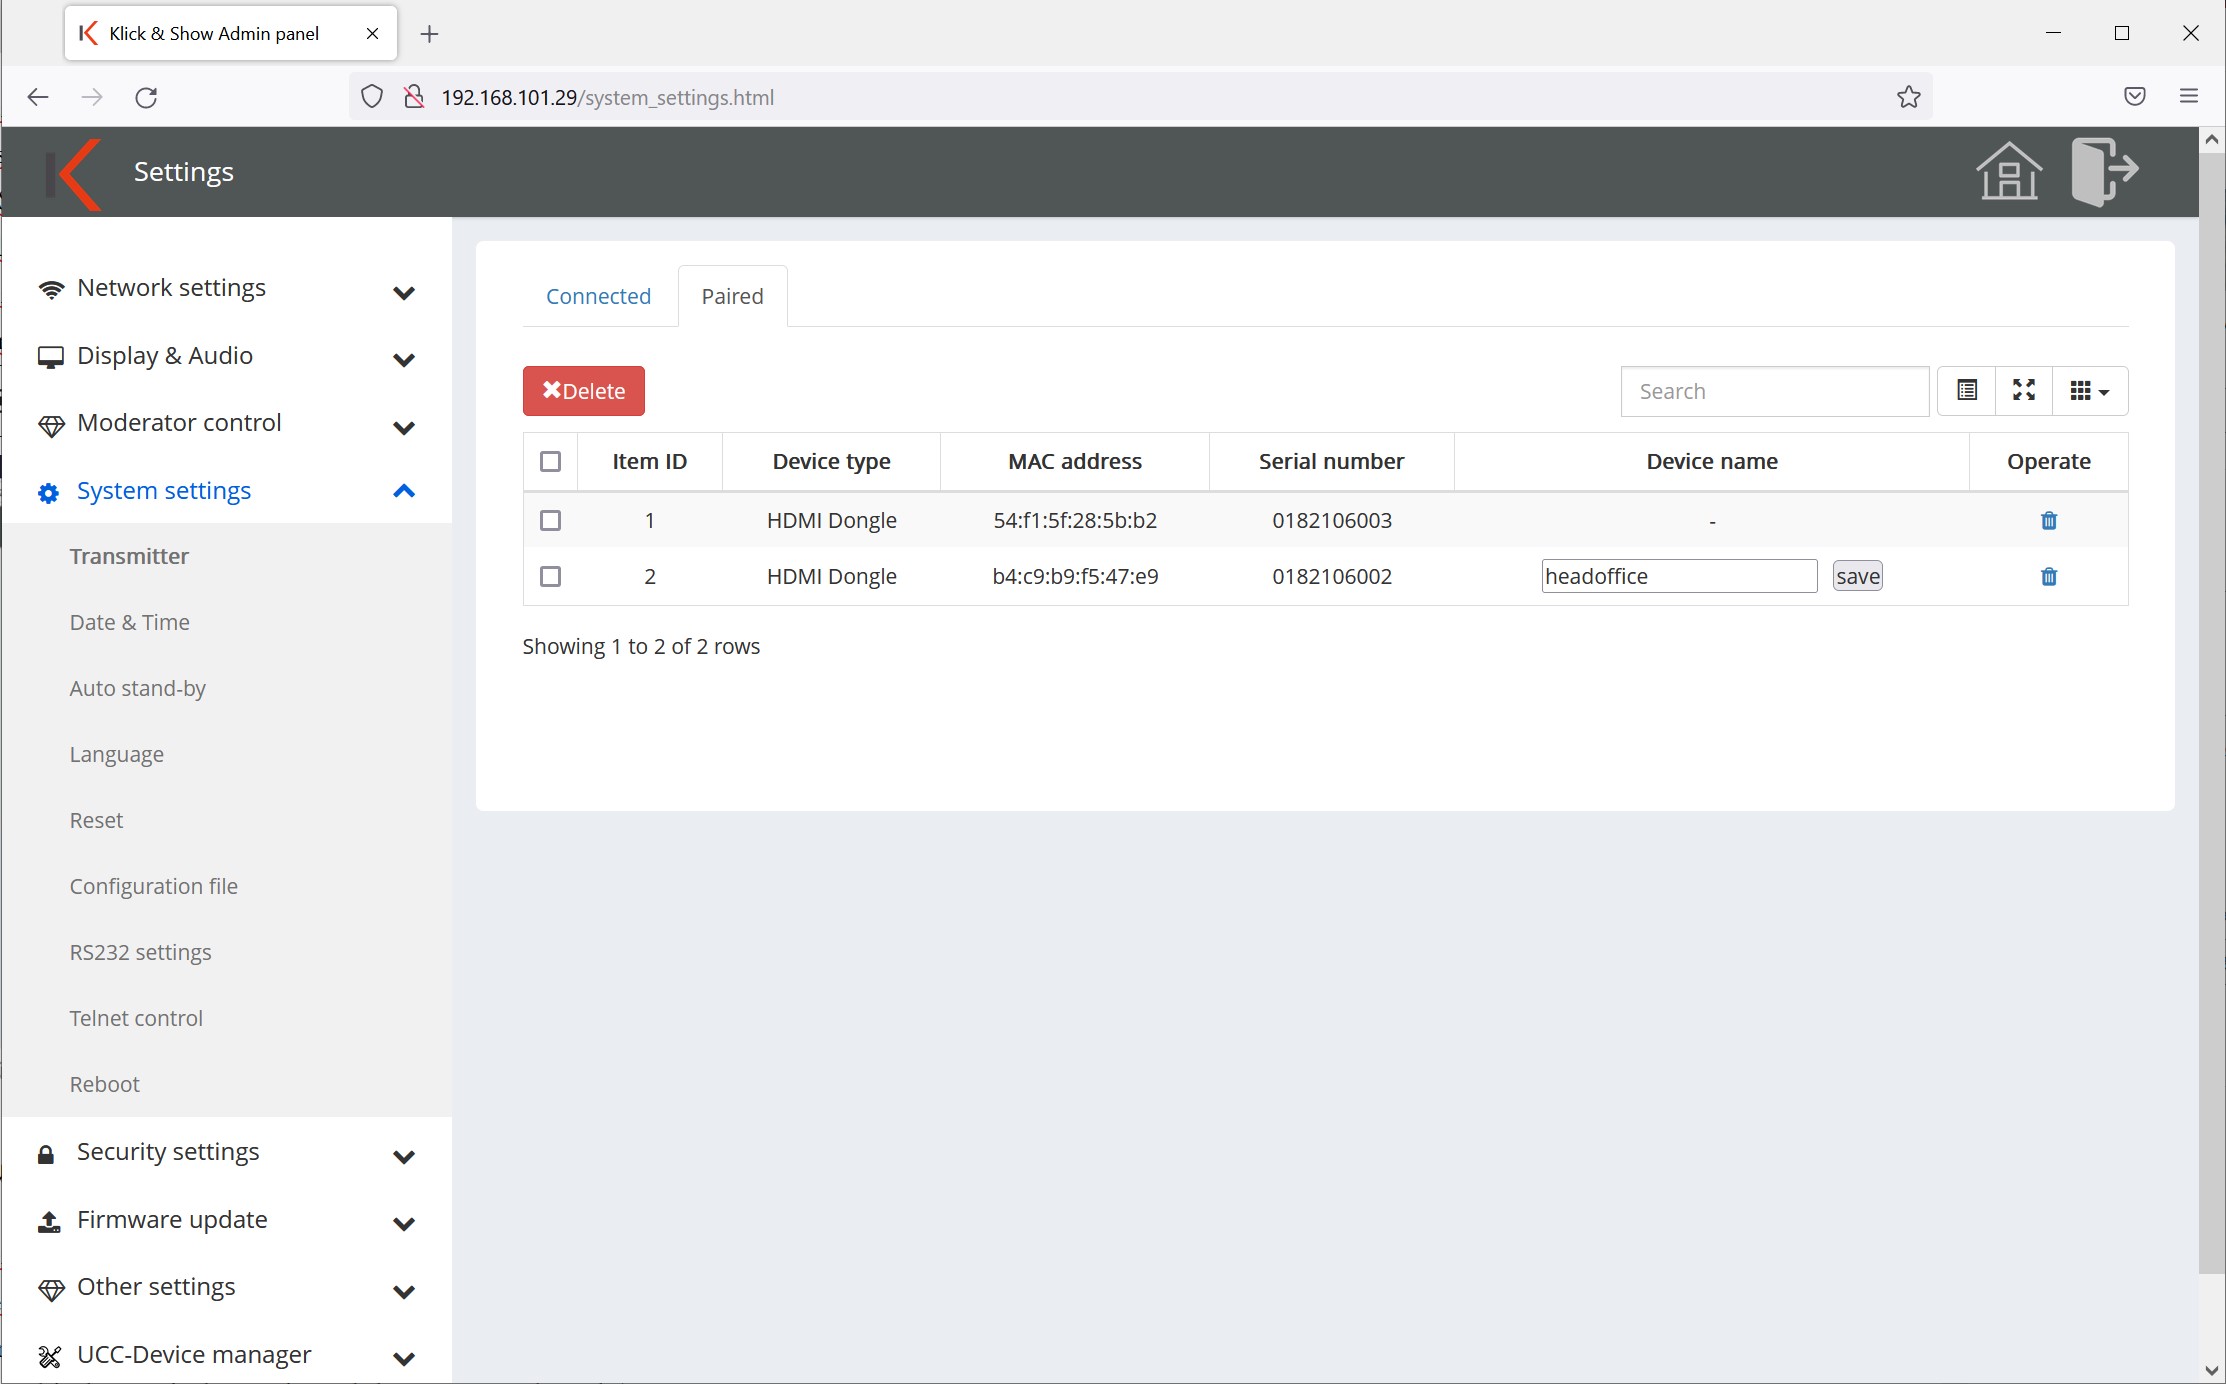
11.4.2 Date and time
Under the "Date & Time" tab, the display format can be selected and the time setting can be automatically obtained from a time server from the Internet or assigned manually (e.B. if there is no connection to the base and the Internet).
Optionally, the default time server on the Internet, e.B. can also be replaced by a local server.
Under the "Time Zone" tab, this can be selected accordingly.

![]() Hint:
Hint:
In the factory setting, the Klick&Show Basic access to a time server, otherwise no time and date information is displayed on the home screen.
11.4.3 Car stand-by
Auto Stand-by offsets the Klick & Show Base automatically enters the power saving mode if there is no connection or use of the device within the selected time.
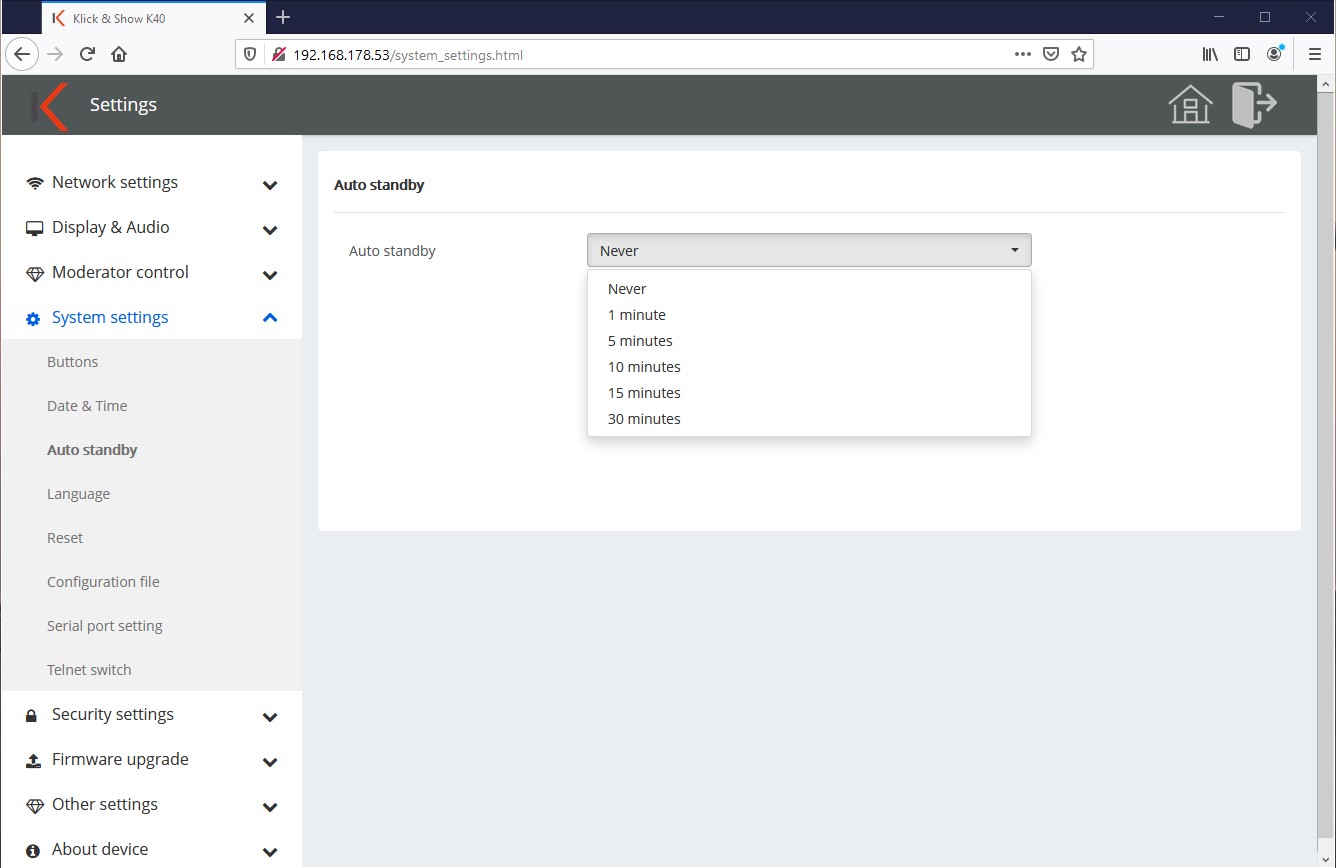
In stand-by, the LED ring of the base flashes and the HDMI output is switched off. However, the network connection remains active. As soon as a device with the Klick & Show is connected, the power saving mode is terminated.
Pressing the POWER button on the front of the device or entering it on the connected touch screen also ends the energy-saving mode.
11.4.4 Language
You can select the desired language of the Klick&Show Select home screens and the WebUI (administration) independently of each other.

11.4.5 Resetting
With the "Confirm settings" button and the confirmation of the security prompt again, the device is reset to the factory settings. Alternatively, you can use the Klick&Show also reset via the reset button on the back of the device.
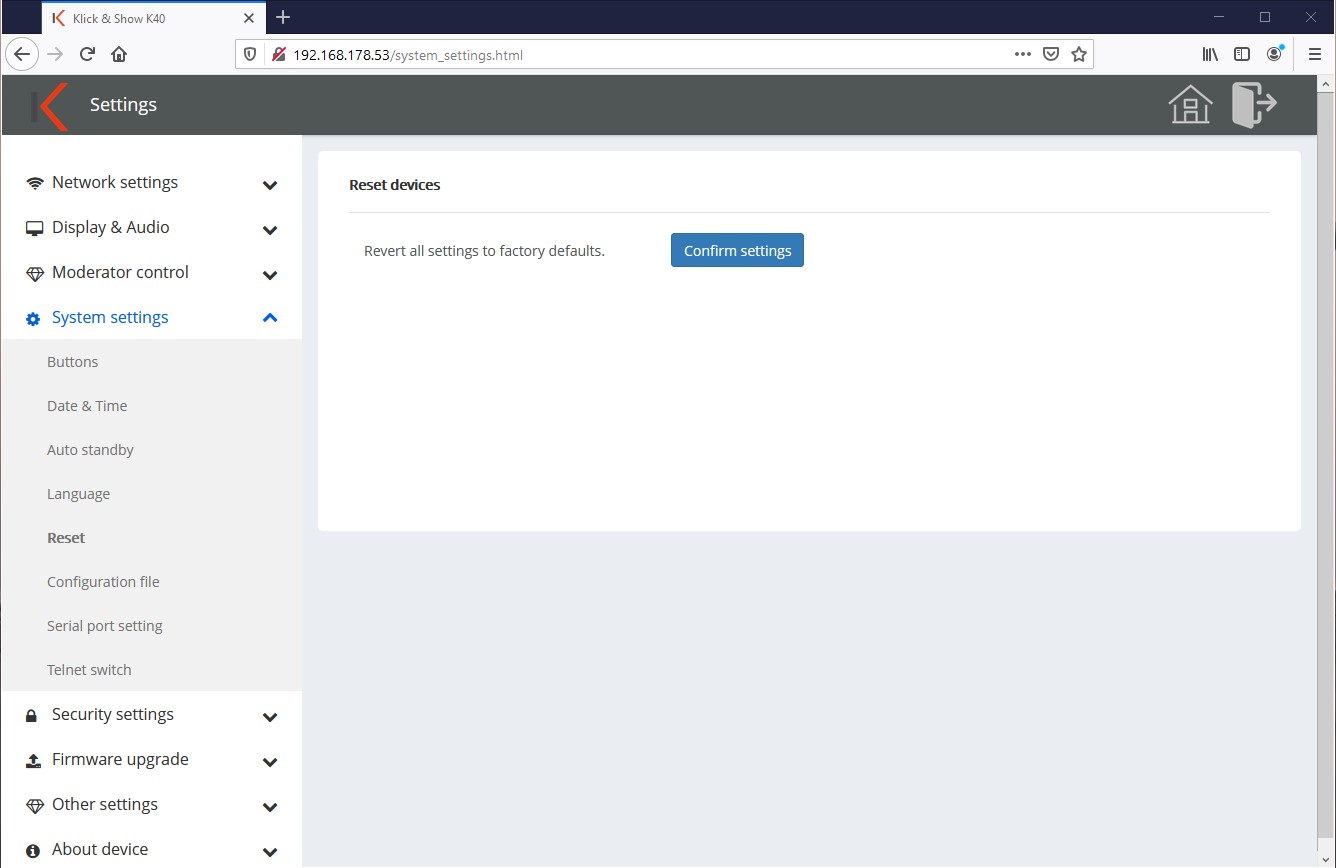
11.4.6 Save/install configuration
Under the Download Configuration File tab, you can save the current system configurations as a local config .dat.
Under the tab "Upload configuration file" you can then upload it again (e.B. after a reset) or to another Klick & Show so that the configuration effort is minimized.
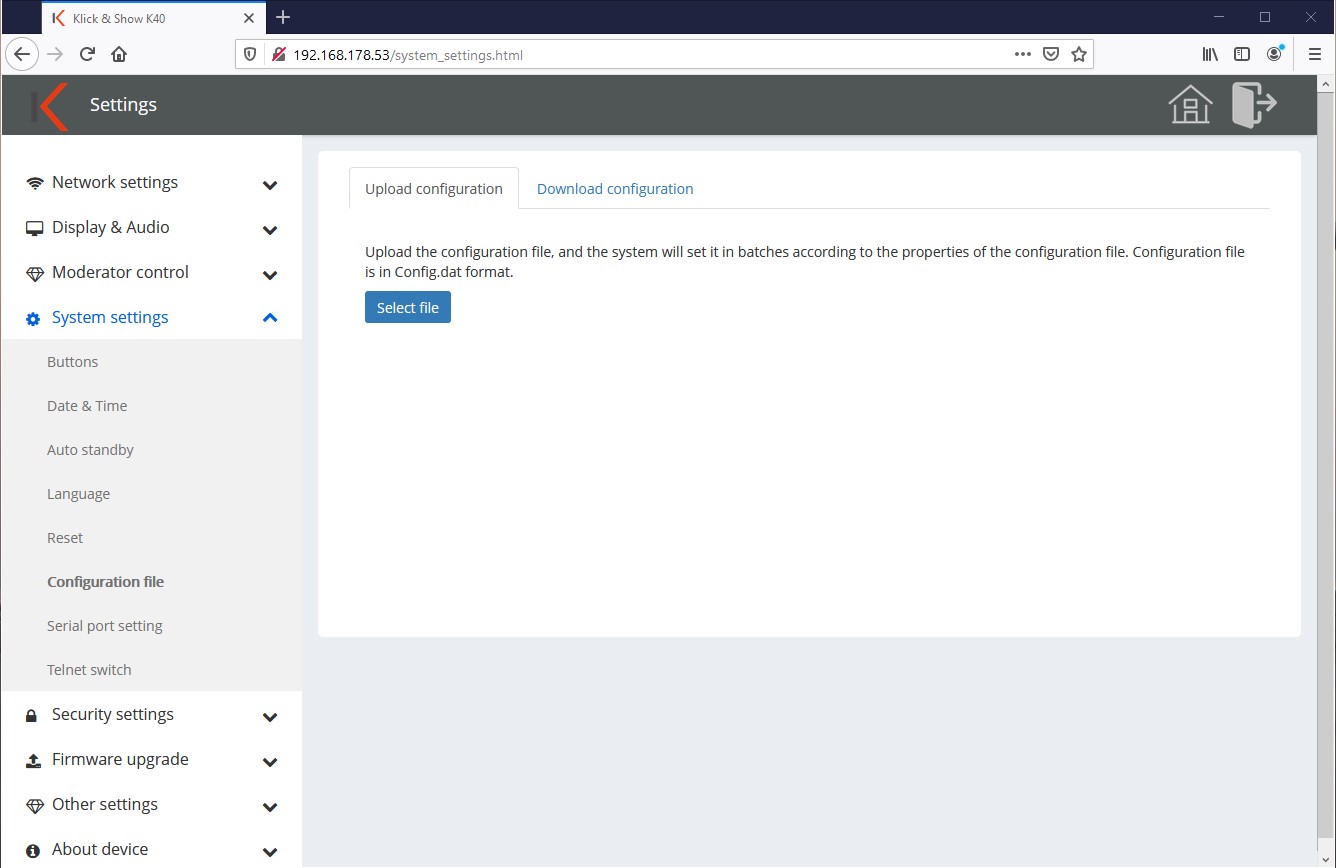
11.4.7 Serial interface (RS232)
The RS232 interface can be activated or deactivated in this menu. Via RS232, the Klick&Show base, e.g. can be remotely controlled by a media controller. Alternatively, the interface can also be used to control other devices.
Remote control of the Klick&Show Base via RS232:
To do this, configure the serial port function to "Klick&Show Taxes ". The control commands are identical to the Telnet commands.
You can take over the other settings (baud rate, etc.) or adapt them to the capabilities of the media control.

Remote control of external devices via RS232 by Klick&Show:
To do this, set the serial port function to "Klick&Show controls" and adapt the communication parameters to the technical requirements specified by the device to be controlled.
These can usually be found in the manual as a preliminary remark to the RS232 commands.
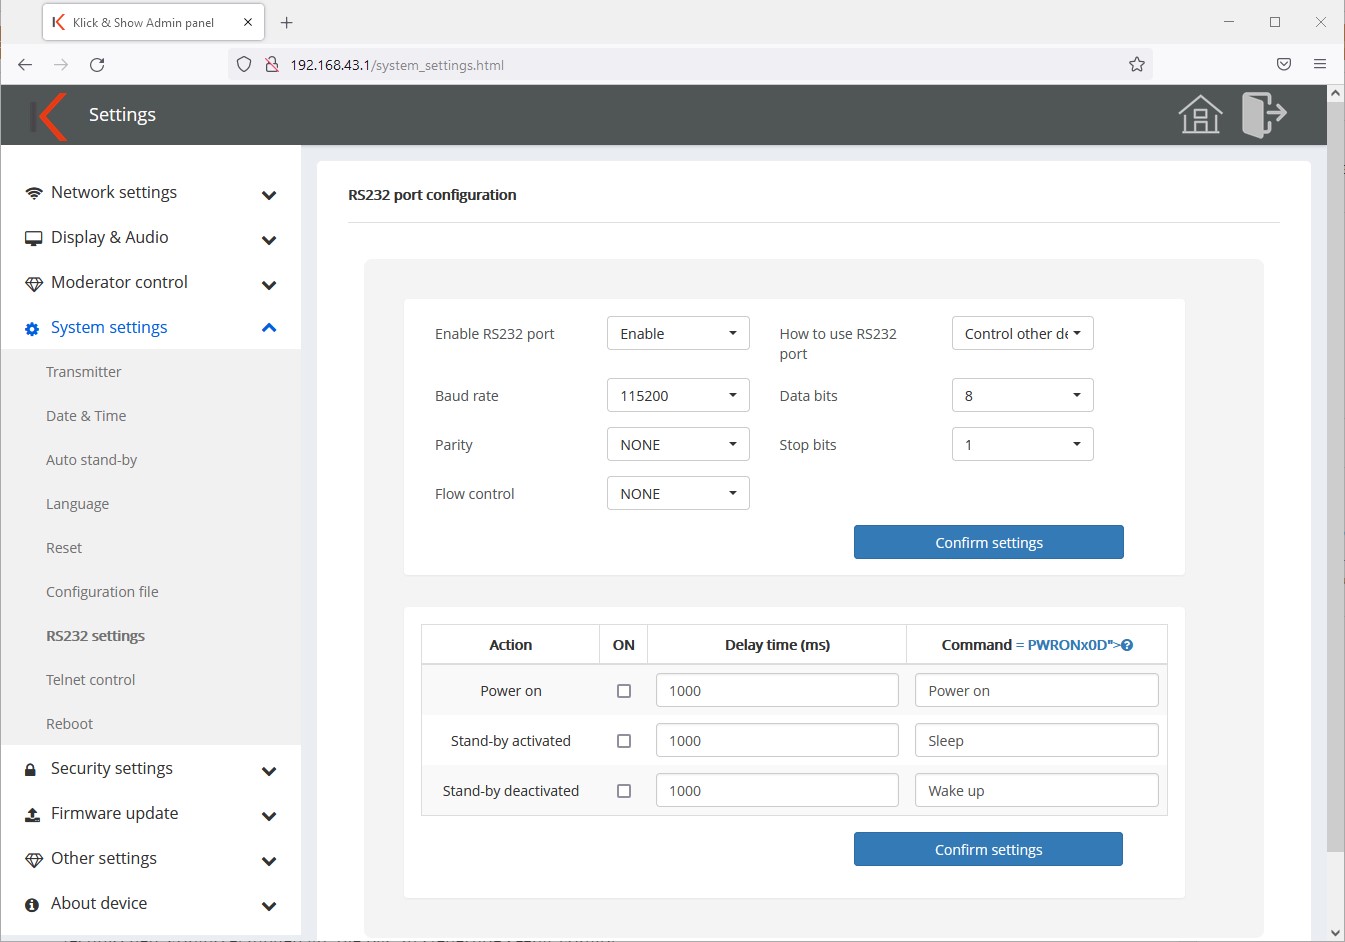
Commands can be stored for the following functions:
- Turn on
(as soon as the power supply of Klick&Show was manufactured) - Going to sleep (If Klick&Show goes into stand-by)
- Waking up (When Klick&Show ended stand-by)
The delay can be entered separately.
With ON/OFF, the stored command can be set active or inactive. The commands must be entered in ASCII.
11.4.8 Taxes with Telnet
Here the control can be activated or deactivated via Telnet.
The control commands can be found here.
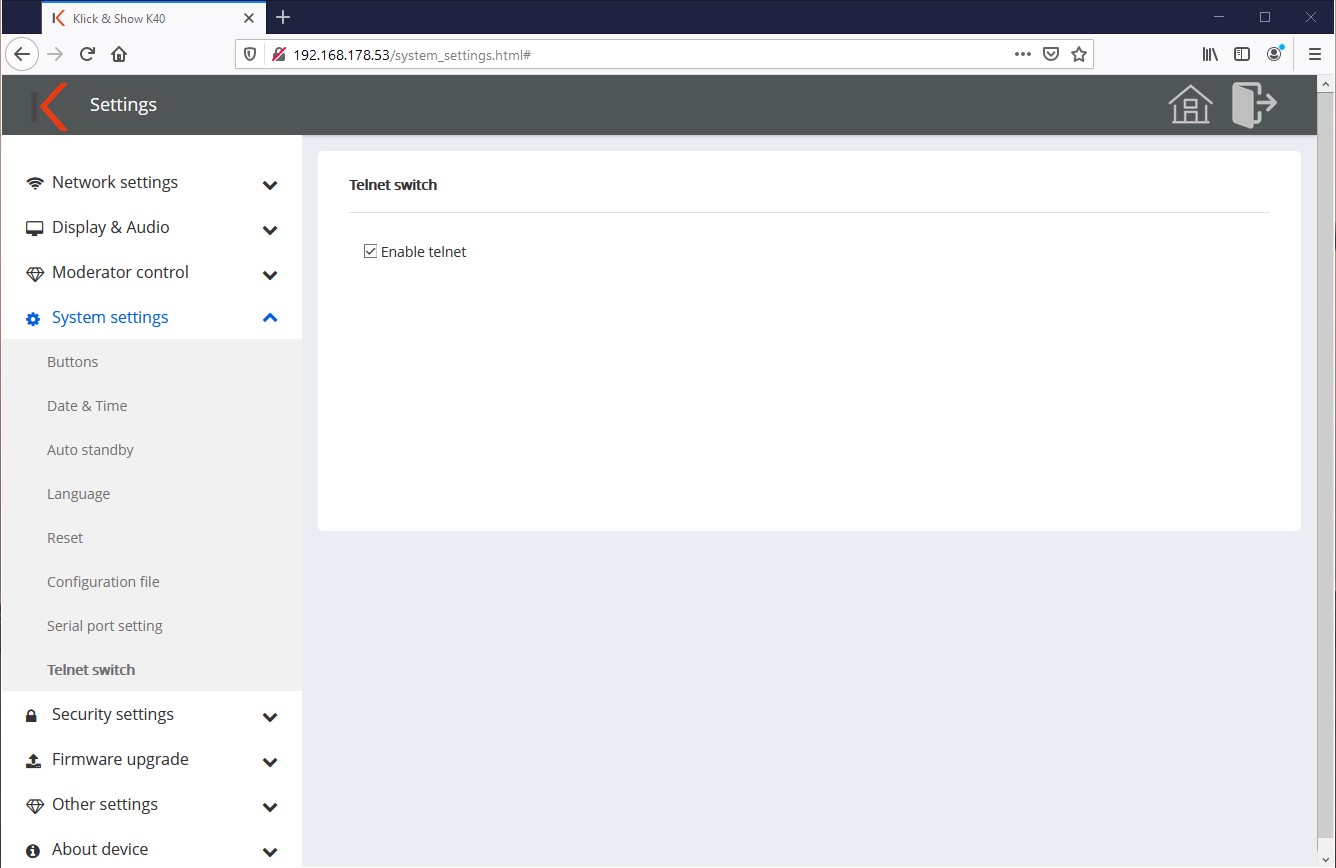
11.4.9 Restarting
Here, a restart of the Klick&Show Basis can be initiated directly or automated on certain days of the week at a predefined time.
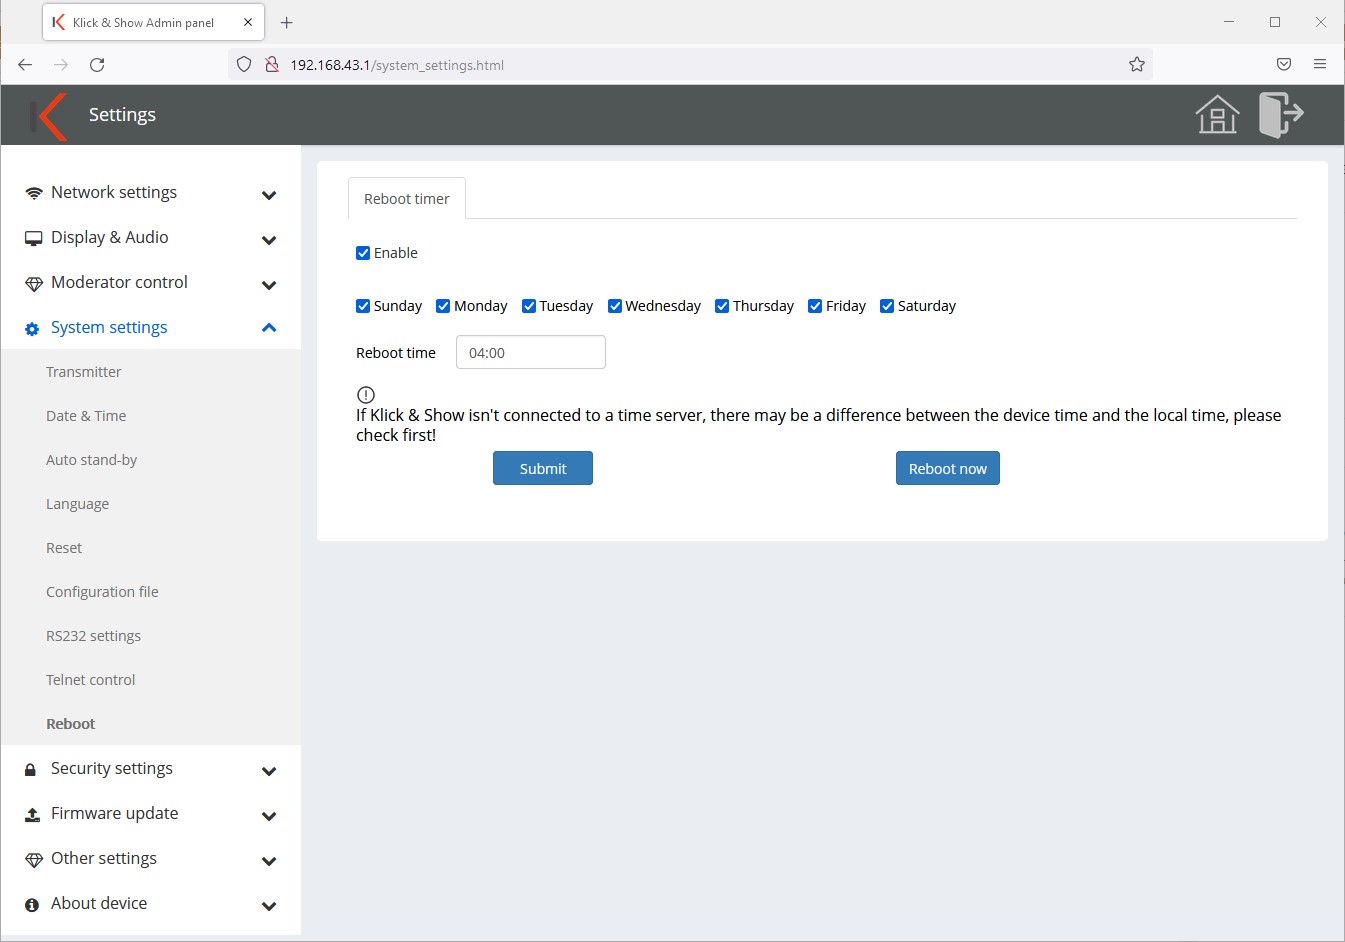
11.5 Security settings
11.5.1 Security levels
You can set four different levels of security for the Klick&Show choose. Security levels 1 to 3 are predefined and cannot be changed. The "Custom" security level allows you to select the individual security features individually according to your needs. The first two security features are enabled at each level and cannot be disabled. In the factory settings, security level 2 is activated.
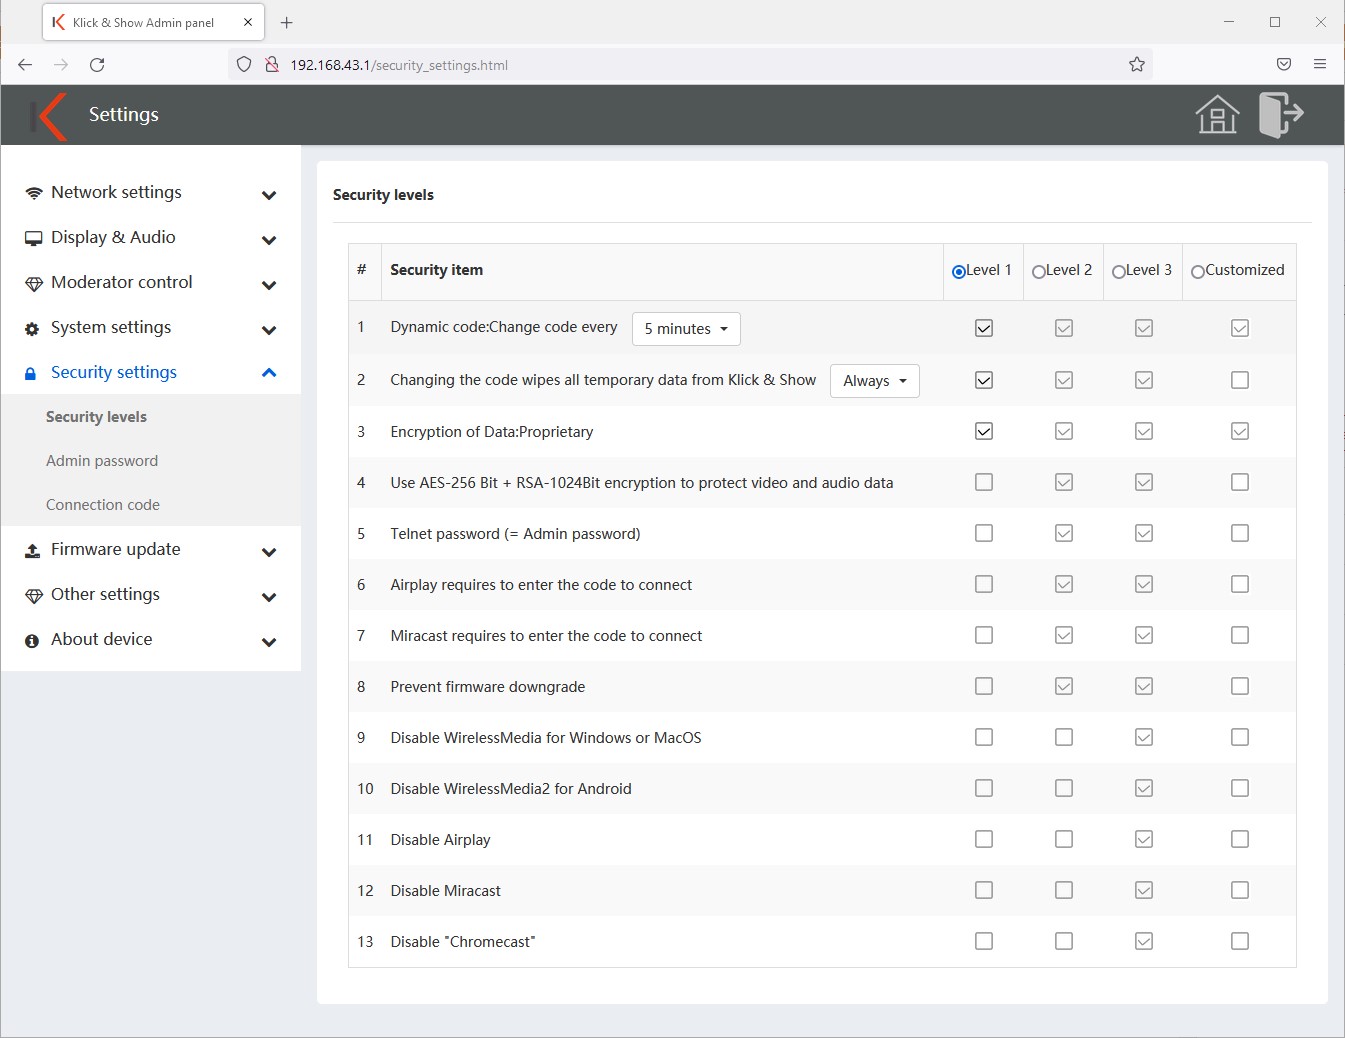
Change code/WLAN password automatically
The code secures the use of Klick & Show against unauthorized use. Depending on the network configuration, this is also the WLAN password (in Access Point Mode) or only serves to protect against interference by outsiders, e.B. accidental connection.
Changing the code regularly prevents a previous user from still being presenting after leaving the room.
The code remains unchanged as long as a device with the Klick&Show is connected. After the last device disconnects, the set timer expires. Fifteen seconds before expiration, a warning message appears that the code is about to change. The timer can be changed to different times:
- Never (= requires the individual configuration of the security levels)
- 5 / 30 minutes
- 1 / 2 / 4 / 24 hours
![]() hint:
hint:
If you Klick&Show in Access Point Mode and select "Never", you must enter the password .
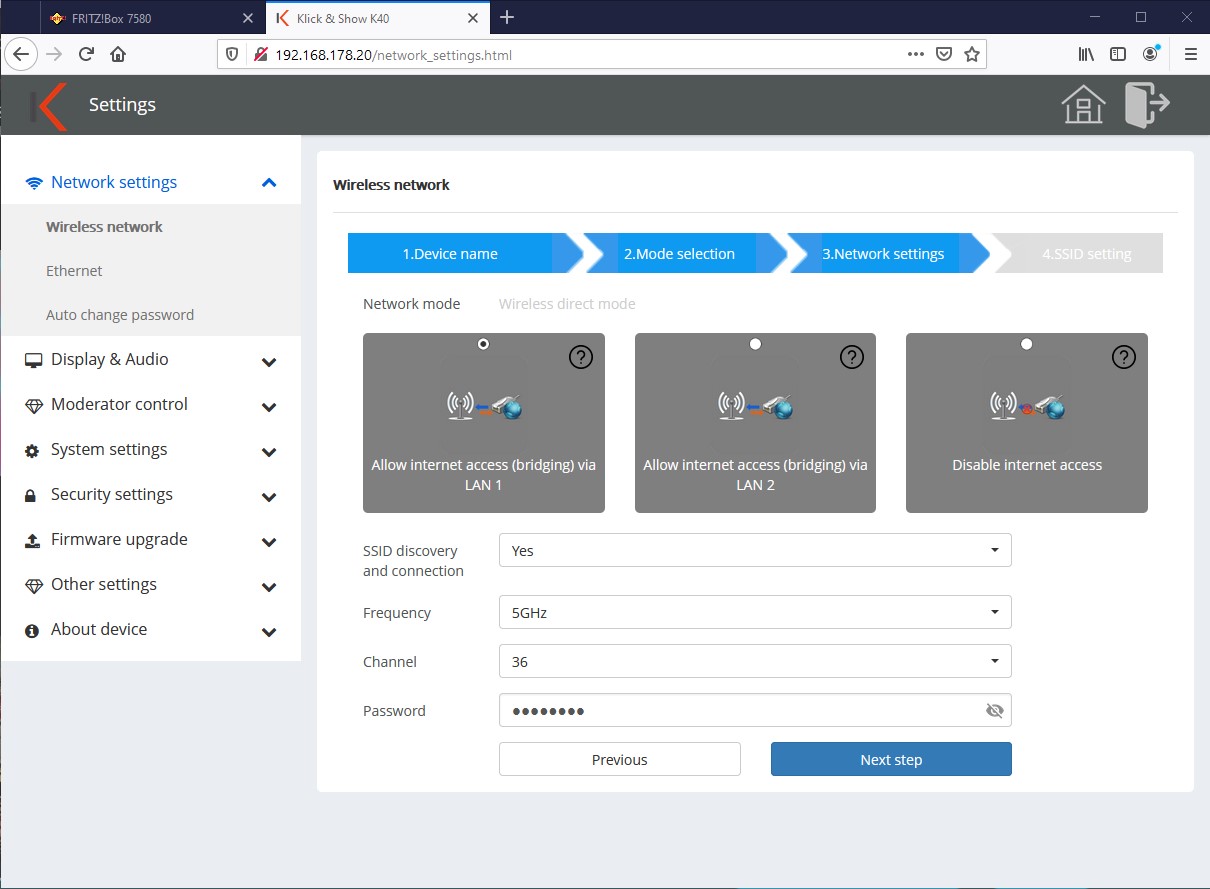
![]() tip:
tip:
If the password timer is not displayed, at least one device is still connected. Mobile devices can also maintain a Wi-Fi connection in the background and prevent automatic password changes and the STANDBY function!
If the code changes, it will only affect all manual Wi-Fi connections. The transmitter must: not be newly paired with the base device.
Password change deletes the temporary memory
The code remains unchanged as long as at least one device is connected to the Klick&Show is connected. After the last device disconnects, the set timer expires. Subsequently, depending on the setting made, the temporary memory of the Klick&Show Base securely erased. The following settings can be made:
- Never (= requires the individual configuration of the security levels)
- User decides (a corresponding window appears on the display, after 100 seconds without input the data is automatically deleted)
- Always
Encryption of data: Proprietary
The user content is already secured with proprietary encryption before the actual wireless transmission to the base device (1st encryption level). In addition, a further level of data encryption takes place during the subsequent wireless communication between transmitters or software client for Klick&Show Based on WPA2 (2nd level of encryption).
Encrypt video/audio data with AES-256 bit + RSA-1024 bit (screen sharing)
The user content is secured with a particularly secure AES-256 bit + RSA-1024 bit encryption (1st encryption level) even before the actual wireless transmission to the base device. In addition, a further level of data encryption takes place during the subsequent wireless communication between transmitters or software client for Klick&Show Basis by means of WPA2 (2nd encryption level).
11.5.2 Login password
The password protects access to the administration menu.
The default password in the delivery state and after a reset is "admin".
Please change the password to a secure one during commissioning.
However, you can also disable password prompting for the administrator menu. To do this, tick "Disable password request".
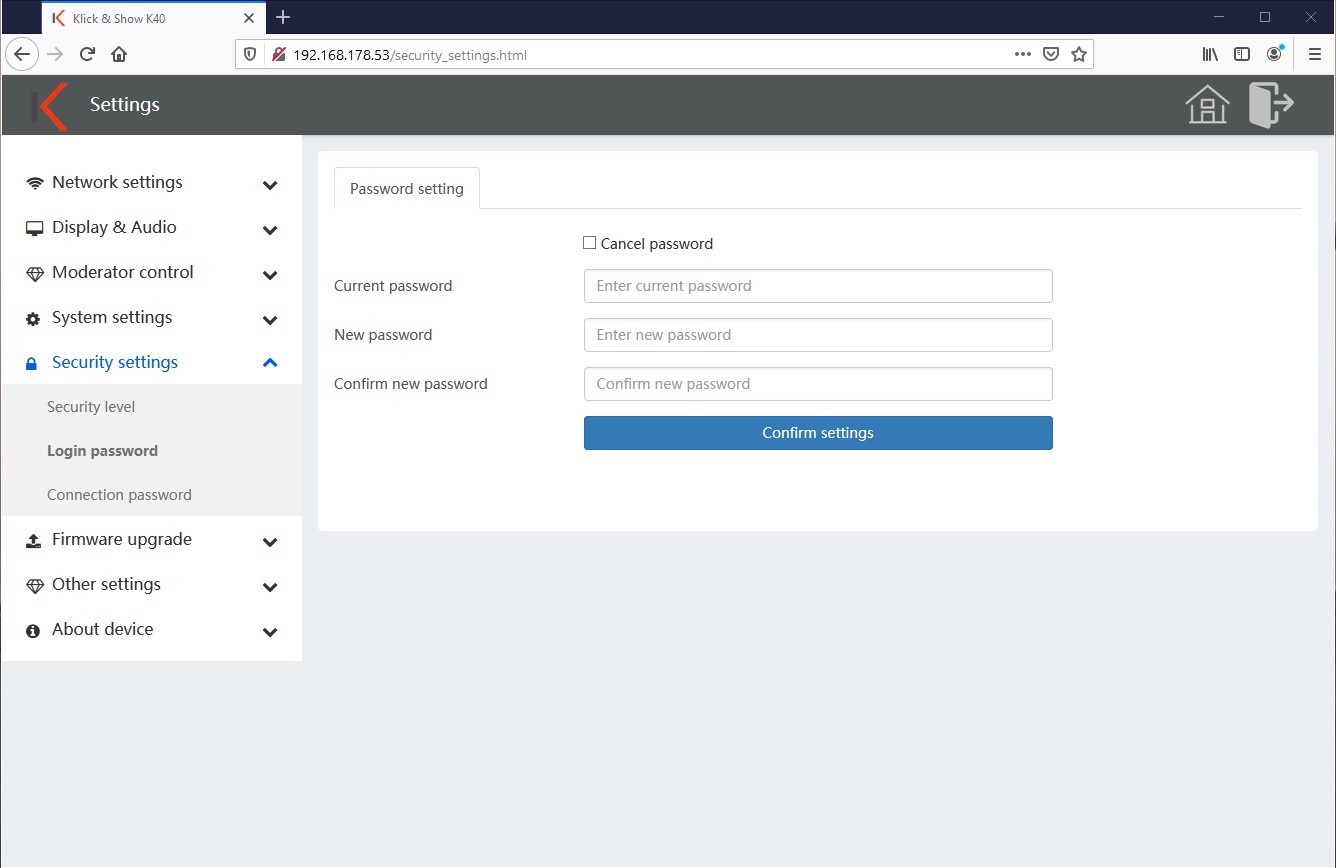
11.5.3 Connection password
Define whether the code should be 4-digit (with four leading zeros) or 8-digit.
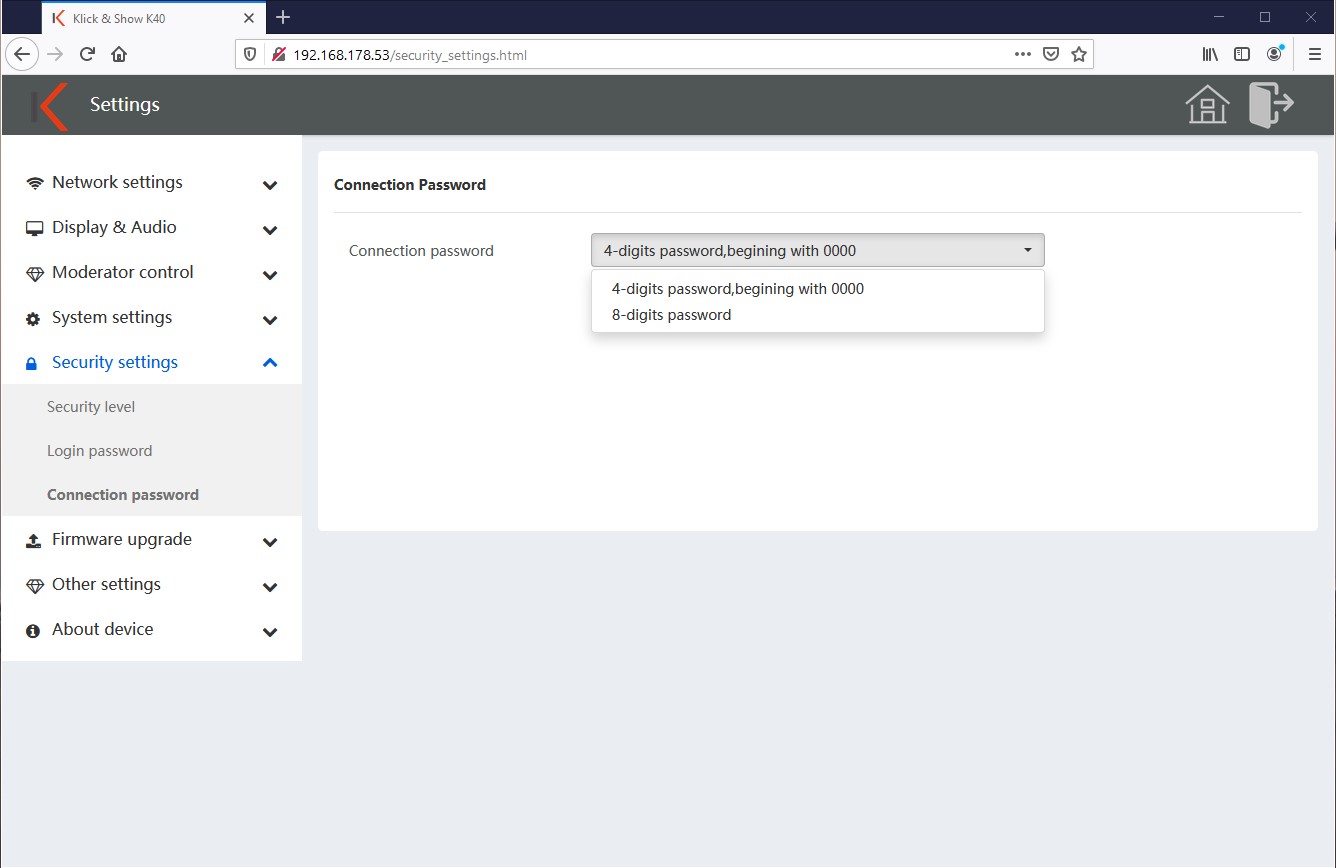
11.6 Firmware Update
11.6.1 Update firmware manually
Download the latest firmware from http://www.klickandshow.com :
Unzip and save the "update.img" file on your computer. Via "Select firmware" in the WebUI you can search for and select the file on your computer. Start the update process by pressing the "Start Upload" button.
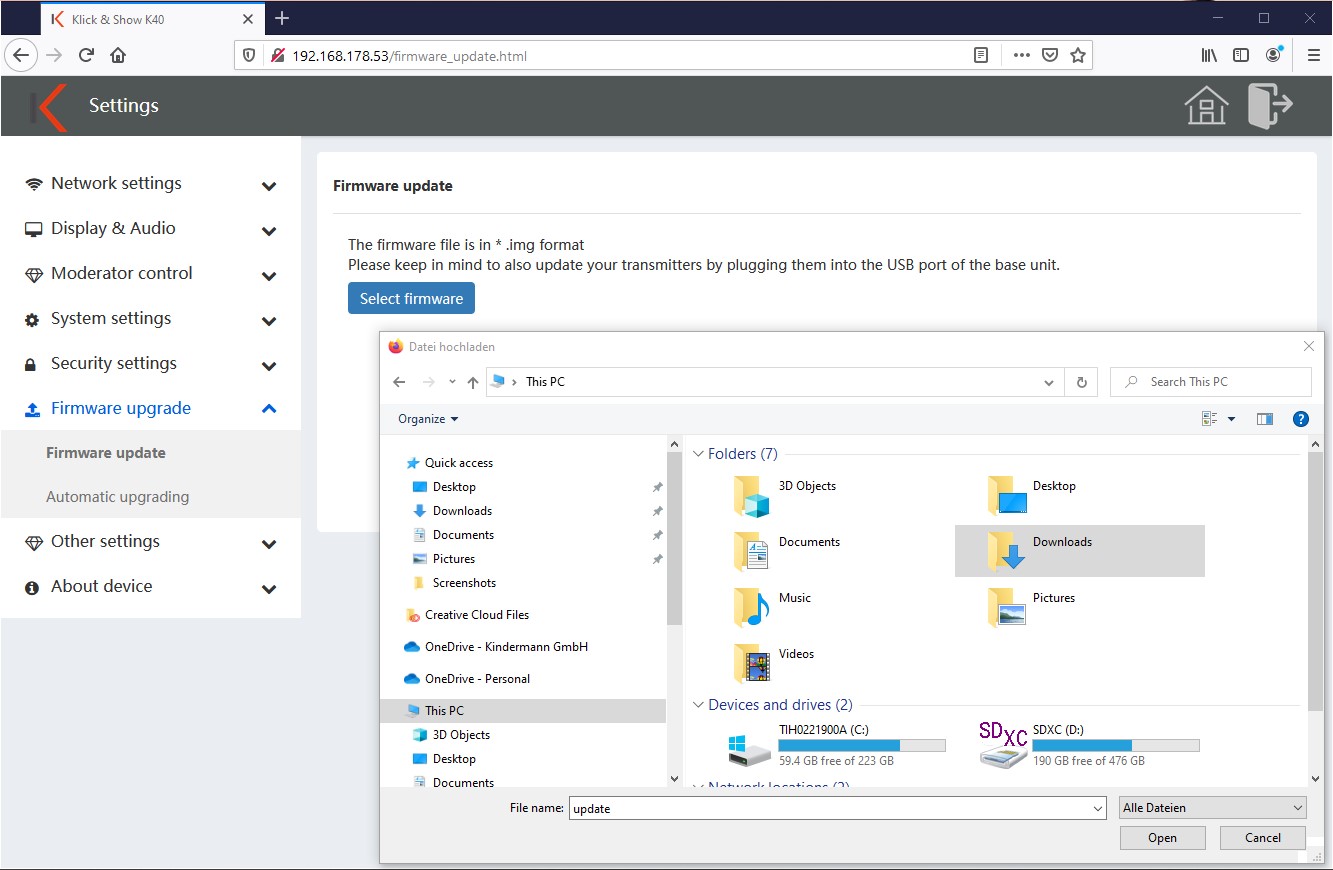
![]() Attention:
Attention:
Wduring the update, the device must not be switched off or disconnected from power. There is a risk that your device will become unusable.
The progress of the update is displayed in the browser.

That Klick&Show Base unit automatically reboots and shows the update status on the connected display.
After the restart, the update process is complete and Klick&Show displays the home screen again in the usual way.
![]() hint:
hint:
Please remember to also update the transmitter and client software after an update by connecting to one of the USB ports on the base unit.
11.6.2 Updating Firmware Manually (USB)
Download the latest firmware as described in chapter 11.6.1.
Unzip and save the "update.img" file on your computer. Copy the file to the root directory of a FAT/FAT32 formatted USB drive.
Connect the USB drive to a USB port of the base. The update process starts automatically after a few seconds.
That Klick&Show Base unit automatically reboots and shows the update status on the connected display.
After the restart, the update process is complete and Klick&Show displays the home screen again in the usual way.
11.6.3 Automatically Update Firmware (OTA)
Alternatively, you can also have the firmware update carried out automatically via OTA (Over the Air). To do this, the Klick&Show be able to communicate with the update server on the Internet. The base checks daily between 00:00 and 7:00 a.m. whether an update is available, which is then downloaded and installed independently.
Of course, you can also trigger the search for an update manually. The update server is located in Germany.
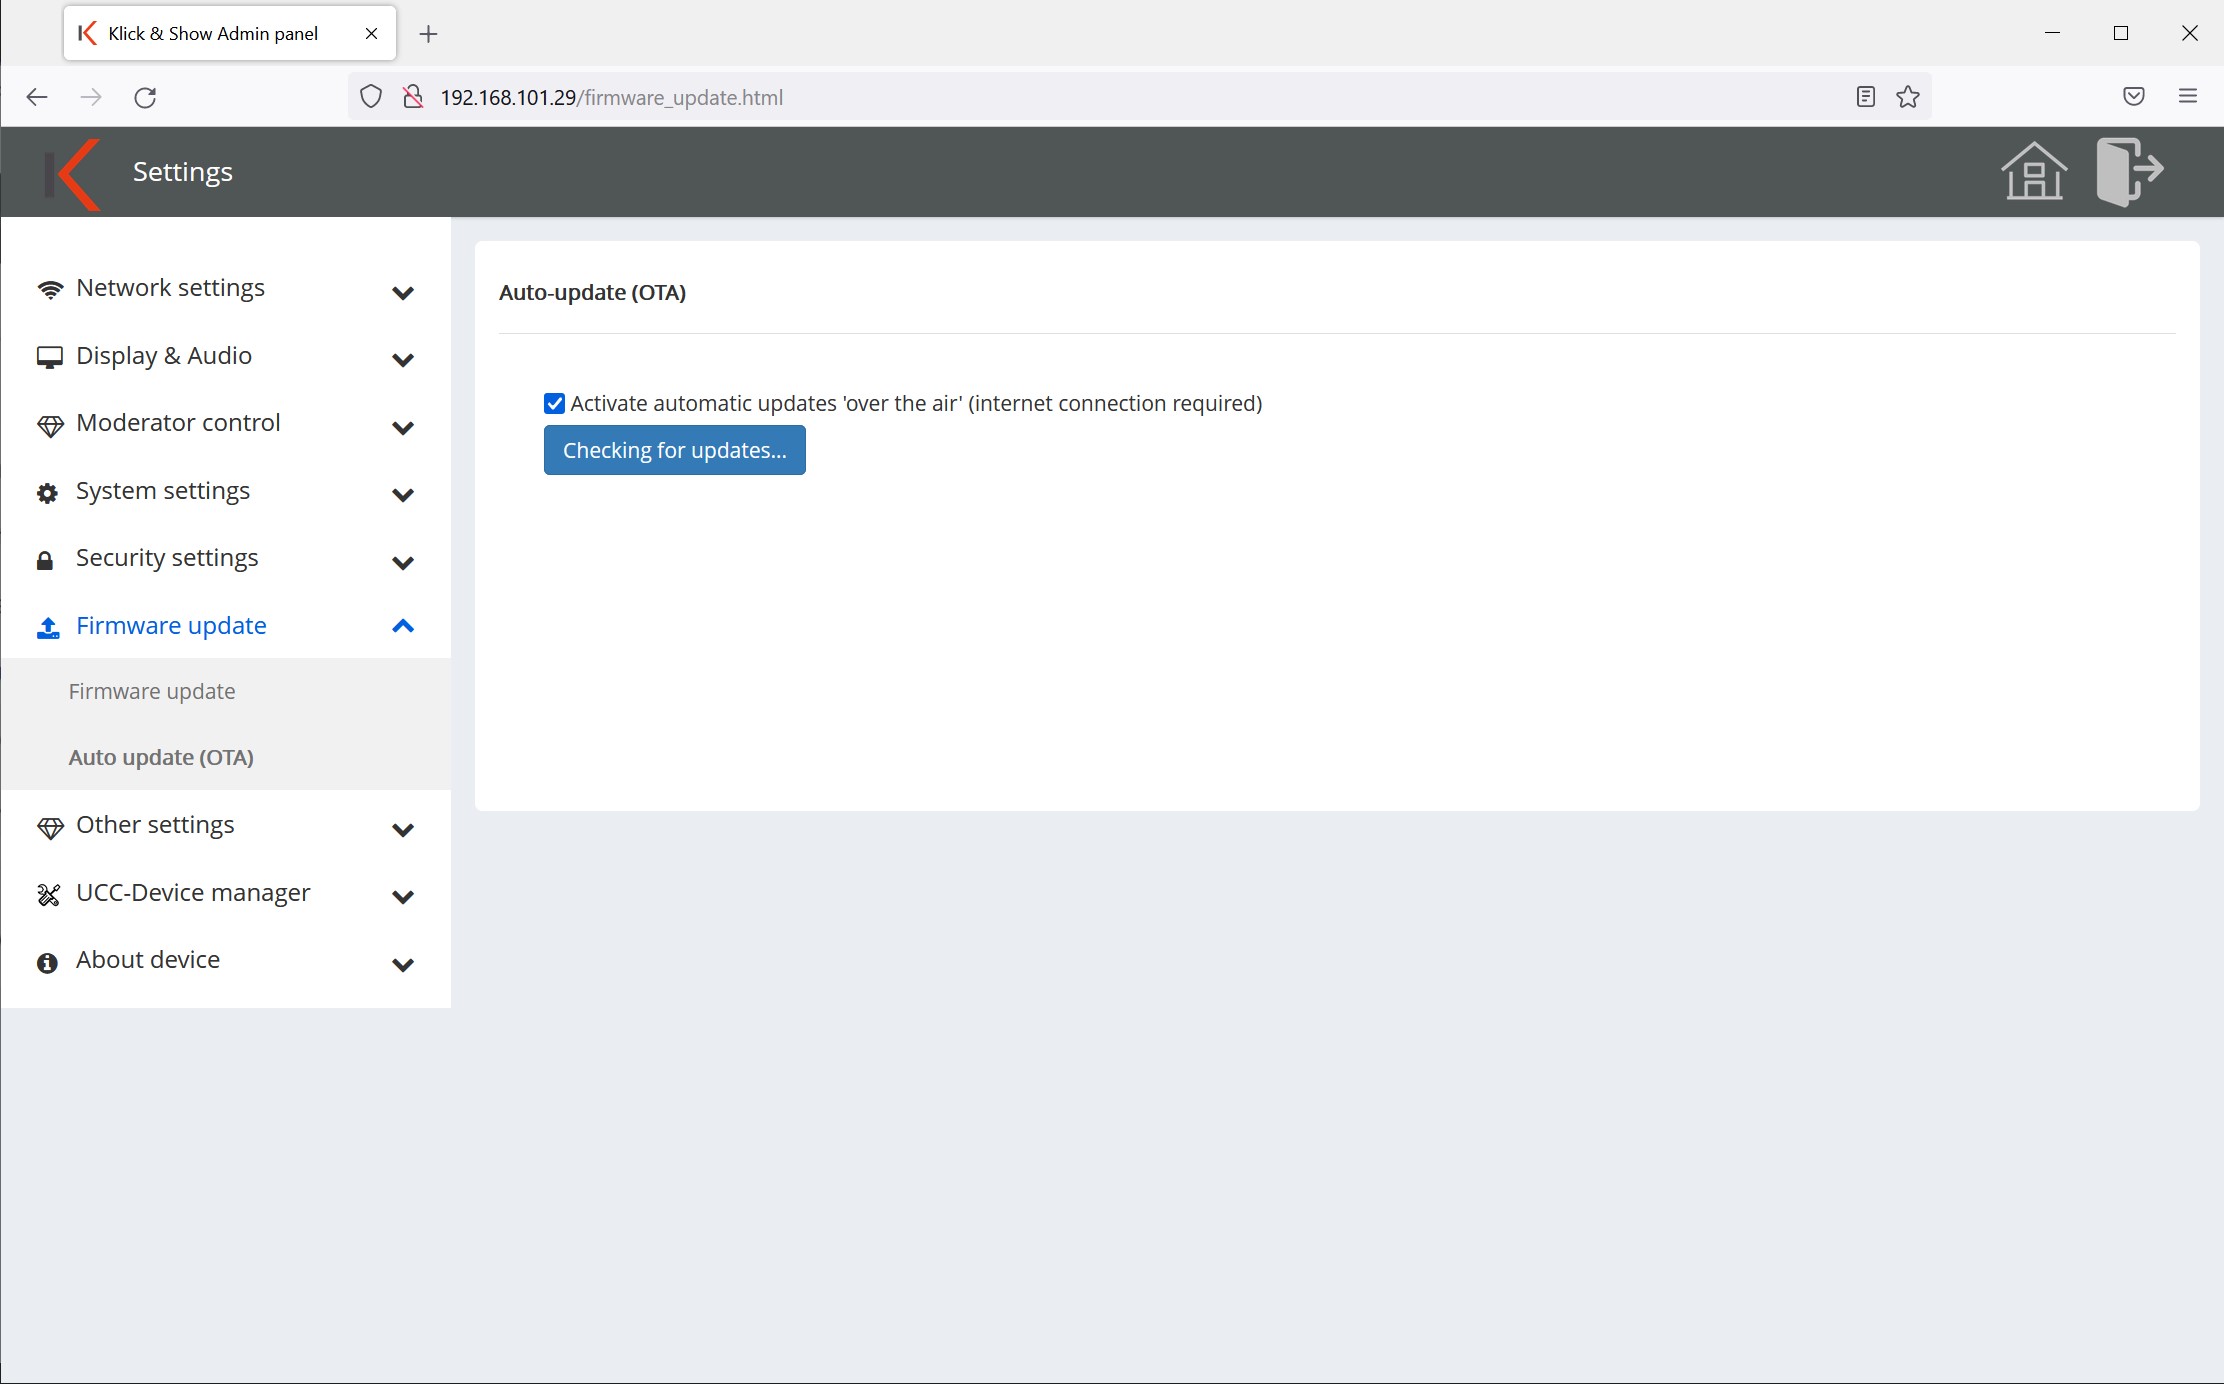
![]() hint:
hint:
Please remember to update the transmitters and the client software after an update.
11.7 Other settings
11.7.1 Create the startup program automatically
When this feature is enabled, it will automatically upload to each USB disk that is included in the Klick&Show base is plugged in, which copies WirelessMedia Clients.
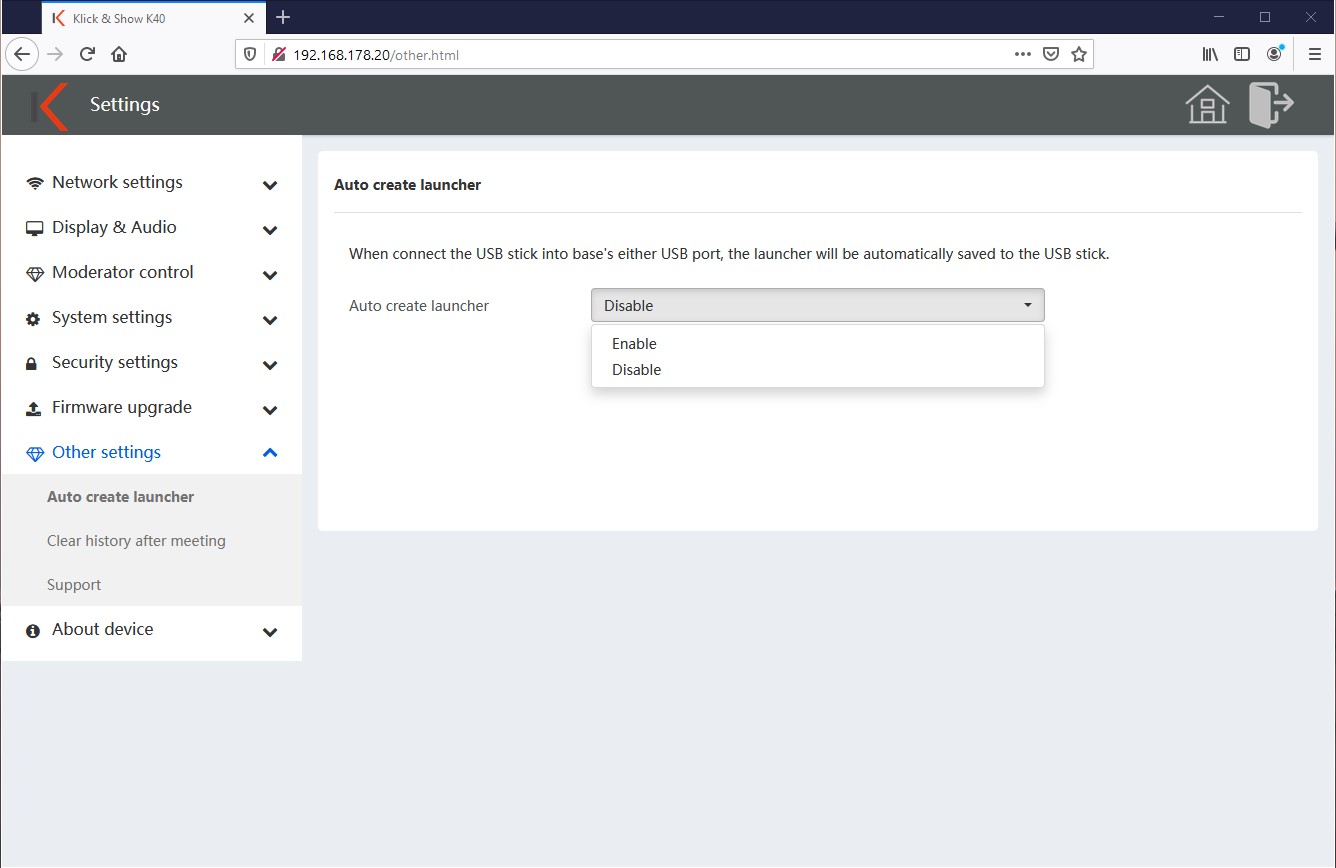
The following message is then displayed on the display:
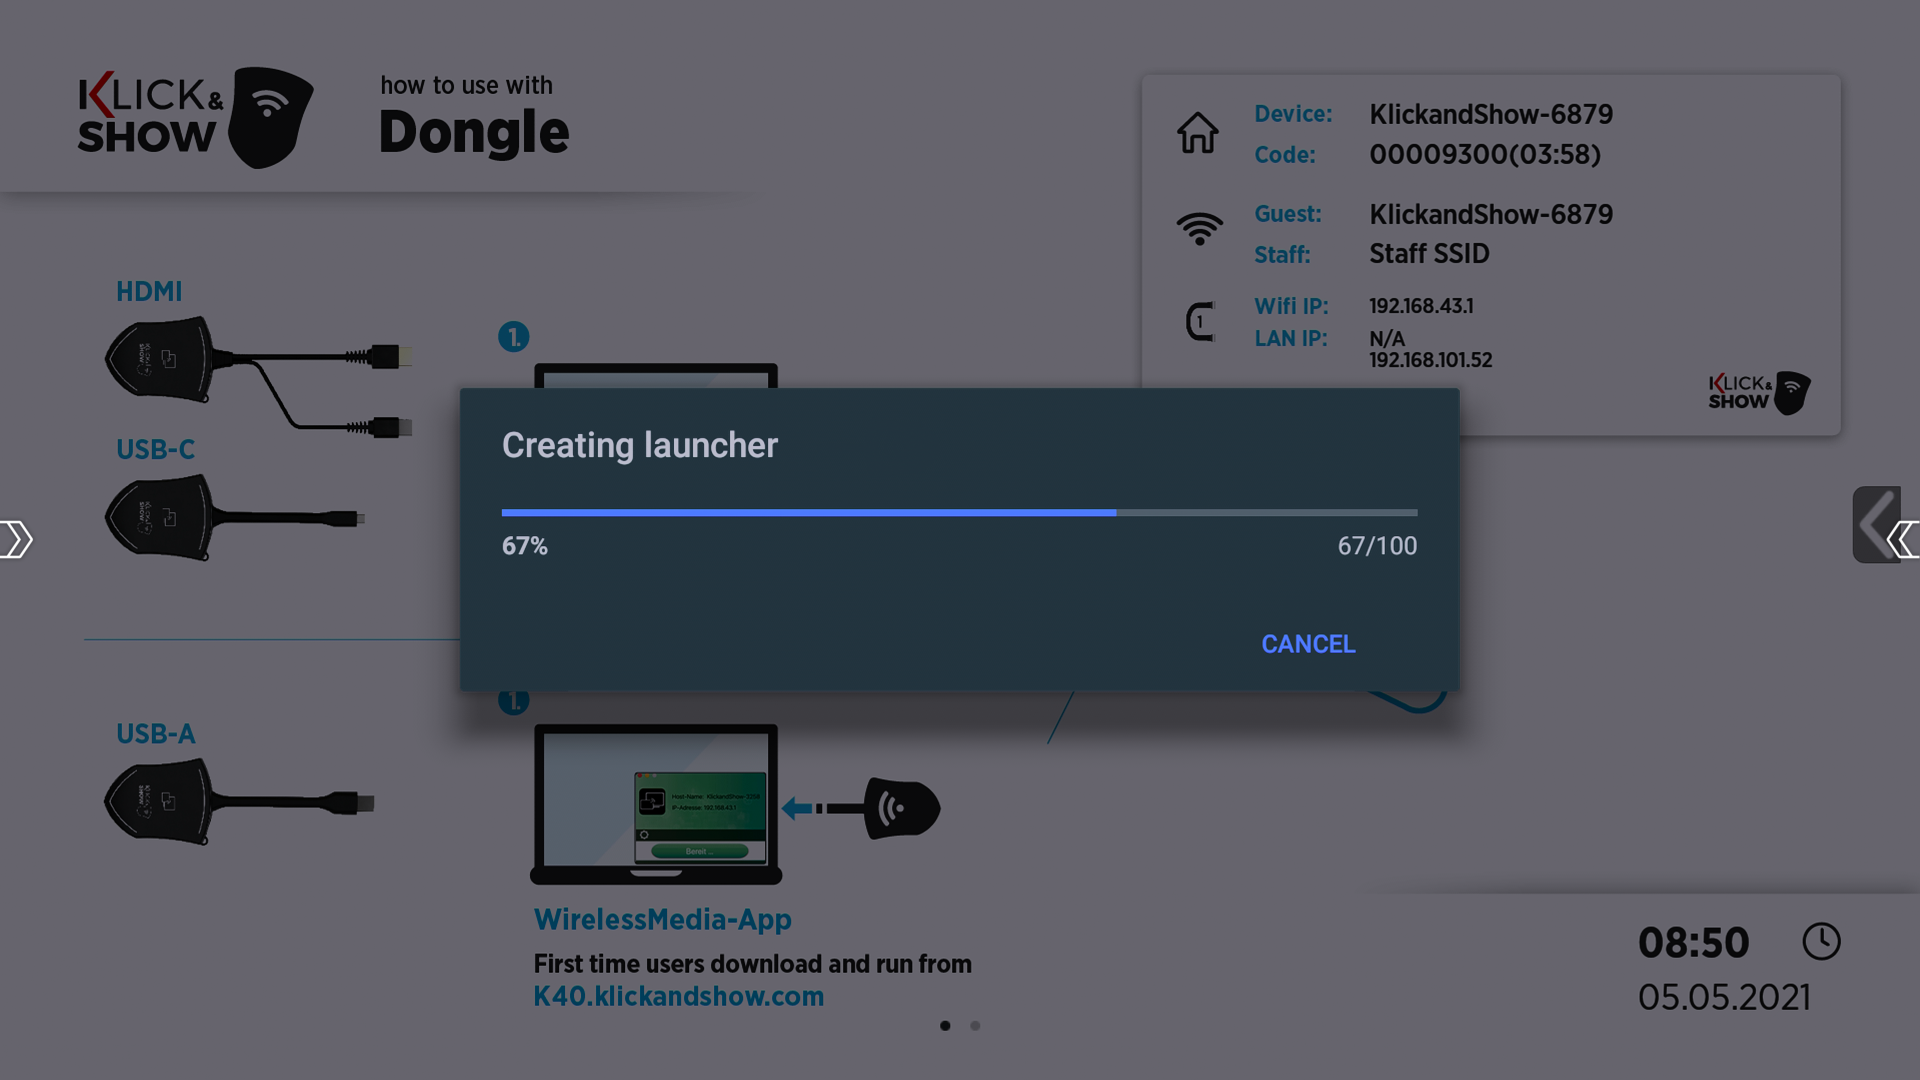
In the end, you can unplug the USB disk.
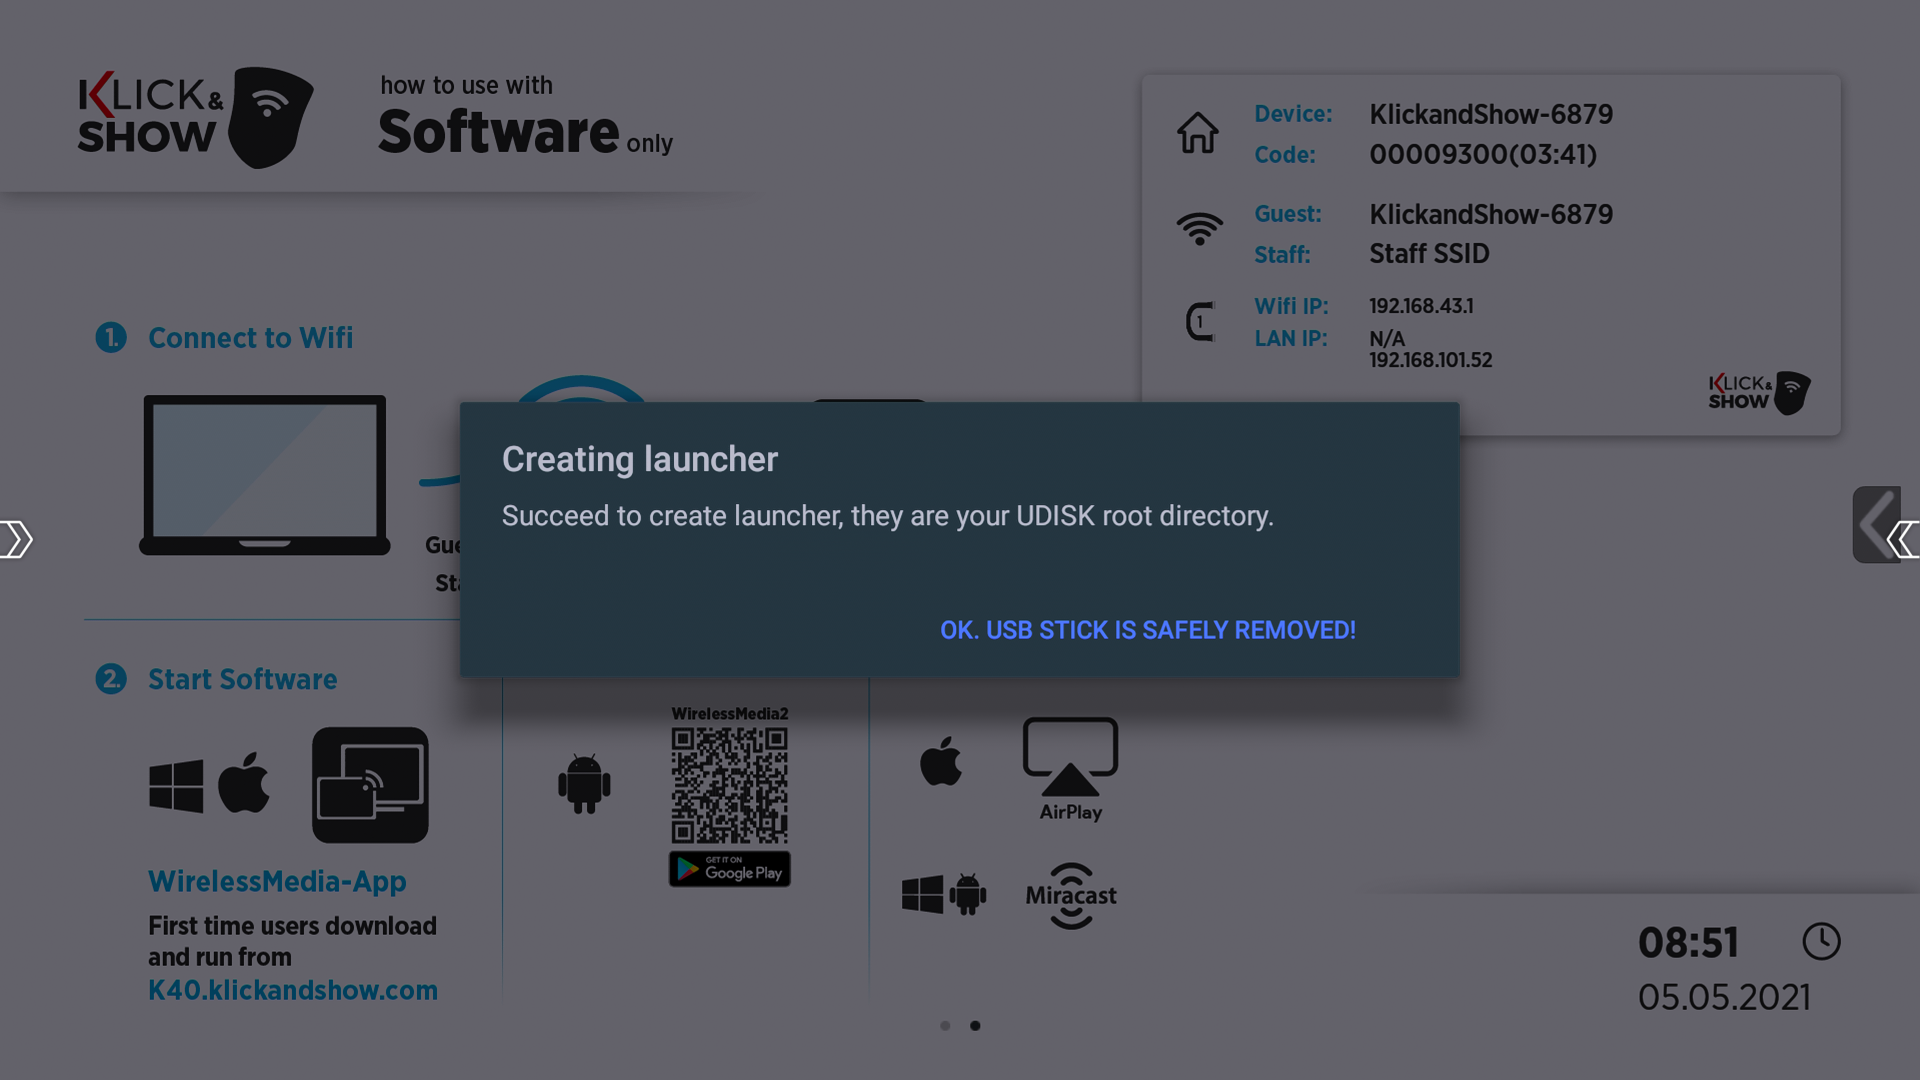
11.7.2 Support
At this point, the e-mail address and telephone number of your in-house helpdesk or a service provider can be entered.
This information is then displayed on the home page .
In the factory setting, the support information of Kindermann registered.

11.8 UCC Device Manager (K-FX)
11.8.1 USB Camera (K-FX)

The function of the connected USB camera can be checked via the USB Camera menu.
11.8.2 USB Audio (K-FX)
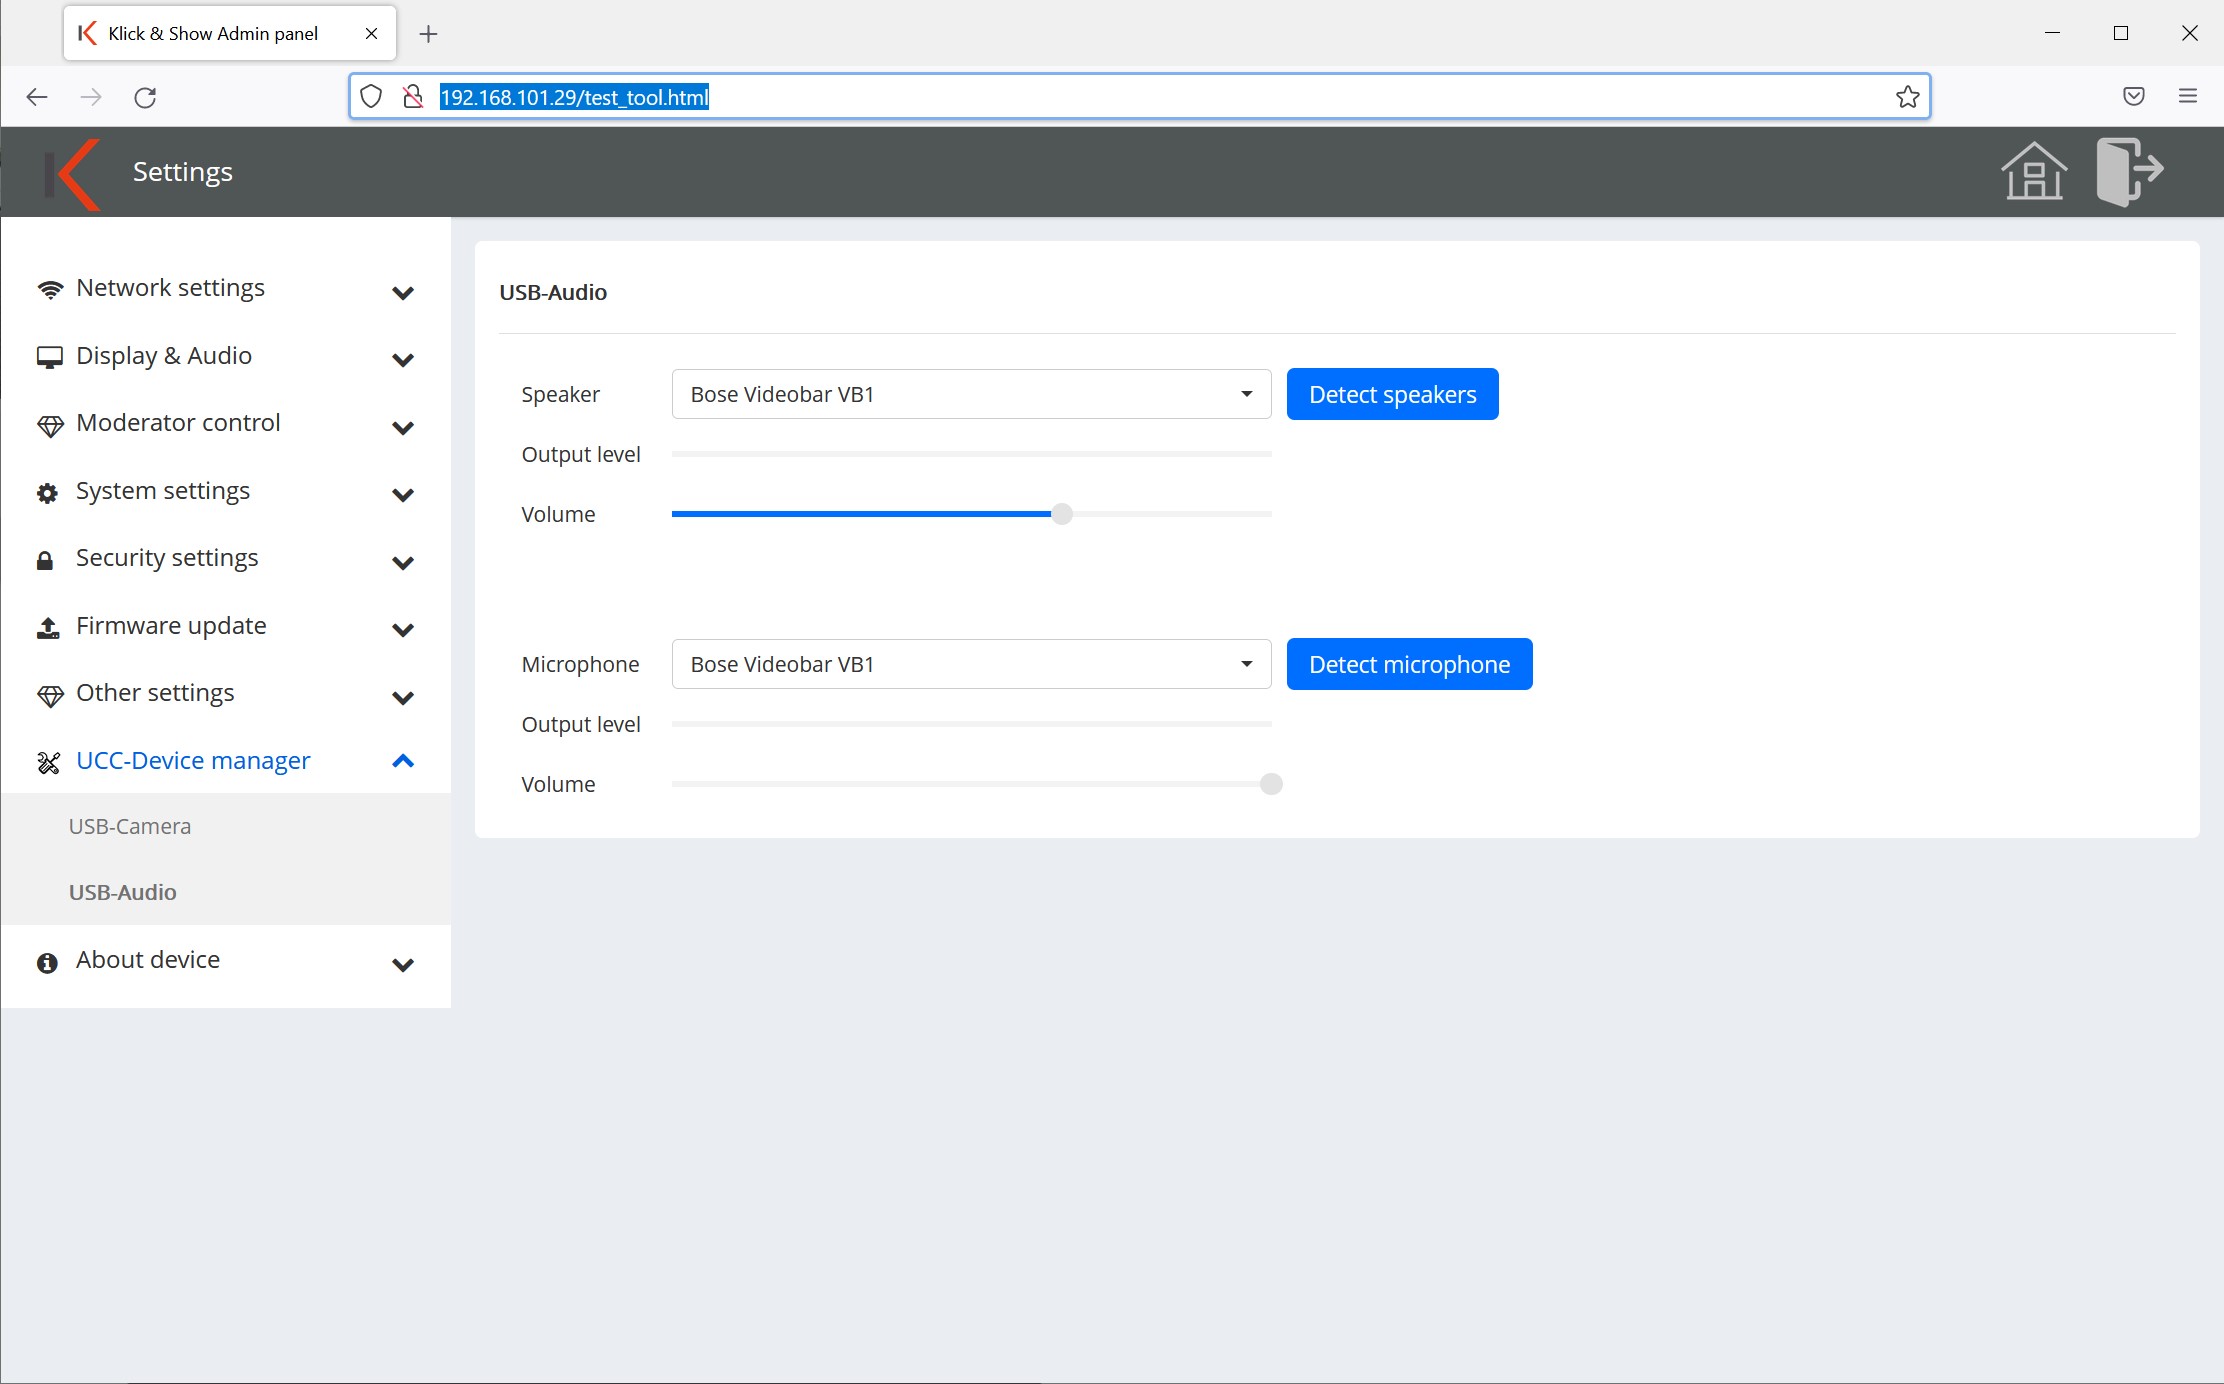
The USB Audio menu can be used to check the function of the connected USB audio device.
![]() Hint:
Hint:
If the playback of the video image or the audio signal does not work correctly, please first check whether the USB connection is correct. The camera and audio device must be connected to the USB 3.0 ports on the back of the device.
Please use a USB cable that is as short and high-quality as possible for the test.
Please also check whether your hardware is compatible with Klick&Show K-FX is.
Please also refer to the list of successfully tested third-party devices at www.klickandshow.com/kfx-download/.
If necessary, please contact our support for further support during commissioning.
11.9 Screen Link
The exclusive Screen Link function allows you to link two Klick&Show HDMI outputs and processors, so that the now duplicate HDMI outputs and processors form a more powerful basic system with dual monitor output and extended functionality.
To use the Screen Link, the two base devices for exchanging video/audio and control data must be connected via Ethernet cable via LAN port 1. In this case, either direct cabling using a "crossover" Ethernet cable or structured cabling via an IP switch with automatic crossover function and standard (uncrossed) Ethernet cables must be used.
After activating the Screen Link mode, the desired settings can be made in the Screen Link menu. Here, one of the base devices is defined as the "primary" device and the other base device as the "secondary" device. The secondary base unit can no longer be used as a stand-alone system in this operating mode. To set up a Screen Link function, any basic devices from the series can be Klick&Show K-FX, K-40 or K-WM.
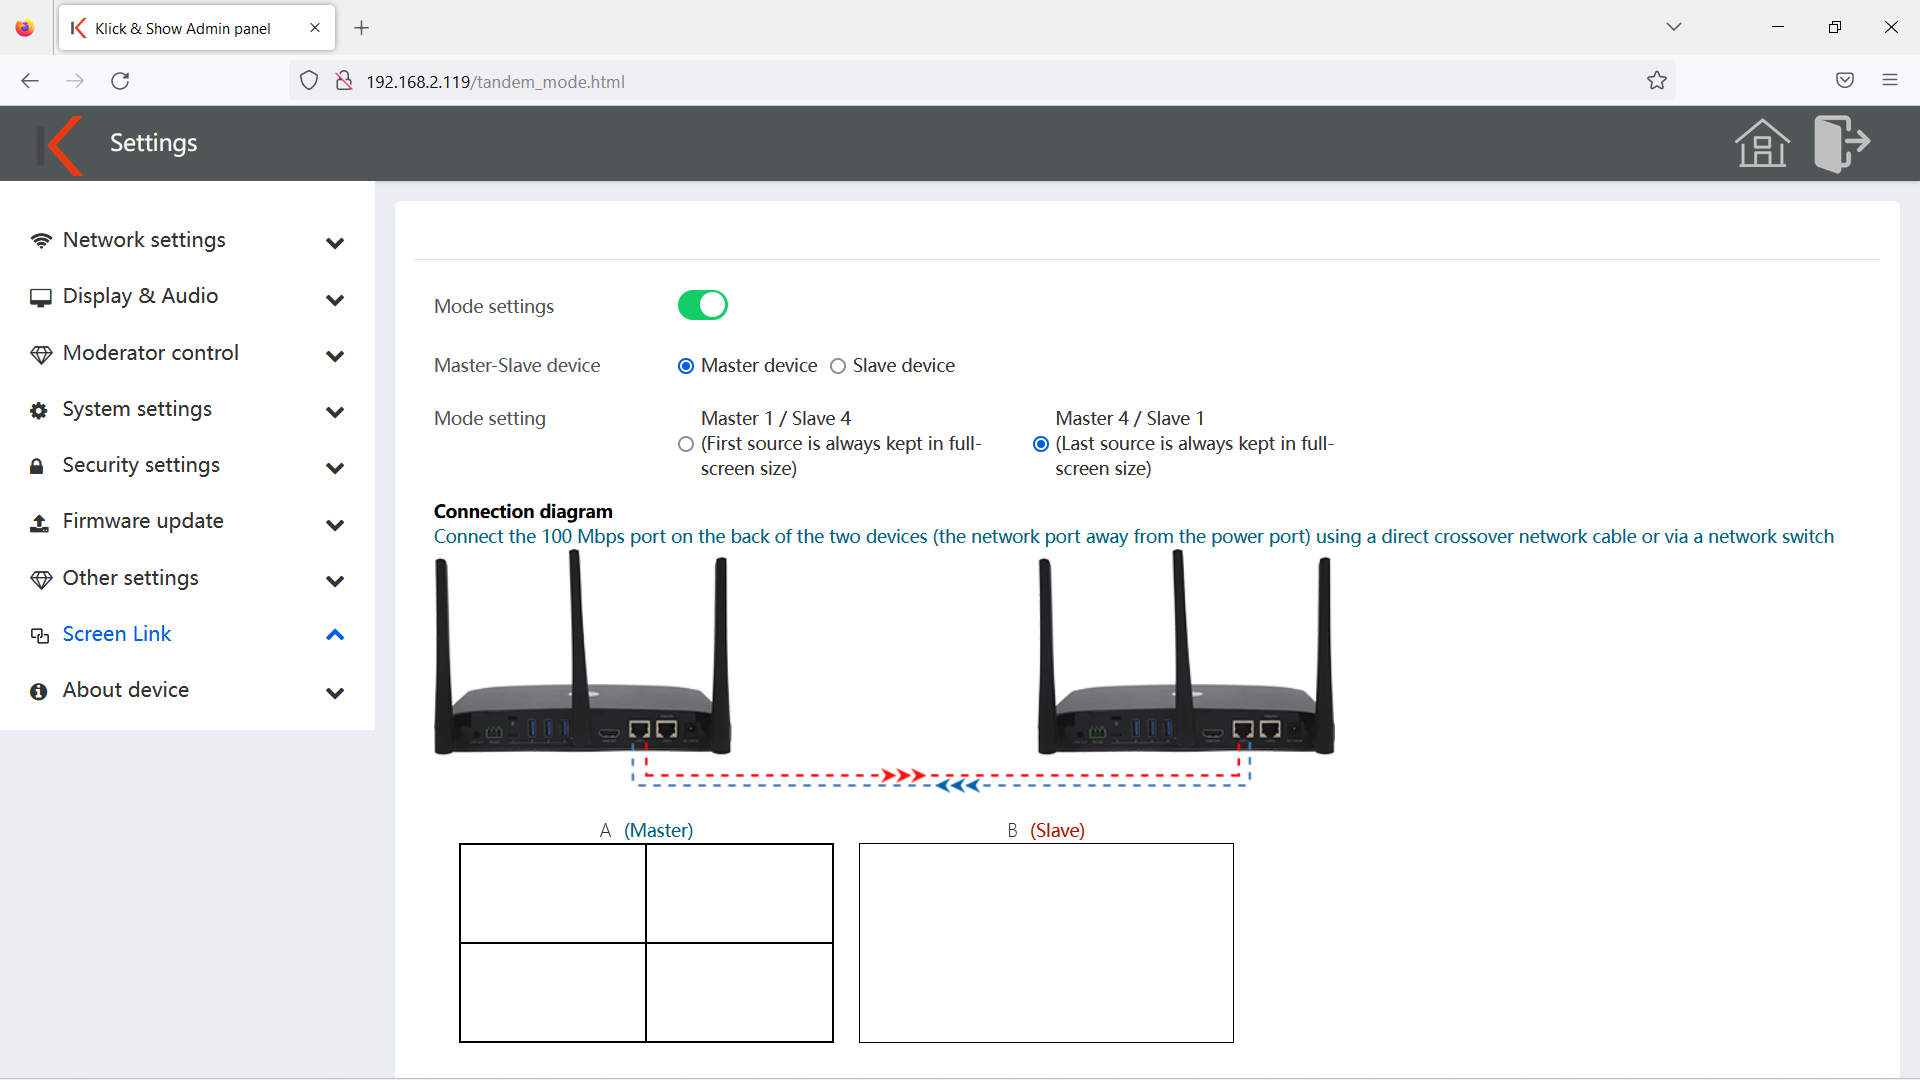
With the Screen Link function, a double monitor output for up to 5 participant content (4+1) takes place. The mode setting can be used to predefine whether either:
- The first source always remains in full screen display (Primary 1 / Secondary 4)
or - The last source always remains in full screen display (Primary 4 / Secondary 1)
The following table gives an overview of how the image outputs are performed on the primary or secondary monitor, depending on the mode setting, as the number of displayed participant content increases:
| Primary-Secondary Device: | Primary | Secondary |
|---|---|---|
| Mode setting: | ||
| Primary 1 / Secondary 4 | First Source always remains in full-screen display | 1 Source: same content on primary and secondary 2 sources: both contents in full screen display 3-5 Sources: Secondary shows sources 2-5 as PiP |
| Primary 4 / Secondary 1 | 1 Source: same content on primary and secondary 2 sources: both contents in full screen display 3-5 Sources: Primary shows sources2-5 as PiP | Last Source always remains in full-screen display |
To set up a screen link:
- Decide whether you want a particular source to have special meaning in your scenario (for example, a presenter's image content).
- In this case, set the base unit assigned to the preferred screen (left/right) as "Primary" and select the mode setting "Primary 1 / Secondary 4" so that the first mirrored source always appears in full screen mode on the primary display, while subsequent content is shown on the secondary display.
- In the other case, if the content in your scenario is more likely to have the same relevance, then set the base device associated with the screen (left/right) that will show the last mirrored content in full screen size as your "Secondary" and select the mode setting "Primary 4 / Secondary 1".
Tip:
The Screen Link function is particularly advantageous for applications that benefit from the output of various image contents, for example:
- Presentations that often compare different content
- Web conferencing in companies, with visualization of remote participants and local content
- In education, if the content of a lecturer should always remain visible in full screen size and simultaneously changing content of students is displayed
11.10 About the Device
11.10.1 About the Device
Here you will find the information on the model number, firmware version and the serial number of the base.
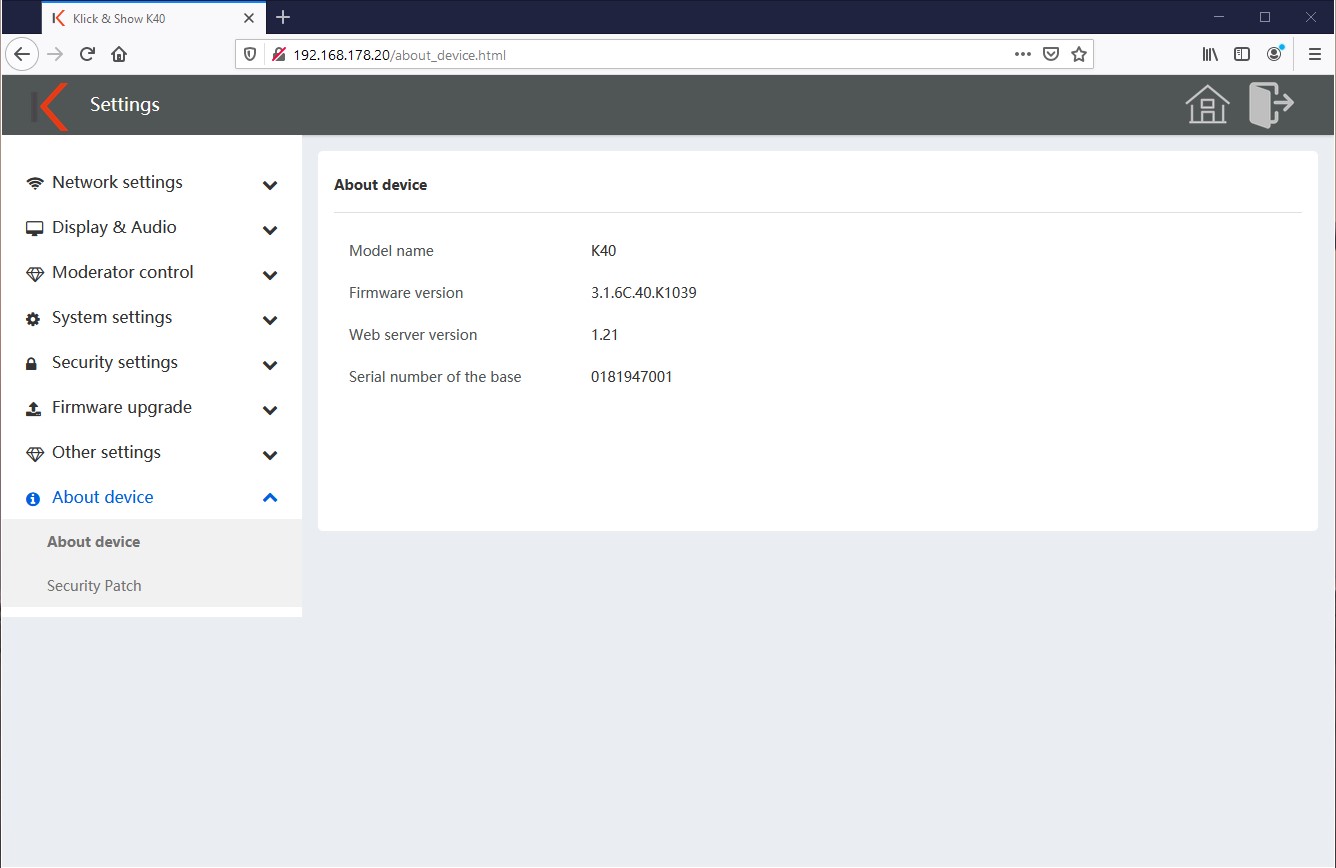
11.10.2 Security Patch
Here you will find information about the status of the Android security patches. These will be updated together with the firmware update if necessary.
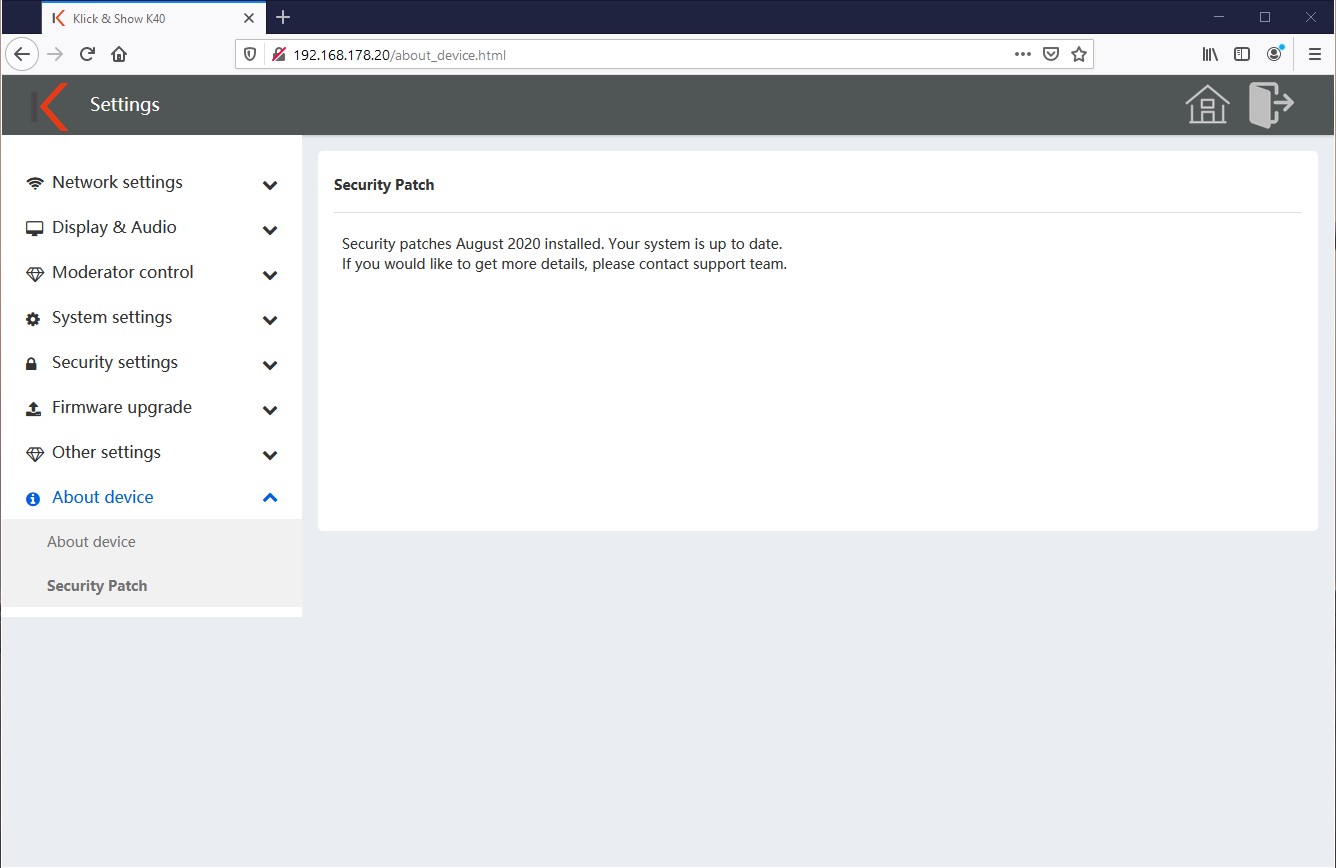
12. Port shares for use in THE LAN/WLAN
The following ports must be enabled for the correct function of Klick&Show be shared on the network:
| From | To | Protocol | Direction | Usage | Description |
|---|---|---|---|---|---|
| PC:Port is assigned by windows/MAC WMT:Port is assigned by system | WMS, port is 20000 | TCP | Command | Transfer control command between WMT/PC software and WMS | |
| PC:Port is assigned by windows/MAC WMT:Port is assigned by system | WMS, port is 20002 | TCP | video | Transfer video from WMT/PC software to WMS | |
| PC:Port is assigned by windows/MAC WMT:Port is assigned by system | WMS, port is 20003 | TCP | audio | Transfer aideo from WMT/PC software to WMS | |
| PC:Port is assigned by windows/MAC WMT:Port is assigned by system | WMS, port is 20005 | UDP | Preview window Fast cursor Command | Transfer preview video from WMT/PC to WMS Transfer cursor from WMT/PC to WMB Transfer command between WMT/PC software and WMS | |
| PC:Port is assigned by windows/MAC WMT:Port is assigned by system | WMS, port is 20006 | TCP | Command | Transfer control command between WMT/PC software and WMS | |
| WMS, port is 20007 | |||||
| PC:Port is assigned by windows/MAC WMT:Port is assigned by system | WMS, port is 8887 | Multi cast | Discovery | Used by WMT/ PC software to send multicast message to network to search WMS. The group ip is "239.1.1.1" | |
| PC:Port is assigned by windows/MAC WMT:Port is assigned by system | WMS, port is 8889 | Broad cast | Discovery | Used by WMT/ PC software to send broadcast message to network to search WMS | |
| PC:Port is assigned by windows/MAC WMT:Port is assigned by system | WMS, port is 6667 | UDP | Discovery | After search, authentiacation message is transferred through this port | |
| ManageTool | WMS, port is 2006 | TCP | ManageTool | transfer cmd/data between wmb and ManageTool | |
| WMB:Port is 80/8080 | remote OTA server Web port is 8080/80 | HTTP | OTA | communication between WMS and remote OTA server. Such as query firmware info, download new firmware OTA server: http://www.fw-service.com | |
| Any telnet client | WMS, port is 23 | Telnet | Telnet Command | Send command from telnet client to WMB, response result to telnet client send info to telnet client | |
| Any client | WMS, port is 5656 | TCP | Telnet Command | the same as telnet | |
| Apple device | WMS, port is 5353 | Multi cast | Airplay | For apple device to search WMS | |
| From apple device | WMS, port is 51010 | TCP | Airplay | Apple device push URL to WMS | |
| From apple device | WMS, port is 51020 | TCP | Airplay | Airply protocol event port | |
| From apple device | WMS,port is 7100/7011/7012 | TCP | Airplay | ||
| From apple device | WMS, random port | UDP | Airplay | Airply protocol random assign an UDP port for connected apple device to transfer audio | |
| From apple device/Mobile app(ios/Android) | WMS, port is 51030 | TCP | Airplay /Mobile APP | Transfer video data, for screen mirror | |
| From Mobile app(ios/Android) | WMS, port is 51040 | TCP | Mobile app (ios/Android) | RTSP control protocal, transfer control command | |
| From Mobile app(ios/Android) | WMS, port is 52020 | TCP | Mobile app (ios/Android) | Remote control | |
| From Mobile app(ios/Android) | WMS, port is 52030 | TCP | Mobile app (ios/Android) | When sharing, sync status between Mobile app and WMS | |
| From Mobile app(ios/Android) | WMS, port is 8121 | TCP | Mobile app (ios/Android) | Mobile app transfer photo, audio, video to WMS | |
| From Mobile app(ios/Android) | WMS, port is 48689 | Multi cast | Mobile app (ios/Android) | For mobile app to search WMS | |
| browser | WMS, port is 8000 | HTTP | web page | download app/user manual from web page | |
| usb over wifi | 20008 | UDP | transfer audio/video data | ||
| usb over wifi | 20009 | TCP | transfer audio/video data | ||
| miracast | 15550/ 15560 | RTP | |||
| miracast | 15551/ 15561 | RTCP | |||
| chrome cast | 16660-16663 | UDP | transfer audio/video data | ||
| chrome cast | 8008 | TCP | transfer audio/video data | ||
| chrome cast | 8009 | UDP | mDns | ||
| chrome cast | 1900 | UDP multi cast | to discovery chrome device |
13. Telnet/RS232 commands
Klick&Show can be controlled by the commands below via RS232 or Telnet.
Ports :23 and :5656 are used for Telnet control.
![]() hint:
hint:
The possibility of control via Telnet depends on the set security level.
Command table:
|
Command Tag |
Command Parameters |
Command Response |
Effect |
Command Example |
|
help |
list all command |
help |
||
|
help |
Xxx |
show xxx command details |
help hdmi |
|
|
Home |
OK |
Home |
||
|
Home |
? |
#home on |
force go to home screen |
Home? |
|
wifi |
on |
OK |
turn on wifi hotspot |
|
|
wifi |
Off |
OK |
turn off wifi hotspot |
|
|
wifi |
Channel |
OK |
set wifi hotspot channel |
wifi channel 40 |
|
wifi |
ssid |
OK |
set wifi hotspot ssid |
wifi ssid room506 |
|
wifi |
pass |
OK |
set wifi hotspot password |
wifi ssid romt34 pass 12345678 |
|
wifi |
stratagem |
#wifi 08:d4:0c:d1:1e:92 192.168.43.180 |
list all clients which are connected to wifi hotspot |
wifi list |
|
wifi |
amount |
#wifi 2 |
return how many wifi device which are connected to wifi hotspot |
wifi amount |
|
wifi |
? |
#wifi ap-on 10 ty56rytt 234324rtyuu |
query wifi hotspot settings param |
wifi ? |
|
Mute |
on |
OK |
mute volume |
mute on |
|
Mute |
Off |
OK |
unmute volume |
mute off |
|
Mute |
? |
#mute on |
query mute status |
Mute? |
|
Standby |
set |
OK |
set auto standby timeout time, as menu general setting->auto standby |
Standby set off |
|
Standby |
Wakeup |
OK |
force system wake up from standby |
standby wakeup |
|
Standby |
? |
, |
PARAM1: Auto Standby Timeout Setting |
Standby? |
|
button |
listconnected |
#button 1513849033 c0a82b98,ec3dfd3a9c2c,V2.0.5C.A1009,1,1,0,1,en |
list connected button info |
|
|
button |
Lc |
#button 1513849033 c0a82b85,ec3dfd3a9c2c,V2.0.5C.A1009,1,1,0,1,LYCAN |
the same as listconnected |
|
|
button |
listdisconnected |
#button 1513849033 c0a82b85,ec3dfd3a9c2c,V2.0.5C.A1009,1,1,0,0,LYCAN |
list buttons which had ever connected to base unit. These info won't be saved to disk, so when the power of base unit is cut off, these info will be lost. |
|
|
button |
ldc |
#button 1513849033 c0a82b85,ec3dfd3a9c2c,V2.0.5C.A1009,1,1,0,0,LYCAN |
the same as listdisconnected |
|
|
button |
listsharing |
#button 1513849033 c0a82b85,ec3dfd3a9c2c,V2.0.5C.A1009,1,1,0,1,LYCAN |
list button info which is sharing his screen |
|
|
button |
Ls |
#button 1513849033 c0a82b85,ec3dfd3a9c2c,V2.0.5C.A1009,1,1,0,1,LYCAN |
the same as listsharing |
|
|
button |
listall |
#button 1513849033 c0a82b85,ec3dfd3a9c2c,V2.0.5C.A1009,1,1,0,1,LYCAN |
list all buttons connected/disconnected |
|
|
button |
La |
#button 1513849033 c0a82b98,ec3dfd3a9c2c,V2.0.5C.A1009,1,1,0,1,ter |
the same as listall |
|
|
button |
? |
#button 1513849033 c0a82b85,ec3dfd3a9c2c,V2.0.5C.A1009,1,1,0,1,LYCAN |
the same as listall |
|
|
button |
Share |
c0a82b85 |
request a button to start share, the param can be ip or name |
button share LYCN |
|
button |
stop |
c0a82b85 |
request a button to stop share, the param can be ip or name |
button stop LYCN |
|
statusable |
hide |
OK |
hide home screen statusable |
stateable hide |
|
statusable |
show |
OK |
show home screen statusable |
statusable show |
|
pass |
refresh |
OK |
refresh password |
pass refresh |
|
pass |
? |
#pass : 12345678 |
query password |
pass? |
|
Volume |
volume xxx |
volume 30 |
set audio volume level |
volume 30 |
|
Volume |
Volume? |
Volume? |
read audio volume level |
|
|
login |
login xxx |
Login 12345678 |
login to telnet system |
|
|
refresh |
refresh pass |
Refresh Pass |
refresh password |
|
|
Security |
security x |
security 2 |
set security level |
|
|
Security |
Security? |
Security? |
read security level |
|
|
pair |
pair ? |
Pair ? |
read paired dongle info |
|
|
pair |
pair remove xxx |
pair remove ec3dfd3a9cf0 |
remove paired dongle |
|
|
forceshare |
forceshare 3 |
forceshare 3 |
force share xxx, xxx can be ip, name, or 1,2,3,4 |
14. Technical data
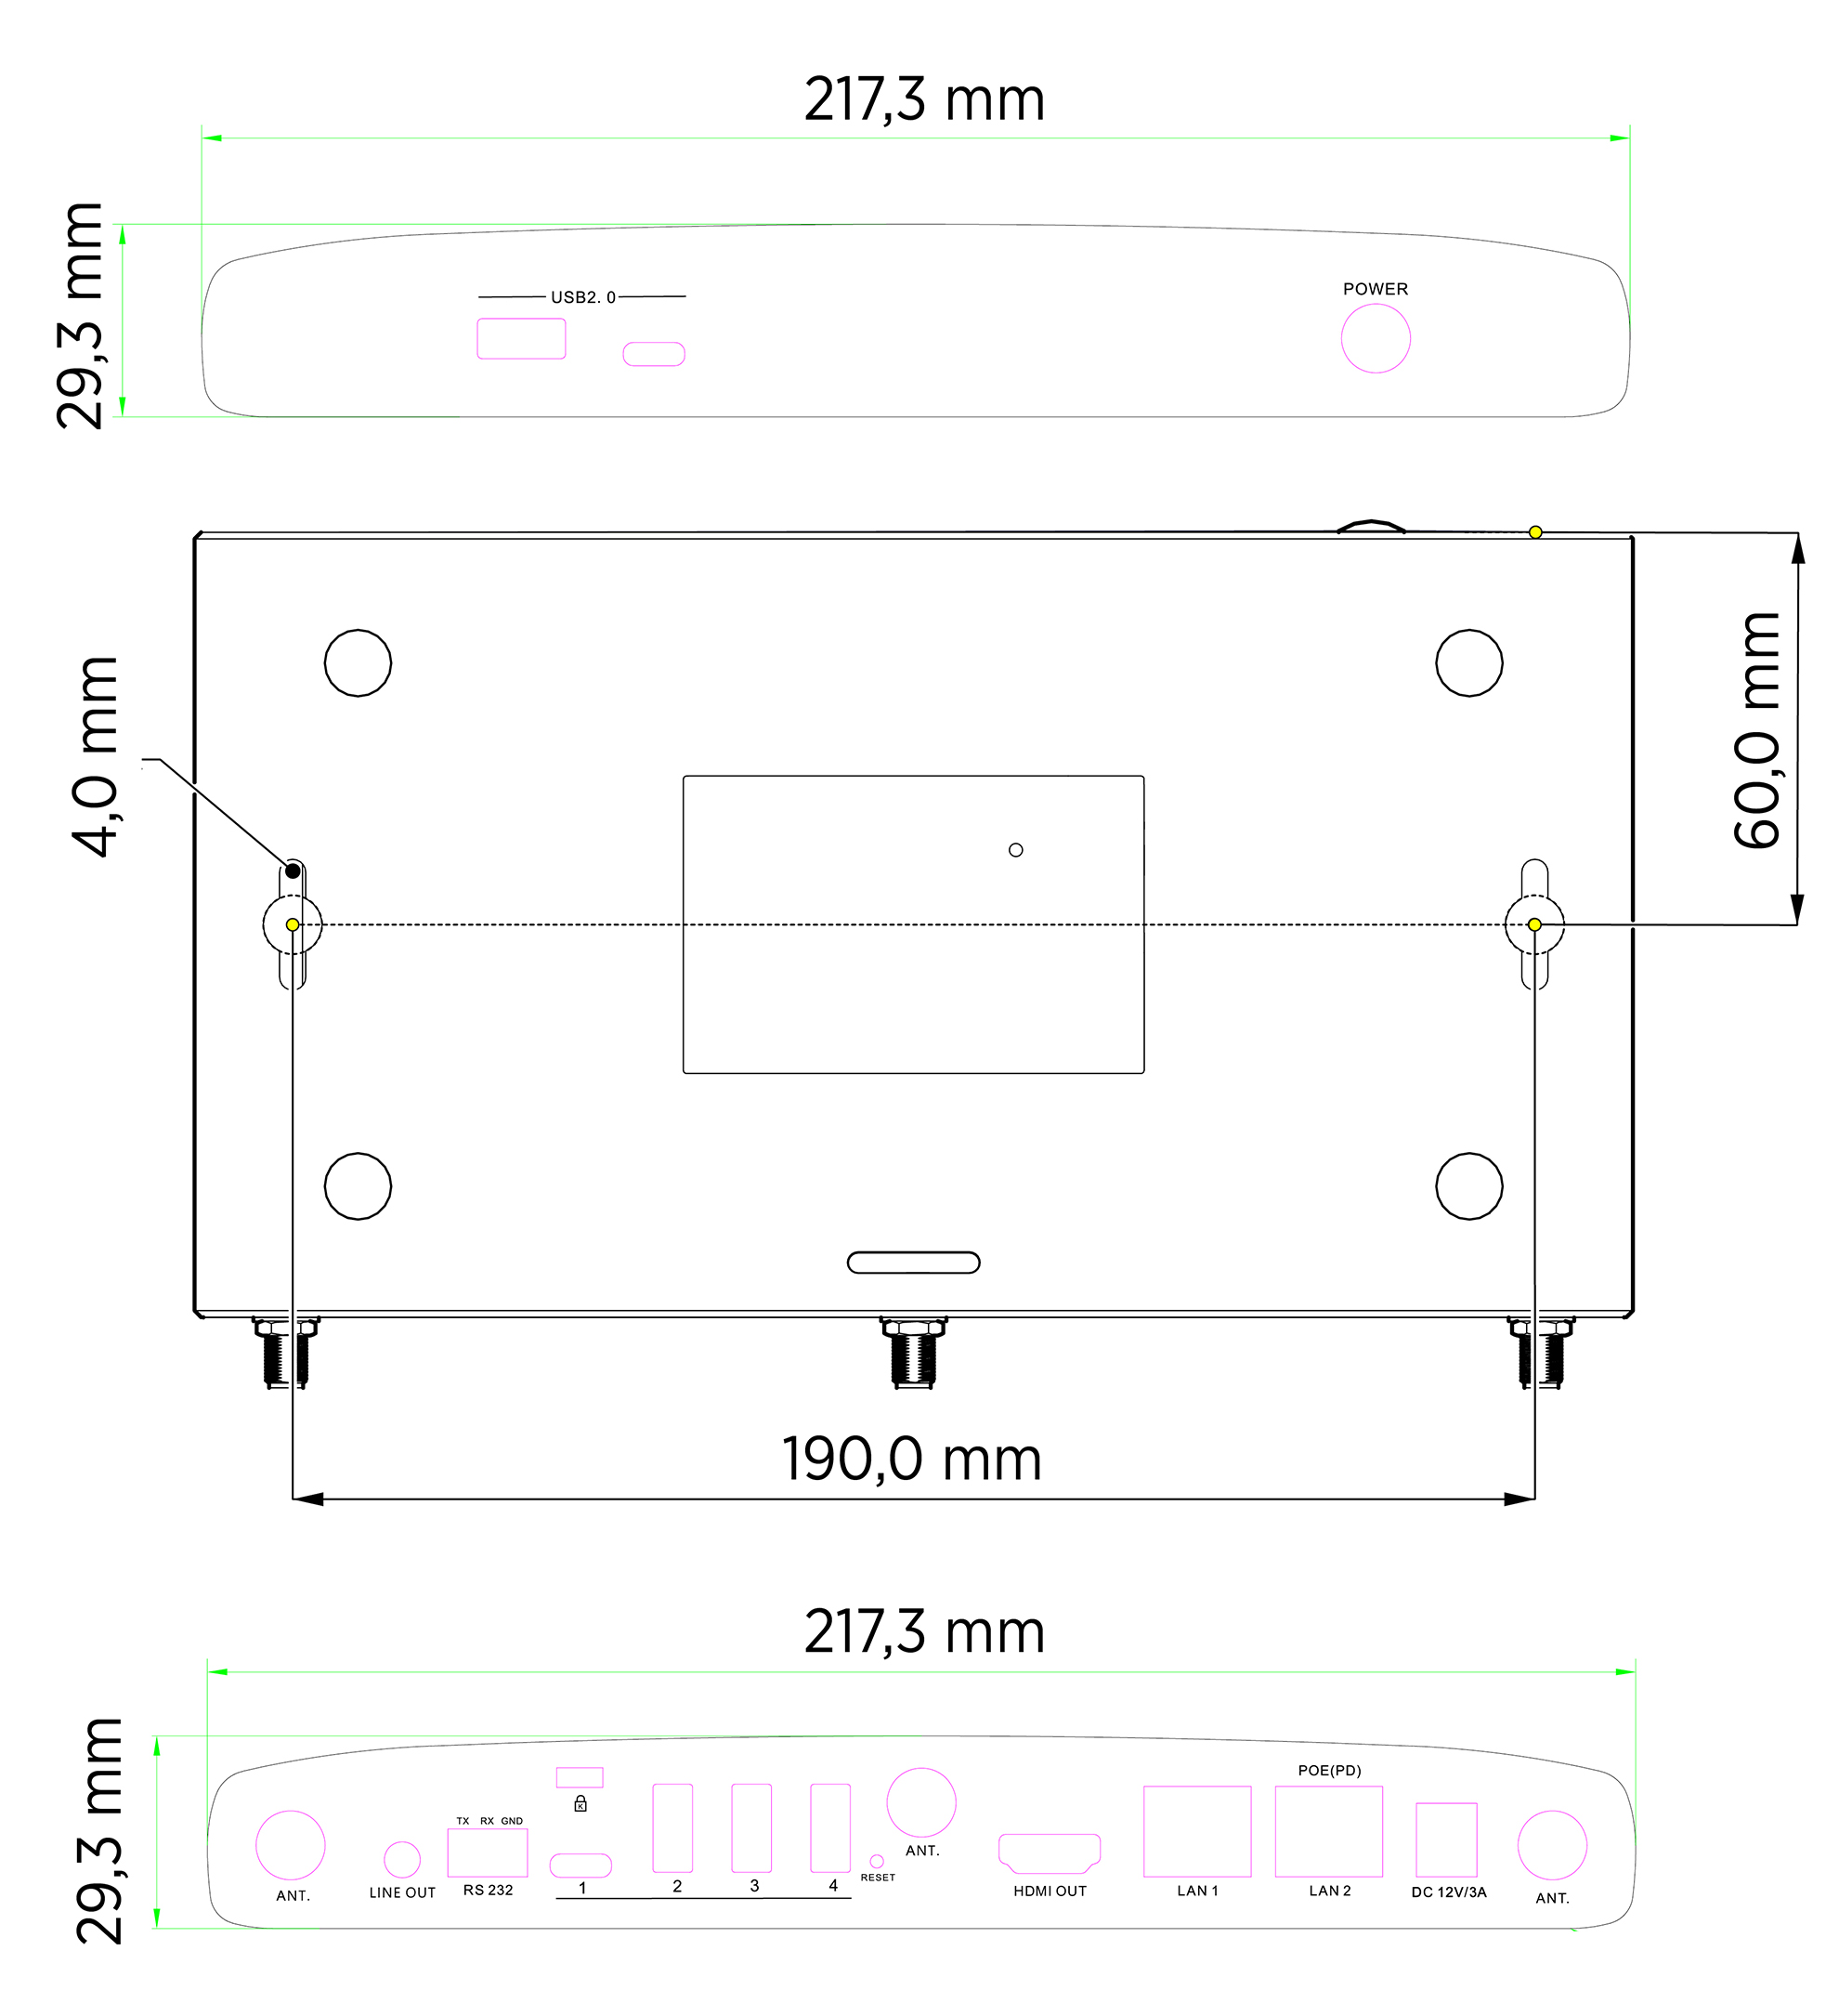
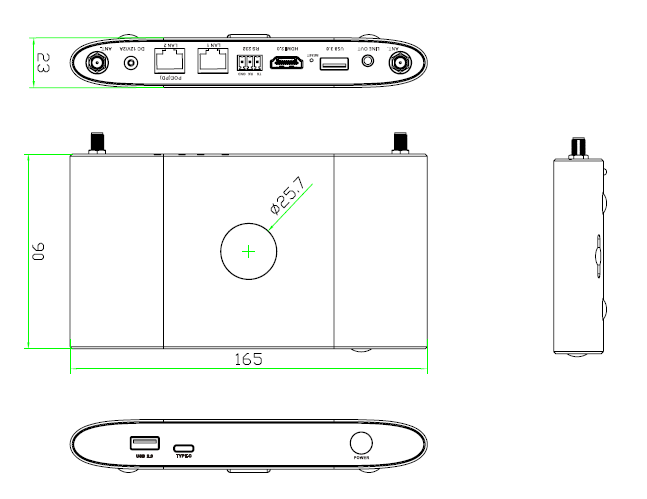
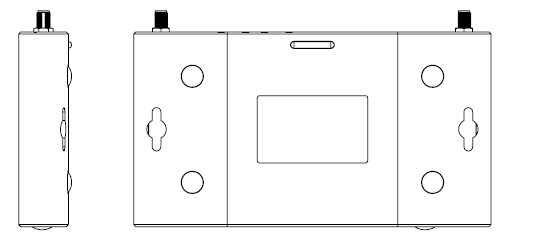
Klick&Show Kits Specifications
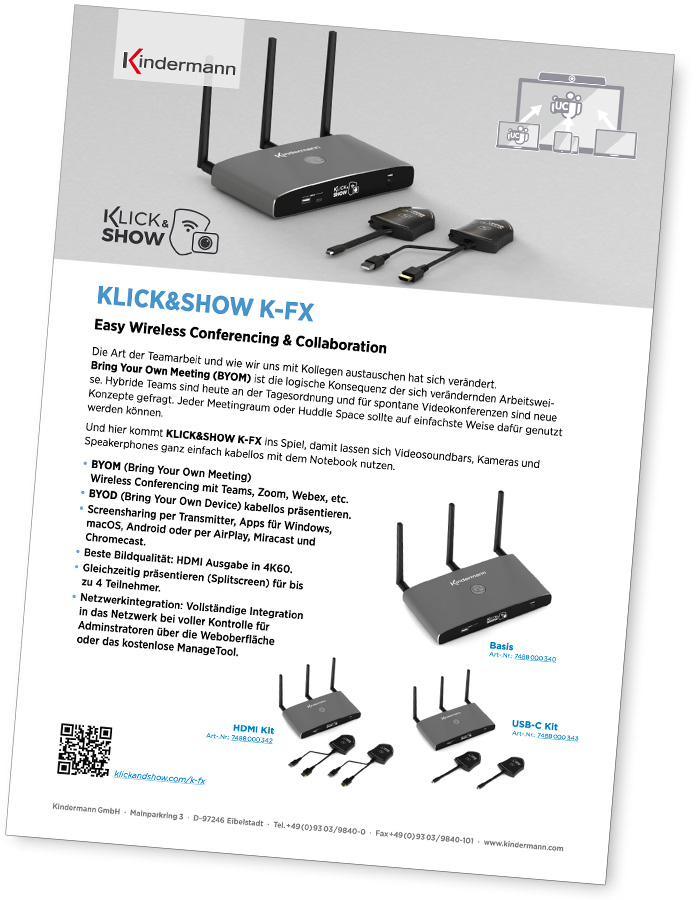
In the data sheets of the Klick&Show K-FX, K-40 and K-WM kits you will find all relevant technical data.
15. Regulatory
15.1 Provision of open source software
This product also includes software components that have been released under an open source license. A list of third-party open source components used can be found here.
15.2 EC declaration
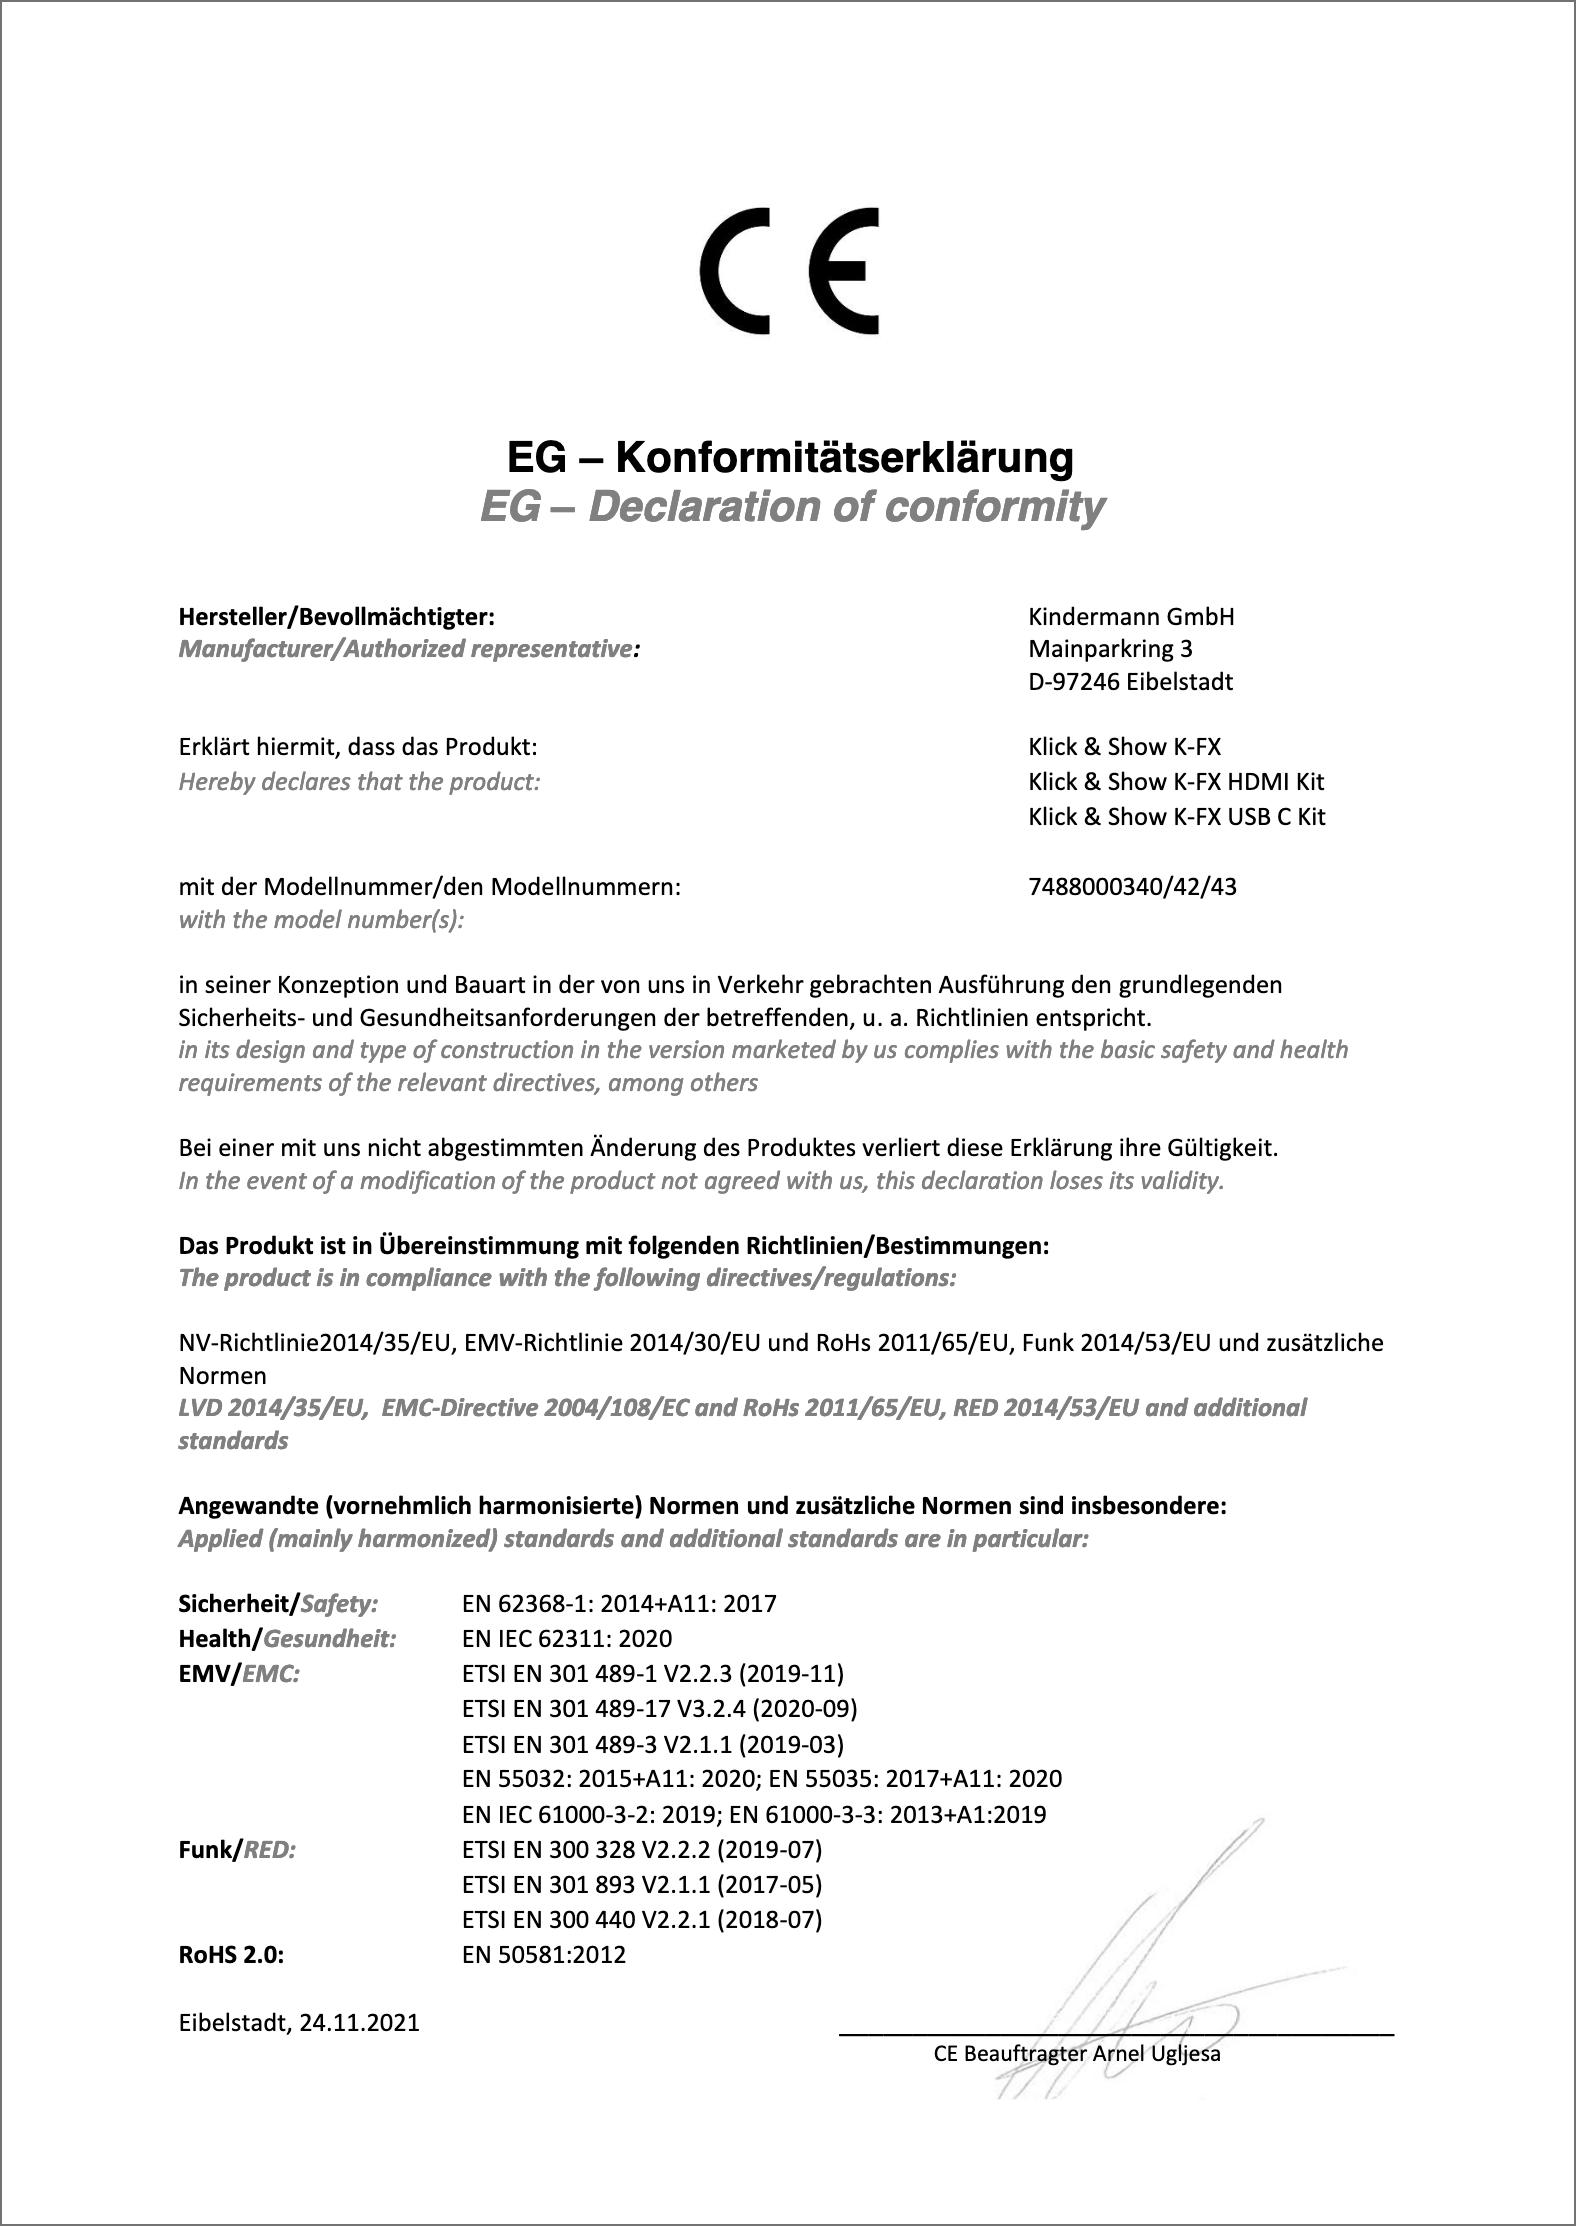
The full text of the EU Declaration of Conformity is available here and the text of the UKCA Declaration of Conformity here:
Hereby, the Kindermann GmbH that the radio equipment type Klick & Show complies with Directive 2014/53/EU.
Klick & Show is only allowed for indoor use when operating in the 5 GHz band.
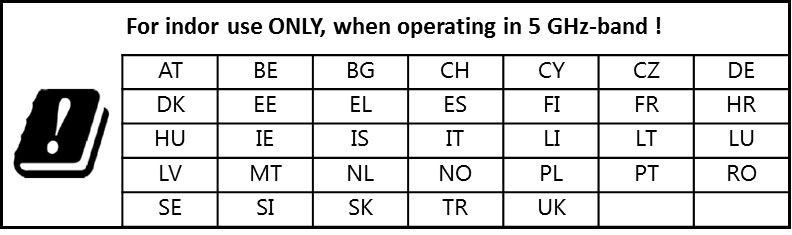
2.4 GHz band: channels 1, 2, 3, 4, 5, 6, 7, 8, 9, 10, 11;
5 GHz band: Channels: 36, 40, 44, 48;
Bandwidth: 20MHz
Transmission power: max. 20 dBm (100mW), dynamically controlled
15.3 Diagnostic data
While using Klick&Show diagnostic information is sent to Kindermann transmitted. Kindermann uses the diagnostic data to: Klick&Show keep secure and up-to-date, troubleshoot issues, and make product improvements.
The diagnostic data collected is limited to a minimum of necessary data and includes information about your device, its settings and functions, and its proper functioning. No personal data is collected.
16. Troubleshooting
Here are some basic problems and possible causes that occur during the use of Klick&Show can occur. Use the solution hints provided.
If you are unable to resolve the issue, contact your reseller or IT administrator.
| problem | cause | solution |
|---|---|---|
| When plugging the USB-A transmitter into the computer, the LED flashes permanently green, the "WirelessMedia" software does not start and no connection is established. | The WirelessMedia Client for Windows or MacOS has not yet been run on the computer, or no longer exists. | Chapter 6.4 describes how to load the software. |
| You have decided to use WirelessMedia-Pro for Windows. | This program must be started manually before each use. | |
| Due to administrative restrictions on your computer, entries cannot be made in the Startup menu. | Please contact your administrator to remove these restrictions. Alternatively, you can run the "WirelessMedia-Pro for Windows" client without installation. However, the program must be used before any use of Klick & Show can be started manually. | |
| Windows: The execution of .exe files is blocked by the administrator. An active antivirus program may block the WirelessMedia app. | Please contact your administrator to remove these restrictions or use an HDMI or USB-C transmitter. These behave like an external monitor and therefore do not require any software on the computer. We regularly check the WirelessMedia clients for viruses. Configure the filters of your anit virus program accordingly so that they are allowed to run. With centrally managed virus protection, you need the assistance of the administrator. | |
| The use of USB ports is blocked due to a company policy. | Please contact your administrator to remove these restrictions or use an HDMI or USB-C transmitter. These behave like an external monitor and therefore do not require any software on the computer. | |
| The transmitter is defective. | Test another transmitter to confirm the conjecture. Please contact support. | |
| When plugging the USB-A transmitter into the computer, the "WirelessMedia Client" starts, but the message appears: "Connection failed". | The network settings of the Click & Show have been changed. The transmitter does not yet know the new parameters. | Pair the transmitter again , see chapter 8.1. |
| The USB port did not recognize the transmitter correctly. | Reconnect the transmitter or use a different USB port on the computer. It may help to restart your computer. | |
| Error message: "The version of the WirelessMedia Client does not match the firmware of the Click & Shows. | A newer version of the WirelessMedia Client is available or the firmware ddes Klick & Show has not been updated yet. | You can ignore this message. The basic function is still given, but newer features may not be usable. Download the new software and run it or ask the administrator to update the firmware. |
| The WirelessMedia app for Android will not work. | Check if your Android device is on the same Wi-Fi network as the Klick & Show is located. | Select the right Wi-Fi network and refresh the list of devices and select the desired Klick & Show from. |
| The Wi-Fi connection between the transmitter or computer and theKlick & Show is not stable and breaks off again and again. | The WLAN connection is disturbed, e.B by other devices that use the same channel. | Use a WLAN scanner app (e.B. Wifi Analyser) to find a suitable WLAN channel and change the WLAN configuration of Klick & Show manual. Repeat the process regularly if Wi-Fi networks in the area are frequently changed. |
| The signal strength is too low. Walls made of plasterboard or reinforced concrete can dampen the signal and cause reflections that interfere with the WLAN signal. | Reduce the distance between the computer and the access point or place Klick & Show or the access point in a more suitable position in the room. Change the antenna orientation. If possible, remove obstacles in the line of sight between the two devices. Avoid it Klick & Show in (metal) cabinets, suspended ceilings, under tables or in neighboring rooms. | |
| Poor video quality (image sharpness, image and sound dropouts, video stream stutters,....) when using the WirelessMedia client. | The video quality also depends on the computing power and processor utilization by other, running software applications. A laptop can be configured on reduced computing power in battery mode. | Reduce CPU usage by other applications.Reduce playback resolution on the computer. Exit the power saving mode. Use an HDMI or USB-C transmitter, these work regardless of the performance of the computer. |
| Poor Wi-Fi connection | see above | |
| A video does not appear on the main screen. | The content is HDCP protected. | Klick & Show does not support HDCP encoded source signals. |
| The transmission stops and the transmitter's LED flashes. | The WLAN connection was interrupted. | Klick & Show tries to reconnect automatically. If this does not work, the transmitter's LED will flash green. Unplg and reconnect the transmitter. If the connection cannot be re-established, check the WLAN environment. |
| Nothing is displayed on the main screen or the image quality of the home screen is poor. | The display is turned off or an incorrect input has been selected. | Turn it on or select the correct input. |
| The HDMI cable is not plugged in correctly, damaged or the quality of the cable is too poor. | Establish a working connection between the HDMI output and the display. | |
| The display detects the resolution of the Klick & Show cannot, or cannot represent them. | Change the resolution in the "Display & Audio"menu. It is best to set them to auto or manually to the native resolution of the display, which you can see in the data sheet. | |
| That Klick & Show in stand-by (ring LED on the top of the Klick & Show Base) flashes green slowly or the power supply is missing. | Connect the power supply. Press the Power button on Klick & Show or connect to the Klick & Show, this automatically terminates the stand-by. | |
| The touch function of the display does not work in conjunction with the Klick & Show. | The touch function requires a separate USB cable between the display and Klick & Show. | Connect the touch display via USB cable to the Klick & Show. |
| No LAN connection to the base. | The network cable is not plugged in. Klick & Show has not received an IP address. | Plug in the network cable and contact your network administrator to verify the correct network integration. |
| You don't hear any sound on the display. | There are no speakers or the volume control has been adjusted to zero. | Connect speakers or increase the volume. |
| The volume level in the Klick & Show was limited. | Customize the audio output in the menu of Klick & Show at. | |
| The volume level is set too low in the options of the "WirelessMedia Client". | Adjust the volume in the "WirelessMedia" starter program. | |
| The audio output on the computer has been disabled. (Mute) | Enable audio output. | |
| The sound is output on the computer and not by the Klick & Show to the display. | On your computer, the wrong audio output device is selected. | Select the right audio output device (WirelesMedia) n the Audi settings of your computer. |
| You don't hear any video sound with the MacBook. | The "Soundflower" app integrated in the WirelessMedia Client is not installed. | You need the "Admin Password" for MacOS: open system settings\Security Run/install the soundflower "Matt Ingels"=>"allow" WirelessMedia.app driver again. |
| When you insert the USB-A transmitter into a MacBook, you will be prompted for a password. | The "Soundflower" app in the WirelessMedia Client requires a local installation. | You need the "Admin Password" for MacOS: open system settings\Security Run/install the soundflower "Matt Ingels"=>"allow" WirelessMedia.app driver again. |
| You cannot use the firmware via USB flash drive on the Klick & Show update. | The USB flash drive is formatted with the NTFS file system. | Use a USB disk with FAT32 formatting for the update. |
| AirPlay does not work. | The use of AirPlay has been updated in the security settings of Klick & Show deactivated. Klick & Show operates in infrastructure mode. Certain network ports must be shared to use AirPlay. | Contact your administrator to enable this feature or to perform the necessary network configurations. |
| The image quality when playing video via AirPlay is poor. | There are 2 states for AirPlay: Mirroring: 1:1 Copy of the screen Streaming: Videos (Internet, youtube; the image is not displayed on the iOS device. => image is jerking | Reduce "quality" in the video, e.B. from "automatic" to 720p. |
| "WirelessMedia2" for Android does not transmit sound. | Android does not allow apps to access the audio signal. | Most Android devices support Miracast,which also allows the transfer of audio. |
| Integration into a company network | ||
| Mobile devices do not find the base device. | Certain network ports must be shared for data transfer. | |
| Klick & Show and mobile devices are not on the same subnet. | Contact the administrator to make the necessary network configurations. | |
| Poor transmission quality | Poor Wi-Fi connection | Contact the Administrato to improve the WLAN supply or to optimize the network configuration. |
| The available bandwidth is occupied by other network participants. Klick & Show requires a data rate of about 4 Mbps per active stream. |
Content errors and changes reserved, as of 2023/08 – FW K1082/K3095